
Loading...
Loading...
Loading...
Loading...
Loading...
Loading...
Loading...
Loading...
Loading...
Loading...
Loading...
Loading...
Loading...
Loading...
Loading...
Loading...
Loading...
Loading...
Loading...
Loading...
Loading...
Loading...
Loading...
Loading...
Loading...
Loading...
Loading...
Loading...
Loading...
Loading...
Loading...
Loading...
Loading...
Loading...
Loading...
Loading...
Loading...
Loading...
Loading...
Loading...
Loading...
Loading...
Loading...
Loading...
Loading...
Before installing Devtron's Modern Kubernetes Dashboard, make sure to fulfill the following requirements:
Create a Kubernetes cluster
You can create any (preferably K8s version 1.16 or higher) for installing Devtron.
You can create a cluster using one of the following cloud providers as per your requirements:
The above is not an exhaustive list. You may create a cluster using a platform of your choice, such as , , on your local machine or cloud.
The minimum cluster resource requirements for installing Modern Kubernetes Dashboard (as per the number of applications you want to manage on Devtron) are provided below:
Refer to know the process of installing Helm on your target machine.
Refer
The Authorization section describes how to authenticate and authorize access to resources, also managing role-based access levels in Devtron.
Access can be granted to a user via:
Projects are the logical grouping of your applications so that you can manage and control the access level of users.
Refer user permissions for more detail.
To add a project name, go to the Projects section of Global Configurations.
Click Add Project.
Provide a project name in the field and click Save.
The Devtron Resource Browser provides you a central interface to view and manage all your across clusters. It helps you perform key actions like viewing logs, editing live manifests, and even creating/deleting resources directly from the user interface. This is especially useful for troubleshooting purposes as it supports multi-cluster too.
In Argo CD, a user manages one dashboard for one ArgoCD instance. Therefore, with multiple ArgoCD instances, the process becomes cumbersome for the user to manage several dashboards.
With Devtron, you get an entire Argo CD app listing in one place. This listing includes:
Argo CD apps present in the cluster where Devtron is installed
The Modern Kubernetes Dashboard by Devtron provides a unified interface for managing and observing all Kubernetes resources across your clusters. It simplifies resource management by offering visualizations, RBAC controls, multi-cluster support, thus making it intuitive for you to view and manage your microservices.
AWS EKS
Create a cluster using AWS EKS.
Google Kubernetes Engine (GKE)
Create a cluster using GKE.
Azure Kubernetes Service (AKS)
Create a cluster using AKS.
k3s - Lightweight Kubernetes
Create a cluster using k3s - Lightweight Kubernetes.
For configuring small resources (≤5 apps)
1
1 GB
For configuring medium/large resources (>5 apps)
2
3 GB
This documentation helps you deploy a few Helm Charts available on Devtron.
Parts of Documentation
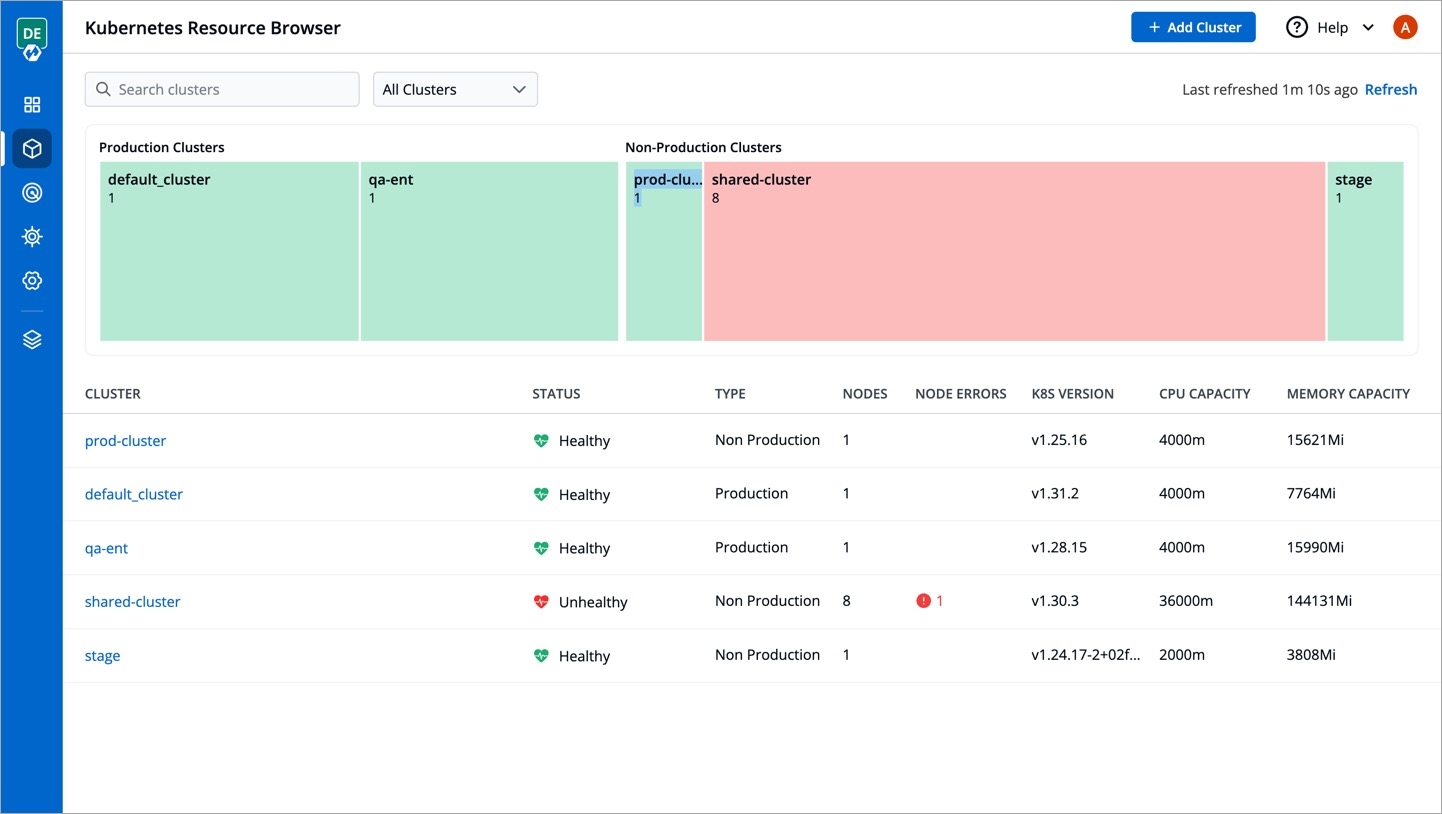
First, the Resource Browser shows you a list of clusters added to your Devtron setup. By default, it displays a cluster named 'default_cluster' after the initial setup is successful.
In the image above, you can see a visual display of the health status for all clusters connected to Devtron. If any node within a cluster encounters an issue and is not ready, it will be highlighted in red, allowing you to quickly address the problem.
If you are a superadmin, you can connect more clusters by clicking the Add Cluster button located at the top of the browser. This will take you to the Clusters page within Global Configurations.
You may click a cluster to view and manage all its resources as shown below.
Argo CD apps present in other clusters you added to Devtron
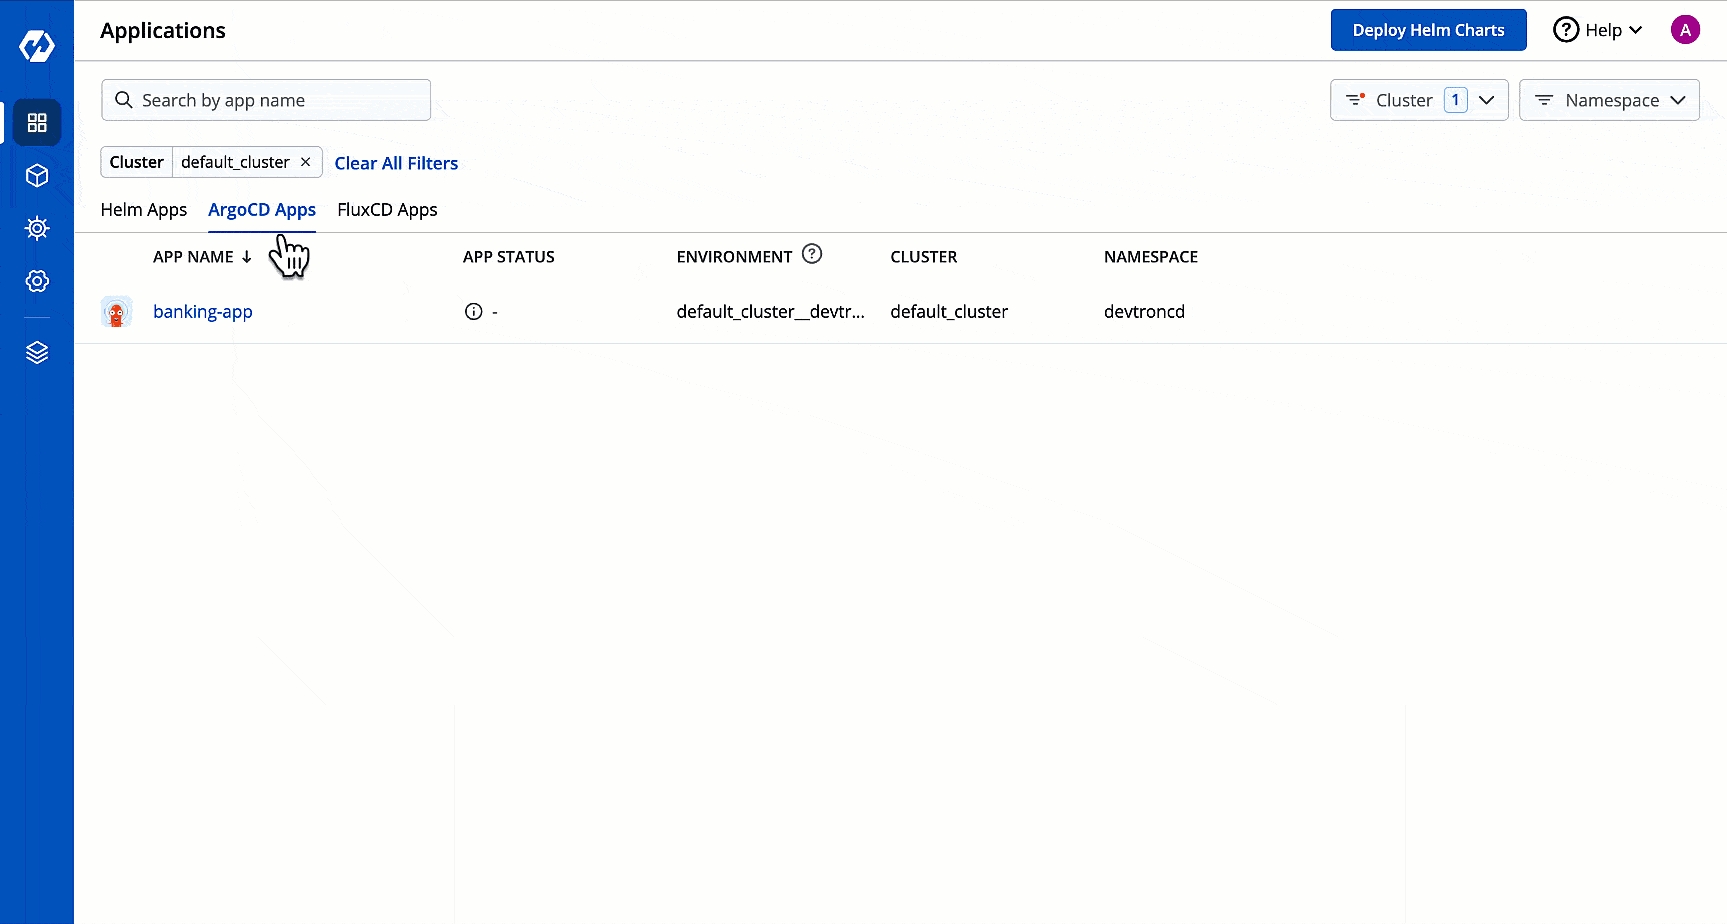
In the ArgoCD Apps tab, select the cluster(s) from the dropdown to view the Argo CD apps available in the chosen cluster(s).
Devtron also bridges the gap for ArgoCD users by providing additional features as follows:
Single-pane View: All Argo CD apps will show details such as their app status, environment, cluster, and namespace together in one dashboard.
Feature-rich Options: Clicking an Argo CD app will give you access to its logs, terminal, events, manifest, available resource kinds, pod restart log, and many more.
Discover how Devtron’s Modern Kubernetes Dashboard simplifies operations by managing all your clusters with the Resource Browser. Visualize Helm releases and ArgoCD/FluxCD apps easily, with fine-tuned RBAC controls and OCI registry support. The intuitive interface removes the complexity of Kubernetes, so you can focus on delivering great software and services.
View and manage the resource kinds available across all your clusters.
Easily view, manage, and deploy your Helm releases.
Visualize your Argo CD apps across all your clusters on a single pane.
Visualize your Flux CD apps across all your clusters on a single pane.
User management with Single Sign-On (SSO) and Role-Based Access Control (RBAC) for enhanced security.
Support to add your OCI registry for uploading and downloading helm charts.
For your advanced and challenging use-cases, Devtron offers enterprise-grade features too:
Resource Watcher: Trigger webhook to notify about any intercepting changes to your resources.
Advanced CEL Filtering: Filter Kubernetes resources with advanced CEL-based queries.
Cluster & Helm Apps Catalog: Manage and browse the data of clusters and Helm apps using Catalog Framework.
Simplified Kubeconfig Sharing: Get Kubeconfig file for gaining cluster access through your local machine.
Fine-grained Access Control: Supports time-based access control for user management.
Pod Restart Snapshot: View snapshots of Pod states for troubleshooting.
Cluster Access via SSH & Proxy: Securely access clusters through SSH or proxy.
Make sure to meet all the requirements for installing Modern Kubernetes Dashboard.
Add the Devtron Helm repository to pull the necessary charts
Update the Helm repo to ensure you are using the latest version.
If you wish to install Devtron on clusters with multi-architecture nodes (ARM and AMD), append the below Devtron installation command with --set installer.arch=multi-arch.
Click the relevant tab given below to get the command:
To install on Minikube/MicroK8s/Kind/ cluster, run the following command:
To install on K3s cluster, run the following command:
It is recommended to use Cloud VM with 2vCPU+, 4GB+ free memory, 20GB+ storage, Compute Optimized VM type, and Ubuntu Flavoured OS.
First, create a MicroK8s Cluster:
Then use these commands after setting up MicroK8s:
Run the following command to get the dashboard URL:
Assuming you have an EKS cluster, you might get a similar message as shown below:
here, hostname aaff16e9760594a92afa0140dbfd99f7-305259315.us-east-1.elb.amazonaws.com is the Loadbalancer URL at which you can access the Devtron dashboard.
To access the dashboard on Minikube cluster, run the following command:
This will directly open the dashboard URL on your browser
To install on MicroK8s/Kind/K3s cluster, run the following command to port-forward the devtron service to port 8000:
After port-fowarding, you can access the dashboard on this URL: http://127.0.0.1:8000
Get devtron-service port number using the following command:
The dashboard URL will be: http://<HOST_IP>:<nodeport>/dashboard
Make sure that the port on which the devtron-service runs remain open in the VM's security group or network security group.
By default, the username will be admin. Run the below command to get the admin password.
When you install Devtron for the first time, it creates a default admin user and password (with unrestricted access to Devtron). You can use it to log in as an administrator.
After the initial login, we recommend you set up any like Google, GitHub, etc., and then add other users (including yourself). Subsequently, all the users can use the same SSO (let's say, GitHub) to log in to the Dashboard.
Devtron provides a sample configuration out of the box. There are some values that you need to either get from your SSO provider or give to your SSO provider.
clientID
clientSecret
redirectURI (provided in SSO Login Services by Devtron)
The Resource Browser allows you to integrate monitoring graphs and dashboards from tools like Grafana, Kibana, Prometheus, and many more tools, with each cluster. This centralizes all monitoring visuals for your clusters in one place within Devtron, streamlining troubleshooting and significantly reducing manual effort.
It works similarly to a 'Single Pane of Glass (SPOG)' that displays data coming from different sources in a single unified view.
Go to Resource Browser and select your cluster.
Click the graph icon as shown below and click the Add Panel button.
Give a name to the monitoring dashboard and add the iframe code supplied by your graph/dashboard tool.
You can also rearrange and resize the graphs/dashboards in case you have added many of them. Refer the to know more.
Users need super-admin permission to view/enable/disable the FluxCD listing.
Flux CD doesn't have any official dashboard; however, Devtron supports the listing of your apps in one dashboard.
With Devtron, you get an entire Flux CD app listing in one place. This listing includes:
Flux CD apps present in the cluster where Devtron is installed
Flux CD apps present in other clusters you added to Devtron
In the FluxCD Apps tab, select the cluster(s) from the dropdown to view the Flux CD apps available in the chosen cluster(s).
(Optional) Once you choose cluster(s), you may use the Template Type dropdown to further filter your Flux CD app listing based on its type, i.e., or .
Click any Flux CD app to view its details as shown below.
Devtron also bridges the gap for Flux CD users by providing additional features as follows:
Single-pane View: All Flux CD apps will show details such as their app status, environment, cluster, and namespace together in one dashboard.
Feature-rich Options: Clicking an Flux CD app will give you access to its logs, terminal, events, manifest, available resource kinds, pod restart log, and many more.
User with access can now troubleshoot cluster issues by accessing the cluster terminal from Devtron. You can select an image from the list that has all CLI utilities like kubectl, helm, netshoot etc. or can use a custom image, which is publicly available.
To troubleshoot a cluster or a specific node in a cluster, click the terminal icon on the right side.
You will see the user-defined name for the cluster in Devtron. E.g. default-cluster.
Select the node you wish to troubleshoot from the Node
helm repo add devtron https://helm.devtron.aihelm repo update devtronhelm install devtron devtron/devtron-operator \
--create-namespace --namespace devtroncdhelm install devtron devtron/devtron-operator \
--create-namespace --namespace devtroncd \
--set components.devtron.service.type=NodePort kubectl apply -f https://raw.githubusercontent.com/rancher/local-path-provisioner/master/deploy/local-path-storage.yaml
helm install devtron devtron/devtron-operator \
--create-namespace --namespace devtroncd \
--set components.devtron.service.type=NodePortsudo snap install microk8s --classic --channel=1.22
sudo usermod -a -G microk8s $USER
sudo chown -f -R $USER ~/.kube
newgrp microk8s
microk8s enable dns storage helm3
echo "alias kubectl='microk8s kubectl '" >> .bashrc
echo "alias helm='microk8s helm3 '" >> .bashrc
source .bashrchelm install devtron devtron/devtron-operator \
--create-namespace --namespace devtroncd \
--set components.devtron.service.type=NodePort kubectl get svc -n devtroncd devtron-service -o jsonpath='{.status.loadBalancer.ingress}'[test2@server ~]$ kubectl get svc -n devtroncd devtron-service -o jsonpath='{.status.loadBalancer.ingress}'
[map[hostname:aaff16e9760594a92afa0140dbfd99f7-305259315.us-east-1.elb.amazonaws.com]]minikube service devtron-service --namespace devtroncdkubectl -n devtroncd port-forward service/devtron-service 8000:80kubectl get svc -n devtroncd devtron-service -o jsonpath='{.spec.ports[0].nodePort}'kubectl -n devtroncd get secret devtron-secret \
-o jsonpath='{.data.ADMIN_PASSWORD}' | base64 -dClick Save.
Select Charts from the left panel to visit the Chart Store page. You will see numerous of charts on the page from which you have to find bitnami/mysql chart. You also can use the search bar to search the MySQL chart.
After selecting the bitnami/mysql Helm chart, click on Configure & Deploy.
Enter the following details, to deploy MySQL chart:
Set the following parameters in the chart, to be later used to connect MySQL with your Django Application.
MySQL architecture
Available options: Standalone or Replication
MySQL custom username
Username of new user to create
MySQL custom password
Password for the new user. Ignored if existing secret is provided
Primary database configuration
Persistent Volume Size in Gibibytes
Secondary database configuration
Persistent Volume Size in Gibibytes
Apart from GUI, you can directly edit the values.yaml file using the editor as shown below:
Finally, click on Deploy Chart to deploy the Chart.
After clicking on Deploy you will be redirected to app details page where you can see deployment status of the chart. The Status of the chart should be Healthy. It might take few seconds after initiating the deployment of the chart.
In case the Status, of the deployment is Degraded or takes a long time to get deployed. Click on the Status or check the logs of the pods to debug the issue.
Copy the service name, it will be used to connect your application to MySQL.
clientID
tenantID (required only if you want to use Azure AD for auto-assigning permissions)
clientSecret
redirectURI (provided in SSO Login Services by Devtron)
Since Microsoft supports Active Directory (AD) , this feature further simplifies the onboarding process of organizations having a large headcount of users. It also eliminates repetitive permission assignment by automatically mapping your Azure AD groups to Devtron's Permission Groups during single sign-on (SSO) login.
If you've defined groups in your Active Directory, you can create corresponding permission groups in Devtron with the same names. When members of those Active Directory groups first log in to Devtron, they'll automatically inherit the permissions from their Devtron permission group. This means you can't manually adjust or add individual permissions for users mapped to a permission group.
SSO login requires exact matching between Devtron permission group names and AD groups. Any discrepancies or missing groups will prevent successful login.
Once you save the configuration with this feature enabled, existing user permissions will be cleared and the future permissions will be managed through permission groups linked to Azure Active Directory (Microsoft Entra ID) groups.
clientID
clientSecret
redirectURI (provided in SSO Login Services by Devtron)
demo-newSelect the namespace from the drop-down list which you have added in the Environment section.
Select the image from the drop-down list which includes all CLI utilities or you can use a custom image, which is publicly available.
Select the terminal shell from the drop-down list (e.g. sh, bash) to troubleshoot a node.
You can also create a pod for debugging which will connect to the pod terminal. To find out why a particular pod is not running, you can check Pod Events and Pod Manifest for details.
The Auto select option automatically selects a node from a list of nodes and then creates a pod. Alternatively, you can choose a node of your choice from the same dropdown for debugging.
The Debug Mode is helpful in scenarios where you can't access your node by using an SSH connection. Enabling this feature opens an interactive shell directly on the node. This shell provides unrestricted access to the node, giving you enhanced debugging capabilities.
Check the current state of the pod and recent events with the following command:
To know more information about each of these pods and to debug a pod depending on the state of the pods, run the following command:
Here, you can see configuration information about the container(s) and pod (labels, resource requirements, etc.), as well as status information about the container(s) and pod (state, readiness, restart count, events, etc.). Click here to know more about pod lifecycle.
Click Add repository.
You can connect public and private chart repositories on Devtron.
Provide the following information in each field:
Name
Provide a Name for your chart repository. This name is used as a prefix for the chart names listed in the Helm chart section of your application.
URL
Enter the URL of your chart repository. For example: https://charts.bitnami.com/bitnami
Username
For private repositories, provide the username required for access.
Password
Enter the password associated with the username.
Check this box 'Allow Insecure Connection' if you want to allow insecure connections, such as HTTP connections, which may not verify SSL certificates.
You can also update your saved chart repository settings.
Click the chart repository which you want to update.
Modify the required changes and click Update to save you changes.
Note:
You can perform a dry run to validate the below chart repo configurations by clicking Validate.
You can enable or disable your chart repository. If you enable it, then you will be able to see the enabled chart in All Charts section of the Chart Store.
Users need to have access to the cluster to discover resources.
You can use the searchbox to browse the resources.
Moreover, you can use filters that allow you to quickly filter your workload as per labels, field selectors, or as shown below.
Resource kinds displayed upfront for you to manage:
Nodes
Events
Namespaces
Further resources in the cluster are grouped under the following categories:
Namespace
Workloads
Config & Storage
Networking
User needs to be an to edit its manifest. The in the manifest cannot be edited by non-superadmins.
You can edit the of a Kubernetes object. This can be for fixing errors, scaling resources, or changing configuration. Moreover, you can edit a manifest or , as per your convenience.
You can monitor activities like creation, deletion, updation, scaling, or errors in the resources involved. Refer to learn more.
For events with warnings, you can take the assistance of AI. Clicking the Explain button will help you identify the root cause of the issue along with suggestions to fix those.
You can delete an unwanted resource if it is orphaned and no longer required by your applications.
You can create one or more in your cluster using YAML. In case you wish to create multiple objects, separate each resource definition by three dashes (---).
Once you select a cluster in Resource Browser, click + Create Resource, and add the resource definition.
In the below example, we have created a simple pod named nginx:
Here's one more example that shows the required fields and object specifications for a Kubernetes Deployment:
You can use the checkbox to select the resources/workloads you wish to delete or restart.
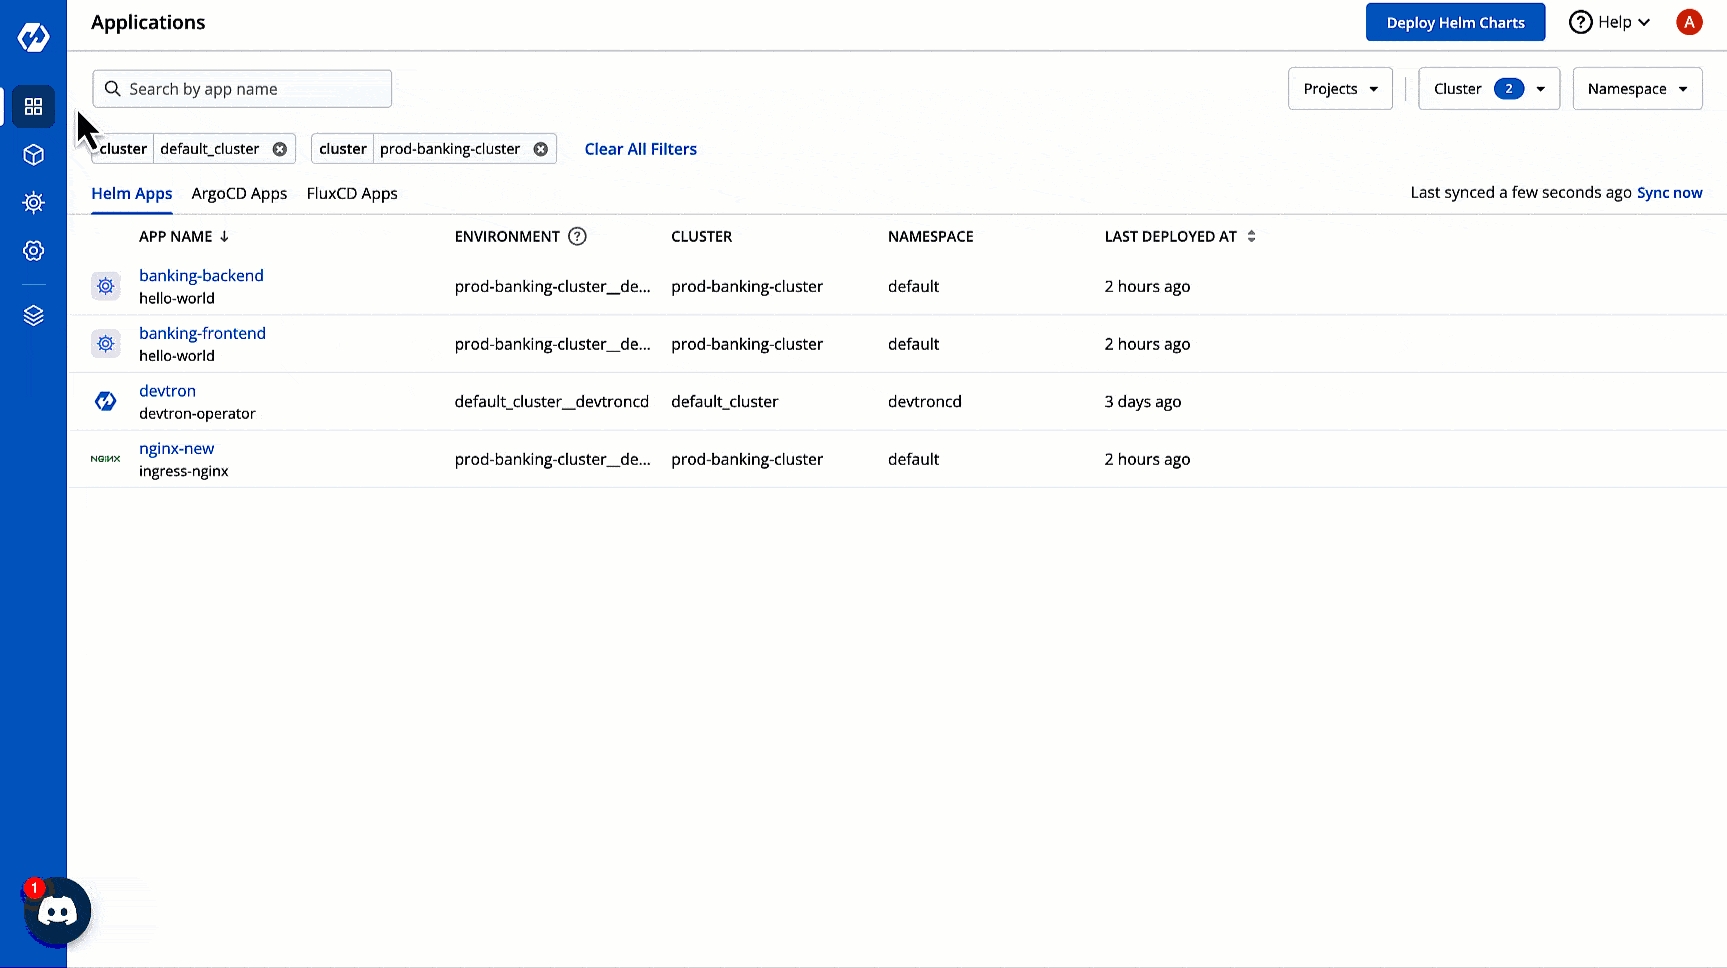
The Devtron Dashboard displays the helm applications deployed to your cluster and lets you deploy your own helm charts or third-party charts (e.g. postgresql) using the Chart Store.
From the left pane, go to Applications.
Click the Helm Apps tab.
You can see the Helm Apps available in your cluster. If you have connected more than one cluster to Devtron, you can use the Cluster selection dropdown to view the respective Helm Apps in your other clusters.
Select the Charts section from the left pane, you will be landed to the Chart Store page.
Search nginx or any other charts in search filter.
Click on chart and it will redirect you to Chart Details
You may refer the README.md attached to the chart to know more about the chart configurations.
Click Configure & Deploy and enter the following details:
You can use the default values or create preset value by clicking on Create preset value.
You can name your preset value, select a chart version, and change the configurations in the YAML file using the editor.
Click on Save Value to save the template, and go back and choose your template from the dropdown for deployment.
After clicking the Deploy button, you will land on the App Details page that shows the status of the chart deployment.
The status of the chart should be Healthy. It might take a few seconds after initiating the deployment of the chart. In case the status of the deployment shows Degraded or if takes a long time to get deployed, click Details in Application Status section on the same page or check the logs of the pods to debug the issue.
Shows status of deployed chart.
Shows the controller service accounts being used.
In the Configure tab, you can update, upgrade, or delete your chart instance.
From the Chart used section you can go to the charts page where you can see all the running instances of this chart.
For update, you can change its Chart Version or values.yaml and then click Update And Deploy.
For upgrade, click on Helm Chart field, search a chart name, change its values corresponding, and click Update And Deploy.
Clicking on View Chart in Chart Used section in the App Details page will redirect you to the Chart Details page where you can see the number of instances installed by that chart along with an option to delete those chart instances too.
Users need to have access to the cluster to view its pods and its data.
Shows you the of the selected pod and allows you to edit it. Refer to learn more.
Shows you all the activities (create/update/delete) of the selected pod. Refer to know more.
Examining your cluster's pods helps you understand the health of your application. By inspecting pod logs, you can check the performance and identify if there are any failures. This is especially useful for debugging any issues effectively.
Moreover, you can download the pod logs for ease of sharing and troubleshooting as shown in the below video.
Frequent pod restarts can impact your application as it might lead to unexpected downtimes. In such cases, it is important to determine the root cause and take actions (both preventive and corrective) if needed.
In case any of your pod restarts, you can view its details from the pod listing screen:
Last pod restart event, along with the timestamp and message
Reason behind restart
Container log before restart
Node status and events
You can access the terminal within a running container of a pod to view its logs, troubleshoot issues, or execute commands directly. This is different from the you get at node level.
This is a part of . It is especially useful when kubectl exec is insufficient because a container has crashed or a container image doesn't include debugging utilities.
In the Resource Browser, select Pod within Workloads.
Use the searchbar to find and locate the pod you wish to debug. Click the pod.
Go to the Terminal tab
Click Launch Ephemeral Container as shown below.
Once Devtron is installed, it has a built-in admin user with super-admin privileges having unrestricted access to all Devtron resources. We recommended to use this user only for initial and global configurations and then switch to local users or configure SSO-login.
Only users with super-admin privileges can configure the SSO. Devtron uses Dex for authenticating a user against the identity provider.
Below are the SSO providers which are available in Devtron. Select one of the SSO providers (e.g., GitHub) to configure SSO:
Dex implements connectors that target specific identity providers for each connector configuration. You must have a created account for the corresponding identity provider and registered an app for client key and secret.
Refer the following documents for more detail.
https://dexidp.io/docs/connectors/
https://dexidp.io/docs/connectors/google/
Make sure that you have a .
From the left sidebar, go to Global Configurations → Authorization → SSO Login Services
Click any SSO Provider of your choice.
In the URL field, enter the valid Devtron application URL where it is hosted.
Note:
Only single SSO login configuration can be active at one time. Whenever you create or update any SSO configuration, it will be activated and used by Devtron and previous configurations will be deleted.
Except for the domain substring, URL and redirectURI remains same.
You can change SSO configuration anytime by updating the configuration and click Update. Note: In case of configuration change, all users will be logged out of Devtron and will have to login again.
type : Any platform name such as (Google, GitLab, GitHub etc.)
name : Identity provider platform name
id : Identity provider platform which is a unique ID in string. (Refer to
After configuring an SSO for authentication, you must in Devtron for them to be able to log in via SSO.
In case you have enabled auto-assign permissions in or , relevant must also exist in Devtron for a successful login.
Let's assume that you are creating an application and want to use mongodb to store data of your application. You can deploy mongodb using bitnami/mongodb Helm chart and connect it to your application.
This guide will introduce you to how to deploy the mongoDB's Helm chart.
Visit the Chart Store page by clicking on Charts present on left panel and find bitnami/mongodb Helm Chart. You also can search mongodb chart using the search bar.
After selecting the bitnami/mongodb Helm chart, click on Configure & Deploy.
Enter the following details before deploying the mongoDB chart:
Set the following parameters in the chart.
You can configure the values.yaml according to your project's requirements. To learn about different parameters used in the chart, you can check
Click on Deploy Chart once you have finished configuring the chart.
After clicking on Deploy Chart, you will be redirected to App Details page that shows the deployment status of the chart. The Status of the chart should be Healthy. It might take few seconds after initiating the deployment.
In case the status of the deployment is Degraded or takes a long time to get deployed, click on Status or check the logs of the pods to debug the issue.
Copy the service name, it will be used to connect your application to mongoDB.
This shows the combined CPU and memory consumption of all running pods in the cluster.
CPU Usage
This shows errors in the cluster. If no error is present in the cluster, Resource Browser will not display this section.
Users need to have super-admin permission to edit the catalog framework.
Based on the schema provided in the catalog framework, you can add relevant details for each cluster. Refer for more details.
You can also include additional information about your cluster using the Markdown editor.
Whenever you upgrade your Kubernetes version, the API versions change and your workloads/resources may not be compatible with those API versions. Therefore, the resources need to be upgraded first. This could mean changing the API version of the resources itself or changing their outdated spec.
The Check Compatibility feature within Resource Browser scans your cluster and automatically identifies all such resources/workloads that need manual intervention before proceeding with an actual cluster upgrade.
Devtron provides a sample configuration out of the box. Here are some values you need to fetch from your LDAP.
bindDN
bindPW
baseDN
Since LDAP supports creation of User Groups, this feature simplifies the onboarding process of organizations having a large headcount of users. It also eliminates repetitive permission assignment by automatically mapping your LDAP User groups to Devtron's during single sign-on (SSO) login.
If you've created user groups in LDAP, you can create corresponding permission groups in Devtron with the same names. When members of those user groups first log in to Devtron, they'll automatically inherit the permissions from their Devtron permission group. This means you can't manually adjust or add mapped to a permission group.
SSO login requires exact matching between Devtron permission group names and LDAP user groups. Any discrepancies or missing groups will prevent successful login.
Once you save the configuration with this auto-assign feature enabled, existing user permissions will be cleared and the future permissions will be managed through linked to LDAP user groups.
kubectl get podskubectl describe pod <podname>Administration
Other Resources
Custom Resource
Project
Select the project of the application
Deploy to Environment
Environment in which you want to deploy the chart
Chart Version
Shows all available versions of the chart. Select the version of the chart to be used.
Chart Value
Shows the latest default value or you may
Once you choose a preferred chart version, chart value, and update the values.yaml using the editor, click Deploy to deploy the chart.
Click the Deployment history tab to view the deployment history of Helm application and values.yaml corresponding to the deployment.
After an update or upgrade, you will land on the App Details page where you can check the pods and service name.
App Name
Unique name of the chart
You get 2 tabs:
Basic - It provides the bare minimum configurations required to launch an ephemeral container.
It contains 3 mandatory fields:
Container name prefix - Type a prefix to give to your ephemeral container, for e.g., debug. Your container name would look like debug-jndvs.
Image - Choose an image to run from the dropdown. Ephemeral containers need an image to run and provide the capability to debug, such as curl. You can use a custom image too.
Target Container name - Since a pod can have one or more containers, choose a target container you wish to debug, from the dropdown.
Advanced - It is particularly useful for advanced users that wish to use labels or annotations since it provides additional key-value options. Refer to view the supported options.
For providing redirectURI or callbackURI registered with the SSO provider, you can either select Configuration or Sample Script.
Provide the client ID and client Secret of your SSO provider (e.g. If you select Google as SSO provider, then you must enter $GOOGLE_CLIENT_ID and $GOOGLE_CLIENT_SECRET in the client ID and client Secret respectively.)
Select Save to create and activate SSO Login Service.
config : User can put connector details for this key. Platforms may not have same structure but common configurations are clientID, clientSecret, redirectURI.hostedDomains : Domains authorized for SSO login (e.g. gmail.com, devtron.ai)
Name of the Chart
Project
Select the name of your Project in which you want to deploy the chart
Environment
Select the environment in which you want to deploy the chart
Chart Version
Select the latest Chart Version
Chart Value
Select the latest default value or create a custom value
MongoDB architecture
Available options: Standalone or Replication
MongoDB admin user
Username of admin
MongoDB admin password
Password for the admin
MongoDB custom user
Username of new user to create
Password for MongoDB custom user
Password for the new user. Ignored if existing secret is provided
App Name
Kubeconfig becomes painstakingly difficult to maintain especially when it comes to:
Granting or revoking access to the cluster for multiple people
Changing the permissions and subsequently the access token
Adding/Updating/Deleting the entries of cluster URLs and tokens
Keeping a record of multiple kubeconfig files
Devtron helps in reducing the challenges and simplifying the maintenance of kubeconfig file through:
Devtron's Proxy URL for Cluster - A standardized URL that you can use in place of your Kubernetes cluster URL.
Devtron's Access Token - A kubectl-compatible token which can be generated and centrally maintained from Global Configurations → Authorization → API tokens.
Prerequisite: An API token with necessary permissions for the user(s) to access the cluster.
If you are not a super-admin and can't generate a token yourself, you can find the session token (argocd.token) using the Developer Tools available in your web browser as shown below.
There are 2 methods of getting kubeconfig in your system:
In Resource Browser, hover on the cluster name and click the Get kubeconfig icon.
Copy the commands and run them on your terminal.
Go to ~/.kube folder on your local machine and open the config file. Or you may create one with the following content:
Edit the following placeholders in the server field and the token field:
<devtron_host_name>
Hostname of the Devtron server
demo.devtron.ai
<cluster_name>
Name of the cluster (or cluster ID)
devtron-cluster
<devtron_token>
API token or session token
-
Test the connection to the cluster by running any kubectl command, e.g., kubectl get ns or kubectl get po -A
Once the connection is successful, you may run any kubectl operations from your system.
Assume your applications are running in a Kubernetes cluster on cloud. Now, if you wish to test or debug them on your local machine, you can perform port forwarding. It creates a tunnel between a port on your machine and a port on a resource within your cluster. Therefore, you can access applications running inside the cluster as though they are running locally on your machine.
Once you have successfully connected to the cluster, you may run the port-forward command. Refer kubectl port-forward to see a few examples.
Go to the Resource Browser of Devtron.
Select the cluster (in which your Argo CD app exists).
Type ConfigMap in the 'Jump to Kind' field.
Search for dashboard-cm using the available search bar and click it.
Click Edit Live Manifest.
Set the feature flag accordingly:
ENABLE_EXTERNAL_ARGO_CD: "true" - Use this to show the Argo CD App Listing
ENABLE_EXTERNAL_ARGO_CD: "false" - Use this to hide the Argo CD App Listing
Click Apply Changes.
Go back to the 'Jump to Kind' field and type Pod.
Search for dashboard pod and use the kebab menu (3 vertical dots) to delete the pod.
Go to Applications and refresh the page (the ArgoCD Apps tab will be visible if you enabled it in step 6).
Go to the Resource Browser of Devtron.
Select the cluster (in which your Argo CD app exists).
Type ConfigMap in the 'Jump to Kind' field.
Search for dashboard-cm using the available search bar and click it.
Click Edit Live Manifest.
Set the feature flag accordingly:
FEATURE_EXTERNAL_FLUX_CD_ENABLE: "true" - Use this to show the Flux CD App Listing
FEATURE_EXTERNAL_FLUX_CD_ENABLE: "false" - Use this to hide the Flux CD App Listing
Click Apply Changes.
Go back to the 'Jump to Kind' field and type Pod.
Search for dashboard pod and use the kebab menu (3 vertical dots) to delete the pod.
Go to Applications and refresh the page (the FluxCD Apps tab will be visible if you enabled it in step 6).
Helm Chart(s)
Chart Repository added to Devtron
OCI-Compliant Registry (e.g. Docker Hub and many more)
You cannot remove a chart from the Chart Store if the source was a chart repository. Removal is possible only if the charts come from OCI registry.
Go to your OCI registry settings in Devtron.
In the List of repositories field, remove the unwanted chart repo.
Click Update.
The removed chart will no longer appear in the Chart Store.
A light alternative is to disable the chart source as shown below, but this doesn't imply the removal of a chart.
App Name
Name of the Chart
Project
Select the name of your Project in which you want to deploy the chart
Environment
Select the environment in which you want to deploy the chart
Chart Version
Select the latest Chart Version
Chart Value
Select the default value or create a custom value
Percentage of CPU resources currently being used across all the pods in the cluster.
CPU Capacity
Total amount of CPU resources available across all the nodes in the cluster. Measured in millicores (m).
CPU Requests
Total amount of CPU resources requested by all the pods in the cluster.
CPU Limits
Maximum amount of CPU resources that a total number of pods can use in the cluster.
Memory Usage
Percentage of memory resources currently being used across all the pods in the cluster.
Memory Capacity
Total amount of memory resources available across all the nodes in the cluster. Measured in Megabytes (Mi).
Memory Requests
Total amount of memory resources requested by all the pods in the cluster.
Memory Limits
Maximum amount of memory resources that a total number of pods can use in the cluster.
In Devtron, you can create CRDs for defining lock schema. Your lock schema will be used to determine the fields (in the resource manifest) that cannot be added/updated/deleted by non-superadmins. This is especially useful for preventing unwanted edits to the manifests of pod, deployment, configmap, and many more.
Go to Resource Browser and select your cluster.
Use the searchbox labelled 'Jump to Kind' and search for LockSchema.
Click the Lock Schema you wish to edit. In case no Lock Schema exists, you may for your resource kind.
Go to Resource Browser and select your cluster.
Click Create Resource at the top.
Use the following template and specify the fields/paths you wish to lock in the lockedPaths list, also specify the resource kinds in applyTo. Once done, click Apply.
apiVersion: apps/v1
kind: Deployment
metadata:
  name: nginx-deployment
  labels:
     app: nginx
spec:
  replicas: 2
  selector:
    matchLabels:
       app: nginx
  template:
    metadata:
      labels:
        app: nginx
    spec:
      containers:
       - name: nginx
         image: nginx:1.14.2
         ports:
- containerPort: 80apiVersion: v1
kind: Config
clusters:
- cluster:
insecure-skip-tls-verify: true
server: https://<devtron_host_name>/orchestrator/k8s/proxy/cluster/<cluster_name>
name: devtron-cluster
contexts:
- context:
cluster: devtron-cluster
user: admin
name: devtron-cluster
current-context: devtron-cluster
users:
- name: admin
user:
token: <devtron_token>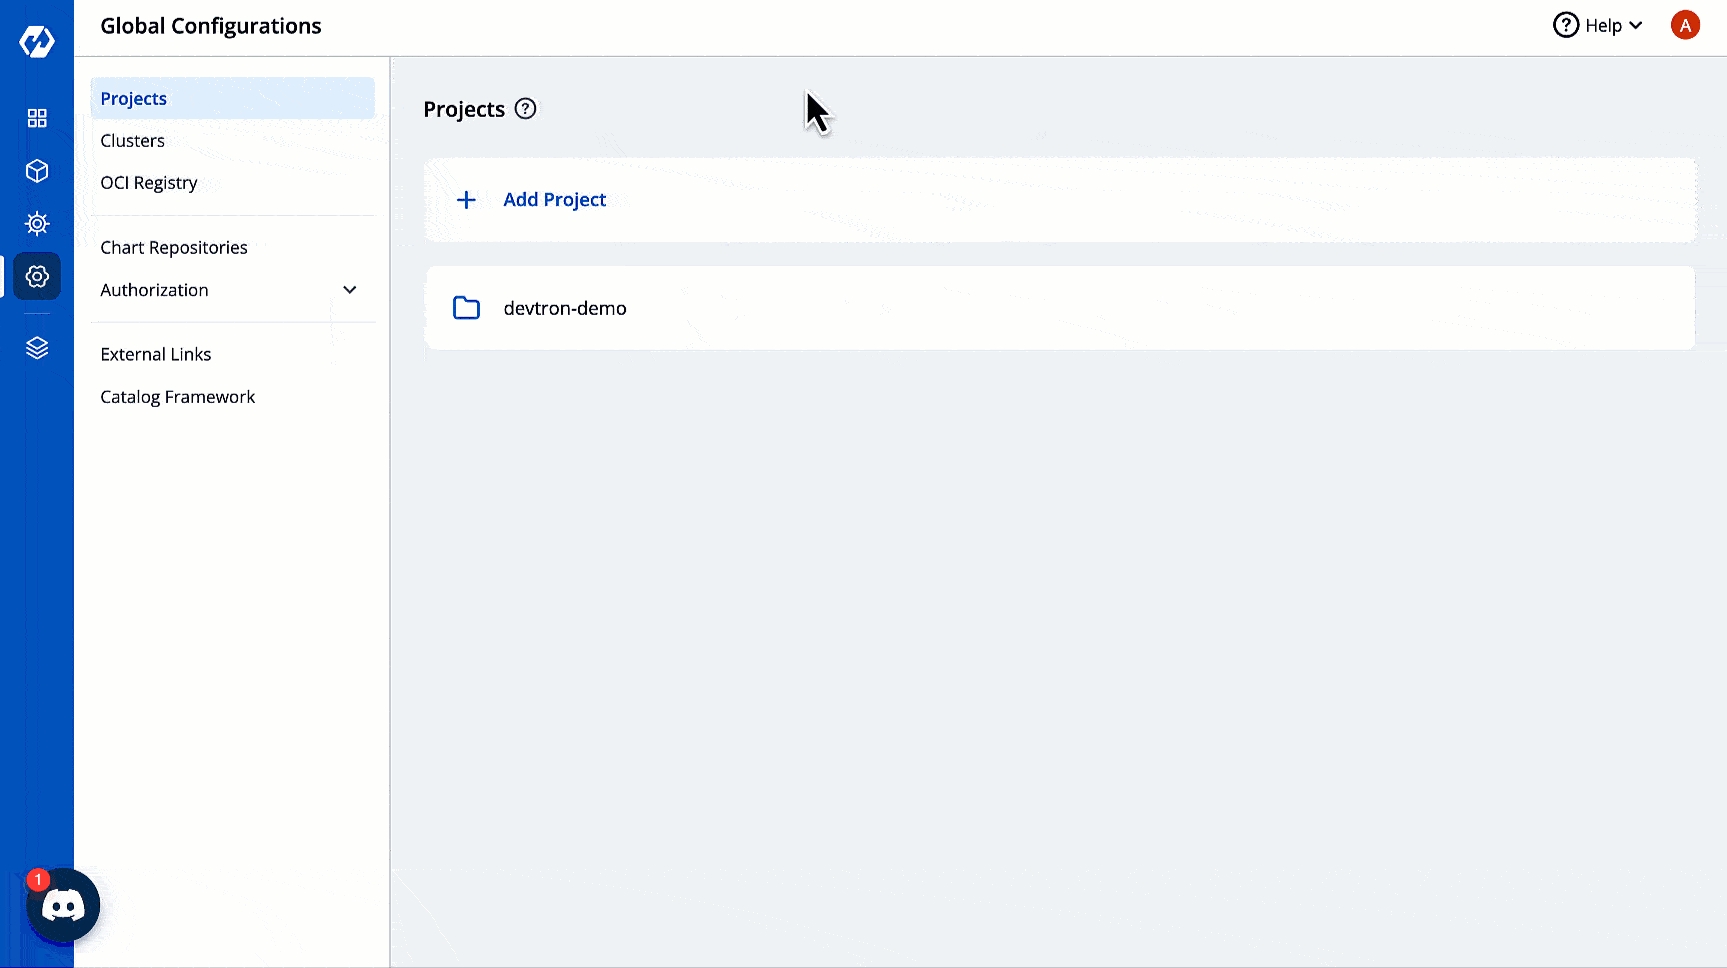
Click Edit Live Manifest to modify the YAML.
Locate the lockedPaths list and specify the fields/paths you wish to lock from unwanted edits by non-superadmins in the manifest.
Click Apply Changes.
Use this option to add a managed or on-premise Kubernetes cluster.
Go to Global Configurations → Clusters & Environments.
Click the Add Cluster button on the top-right corner.
You can choose to add your Kubernetes cluster using either of the following methods:
Refer Get Cluster Credentials to know the process of getting Server URL and bearer token.
To add a Kubernetes cluster on Devtron using a Server URL and bearer token, provide the information in the following fields:
Name
Enter a name of your cluster
Server URL
Server URL of a cluster. Note: We recommended to use a instead of cloud hosted URL.
Bearer Token
Bearer token of a cluster
To add clusters using kubeconfig, follow these steps:
First, navigate to the global configurations menu, and then go to "clusters and environment" section.
Click on the Add cluster button. In the options provided, choose the From kubeconfig option.
Next, either paste the kubeconfig file or browse for it and select the appropriate file.
Afterward, click on the Get cluster button. This action will display the cluster details alongside the kubeconfig.
Select the desired cluster and click on Save to successfully add the cluster to Devtron.
Please ensure that the kubeconfig file you use has admin permissions. It is crucial for Devtron to have the necessary administrative privileges; otherwise, it may encounter failures or disruptions during deployments and other operations. Admin permission is essential to ensure the smooth functioning of Devtron and to prevent any potential issues that may arise due to insufficient privileges.
Once you have added your cluster in the Clusters & Environments, you can add the environment by clicking Add environment.
A new environment window pops up.
Environment Name
Enter a name of your environment.
Enter Namespace
Enter a namespace corresponding to your environment. Note: If this namespace does not already exist in your cluster, Devtron will create it. If it exists already, Devtron will map the environment to the existing namespace.
Environment Type
Select your environment type:
Production
Non-production
Note: Devtron shows deployment metrics (DORA metrics) for environments tagged as Production only.
Click Save and your environment will be created.
You can also update an environment by clicking the environment.
You can change Production and Non-Production options only.
You cannot change the Environment Name and Namespace Name.
Make sure to click Update to update your environment.
We recommend to use a self-hosted URL instead of cloud hosted URL. Refer the benefits of self-hosted URL.
You can get the Server URL and Bearer Token by running the following command depending on the cluster provider:
If you are using EKS, AKS, GKE, Kops, Digital Ocean managed Kubernetes, run the following command to generate the server URL and bearer token:
If you are using a microk8s cluster, run the following command to generate the server URL and bearer token:
Disaster Recovery:
It is not possible to edit the server URL of a cloud specific provider. If you're using an EKS URL (e.g. *****.eu-west-1.elb.amazonaws.com), it will be a tedious task to add a new cluster and migrate all the services one by one.
But in case of using a self-hosted URL (e.g. clear.example.com), you can just point to the new cluster's server URL in DNS manager and update the new cluster token and sync all the deployments.
Easy Cluster Migrations:
In case of managed Kubernetes clusters (like EKS, AKS, GKE etc) which is a cloud provider specific, migrating your cluster from one provider to another will result in waste of time and effort.
On the other hand, migration for a self-hosted URL is easy as the URL is of single hosted domain independent of the cloud provider.
Once your Okta org is set up, create an app integration on Okta to get a Client ID and Client Secret.
In the Admin Console, go to Applications → Applications.
Click Create App Integration.
Select OIDC - OpenID Connect as the Sign-in method.
Select Web as the application type and click Next.
On the App Integration page:
Give a name to your application.
Select the Interaction Code and Refresh Token checkbox.
Now go to Devtron's Global Configurations → SSO Login Services → OIDC.
Copy the redirect URI given in the helper text (might look like: https://xxx.xxx.xxx/xxx/callback).
Return to the Okta screen, and remove the prefilled value in Sign-in redirect URIs.
Paste the copied URI in Sign-in redirect URIs.
Click Save.
On the General tab:
Note the Client ID value.
Click the Edit option.
In Client Authentication, choose Client Secret.
Go to the Global Configurations → SSO Login Services → OIDC.
In the URL field, enter the Devtron application URL (a valid https link) where it is hosted.
Under Configuration tab, locate the config object, and provide the clientID and clientSecret of the app integration you created on Okta.
Add a key insecureSkipEmailVerified: true. Note that this key is only required for Okta SSO. For other types of OIDC SSO, refer .
Provide issuer value as https://${yourOktaDomain}. Replace ${yourOktaDomain} with your domain on Okta as shown in the video.
For providing redirectURI or callbackURI registered with the SSO provider, you can either select Configuration or Sample Script. Note that the redirect URI is already given in the helper text (as seen in the previous section).
Click Save to create and activate Okta SSO login.
Now your users will be able to log in to Devtron using the Okta authentication method. Note that existing signed-in users will be logged out and they have to log in again using their OIDC account.
You can see the list of nodes available in your cluster. Typically you have several nodes in a cluster; in a learning or resource-limited environment, you might have only one node.
The components on a typical node include the kubelet, a container runtime, and the kube-proxy.
If you have multiple nodes, you can search a node by name or label in the search bar. The search result will display the following information about the node. To display a parameter of a node, use Columns on the right side, select the parameter to display from the drop-down list, and click Apply.
Clicking on a node shows you a number of details such as:
CPU Usage and Memory Usage of Node
CPU Usage and Memory Usage of Each Pod
Number of Pods in the Node
List of Pods
Further using the Devtron UI, you will be able to:
Your applications run on pods, and pods run on nodes. But sometimes, Kubernetes scheduler cannot deploy a pod on a node for several reasons, e.g., node is not ready, node is not reachable, network is unavailable, etc. In such cases, node operations help you manage the nodes better.
You can debug a node via by selecting your namespace and image from the list that has all CLI utilities like kubectl, helm, netshoot etc. or can use a custom image, which is publicly available.
Click Debug.
Debug a node by selecting the terminal shell, i.e., bash or sh.
Cordoning a node means making the node unschedulable. After , new pods cannot be scheduled on this node.
Click Cordon.
A confirmation dialog box will appear, click Cordon Node to proceed.
The status of the node shows SchedulingDisabled with Unschedulable parameter set as true.
Similarly, you can uncordon a node by clicking Uncordon. After a node is uncordoned, new pods can be scheduled on the node.
Before performing maintenance on a node, evicts all of your pods safely from a node. Safe evictions allow the pod’s containers to gracefully terminate and honour the PodDisruptionBudgets you have specified (if relevant).
After the node is drained, all pods (including those managed by DaemonSets) in the node will be automatically drained to other nodes in the cluster, and the drained node will be set to cordoned status.
Click Drain.
A confirmation dialog box will appear, click Drain Node to proceed.
You can also select from the following conditions before draining a node:
Taints are key:value pairs associated with effect. After you add taints to nodes, you can set tolerations on a pod to allow the pod to be scheduled to nodes with certain taints. When you taint a node, it will repel all the pods except those that have a toleration for that taint. A node can have one or many taints associated with it.
Note: Make sure to check taint validations before you add a taint.
Click Edit taints.
Enter the key:value pairs and select the from the drop-down list.
Click Save.
You can also add more taints using + Add taint button, or delete the existing taint by using the delete icon.
This allows you to directly edit any node. It will open the editor which contains all the configuration settings in which the default format is YAML. You can edit multiple objects, although changes are applied one at a time.
Go to the YAML tab and click Edit YAML.
Make the changes using the editor.
Click Review & Save changes to compare the changes in the YAML file.
Click Apply changes to confirm.
You can also delete a node by clicking the Delete button present on the right-hand side.
The node will be deleted from the cluster.
An incident response if delayed can impact businesses, revenue, and waste valuable engineering time. Devtron's Resource Watcher enables you to perform automated actions upon the occurrence of events:
Create Event - Occurs when a new Kubernetes resource is created, for e.g., a new pod spun up to handle increased traffic.
Update Event - Occurs when an existing Kubernetes resource is modified, for e.g., deployment configuration tweaked to increase the replica count.
Delete Event - Occurs when an existing Kubernetes resource is deleted, for e.g., deletion of an orphaned pod.
You can make the Resource Watcher listen to the above events and accordingly trigger a webhook to notify the relevant party. Since manual intervention is absent, the timely response of this auto-remediation system improves your operational efficiency.
This page allows you to create a watcher to track events and trigger a webhook. It also shows the existing list of watchers (if any).
Click + Create Watcher.
Creating a watcher consists of 4 parts, fill all the sections one by one:
Here, you can give a name and description to your watcher.
Here, you can select the whose you wish to monitor for changes.
You can watch the namespace(s) across All Clusters (existing and future).
Or you can watch namespace(s) of Specific Clusters.
Here, you can select the exact Kubernetes resource(s) you wish to track for changes (in the namespace(s) you selected in the previous step).
You can choose the resource from the Resource kind(s) to watch dropdown. Enter the Group/Version/Kind (GVK) if it's a custom resource definition (CRD), for e.g., install.istio.io/v1apha1/IstioOperator
Choose the event type your watcher should listen to: Created, Updated, Deleted.
Example: DEVTRON_FINAL_MANIFEST.status.currentReplicas == DEVTRON_FINAL_MANIFEST.spec.maxReplicas
Here, you can set up a webhook to receive notifications when specified changes in Kubernetes resources are detected.
Webhook URL: Here, you'll provide the Webhook URL where you want the payload delivered. It must be valid and reachable for the watcher to work properly.
Header Key-Value: Fill in any relevant header key-value pairs necessary for authentication or to include additional metadata for the receiving endpoint.
Payload: Define what you want to deliver to the Webhook when this watcher is triggered. You can customize this payload with information related to changes in the intercepted resources. You can pass the properties of resource manifest in the webhook payload using the following keys:
Click Create Watcher. Your watcher is now ready to intercept the changes to the selected resources.
This page allows you to view the changes to Kubernetes resources that you have selected for tracking changes.
It comes with the following items to help you locate the resource, where the event has been intercepted:
Searchbox
Cluster filter
Namespace filter
Action filter (event type, i.e., Created, Updated, Deleted
You get the following details in the results shown on the page.
You can check the changes in manifest by clicking View Manifest in Change In Resource column.
A live streaming sports application experiences a surge in viewers during a major game. The Horizontal Pod Autoscaler (HPA) might not be able to handle the unexpected traffic if it's capped at a low max replica count.
Create a watcher named 'Live Stream Scaling Alert'.
Monitor updates to HPA resource in the application's namespace.
When currentReplicas count reaches maxReplicas, trigger a webhook to intimate the concerned users.
A stock trading application constantly updates stock prices for its traders. If the pods become unhealthy, traders might see incorrect stock prices leading to bad investments.
Create a watcher named 'Pod Health Monitor'.
Track the pod workload of your application, if DEVTRON_FINAL_MANIFEST.status.phase != 'Running', trigger a webhook to notify the stakeholders.
API tokens are the access tokens for authentication. Instead of using username and password, it can be used for programmatic access to API. It allows users to generate API tokens with the desired access. Only super admin users can generate API tokens and see the generated tokens.
To generate API tokens, go to Global Configurations -> Authorization -> API tokens and click Generate New Token.
Enter a name for the token.
Add Description.
Select an expiration date for the token (7 days, 30 days, 60 days, 90 days, custom and no expiration).
To select a custom expiration date, select Custom from the drop-down list. In the adjacent field, you can select your custom expiration date for the API token.
You can assign permission to the token either with:
Super admin permission: To generate a token with super admin permission, select Super admin permission.
Specific permissions: Selecting Specific permissions option allows you to generate a token with a specific role for:
Click Generate Token.
A pop-up window will appear on the screen from where you can copy the API token.
Once Devtron API token has been generated, you can use this token to request Devtron APIs using any API testing tool like Jmeter, Postman, Citrus. Using Postman here as an example.
Open Postman. Enter the request URL with POST method and under HEADERS, enter the API token as shown in the image below.
In the Body section, provide the API payload as shown below and click Send.
As soon as you click Send, the created application API will be triggered and a new Devtron app will be created as provided in the payload.
To set a new expiration date or to make changes in permissions assigned to the token, we need to update the API token in Devtron. To update the API token, click the token name or click on the edit icon.
To set a new expiration date, you can regenerate the API token. Any scripts or applications using this token must be updated. To regenerate a token, click Regenerate token.
A pop-up window will appear on the screen from where you can select a new expiration date.
Select a new expiration date and click Regenerate token.
This will generate a new token with a new expiration date.
To update API token permissions, give the permissions as you want to and click Update Token.
To delete an API token, click delete icon. Any applications or scripts using this token will no longer be able to access the Devtron API.
In Devtron, you can create CRDs for defining the GUI schema. Your GUI schema will be used to determine the fields displayed to the user when they edit the manifest in GUI mode.
Go to Resource Browser and select your cluster.
Use the searchbox labelled 'Jump to Kind' and search for Guischema.
Click the GUI schema you wish to edit. In case no GUI schema exists, you may for your resource kind.
Go to Resource Browser and select your cluster.
Click Create Resource at the top.
Use the following template and define your schema in the schema object, also specify the resource kinds in applyTo. Once done, click Apply.
If you have stored in your , you can add the OCI registry to Devtron's Modern Kubernetes Dashboard and pull those to Devtron's [Chart Store].
You can configure an OCI registry using any registry provider of your choice, including:
ECR
Docker
Azure
External Links allow you to connect to the third-party applications within your Devtron dashboard for seamlessly monitoring/debugging/logging/analyzing your applications. You can select from the pre-defined third-party applications such as Grafana to link to your application for quick access.
Configured external links will be available on the App details page. You can also integrate Document or Folder using External Links.
Some of the third-party applications which are pre-defined on Devtron Dashboard are:
Ideally, all resources such as microservices, clusters, jobs, pods, etc. should contain detailed information so that its users know what each of those resources do, how to use them, as well as all their technical specs. Access to such data makes it easier for engineers to quickly discover and understand the relevant resources.
To achieve this, Devtron supports a feature known as Catalog Framework. Using this, you as a can decide the data you expect from the managers of different resource types. In other words, you can create a custom that would ultimately render a form for the resource owners to fill. Once the form is filled, a GUI output will appear as shown below.
Using the Permission groups, you can assign a user to a particular group and a user inherits all the permissions granted to the group.
The advantage of the Permission groups is to define a set of privileges like create, edit, or delete for the given set of resources that can be shared among the users within the group.
apiVersion: crd.devtron.ai/alpha1
kind: LockSchema
name: devtron-cm-lock-schema
spec:
applyTo:
    - group: ""
    kind: ConfigMap
    version: v1
lockedPaths:
- data.ENABLE_CI_JOBcurl -O https://raw.githubusercontent.com/devtron-labs/utilities/main/kubeconfig-exporter/kubernetes_export_sa.sh && bash kubernetes_export_sa.sh cd-user devtroncdcurl -O https://raw.githubusercontent.com/devtron-labs/utilities/main/kubeconfig-exporter/kubernetes_export_sa.sh && sed -i 's/kubectl/microk8s kubectl/g' \
kubernetes_export_sa.sh && bash kubernetes_export_sa.sh cd-user \
devtroncd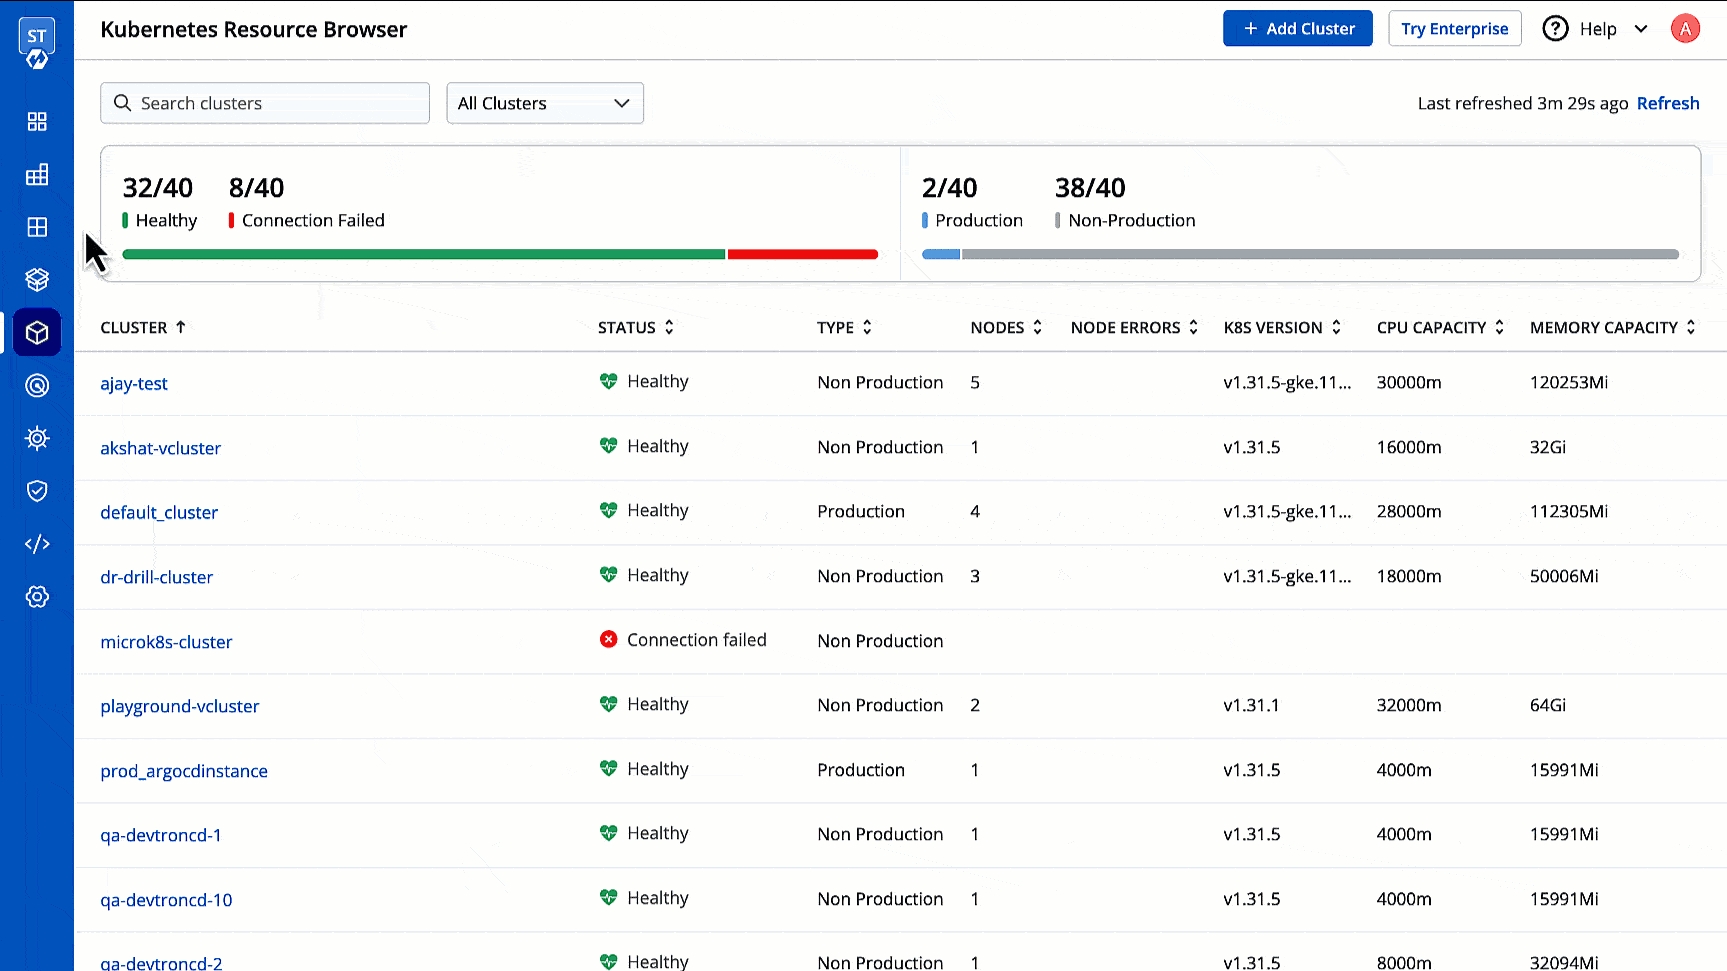
Click Save.
Click Generate new secret.
Note the Client Secret value.
Labels, Annotations, and Taints
Node IP
Node
Alphanumeric name of the node
Status
Status of a node. It can be either Ready or Not Ready.
Roles
Shows the roles of a node, e.g., agent
Errors
Shows the number of errors in nodes (if any)
K8s Version
Shows the version of Kubernetes cluster
Node Group
Shows which collection of worker nodes it belongs to
No. of Pods
Shows the total number of pods present in the node
Grace Period
Period of time in seconds given to each pod to terminate gracefully. If negative, the default value specified in the pod will be used.
Delete empty directory data
Enabling this field will delete the pods using empty directory data when the node is drained.
Disable eviction (use with caution)
Enabling this field will force drain to use delete, even if eviction is supported. This will bypass checking PodDisruptionBudgets.
Note: Make sure to use with caution.
Force drain
Enabling this field will force drain a node even if there are pods that do not declare a controller.
Ignore DaemonSets
Enabling this field will ignore DaemonSet-managed pods.
Created
Triggers the watcher when your Kubernetes resource is created
Updated
Triggers the watcher when your existing Kubernetes resource is modified
Deleted
Triggers the watcher when your existing Kubernetes resource is deleted
Enter a CEL expression to catch a specific change in the resource's manifest.
To access initial resource manifest use DEVTRON_INITIAL_MANIFEST
To access final resource manifest use DEVTRON_FINAL_MANIFEST
The above keys return values as stringified JSON
Watcher filter (to check the intercepted changes of a specific watcher)
Describes the type of change to the Kubernetes resource along with a link to its manifest
Shows the cluster and namespace where the tracked Kubernetes resource belongs to
Intercepted By
Shows the name of the watcher that intercepted the change
Intercepted At
Shows the date and time when the event occurred
Execution Status
Shows the status of the execution of webhook, e.g., Succeeded, Failed
Devtron Apps
Helm Apps
Kubernetes Resources
Chart Groups
Click Edit Live Manifest to modify the YAML.
Locate the schema object and customize it according to your requirements.
Click Apply Changes.
Artifact Registry (GCP)
Quay
From the left sidebar, go to Global Configurations → OCI Registry.
Click Add Registry.
Choose a provider from the Registry provider dropdown. View the Supported Registry Providers.
Under Registry type, you get the following options:
Private Registry: Choose this if your artifacts are hosted or should be hosted on a private registry restricted to authenticated users of that registry. Selecting this option requires you to enter your registry credentials (username and password/token).
Public Registry: Unlike private registry, this doesn't require your registry credentials. Only the registry URL and repository name(s) would suffice.
Assuming your registry type is private, here are few of the common fields you can expect:
Click Save.
Unlike Helm repos, OCI registries do not have an index file to discover all the charts. If you have helm charts pushed to your OCI registry, you can use that registry as a chart repository.
Upon enabling this option, Devtron can use your OCI registry as the chart source and pull the helm charts to display them on your Chart Store for easy deployment.
Search your OCI registry in the list and click it.
In the List of repositories field, add your chart repo(s). The format should be username/chartname. You can find the username from your registry provider account.
Amazon ECR is an AWS-managed container image registry service. The ECR provides resource-based permissions to the private repositories using AWS Identity and Access Management (IAM). ECR allows both Key-based and Role-based authentications.
Before you begin, create an IAM user and attach the ECR policy according to the authentication type.
Provide the following additional information apart from the common fields:
Registry URL
Example of URL format: xxxxxxxxxxxx.dkr.ecr.<region>.amazonaws.com where xxxxxxxxxxxx is your 12-digit AWS account ID
Authentication Type
Select one of the authentication types:
EC2 IAM Role: Authenticate with workernode IAM role and attach the ECR policy (AmazonEC2ContainerRegistryFullAccess) to the cluster worker nodes IAM role of your Kubernetes cluster.
User Auth: It is a key-based authentication, attach the ECR policy (AmazonEC2ContainerRegistryFullAccess) to the .
Access key ID
Provide the following additional information apart from the common fields:
Username
Provide the username of the Docker Hub account you used for creating your registry.
Password/Token
Provide the password/ corresponding to your docker hub account. It is recommended to use Token for security purpose.
For Azure, the service principal authentication method can be used to authenticate with username and password. Visit this link to get the username and password for this registry.
Provide the following additional information apart from the common fields:
Registry URL/Login Server
Example of URL format: xxx.azurecr.io
Username/Registry Name
Provide the username of your Azure container registry
Password
Provide the password of your Azure container registry
JSON key file authentication method can be used to authenticate with username and service account JSON file. Visit this link to get the username and service account JSON file for this registry.
Remove all the white spaces from JSON key and wrap it in a single quote before pasting it in Service Account JSON File field
Provide the following additional information apart from the common fields:
Registry URL
Example of URL format: region-docker.pkg.dev
Service Account JSON File
Paste the content of the service account JSON file
Provide the following additional information apart from the common fields:
Username
Provide the username of your Quay account
Token
Provide the password of your Quay account
Provide below information if you select the registry type as Other.
Registry URL
Enter the URL of your private registry
Username
Provide the username of your account where you have created your registry
Password/Token
Provide the password or token corresponding to the username of your registry
Advanced Registry URL Connection Options
Allow Only Secure Connection: Tick this option for the registry to allow only secure connections
Allow Secure Connection With CA Certificate: Tick this option for the registry to allow secure connection by providing a private CA certificate (ca.crt)
Allow Insecure Connection: Tick this option to make an insecure communication with the registry (for e.g., when SSL certificate is expired)
Kibana
Newrelic
Coralogix
Datadog
Loki
Cloudwatch
Swagger
Jira etc.
To monitor/debug an application using a specific Monitoring Tool (such as Grafana, Kibana, etc.), you may need to navigate to the tool's page, then to the respective app/resource page.
External Links can take you directly to the tool's page, which includes the context of the application, environment, pod, and container.
Before you begin, configure an application in the Devtron dashboard.
Super admin access
Monitoring tool URL
Note: External links can only be added/managed by a super admin, but non-super admin users can access the configured external links on the App Configuration page of Helm App.
On the Devtron dashboard, go to the Global Configurations from the left navigation pane.
Select External links.
Select Add Link.
On the Add Link page, select the external link (e.g. Grafana) which you want to link to your application from Webpage.
The following fields are provided on the Add Link page:
Link name
Provide name of the link.
Description
Description of the link name.
Show link in
All apps in specific clusters: Select this option to select the cluster.
Specific applications: Select this option to select the application.
Clusters
Choose the clusters for which you want to configure the selected external link with.
Select one or more than one cluster to enable the link on the specified clusters.
Select All Clusters to enable the link on all the clusters.
Applications
Choose the application for which you want to configure the selected external link with.
Select one or more than one application to enable the link on the specified application.
Select All applications to enable the link on all the applications.
URL Template
The configured URL Template is used by apps deployed on the selected clusters/applications. By combining one or more of the env variables, a URL with the structure shown below can be created: http://www.domain.com/{namespace}/{appName}/details/{appId}/env/{envId}/details/{podName} If you include the variables {podName} and {containerName} in the URL template, then the configured links (e.g. Grafana) will be visible only on the pod level and container level respectively. The env variables:
{appName}
{appId}
{envId}
Note: To add multiple links, select + Add another at the top-left corner.
Click Save.
The users (admin and others) can access the configured external link on the App Details page.
On the External Links page, the configured external links can be filtered/searched, as well as edited/deleted.
Select Global Configurations > External links.
Filter and search the links based on the link's name or a user-defined name.
Edit a link by selecting the edit icon next to an external link.
Delete an external link by selecting the delete icon next to a link. The bookmarked link will be removed in the clusters for which it was configured.
There are two parts involved in the creation of a desirable resource catalog:
Go to Global Configurations → Catalog Framework.
Choose a resource type, for which you wish to define a schema, for e.g., Helm applications.
You can edit the schema name and description.
There is a sample schema available for you to create your own customized schema. Using this schema, you can decide the input types that renders within the form, for e.g., a dropdown of enum values, a boolean toggle button, text field, label, and many more.
After defining your schema, click Review Changes.
You get a side-by-side comparison (diff) highlighting the changes you made.
Click Save.
Similarly, you can define schemas for other resource types.
Note: If you edit a field (of an existing schema) for which users have already filled the data, that data will be erased. You will receive a prompt (as shown below) to confirm whether you want to proceed with the changes.
Once a catalog schema exists for a resource type, its corresponding form would be available in the overview section of that resource type.
Since we defined a schema for Helm applications in the above example, go to the Overview tab of your application (any Helm application). Click the Edit button within the About section.
The schema created for Helm applications would render into an empty form as shown below.
Fill as many details as an application owner to the best of your knowledge and click Save.
Your saved data would be visible in a GUI format (and also in JSON format) as shown below.
This catalog data would be visible to all the users who have access to the application, but its data can be edited only by the resource owners (in this case, application admin/managers).
Go to Global Configurations → Authorization → Permissions groups → Add group.
Enter the Group Name and Description.
You can either grant super-admin permission to a user group or specific permissions to manage access for:
In Helm Apps option, you can provide access to a group to manage permission for Helm apps deployed from Devtron or outside Devtron.
Provide the information in the following fields:
Project
Select a project from the drop-down list to which you want to give permission to the group. You can select only one project at a time.
Note: If you want to select more than one project, then click Add row.
Environment or cluster/namespace
Select the specific environment or all existing environments in default cluster from the drop-down list.
Note: If you select all existing + future environments in default cluster option, then a user gets access to all the current environments including any new environment which gets associated with the application later.
Application
Select the specific application or all applications from the drop-down list corresponding to your selected Environments.
Note: If All applications option is selected, then a user gets access to all the current applications including any new application which gets associated with the project later
.
Role
Select one of the to which you want to give permission to the user:
View only
View & Edit
Admin
You can add multiple rows for Devtron app permission.
Once you have finished assigning the appropriate permissions for the groups, Click Save.
In Kubernetes Resources option, you can provide permission to view, inspect, manage, and delete resources in your clusters from Resource Browser in Devtron. You can also create resources from Resource Browser.
To provide Kubernetes resource permission, click Add permission.
On the Kubernetes resource permission, provide the information in the following fields:
Cluster
Select a cluster from the drop-down list to which you want to give permission to the user. You can select only one cluster at a time.
Note: To add another cluster, then click Add another.
Namespace
Select the namespace from the drop-down list.
API Group
Select the specific API group or All API groups from the drop-down list corresponding to the K8s resource.
Kind
Select the kind or All kind from the drop-down list corresponding to the K8s resource.
Resource name
Select the resource name or All resources from the drop-down list to which you want to give permission to the user.
Role
Select one of the to which you want to give permission to the user and click Done:
View
Admin
You can add multiple rows for Kubernetes resource permission.
Once you have finished assigning the appropriate permissions for the groups, Click Save.
You can edit the permission groups by clicking the downward arrow.
Edit the permission group.
Once you are done editing the permission group, click Save.
If you want to delete a particular permission group, click the delete icon.
From the left sidebar, go to Chart Store.
You can find your chart(s) either by using the search bar or by selecting your chart source.
You have successfully pulled your charts to the chart store.
Deprecated charts won't show up in the Chart Store unless you enable the Show deprecated charts filter as shown below
Or, you may try performing a chart resync as shown below:
To add a user, go to the Authorization > User Permissions section of Global Configurations. Click Add user.
There are two types of permissions in Devtron:
To assign a super admin access, go to the Authorization > User Permissions section of Global Configurations.
Click Add user.
Provide the email address of a user. You can add more than one email address. Please note that email address must be same as that in the email field in the JWT token returned by OIDC provider.
Select Super admin permission and click Save.
Note:
Only users with Super admin permission can assign super admin permissions to a user.
We suggest that super admin access must be given to the selected users only.
To assign a specific permission, go to the Authorization > User Permissions section of Global Configurations.
Click Add user.
Provide the email address of a user. You can add more than one email address. Please note that email address must be same as that in the email field in the JWT token returned by OIDC provider.
Select Specific permissions.
In Helm Apps option, you can provide access to a user to manage permission for Helm apps deployed from Devtron or outside Devtron.
Provide the information in the following fields:
You can add multiple rows for Helm app permission.
Once you have finished assigning the appropriate permissions for the users, Click Save.
In Kubernetes Resources option, you can provide permission to view, inspect, manage, and delete resources in your clusters from page in Devtron. You can also create resources from the Resource Browser.
Note: Only super admin users will be able to see Kubernetes Resources tab and provide permission to other users to access Resource Browser.
To provide Kubernetes resource permission, click Add permission.
On the Kubernetes resource permission, provide the information in the following fields:
Role-based Access Levels
Devtron supports the following levels of access:
View only: User with View only access has the least privilege. This user can only view the combination of environments and helm charts whose access is granted to that user. This user cannot view sensitive data like secrets used in the charts.
View and Edit: User with View and Edit access can view as well as edit the helm charts whose access is granted to that user.
Admin: User with Admin access can create, edit, delete, and view permitted Helm apps in the permitted projects.
You can add multiple rows for Kubernetes resource permission.
Once you have finished assigning the appropriate permissions for the users, Click Save.
Direct user permissions cannot be edited if you're using / for SSO and 'auto-assign permission' is enabled. Permissions can only be in such a scenario.
You can edit the user permissions by clicking the edit icon.
Edit the user permissions.
After you have done editing the user permissions, click Save.
If you want to delete the user/users with particular permissions, click Delete.

apiVersion: crd.devtron.ai/alpha1
kind: GuiSchema
metadata:
creationTimestamp: 2024-11-08T13:01:00Z
generation: 1
name: devtron-pod-gui
resourceVersion: "216257"
uid: 70e91158-288e-4c4a-8448-012e820148ca
spec:
applyTo:
    - group: ""
    kind: Pod
    version: v1
schema: |
    {
    "title": "Pod Configuration",
    "description": "A form to create a Kubernetes pod manifest",
    "type": "object",
    "required": [
        "metadata",
        "spec"
    ],
    "properties": {
        "metadata": {
        "type": "object",
        "properties": {
            "name": {
            "type": "string",
            "title": "Pod Name",
            "default": "my-pod",
            "pattern": "^[a-z0-9][a-z0-9-]*[a-z0-9]$",
            "description": "Lower case letters, numbers, and hyphens only"
            }
        }
        },
        "spec": {
        "type": "object",
        "required": [
            "containers"
        ],
        "properties": {
            "containers": {
            "type": "array",
            "minItems": 1,
            "items": {
                "type": "object",
                "required": [
                "name",
                "image"
                ],
                "properties": {
                "name": {
                    "type": "string",
                    "title": "Container Name",
                    "default": "container-1",
                    "pattern": "^[a-z0-9][a-z0-9-]*[a-z0-9]$",
                    "description": "Lower case letters, numbers, and hyphens only"
                },
                "image": {
                    "type": "string",
                    "title": "Container Image",
                    "description": "Docker image name with optional tag (e.g., nginx:1.14.2)"
                },
                "ports": {
                    "type": "array",
                    "title": "Container Ports",
                    "items": {
                    "type": "object",
                    "required": [
                        "containerPort"
                    ],
                    "properties": {
                        "containerPort": {
                        "type": "integer",
                        "title": "Port Number",
                        "minimum": 1,
                        "maximum": 65535
                        }
                    }
                    }
                }
                }
            }
            }
        }
        }
    }
    }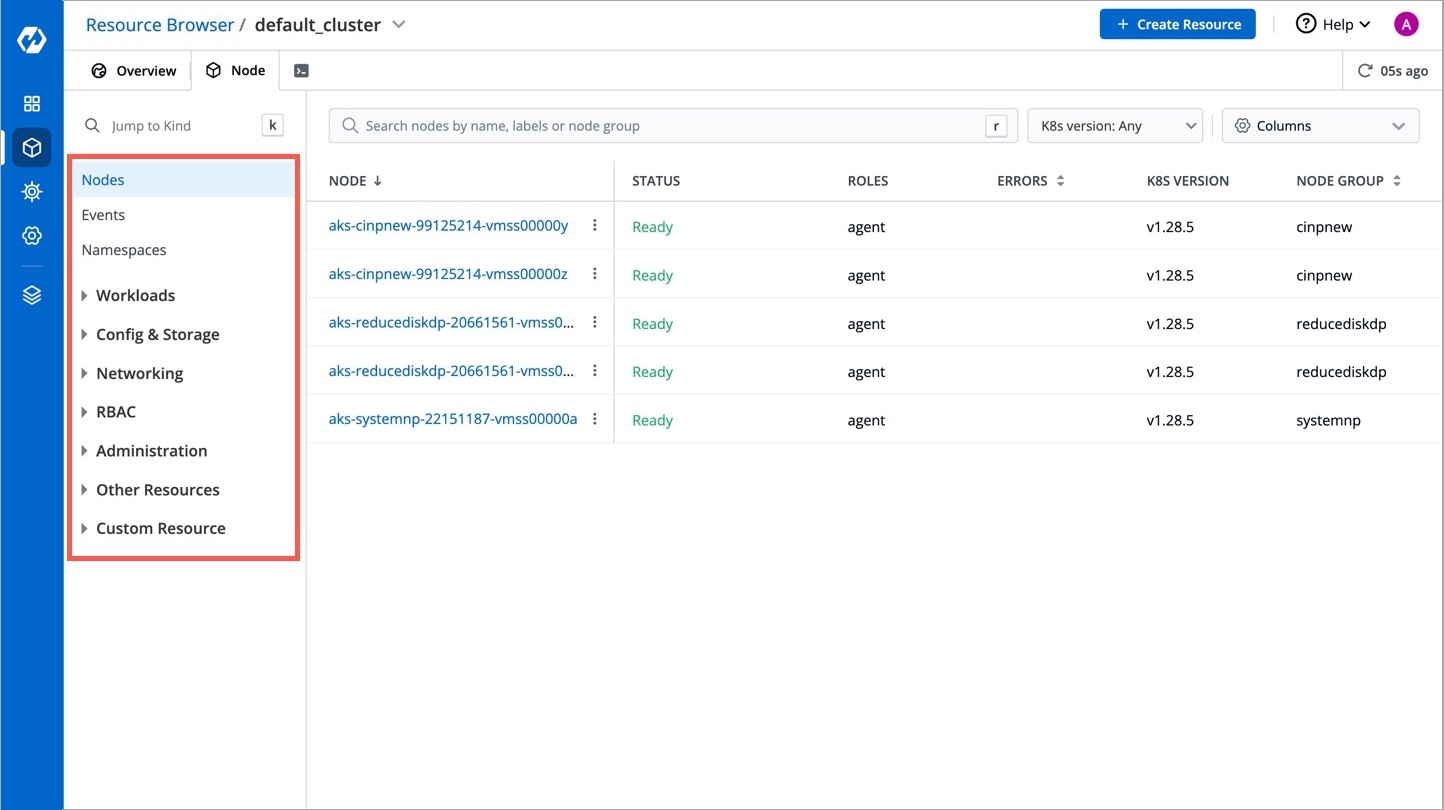
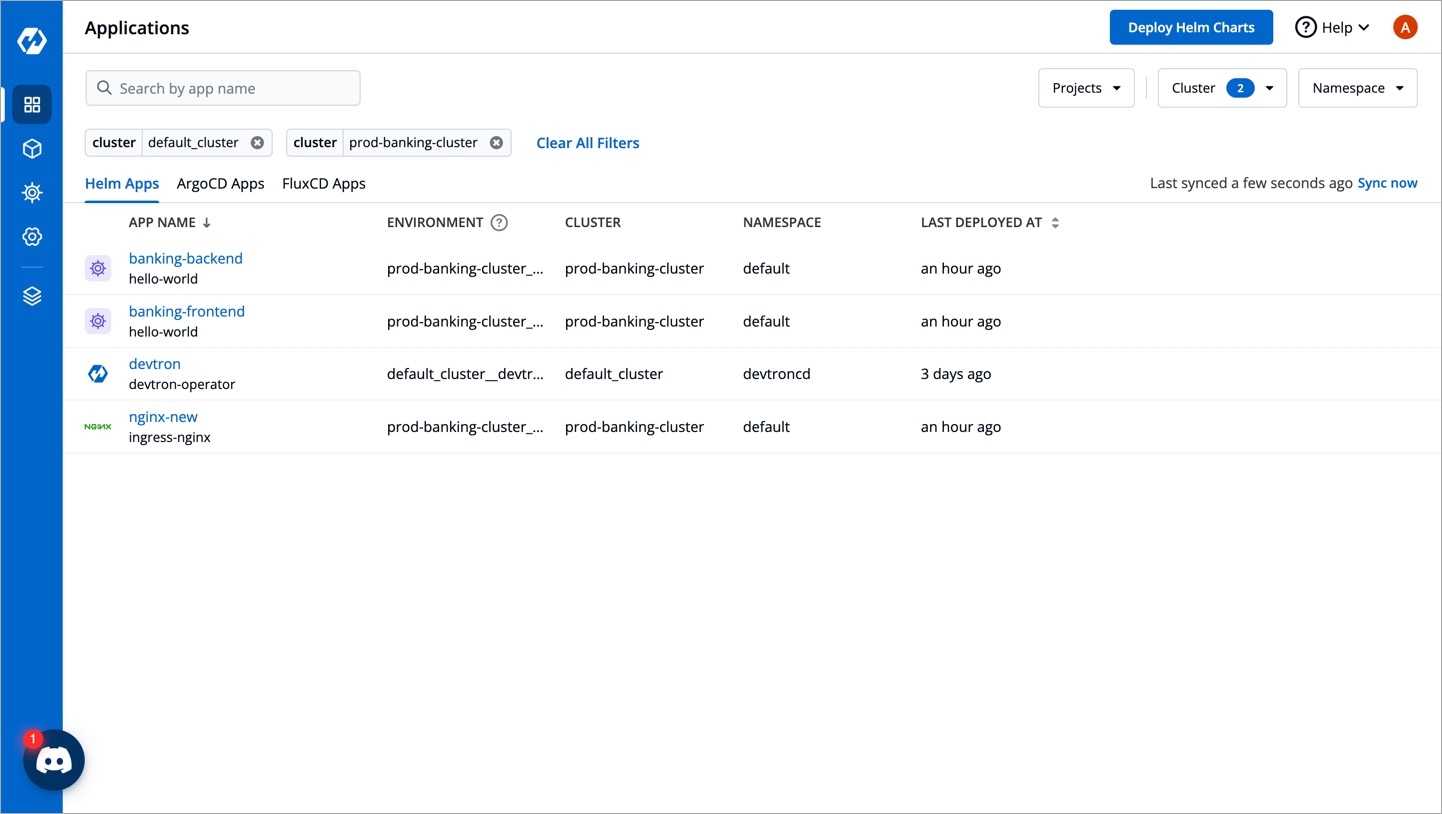
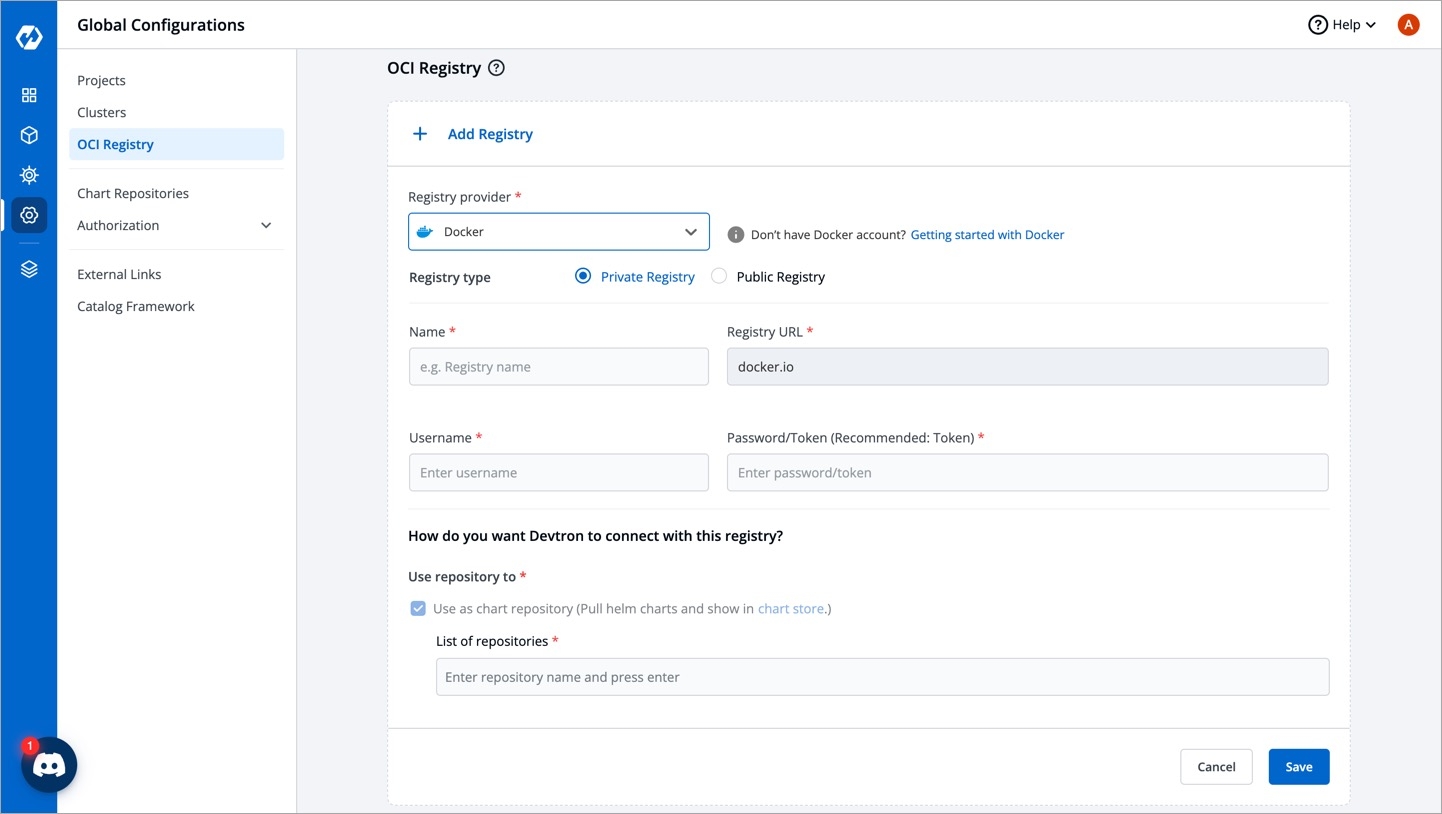
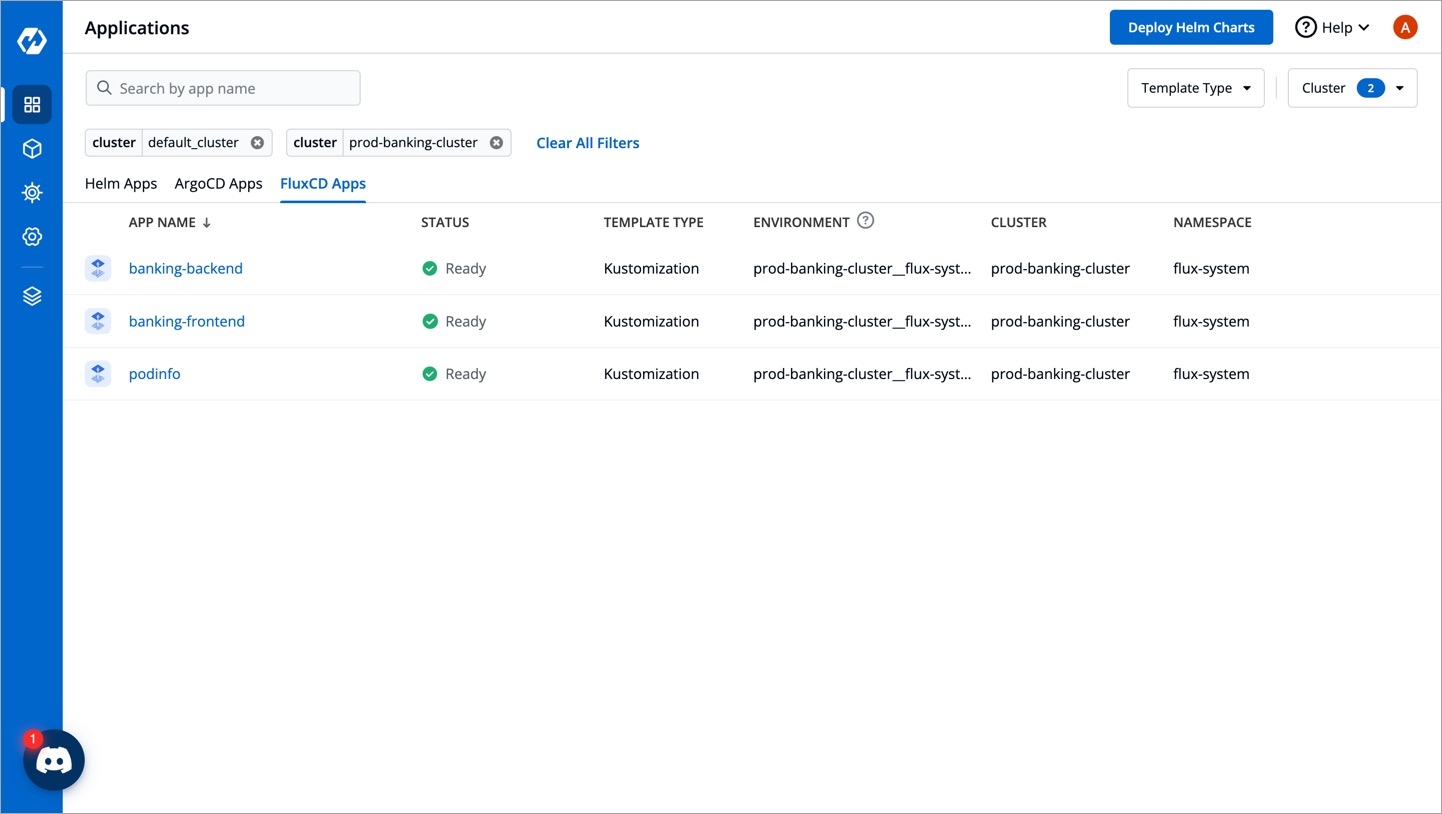
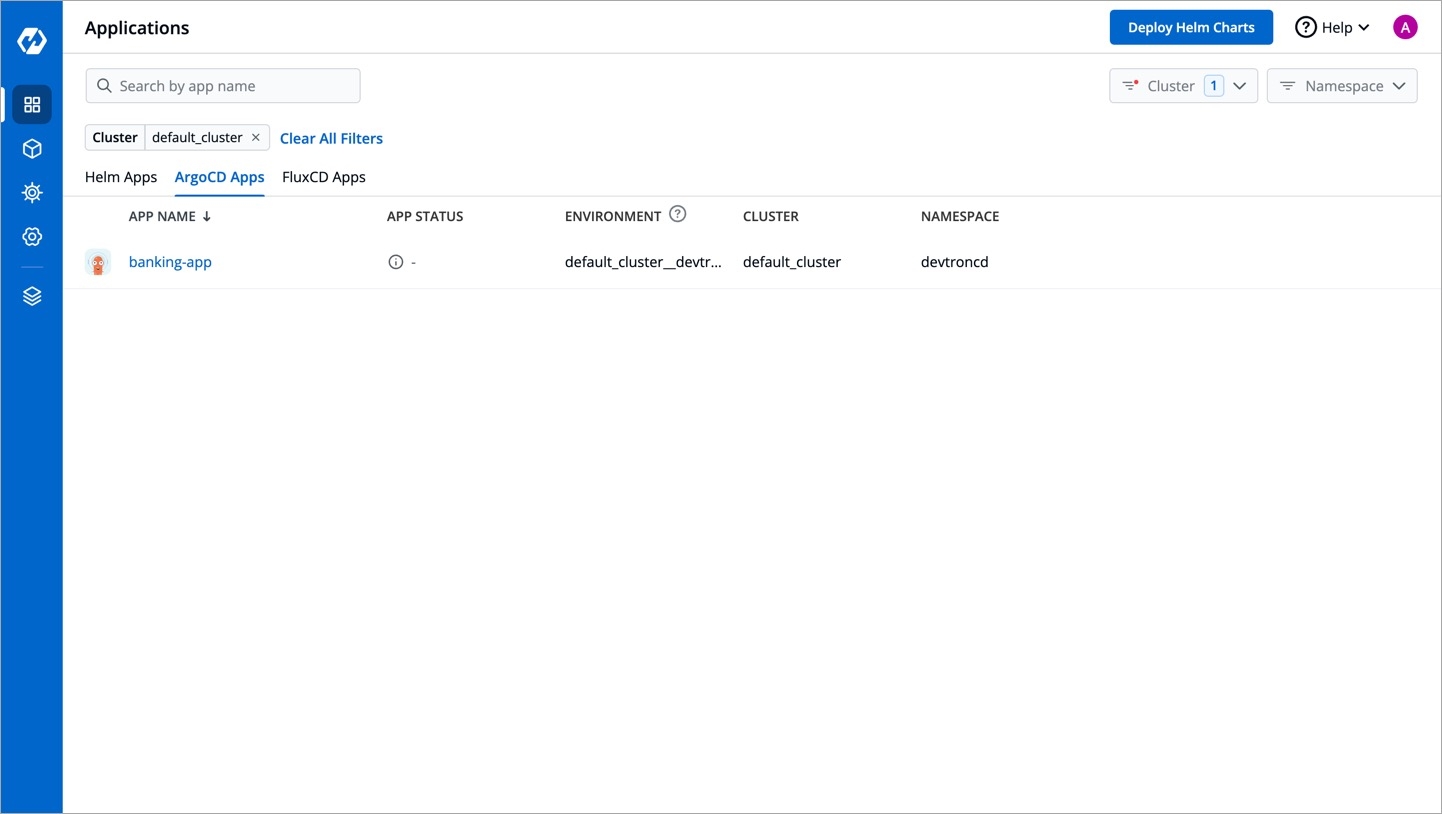
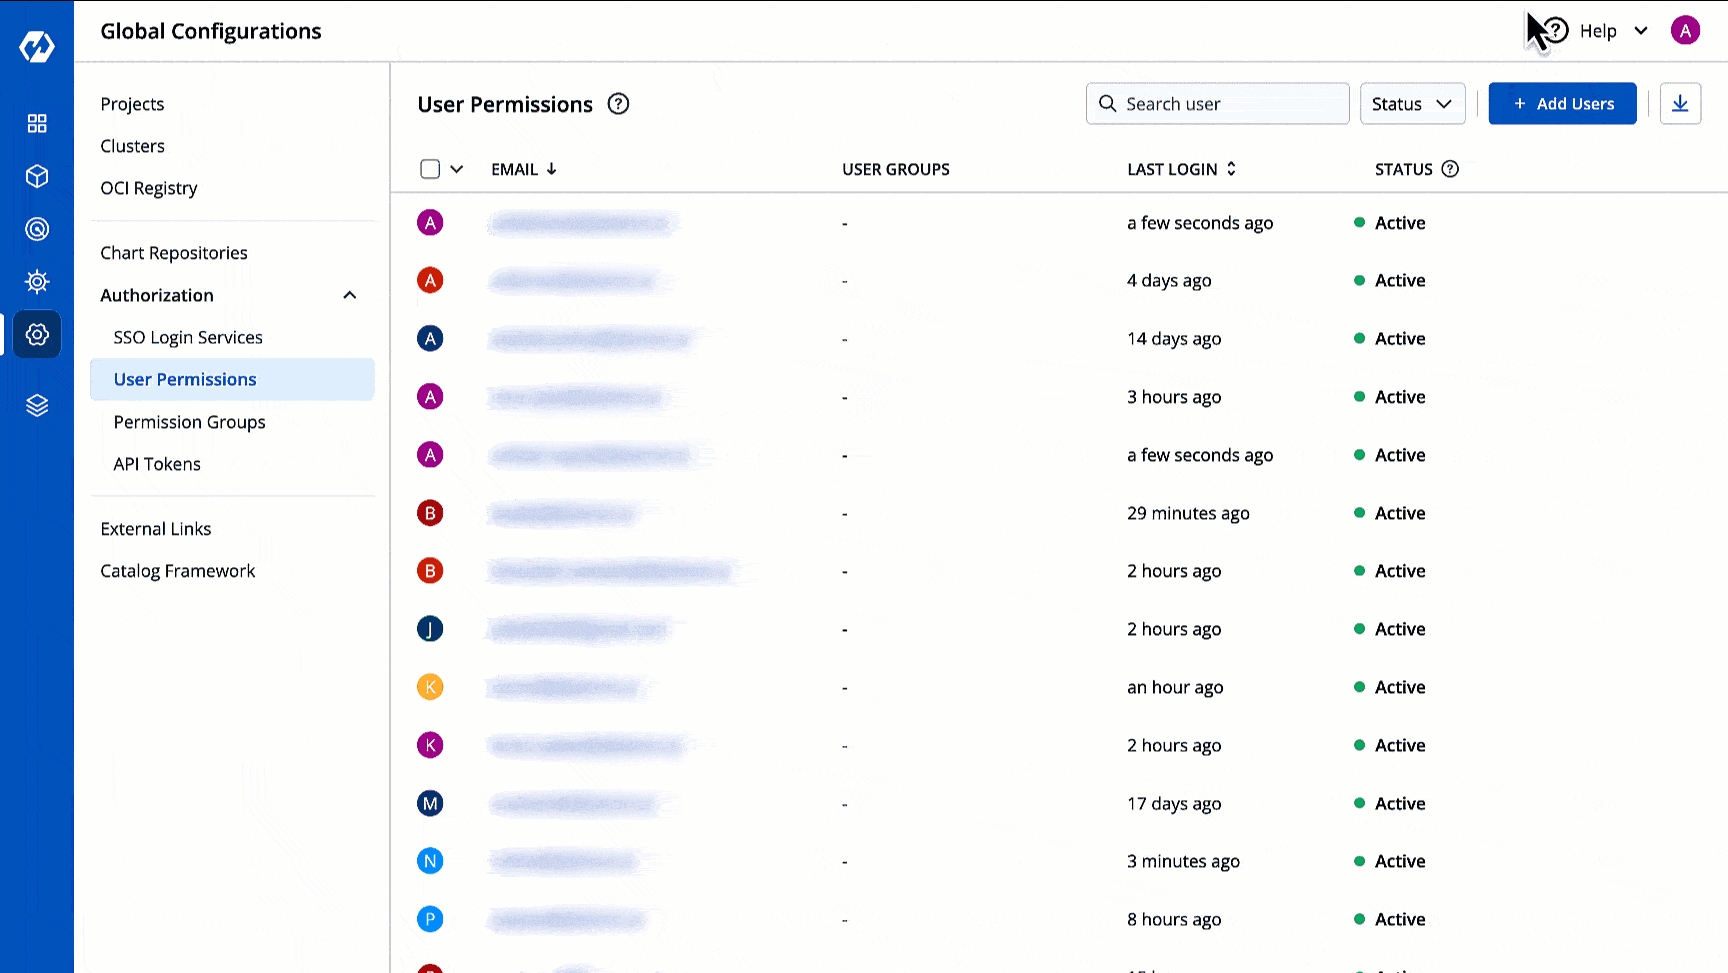
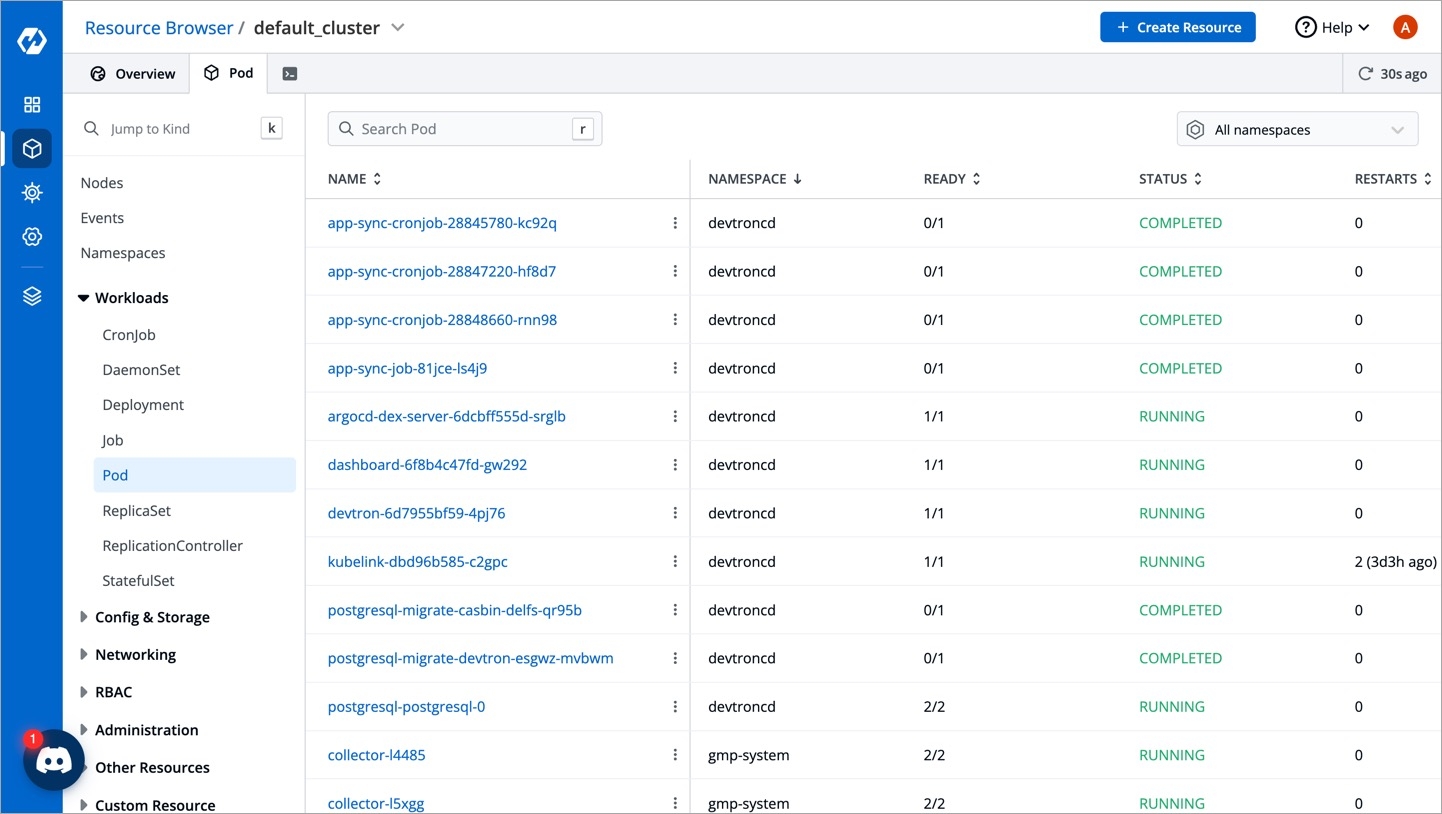
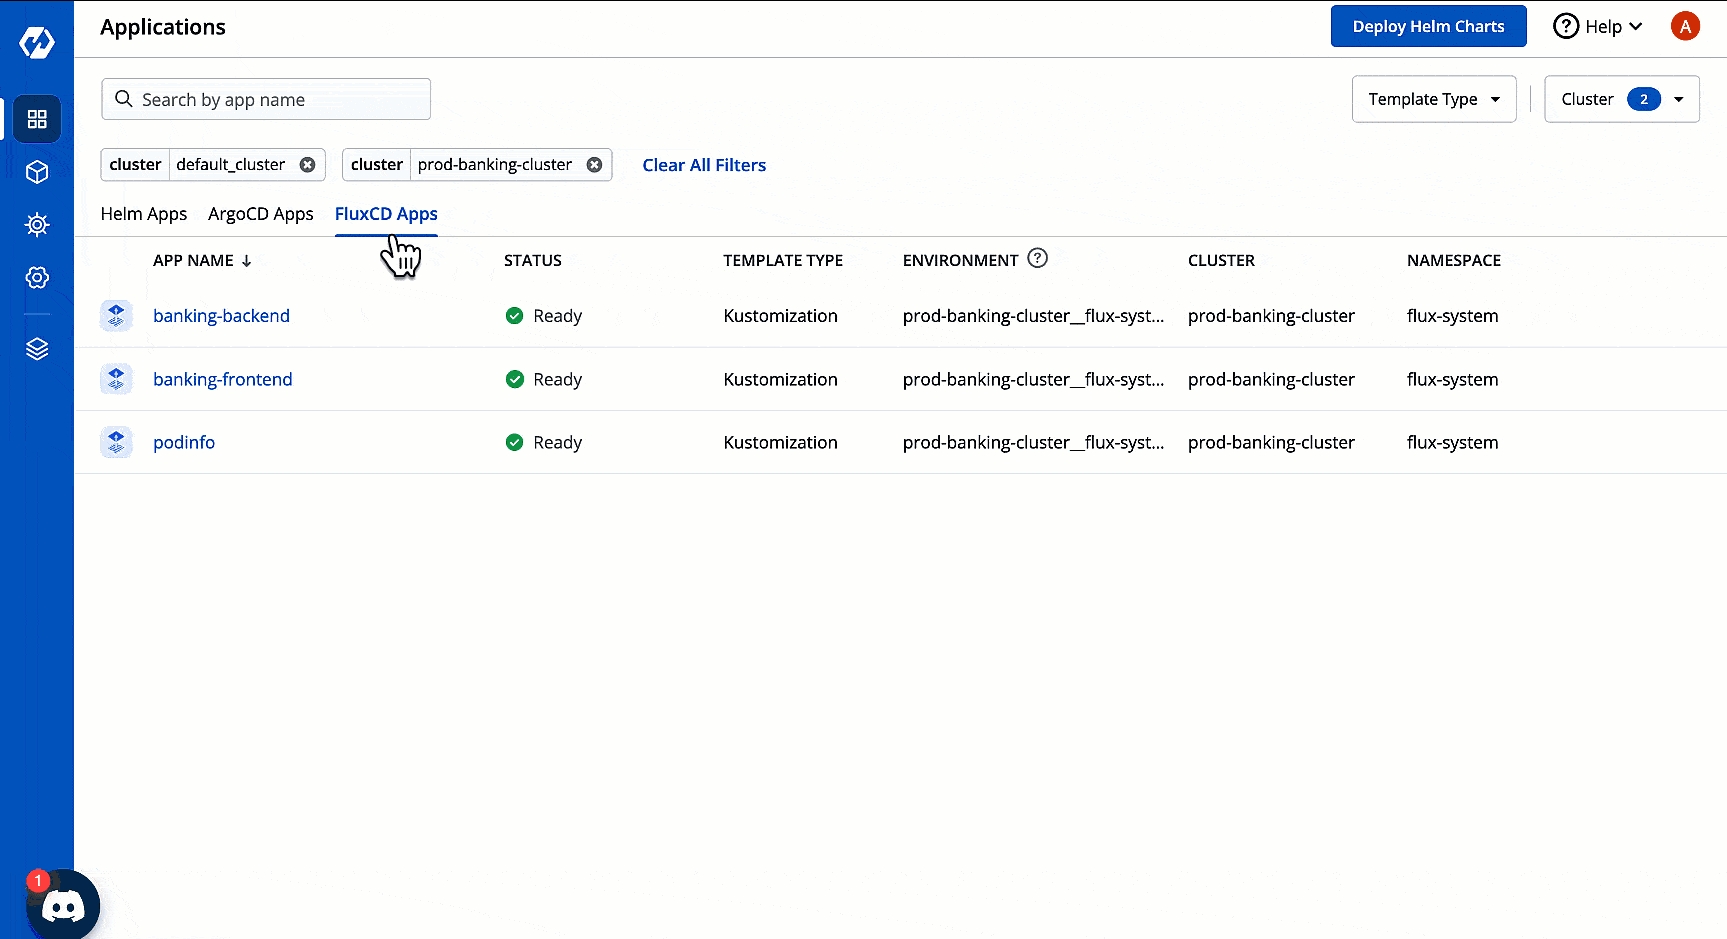

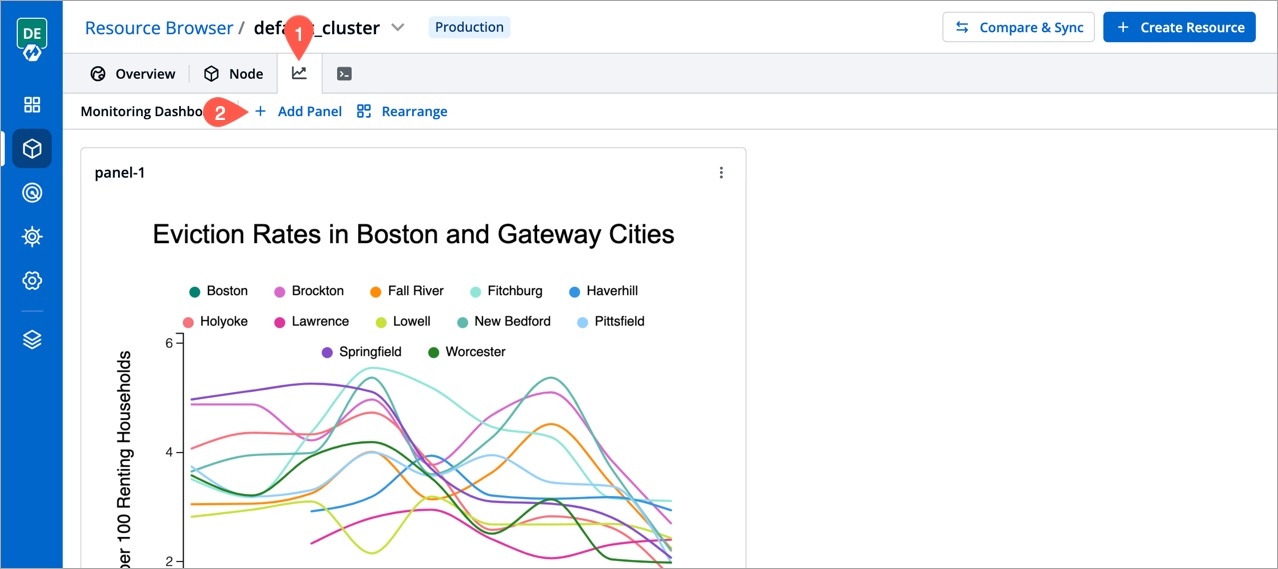
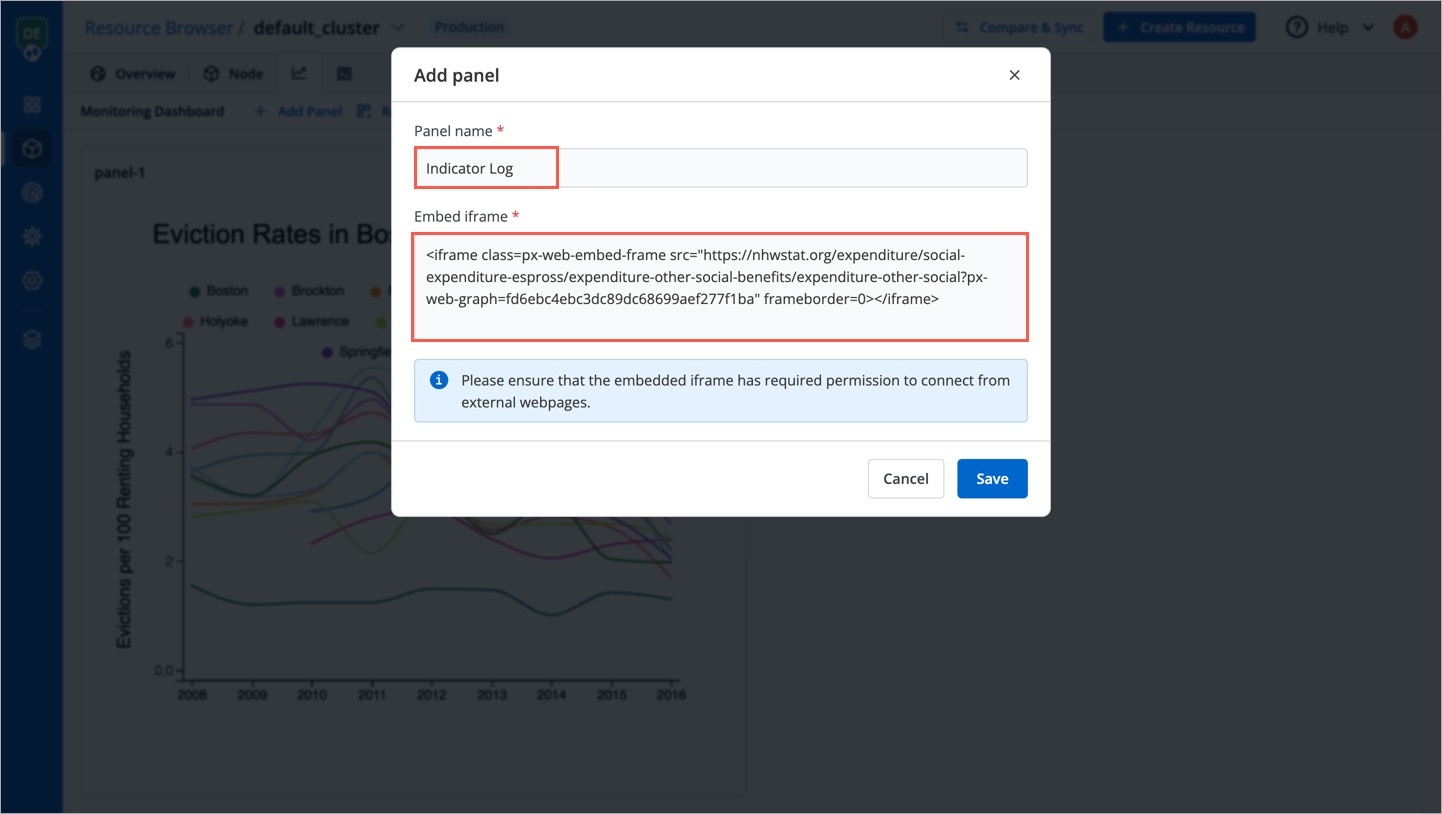
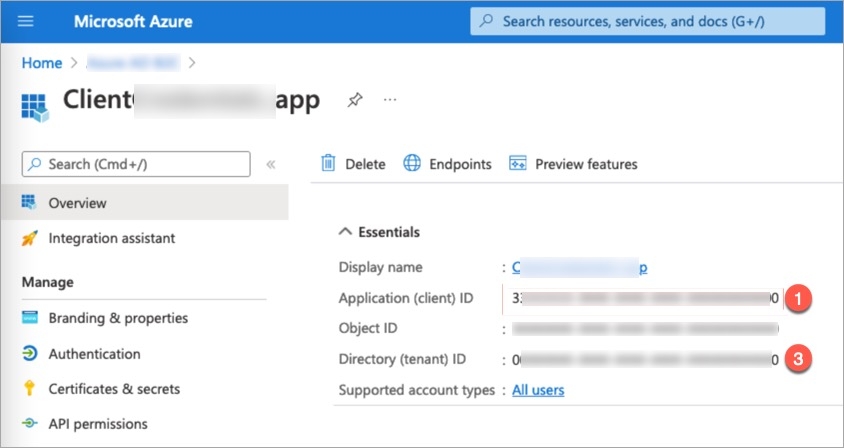
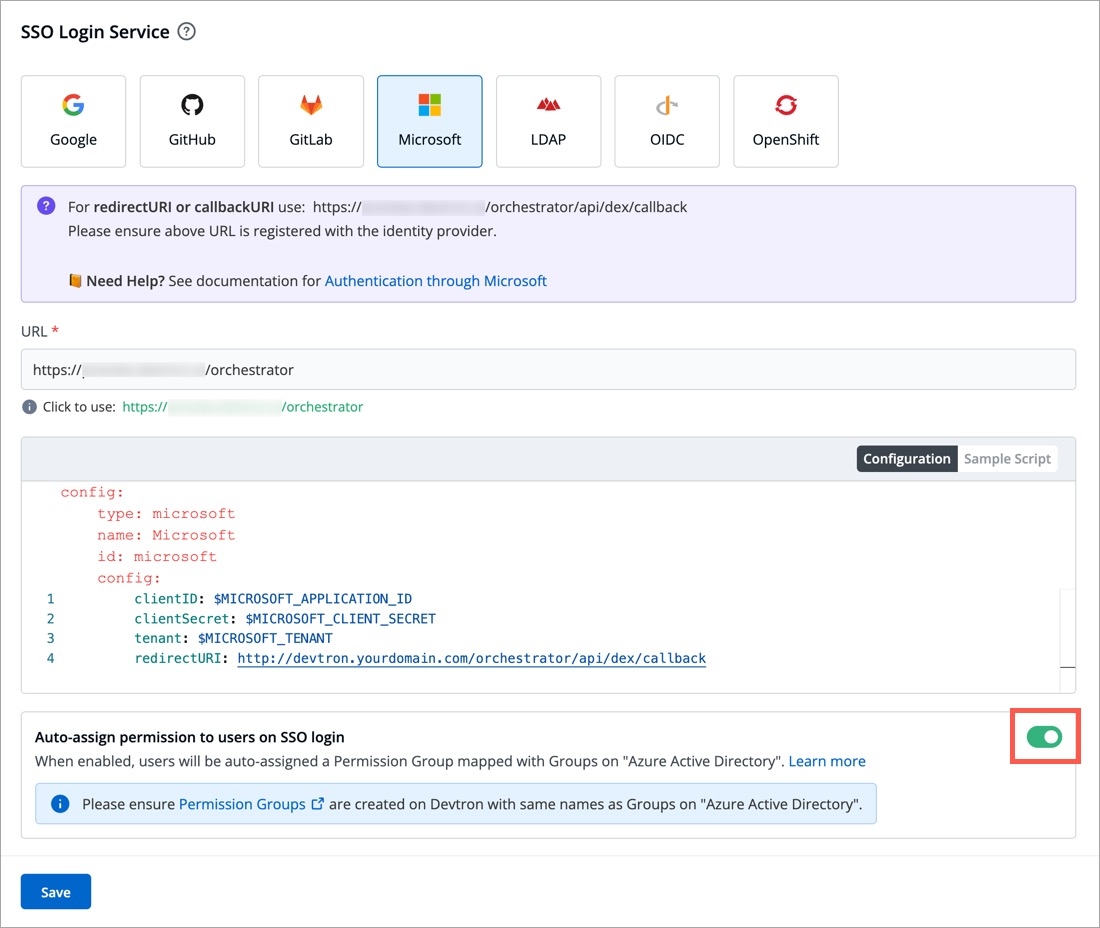
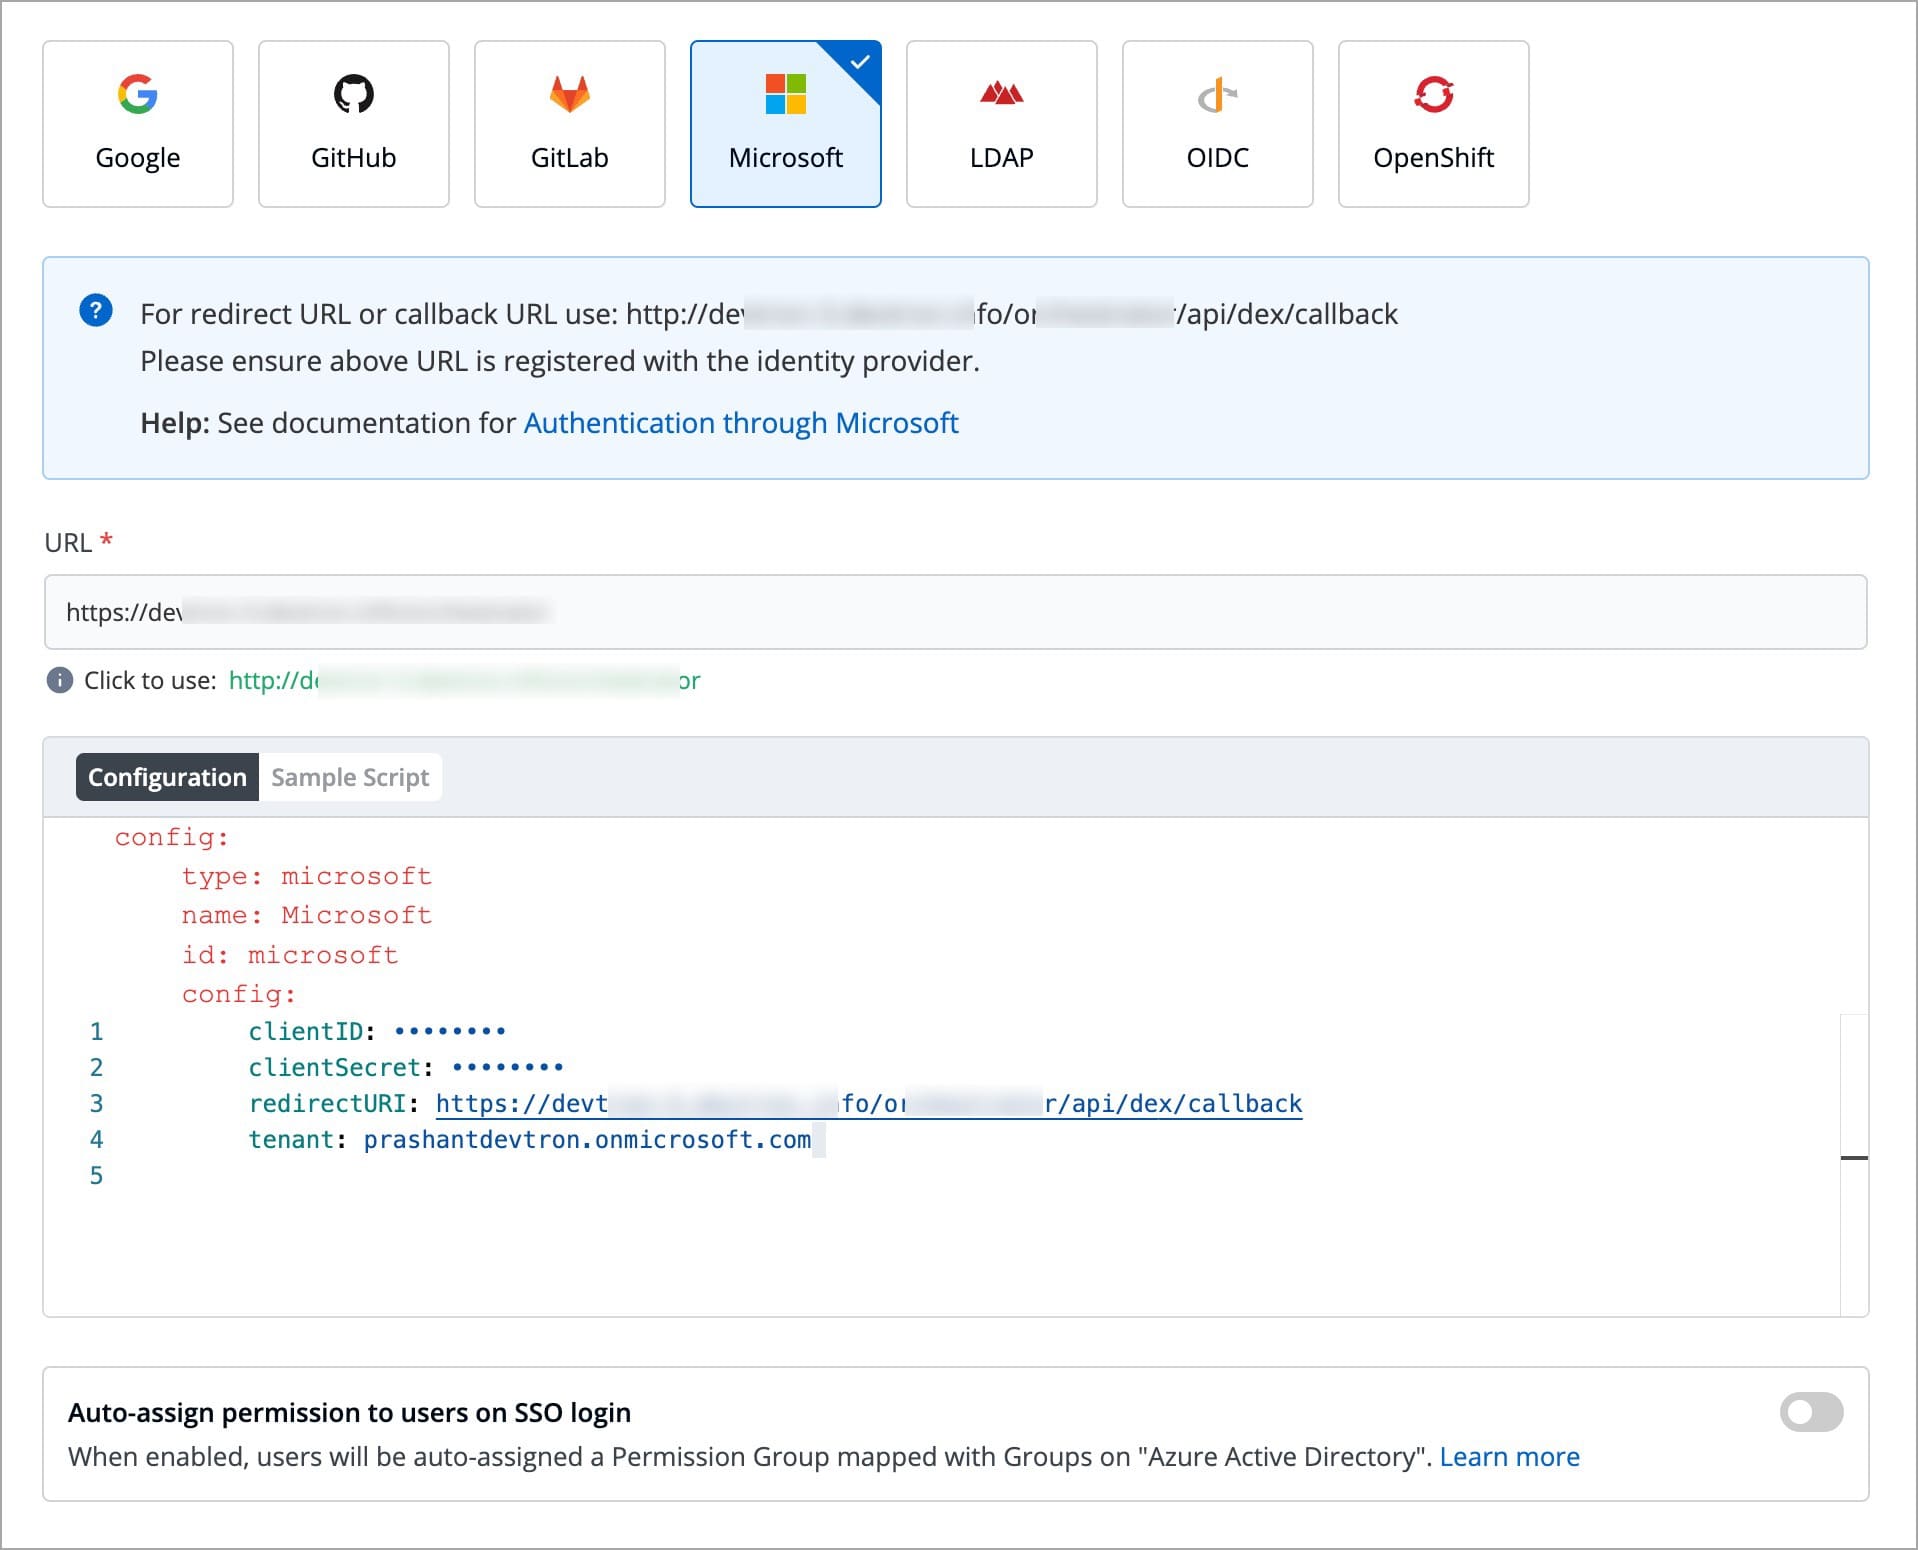
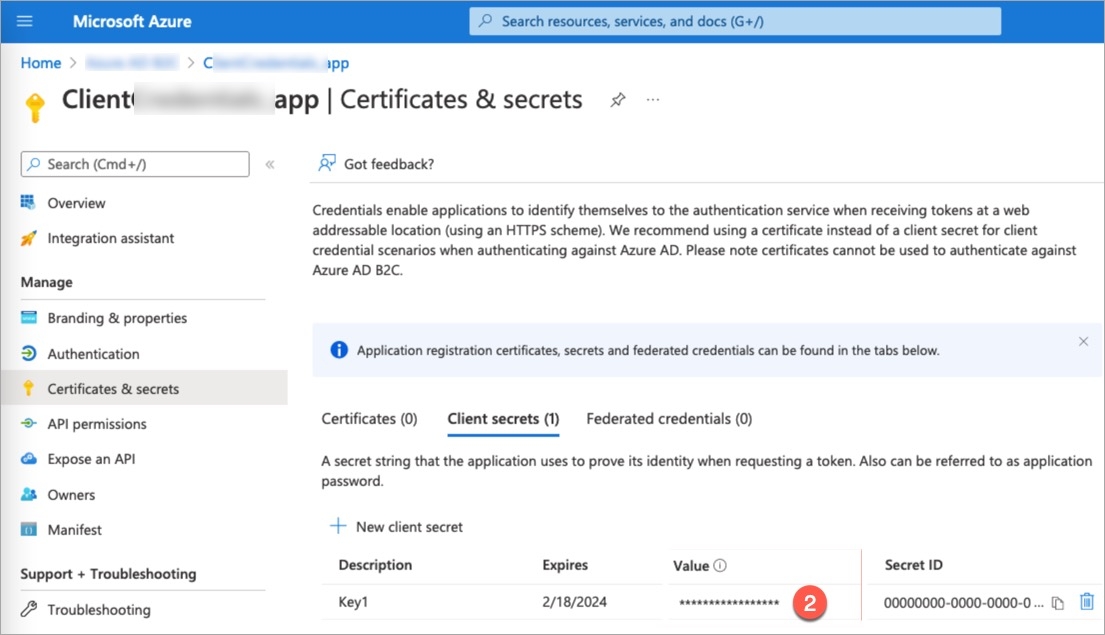
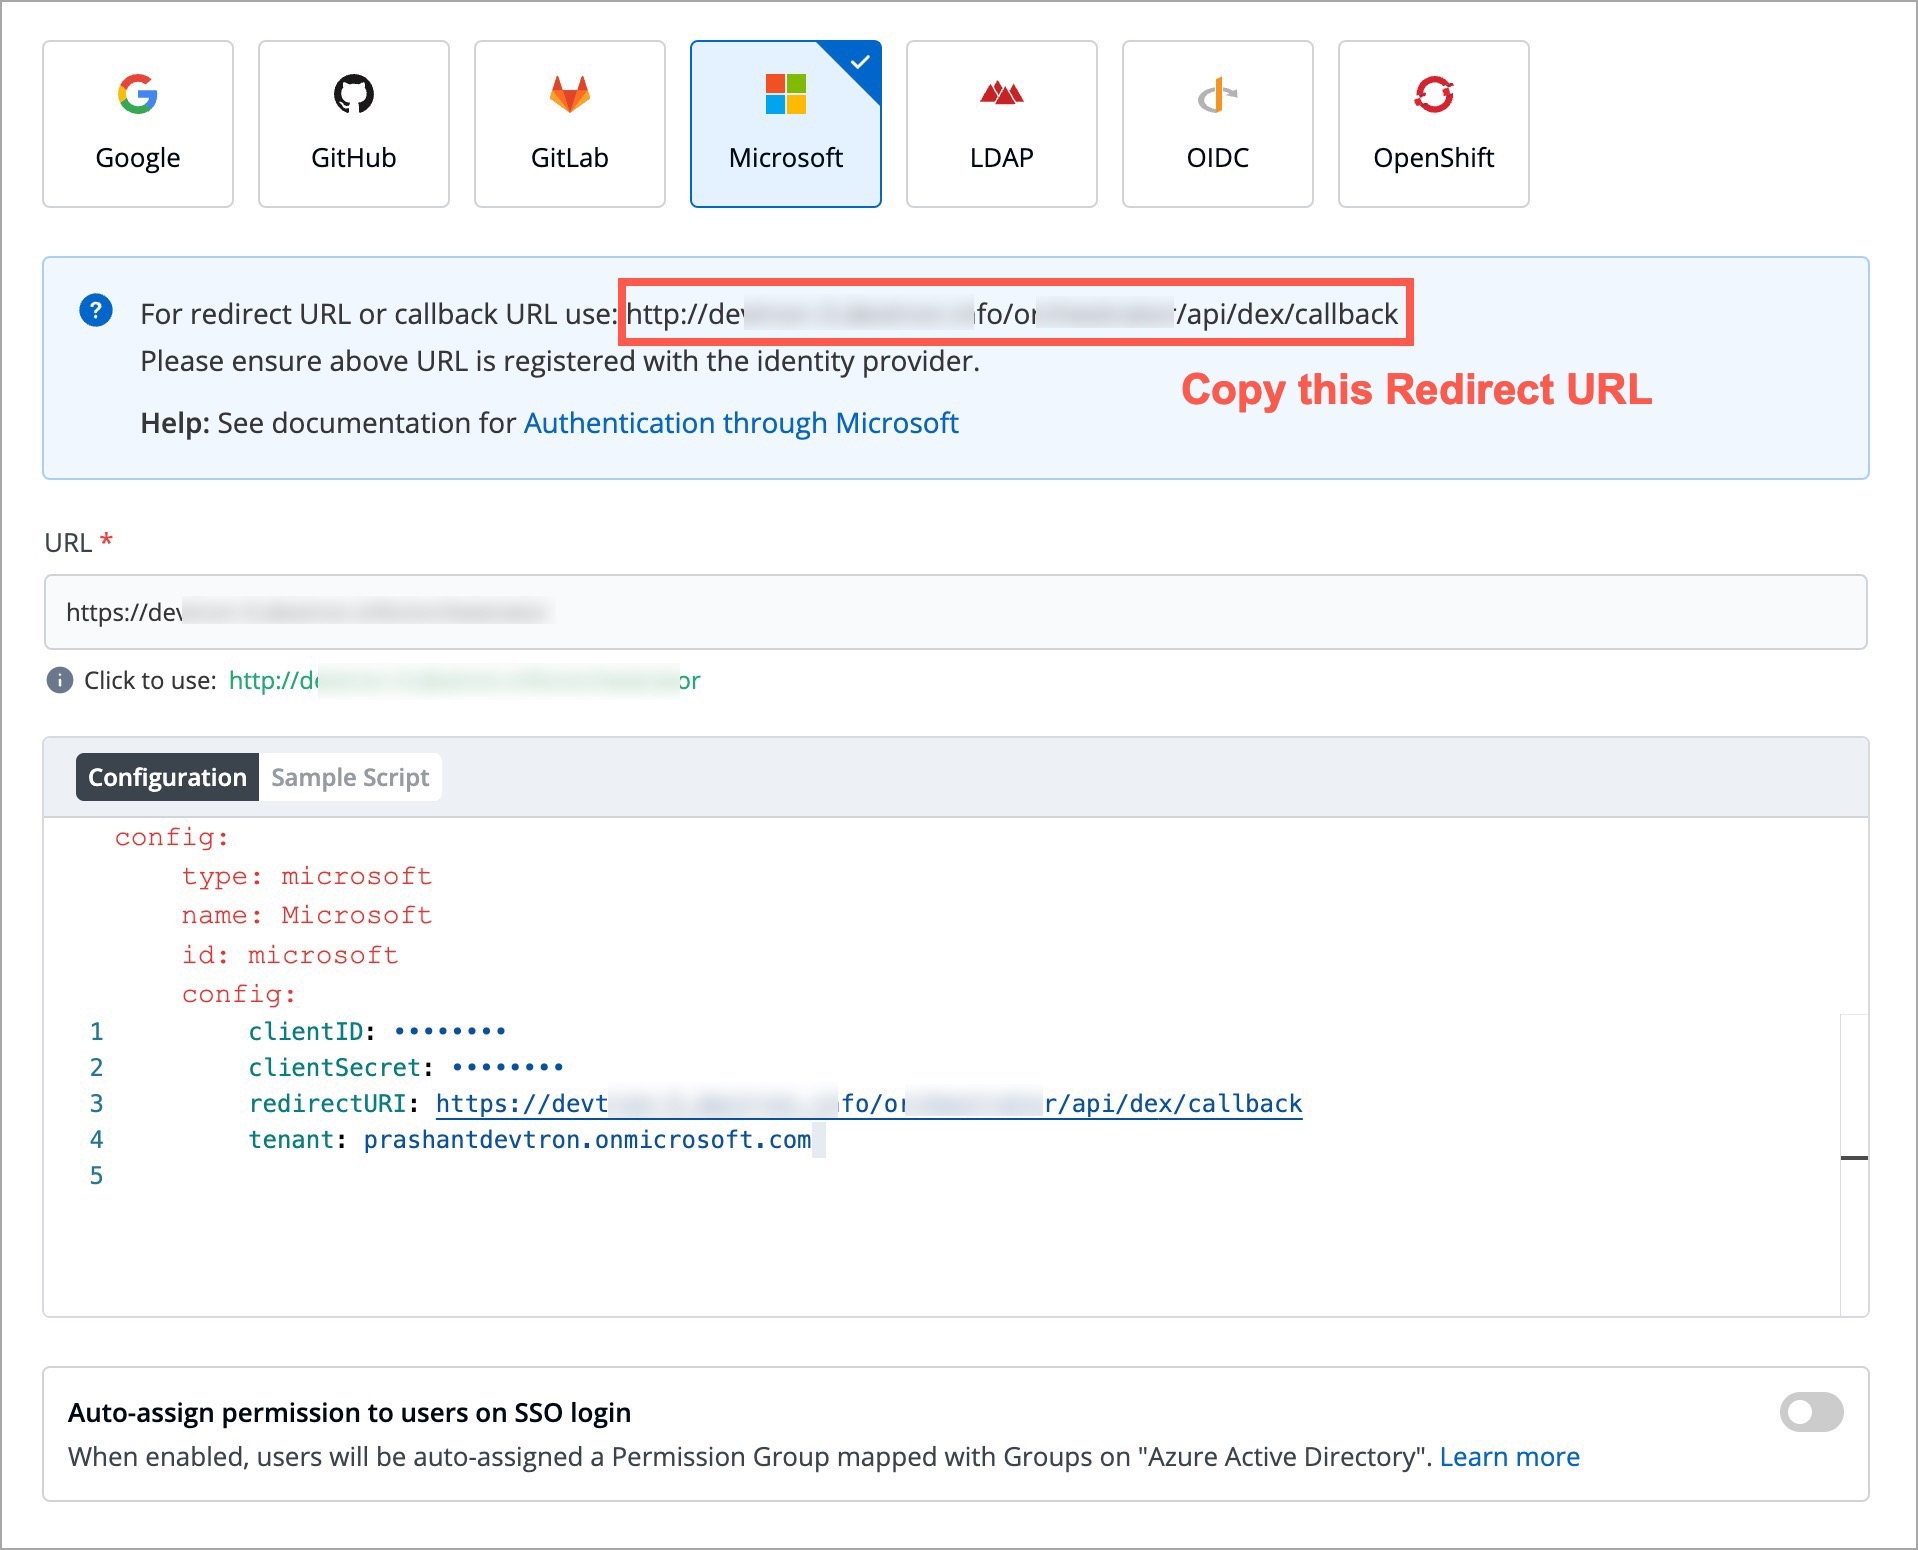

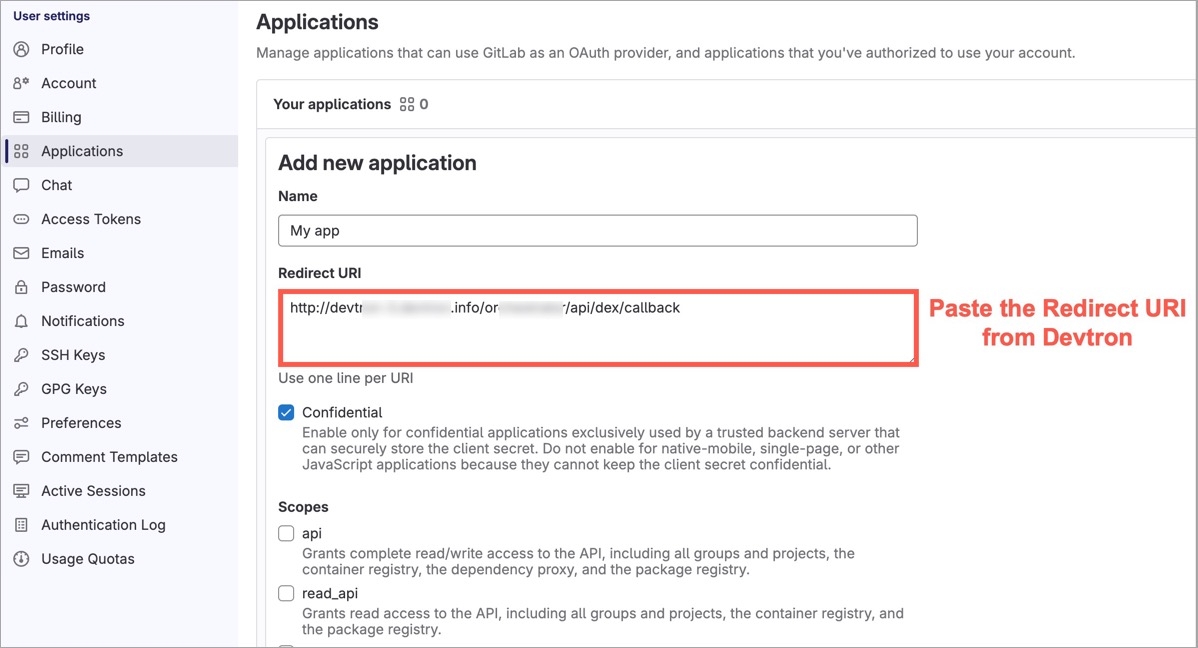
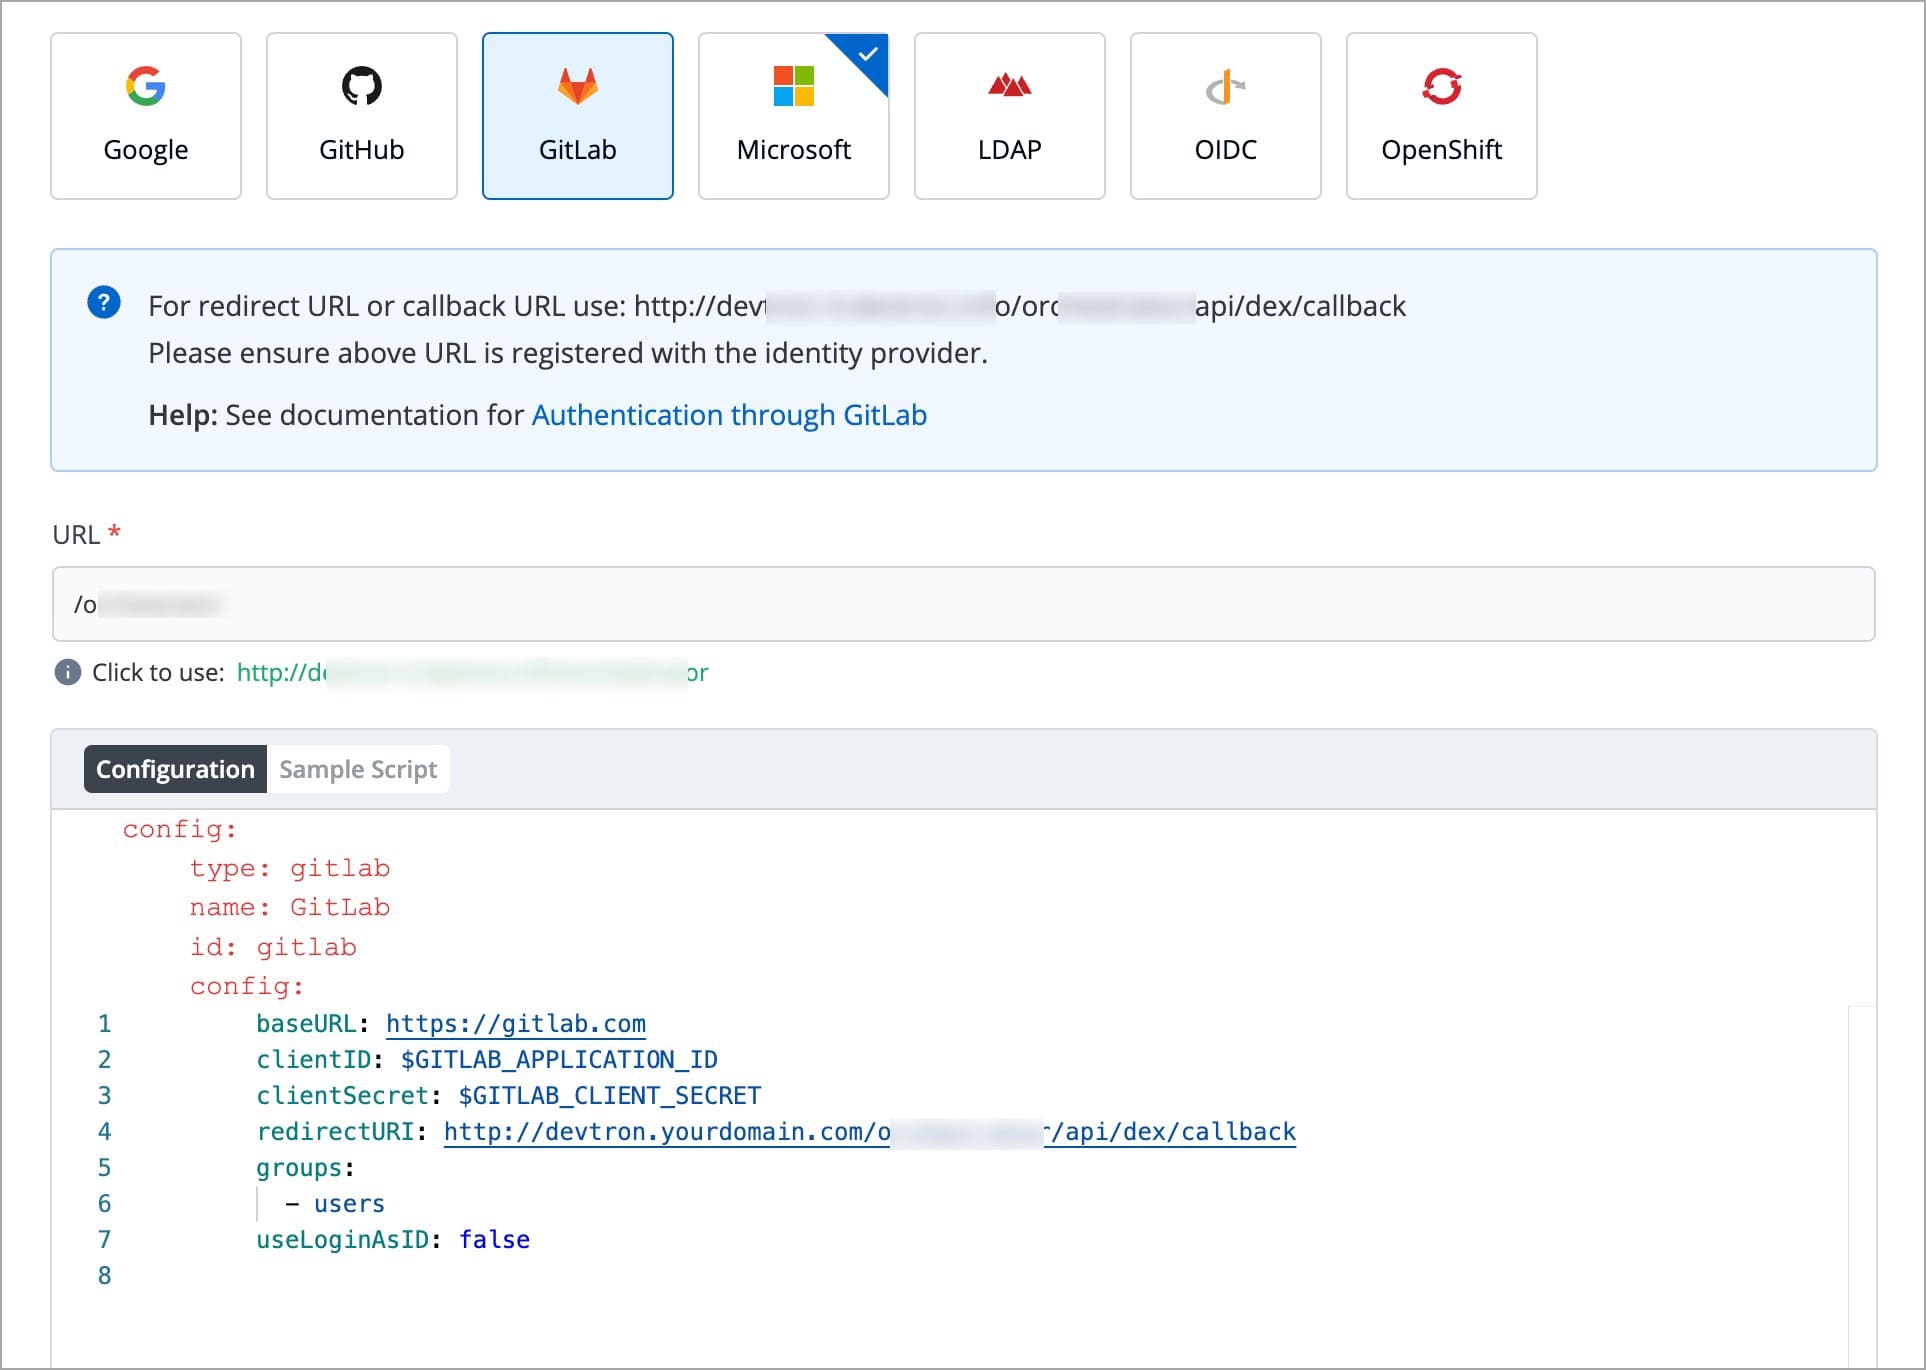
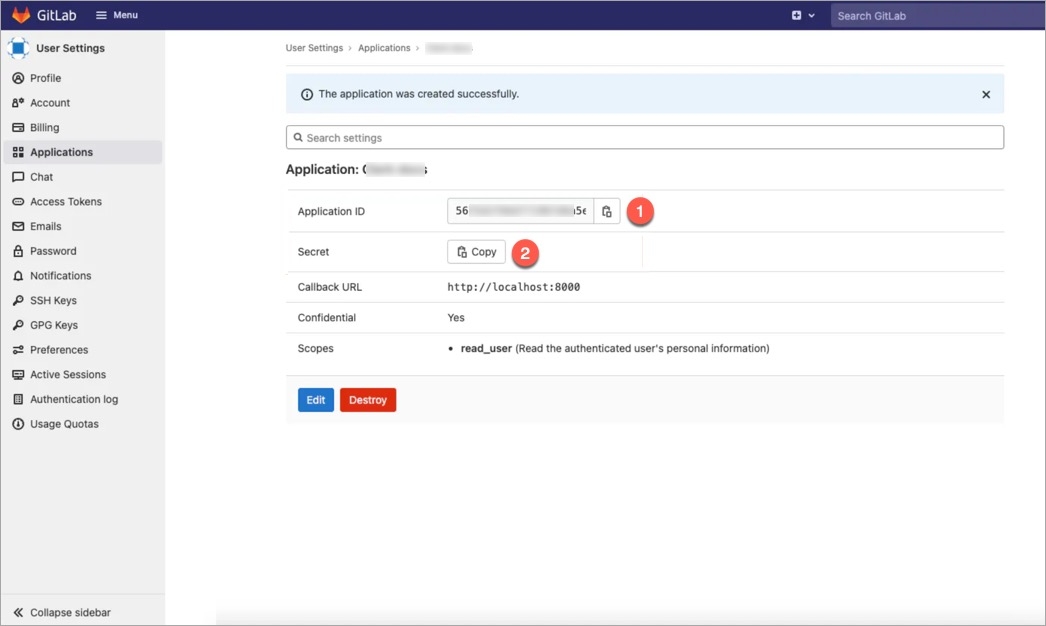
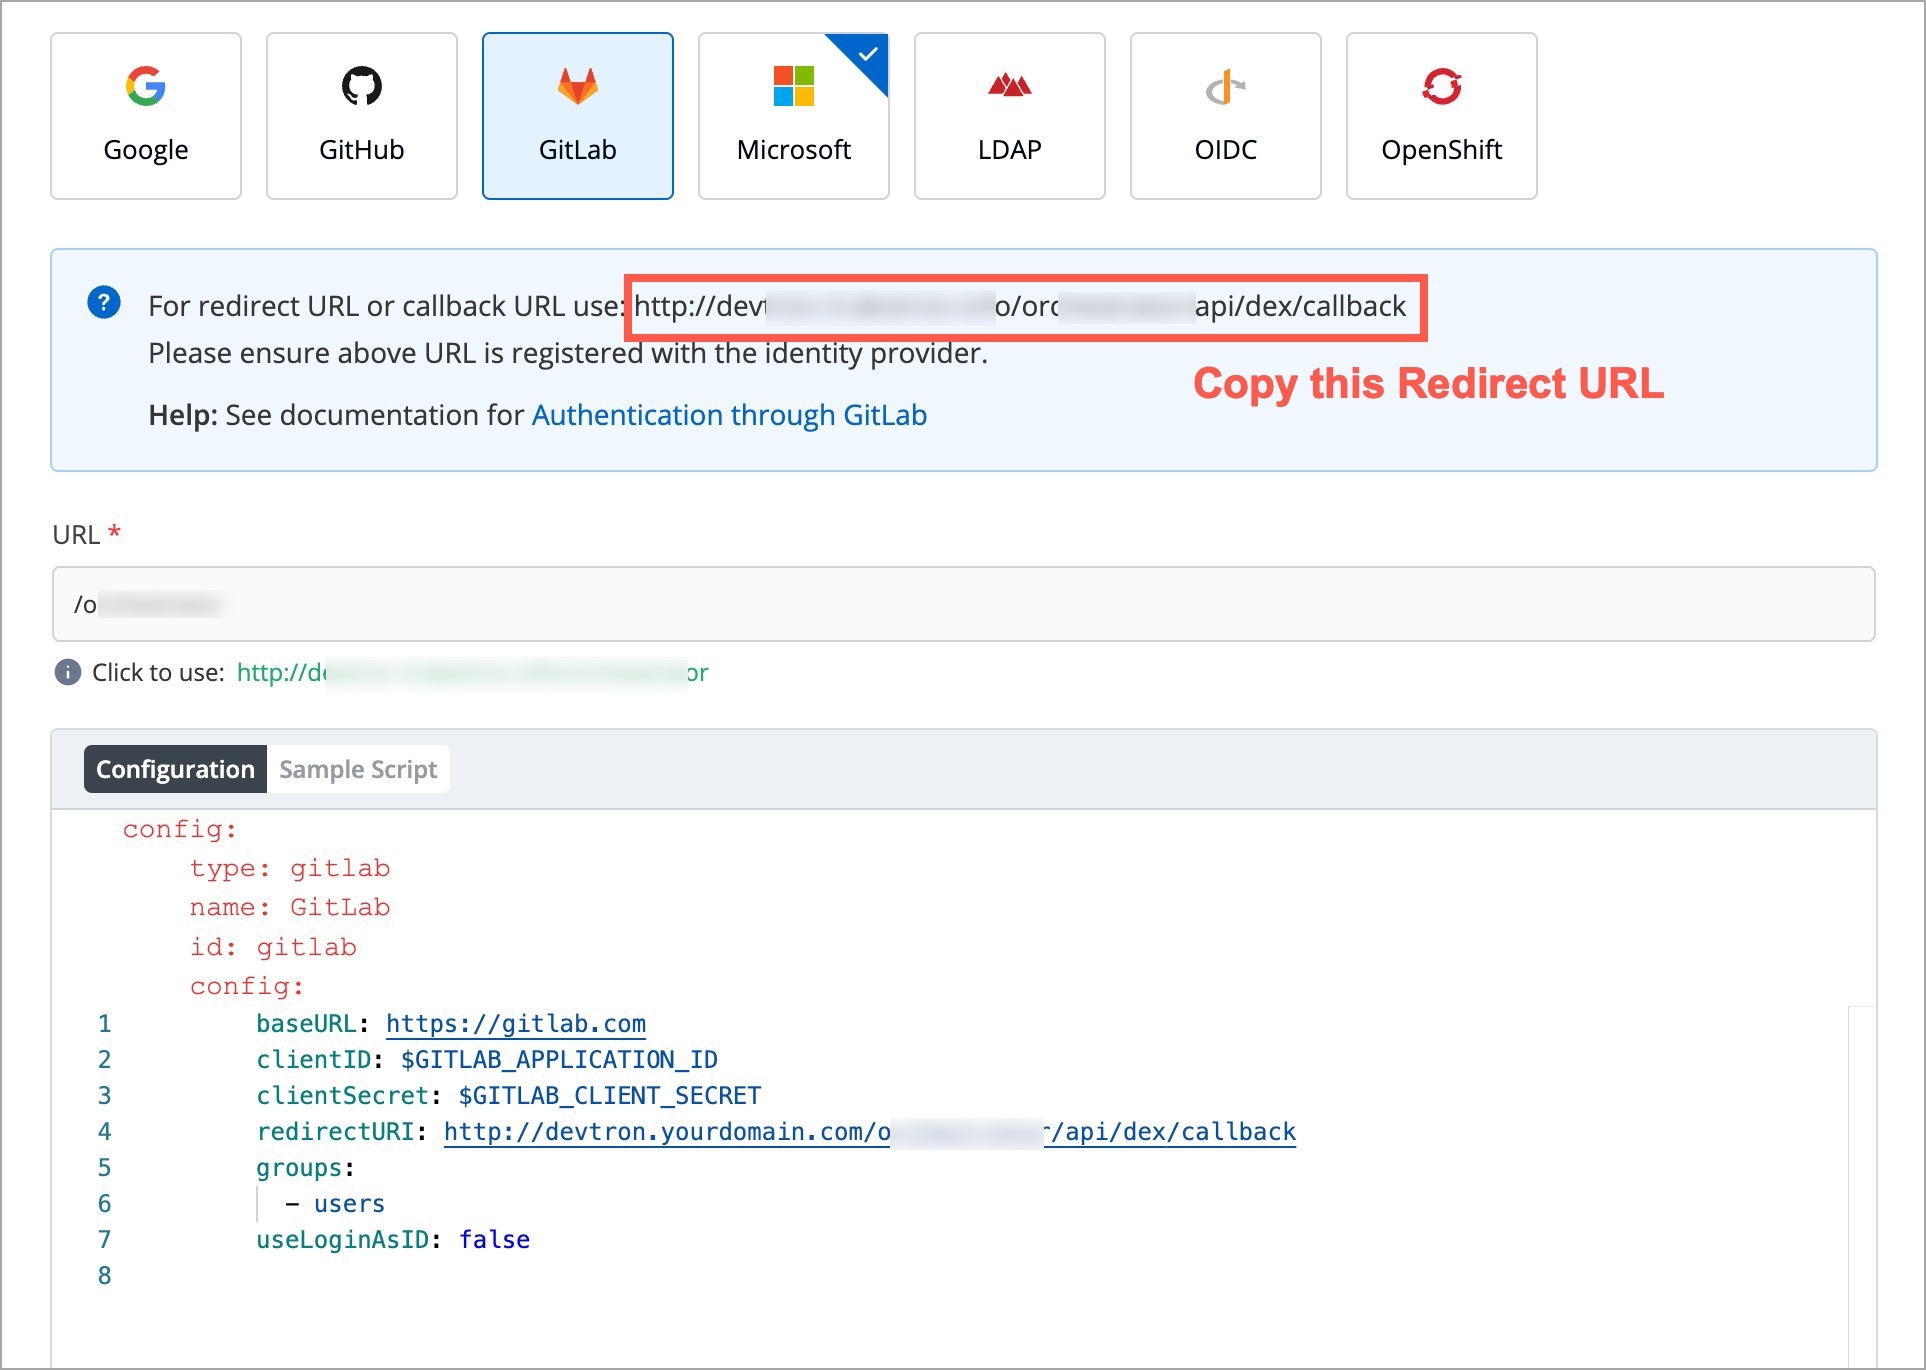
A user now will have a Super admin access.
Selecting Specific permission option allows you to manage access and provide the role-based access accordingly for
Yes
Yes
Yes
Yes
Specific permissions
Selecting Specific permission option allows you to manage access and provide the role-based access accordingly for:
Helm Apps
Kubernetes Resources
Super admin permission
Selecting Super admin permission option will get full access to Devtron resources and the rest of the options will not be available.
Project
Select a project from the drop-down list to which you want to give permission to the user. You can select only one project at a time.
Note: If you want to select more than one project, then click Add row.
Environment or cluster/namespace
Select the specific environment or all existing environments in default cluster from the drop-down list.
Note: If you select all existing + future environments in default cluster option, then a user gets access to all the current environments including any new environment which gets associated with the application later.
Application
Select the specific application or all applications from the drop-down list corresponding to your selected Environments.
Note: If All applications option is selected, then a user gets access to all the current applications including any new application which gets associated with the project later
.
Role
Cluster
Select a cluster from the drop-down list to which you want to give permission to the user. You can select only one cluster at a time.
Note: To add another cluster, then click Add another.
Namespace
Select the namespace from the drop-down list.
API Group
Select the specific API group or All API groups from the drop-down list corresponding to the K8s resource.
Kind
Select the kind or All kind from the drop-down list corresponding to the K8s resource.
Resource name
Select the resource name or All resources from the drop-down list to which you want to give permission to the user.
Role
View Only
Yes
No
No
No
View and Edit
Yes
Yes
Yes
No
Admin
Secret access key: Your AWS secret access key ID
Name
Provide a name to your registry
Registry URL
Provide the URL of your registry in case it doesn't come prefilled. Do not include oci://, http://, or /https:// in the URL.
Authentication Type
The credential input fields may differ depending on the registry provider, check Registry Providers
Use as chart repository
Tick this checkbox if you want Devtron to pull helm charts from your registry and display them on chart store. Also, you will have to provide a list of repositories (present within your registry) for Devtron to successfully pull the helm charts.
{namespace}
{podName}: If used, the link will only be visible at the pod level on the App details page.
{containerName}: If used, the link will only be visible at the container level on the App details page.
Note: The env variables will be dynamically replaced by the values that you used to configure the link.
Here, we will add Devtron as a client for using Keycloak SSO.
In the Admin Console, go to Clients and click Create client.
Within General Settings:
Enter devtron in the Client ID field. We will use this ID while configuring SSO later in Devtron.
Enter Devtron in the Name field.
Within Capability config, turn on Client Authentication.
Within Login settings, enter https://<DEVTRON_BASE_URL>/orchestrator/api/dex/callback in the following fields.
Valid redirect URIs
Valid post logout redirect URIs
Web origins
Click Save.
Here, we will obtain the secret we need while configuring SSO in Devtron.
Go to the Credentials tab of the client you created.
Use the copy button next to the Client Secret field and paste it somewhere for future reference.
Here, we will create a user that can log in to Devtron via SSO. We will assign a username and password that the user can enter while logging in to Devtron via Keycloak SSO.
In the Admin Console, go to Users and click Add user.
Give a username (e.g., usertest) in the Username field and enter the user's email address (e.g., [email protected]) in the Email field.
Click Create. Your user creation will be successful.
Go to the Credentials tab of the user you created.
Click Set password.
Enter the password and confirm it.
Click Save.
Here, we will obtain the Issuer URL we need while configuring SSO in Devtron.
In the Admin Console, go to Realm settings.
In the General tab, scroll down to the Endpoints field, and click the OpenID Endpoint Configuration link.
This will open a new page, copy the value of the key named issuer, and paste it somewhere for future reference.
Here, we will set up an OIDC SSO and enter the values we obtained in the previous section.
Go to Global Configurations → SSO Login Services → OIDC.
Below the URL field, take the help of the Click to use option to populate the exact URL if the displayed one is incorrect.
In the Configuration editor, do the following:
In the issuer field, paste the URL you got while .
In the clientID field, paste the ID you entered while .
In the clientSecret field, paste the secret you got under .
Click Save or Update to activate Keycloak SSO login.
Here, we will add the user we created in the Keycloak Admin Console. If this step is skipped, the user might not be able to log in to Devtron via Keycloak.
Go to Global Configurations → Authorization → User Permissions.
Click + Add Users.
In the Email addresses field, enter the email address of the user you created in Keycloak.
Assign necessary permissions to this new user. Refer to know more.
Click Save.
Now, you may log out and test the Keycloak OIDC login method using the user credentials. Clicking the Login with Oidc button will land you on Keycloak's login page.
clientID
clientSecret
redirectURI (provided in SSO Login Services by Devtron)
Devtron provides a sample configuration out of the box. There are some values that you need to either get from your SSO provider or give to your SSO provider.
clientID
clientSecret
redirectURI (provided in SSO Login Services by Devtron)
Devtron provides a sample configuration out of the box. There are some values that you need to either get from your SSO provider or give to your SSO provider.
clientID
clientSecret
redirectURI (already provided in SSO Login Services by Devtron)
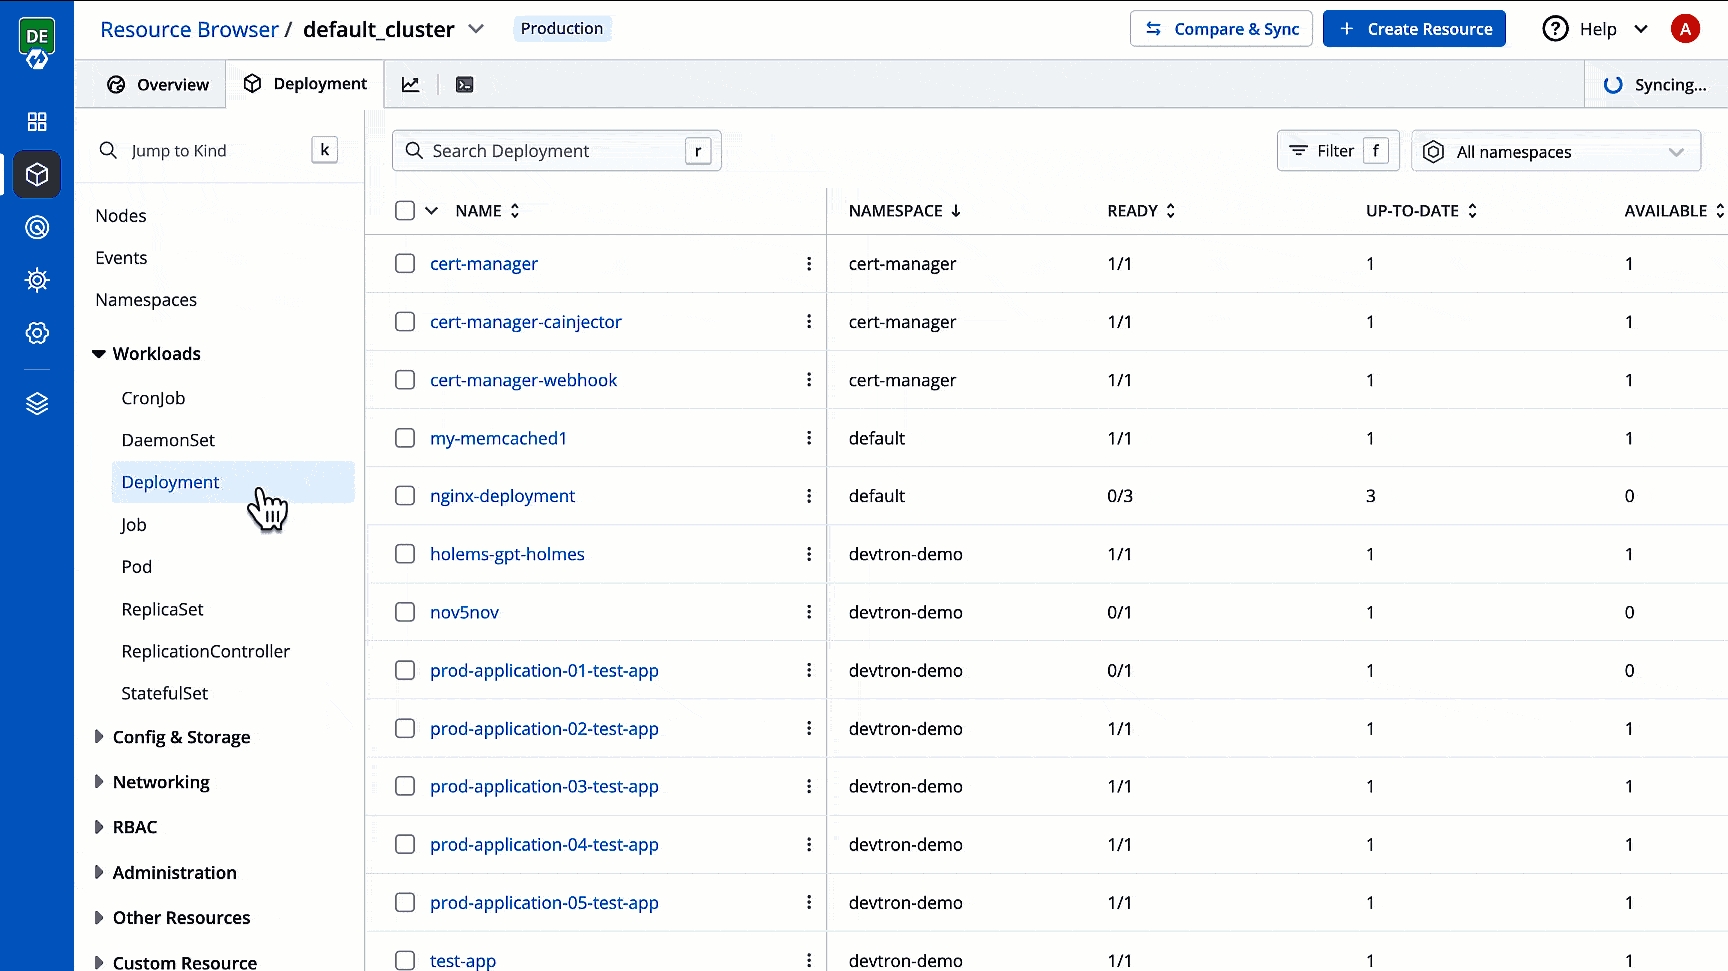

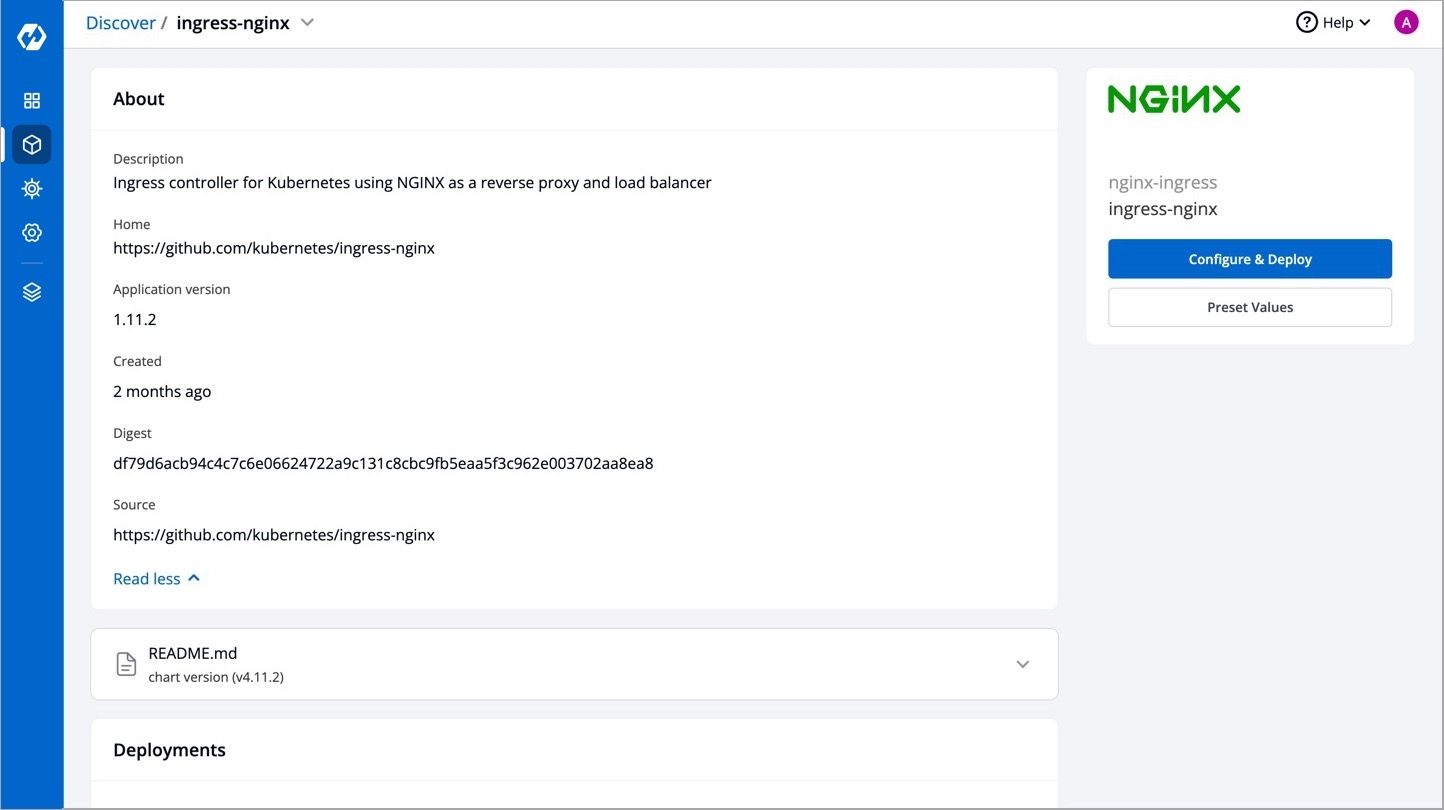
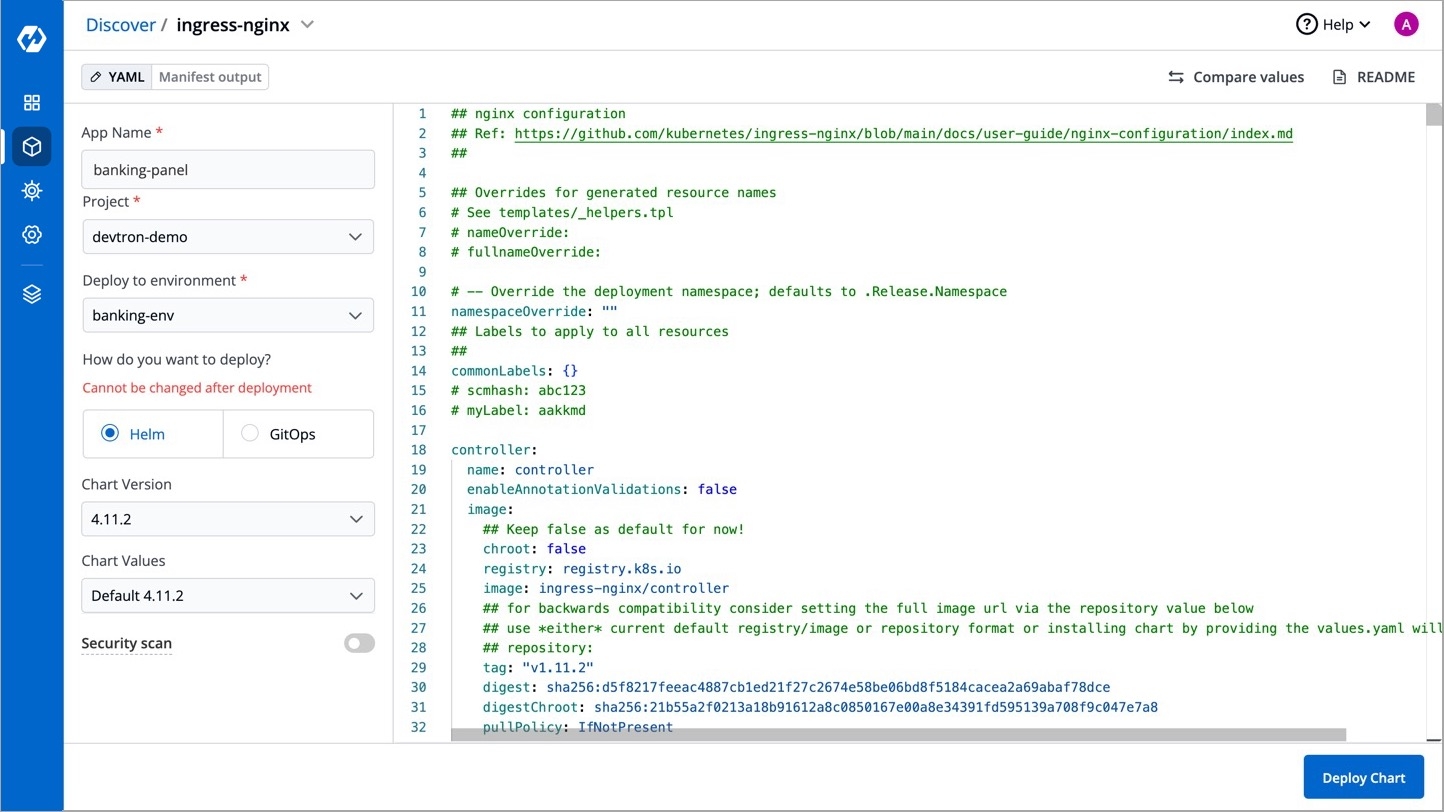
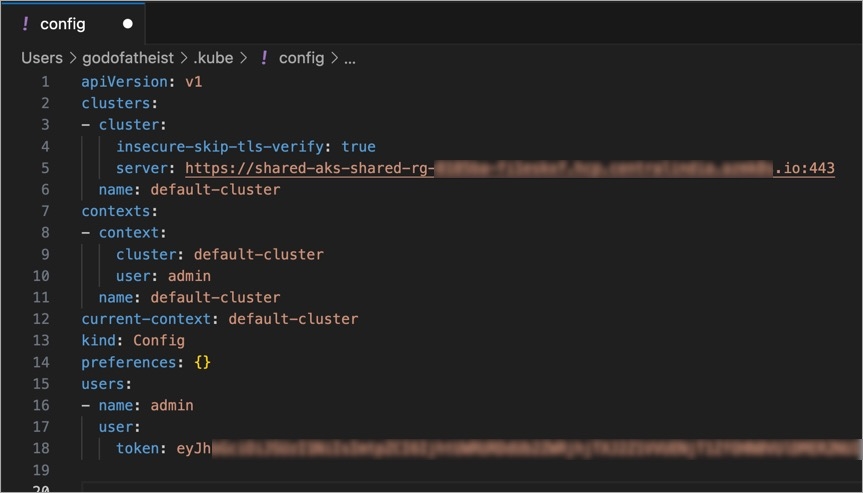

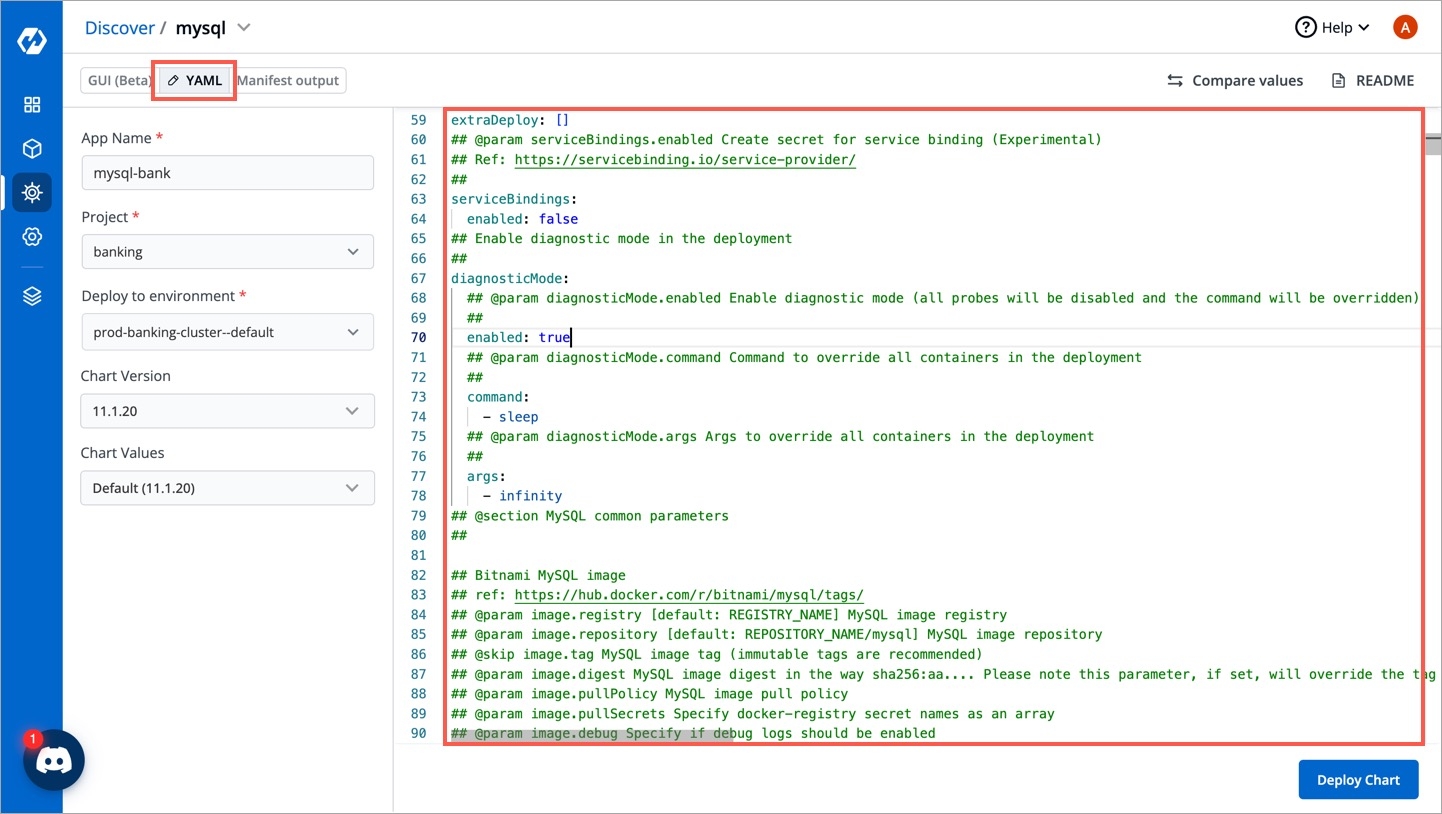
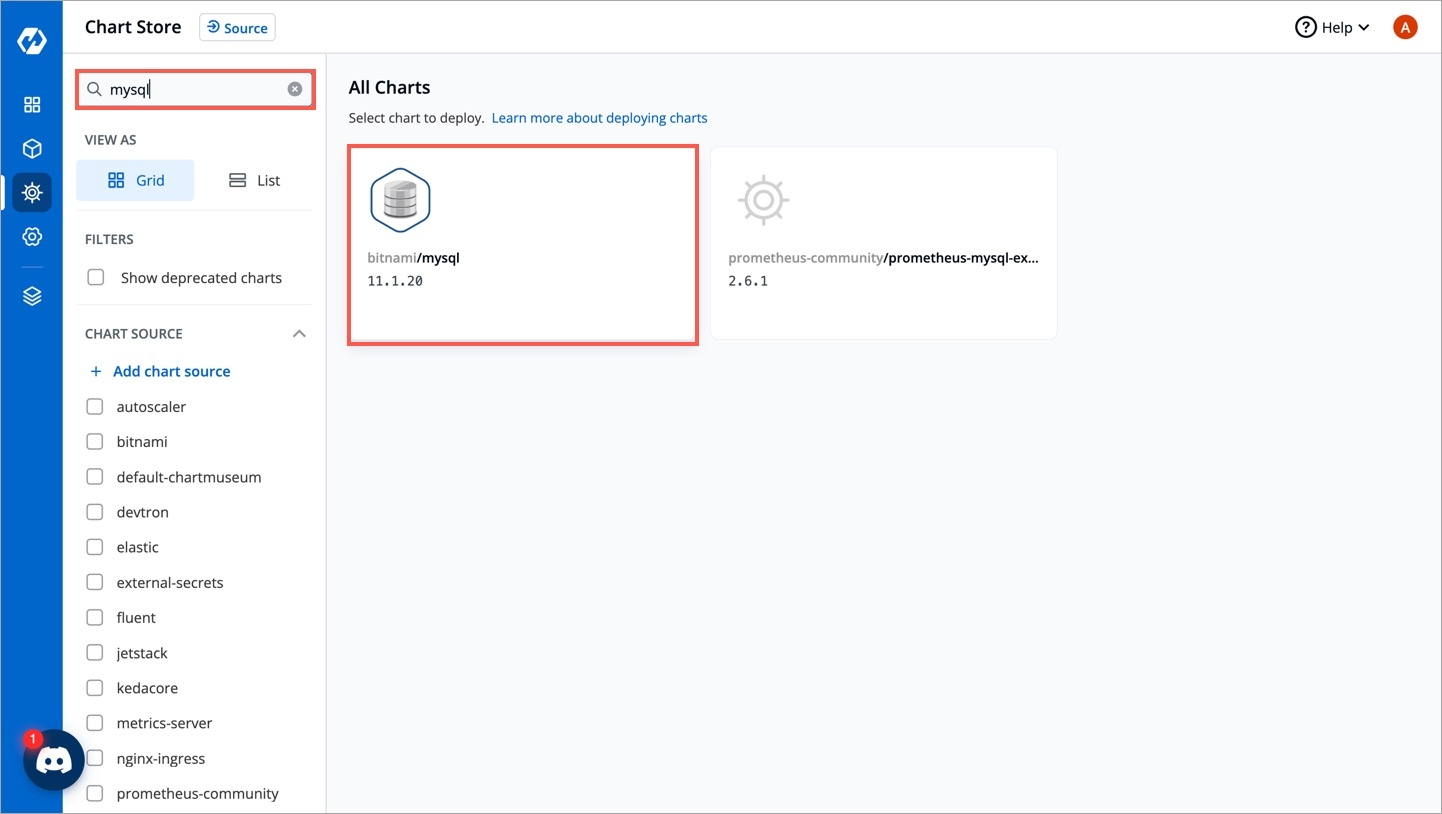
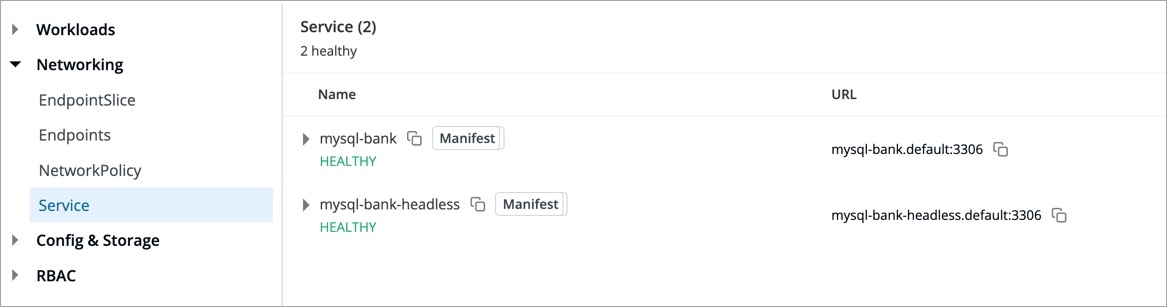

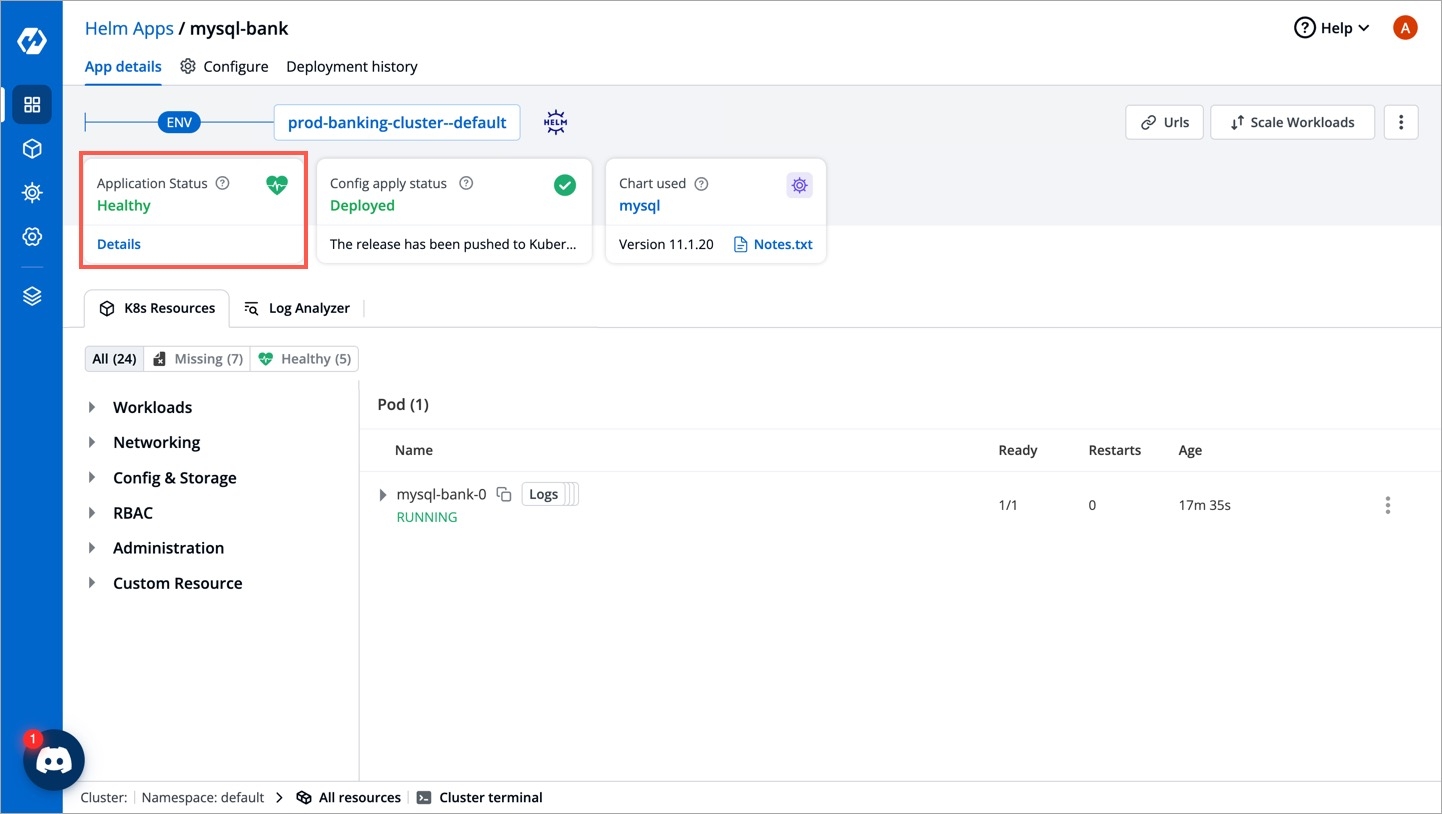

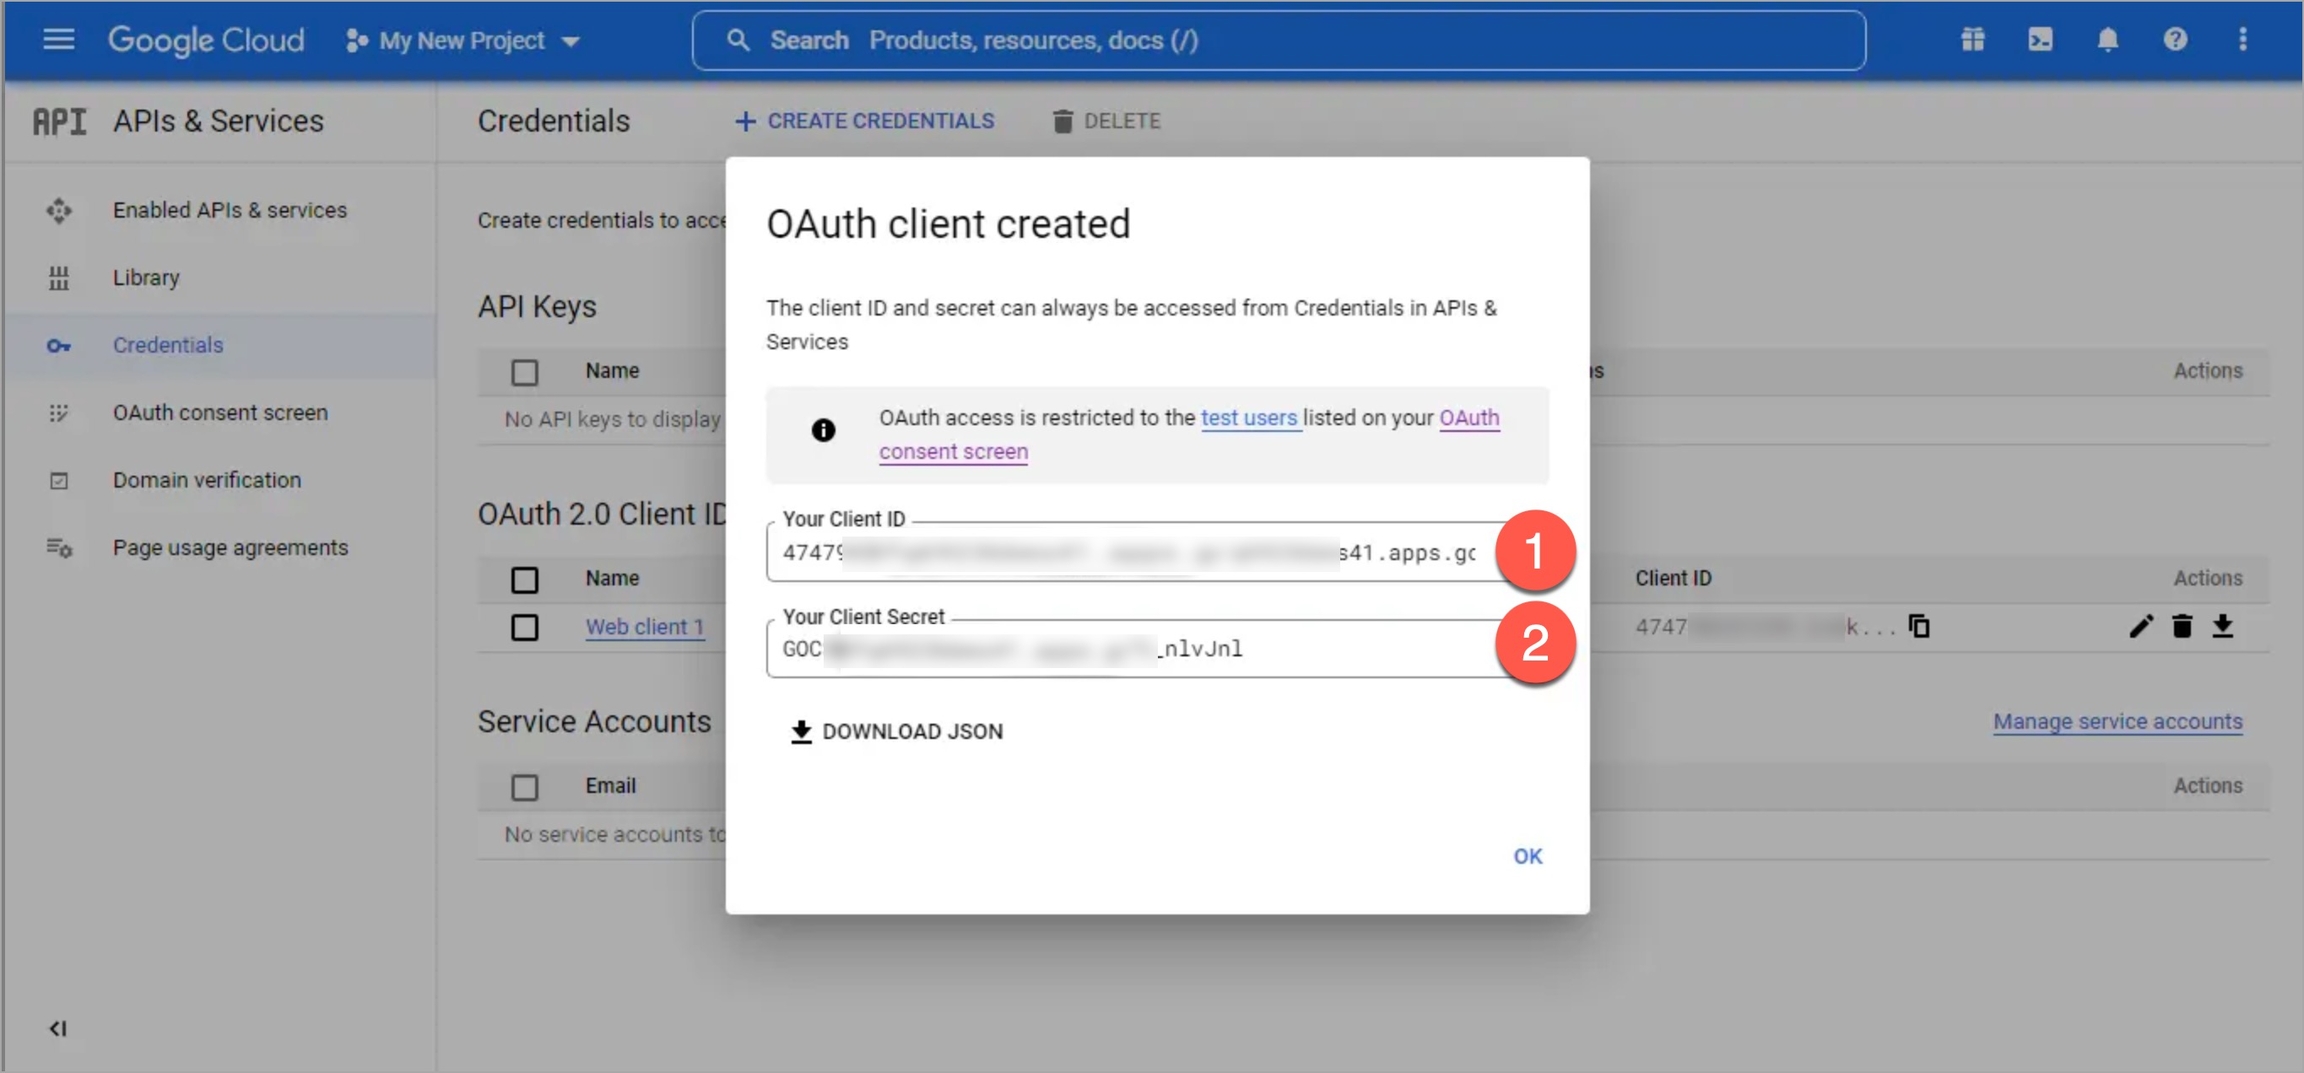
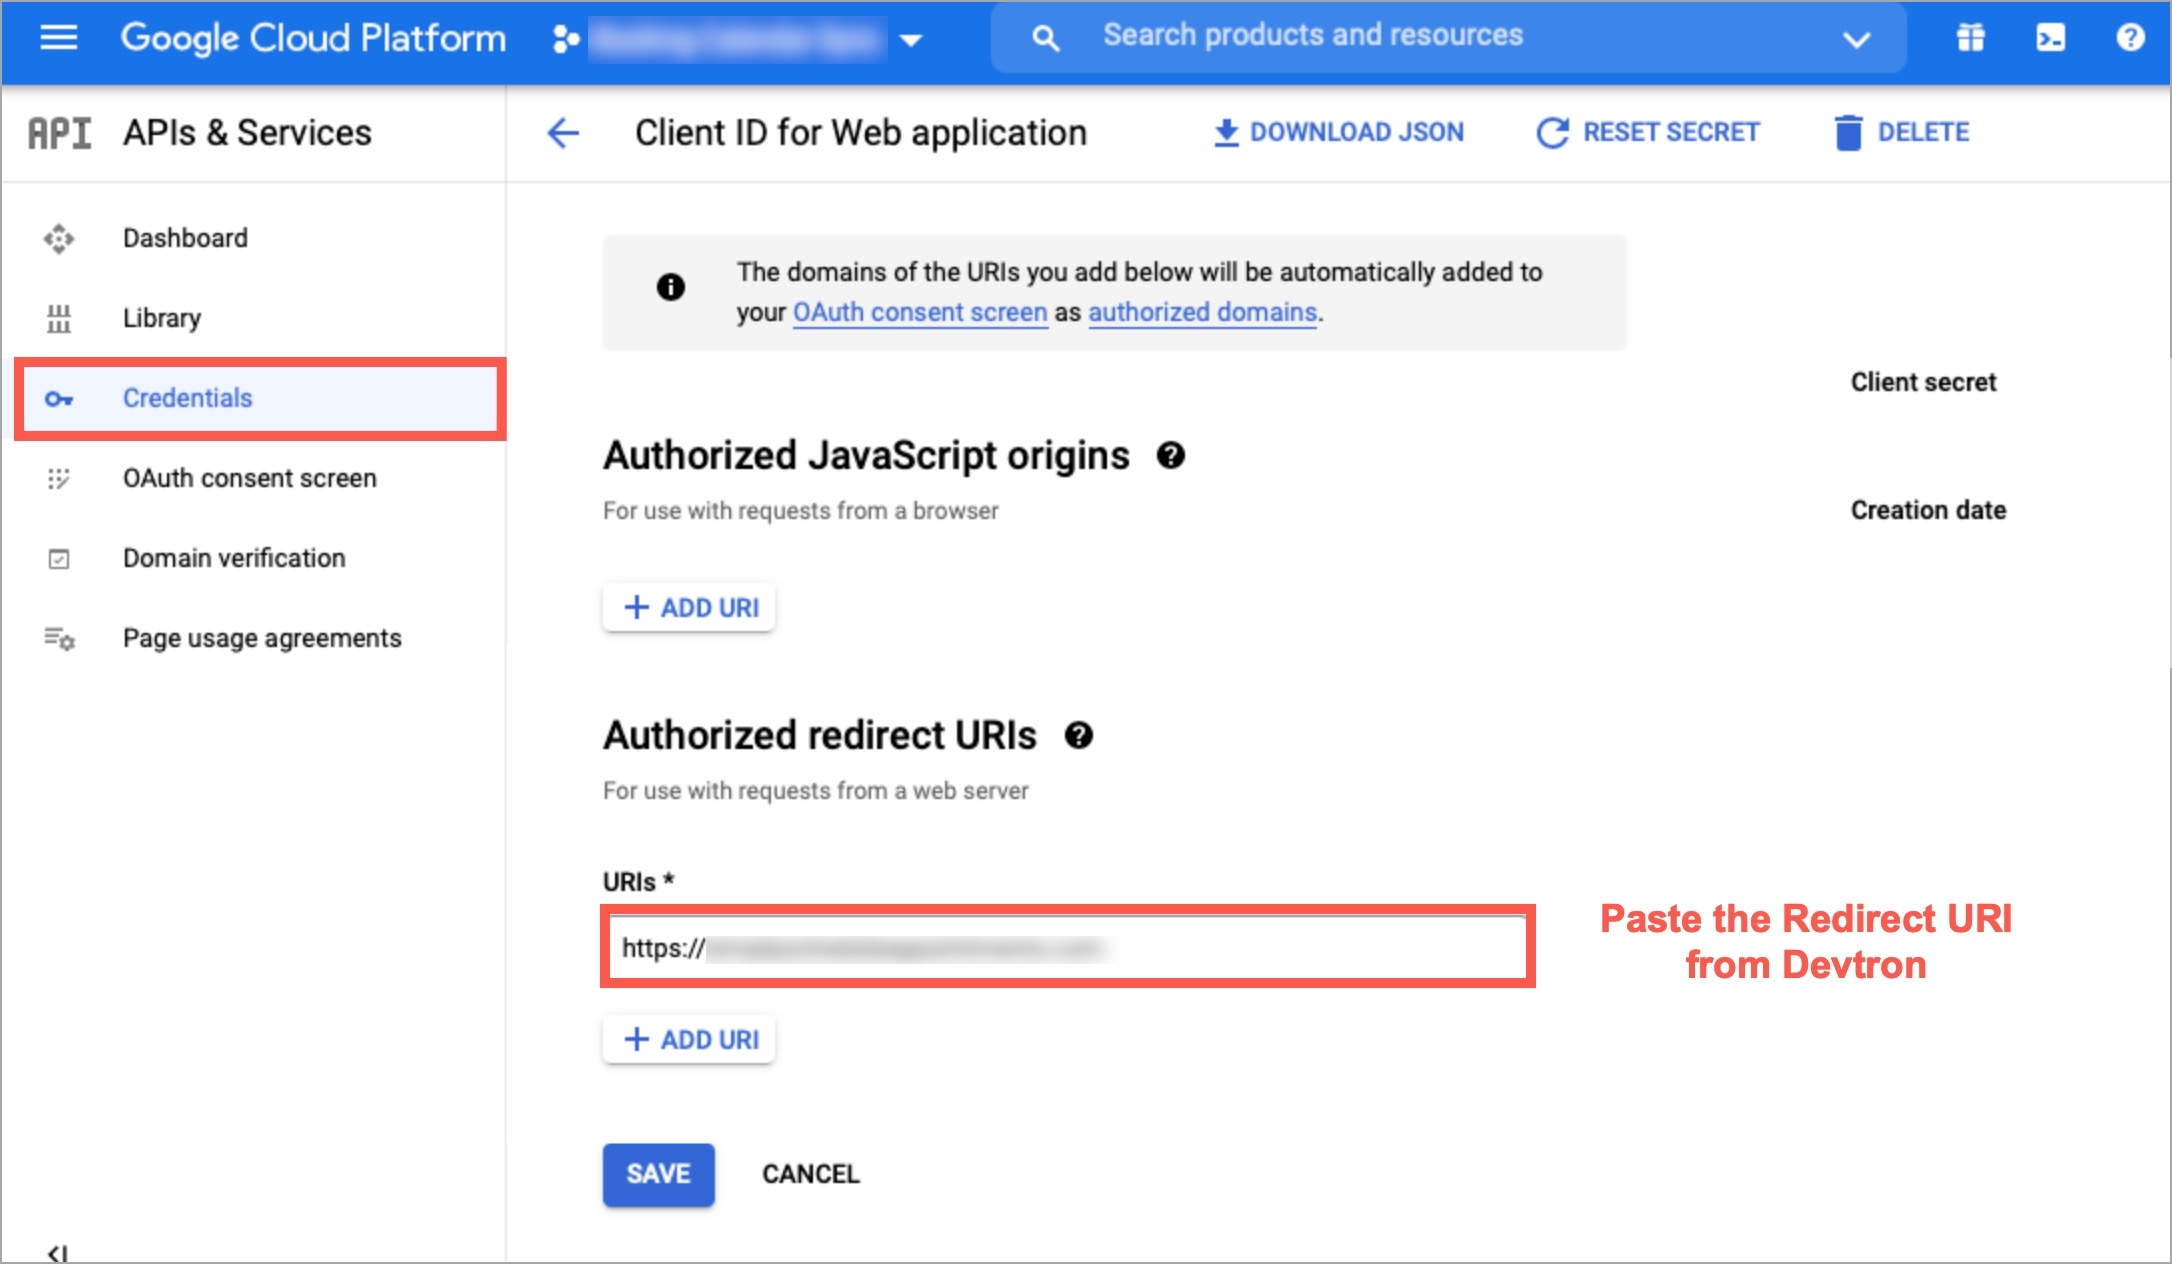
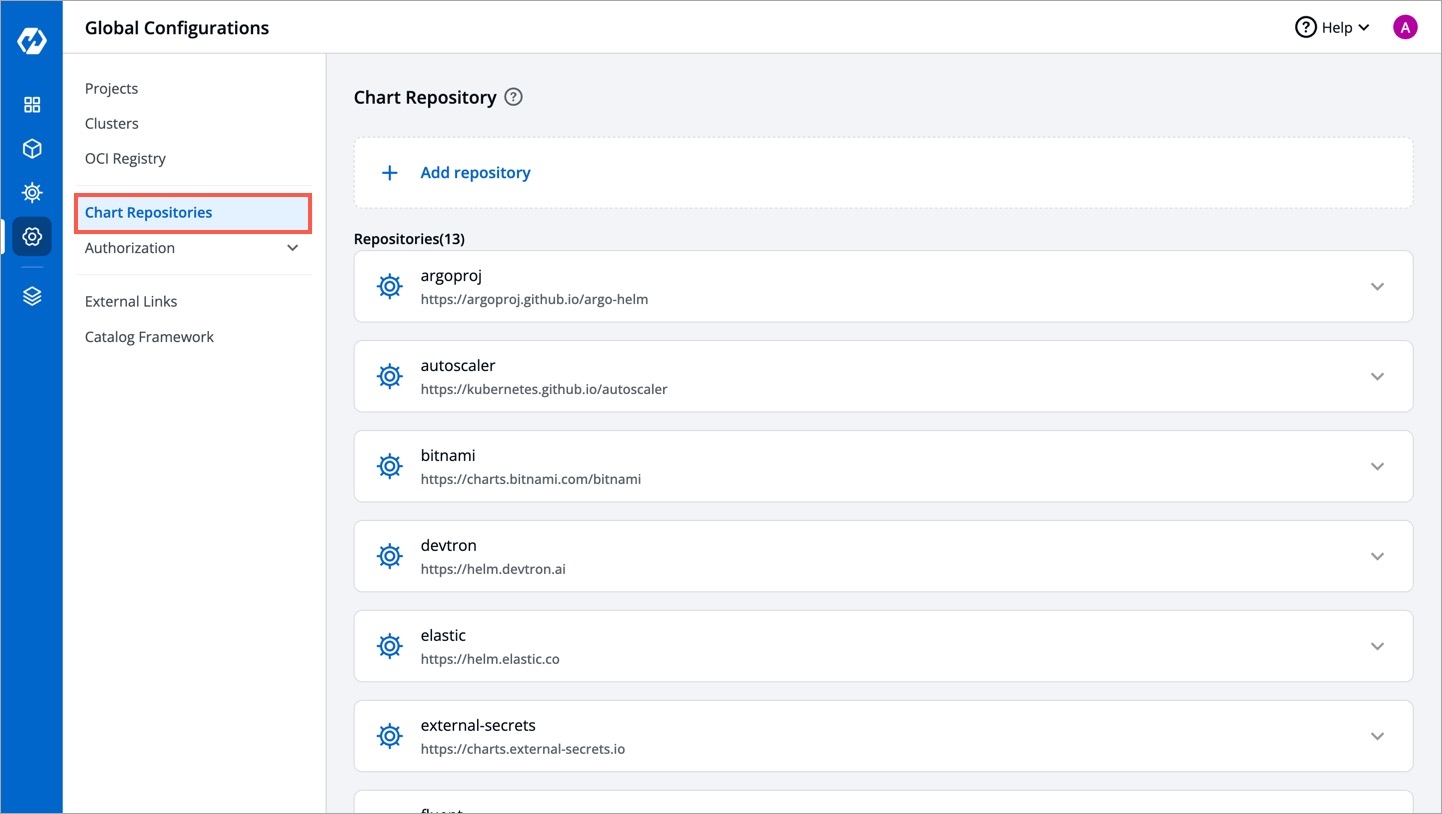
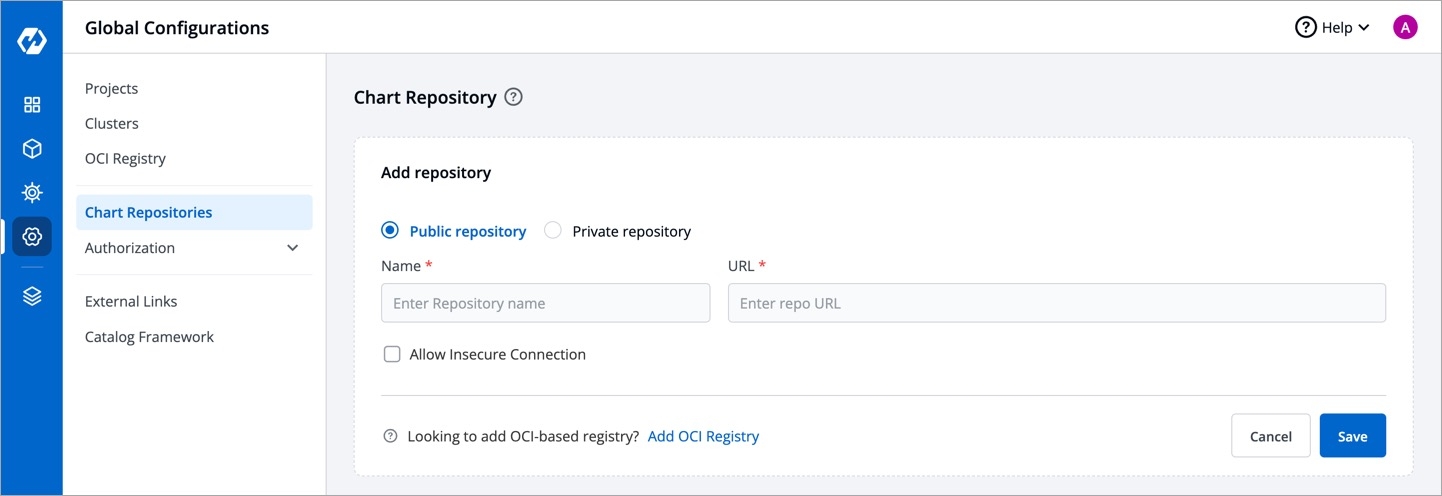
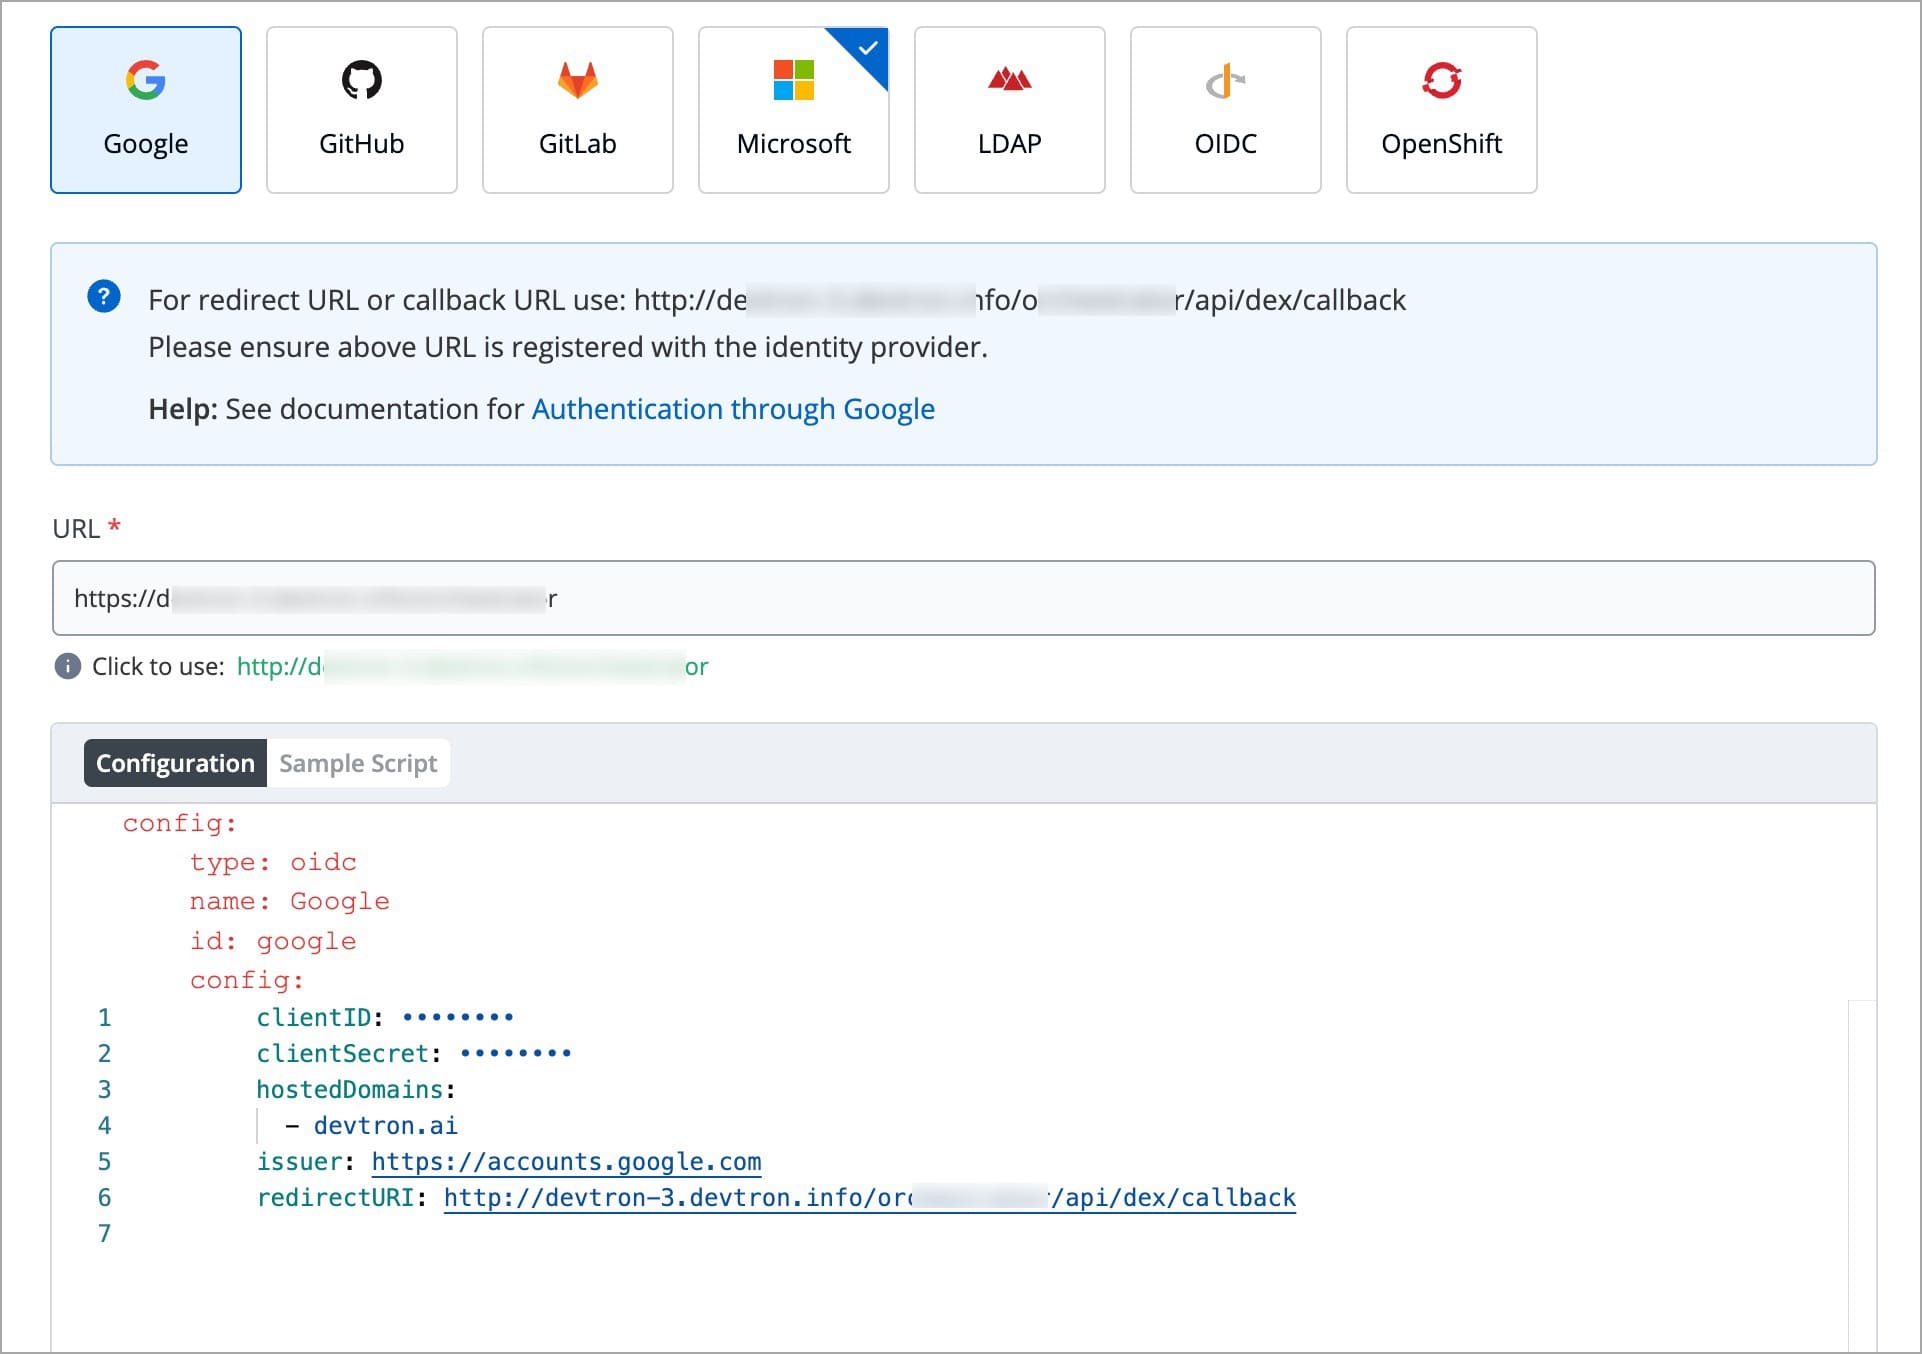
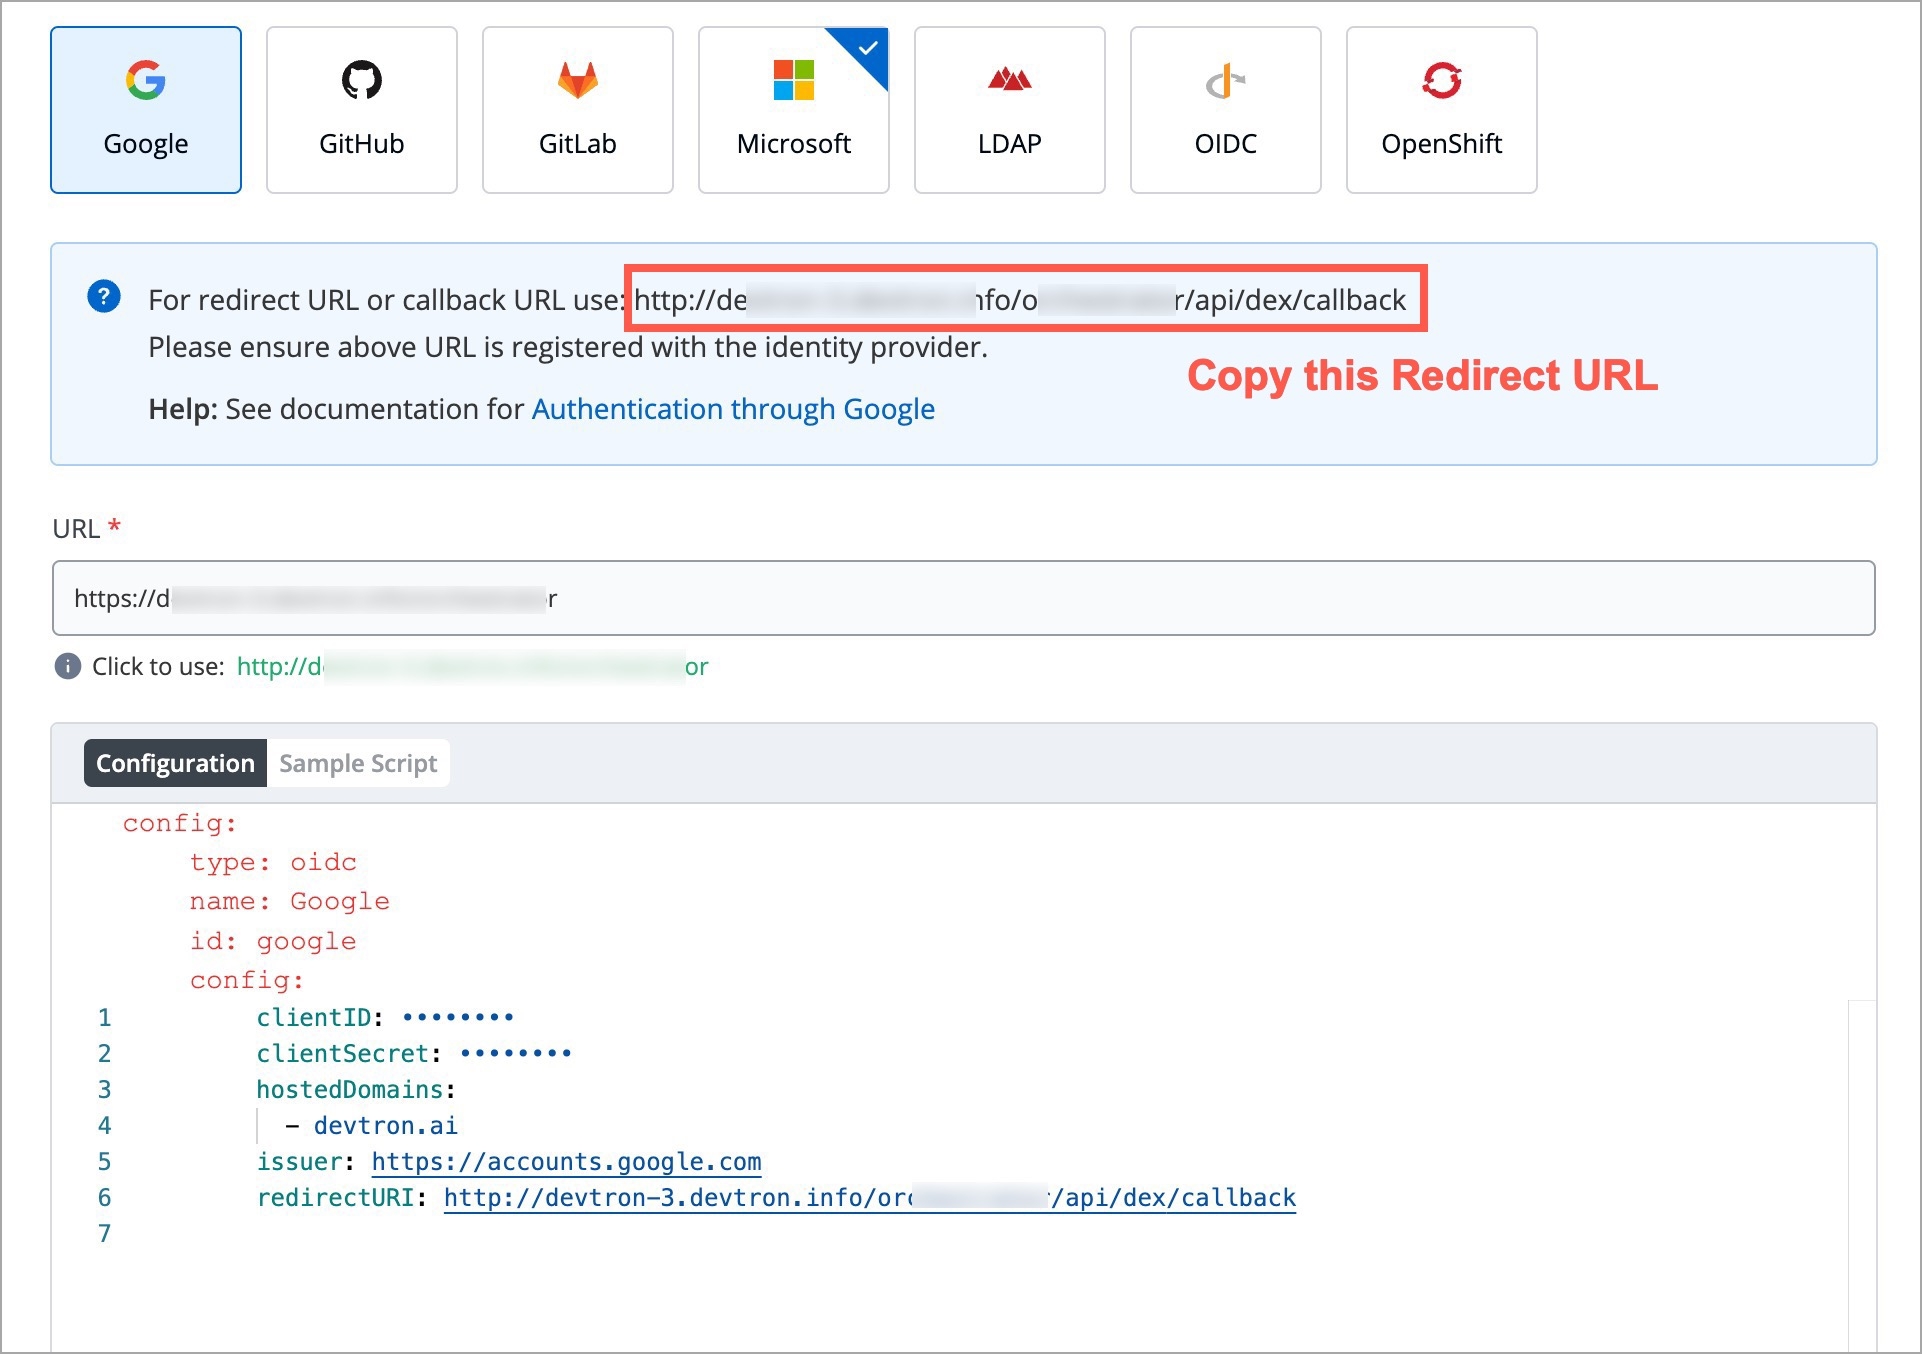
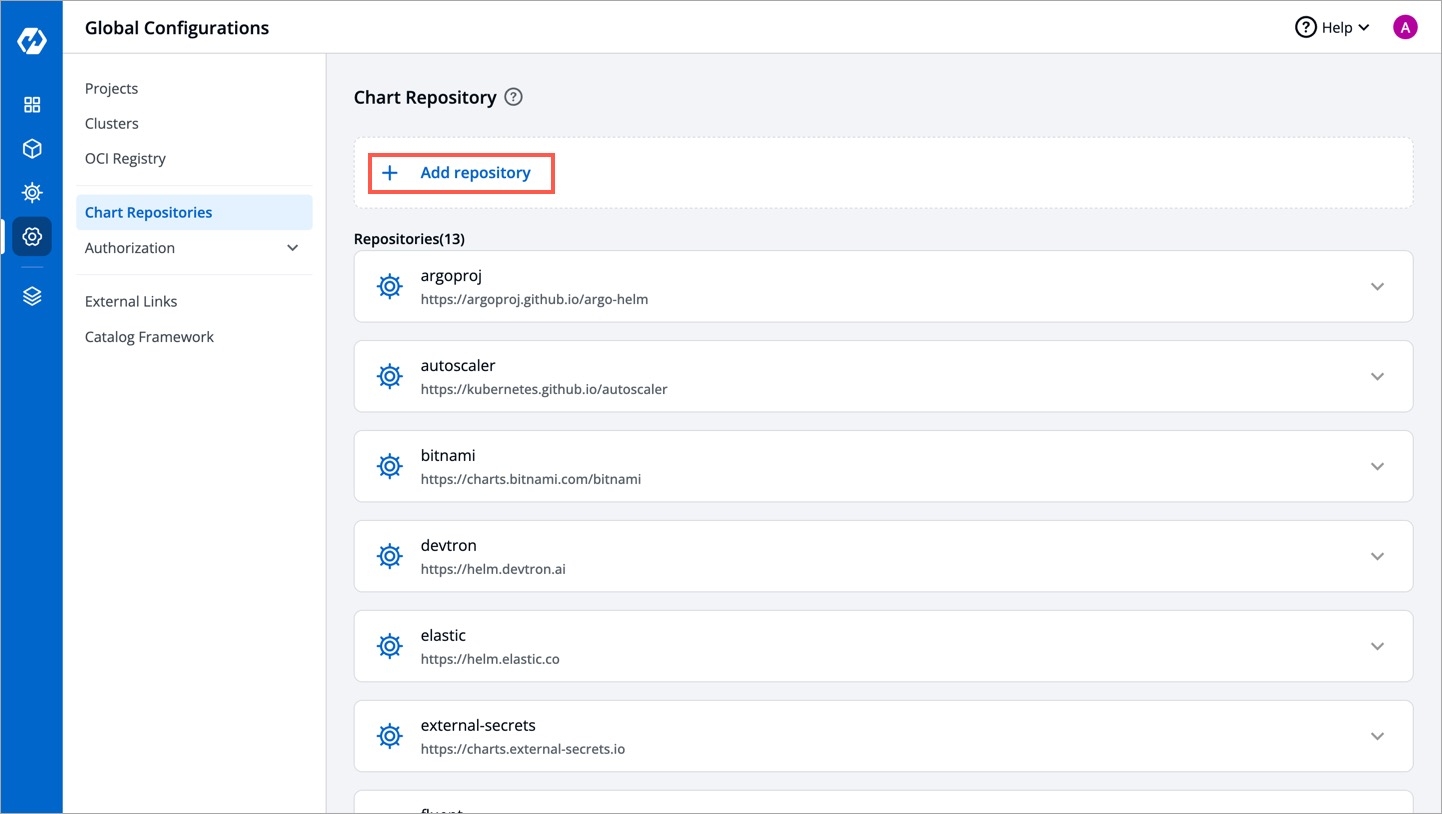
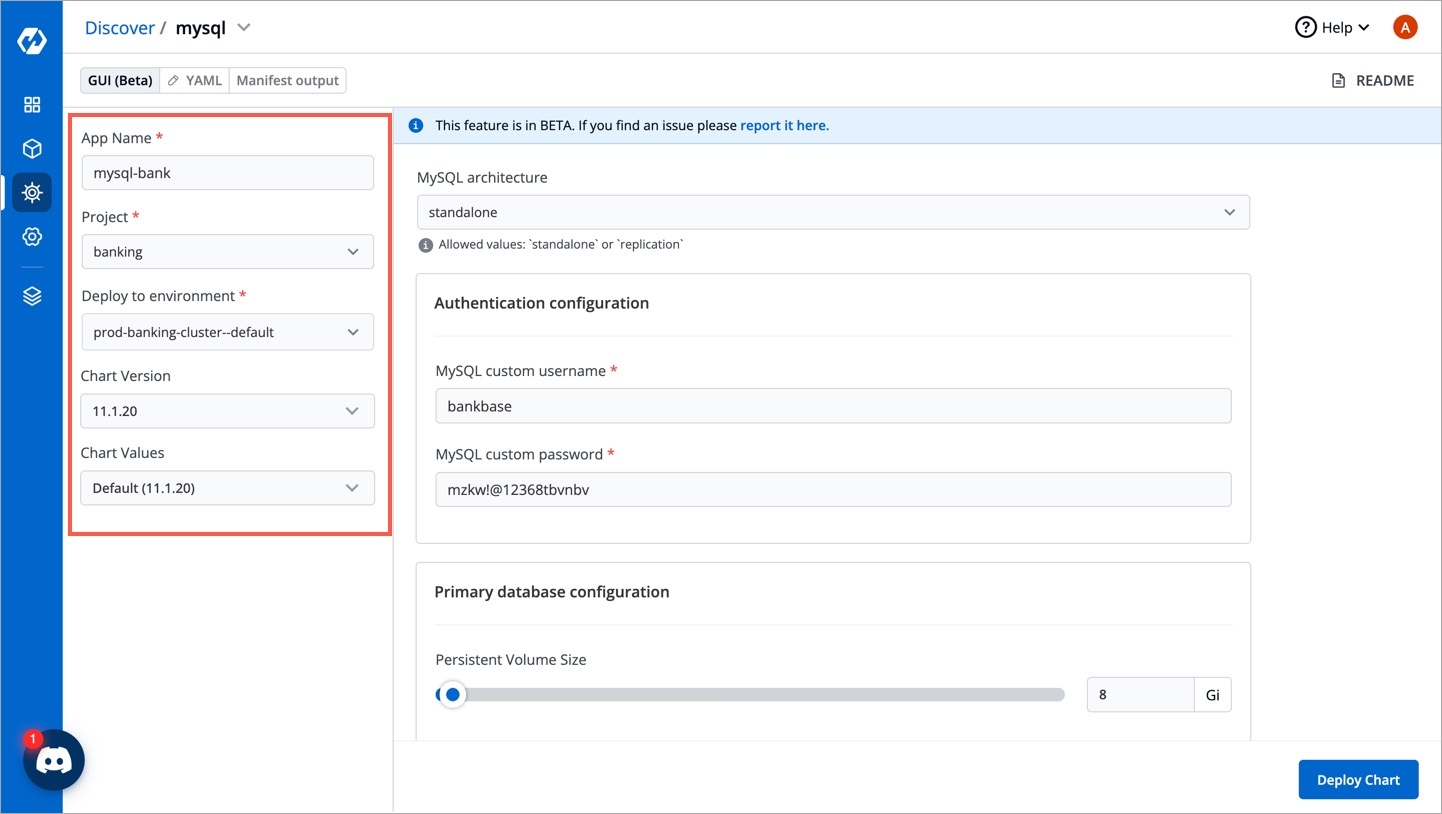
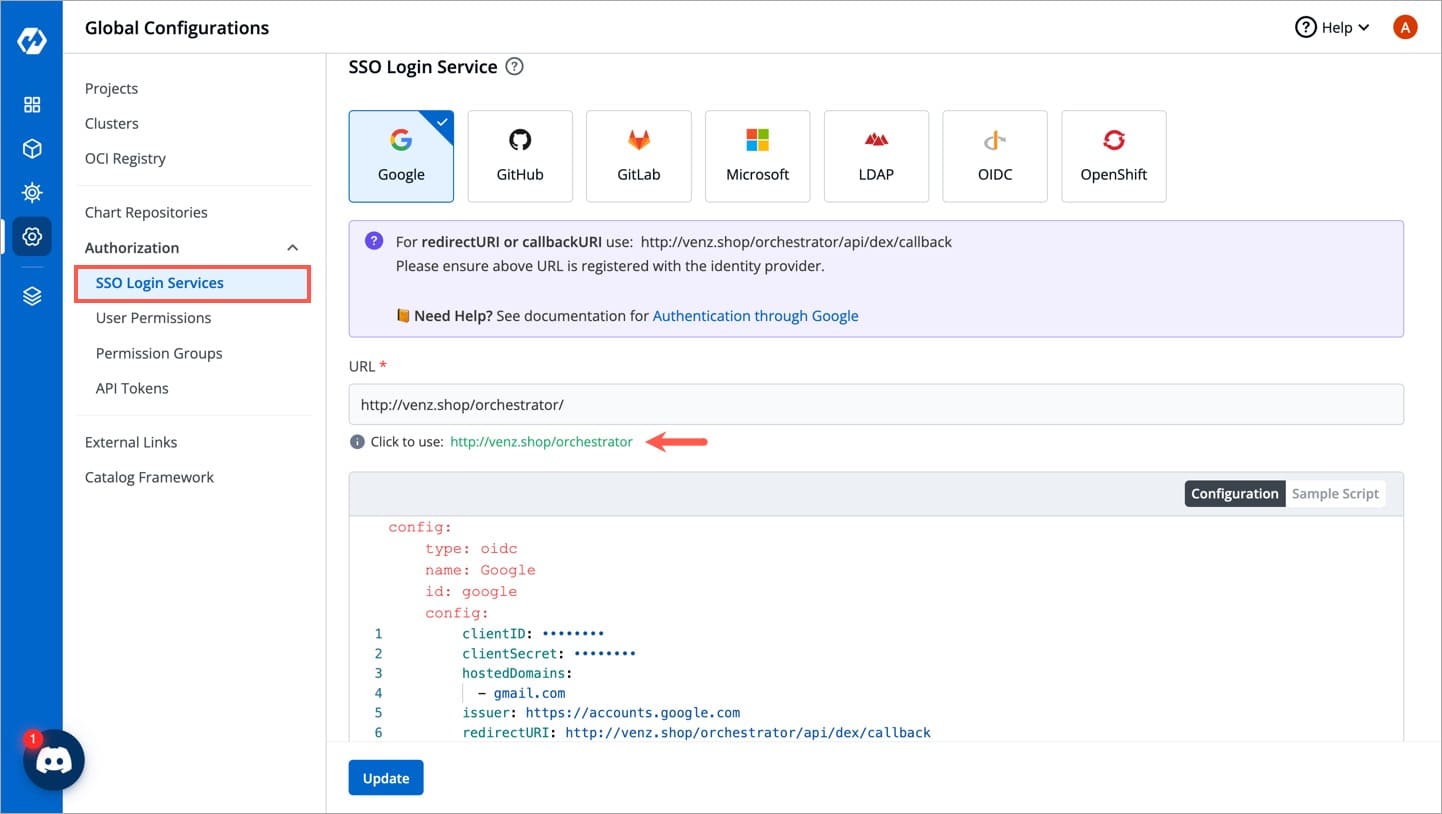
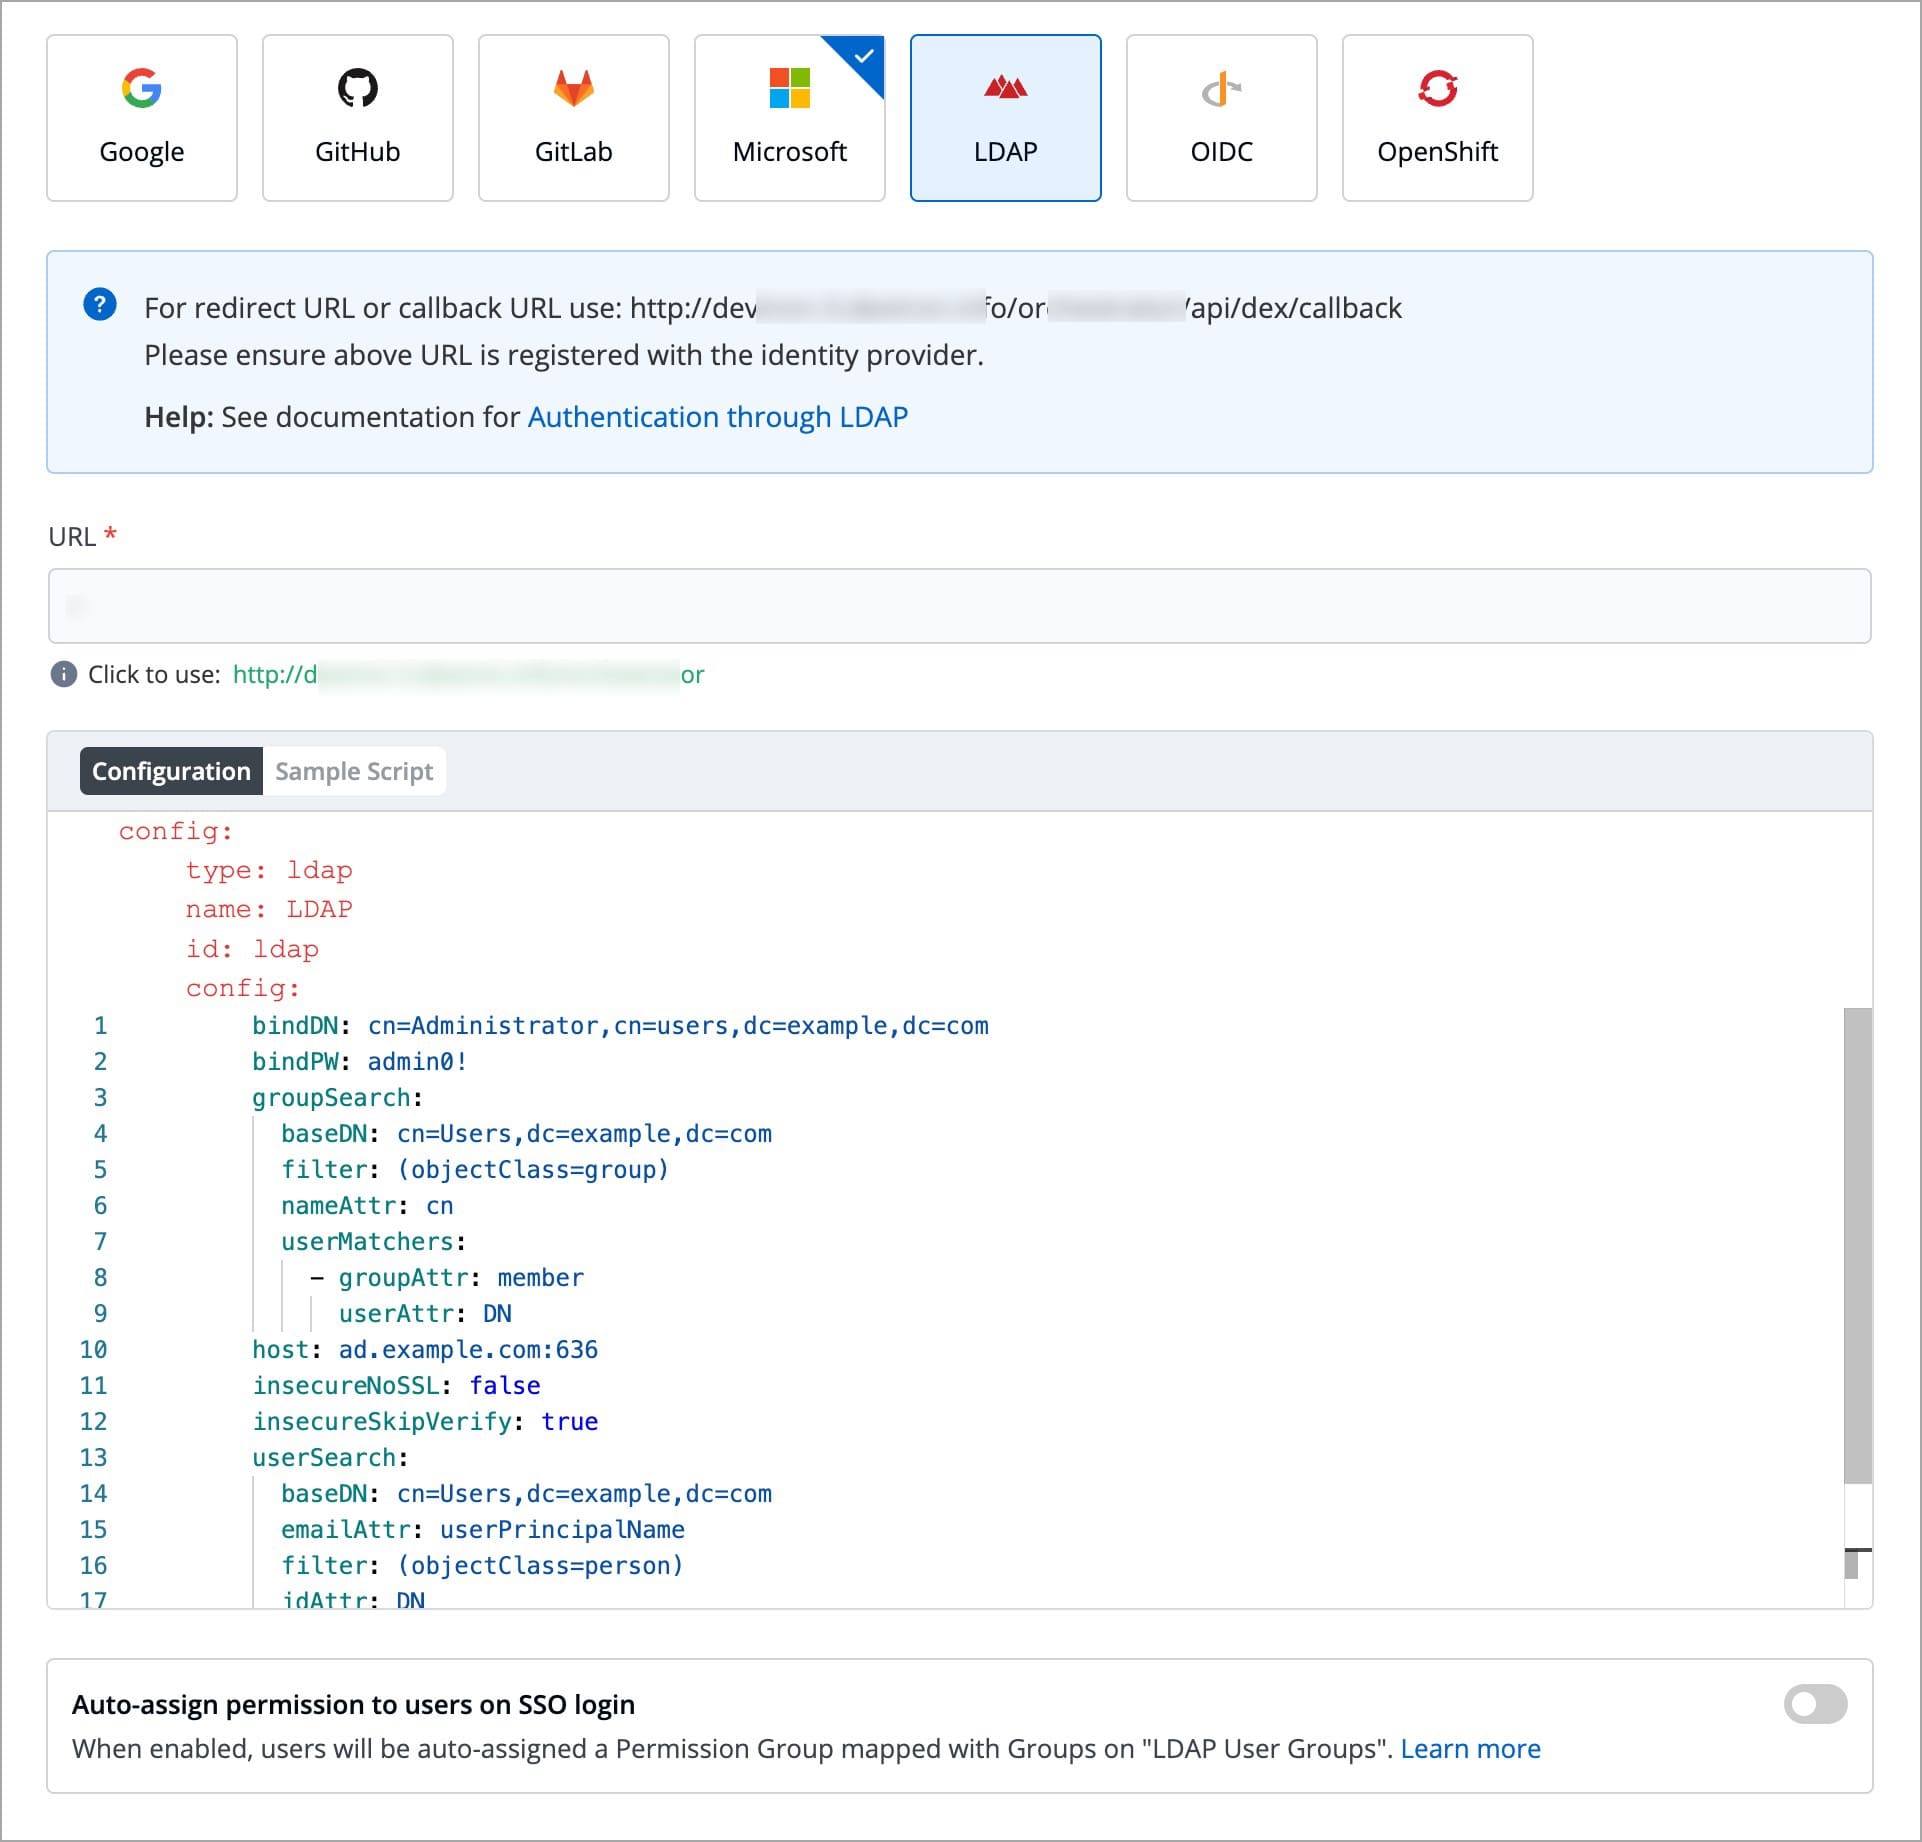
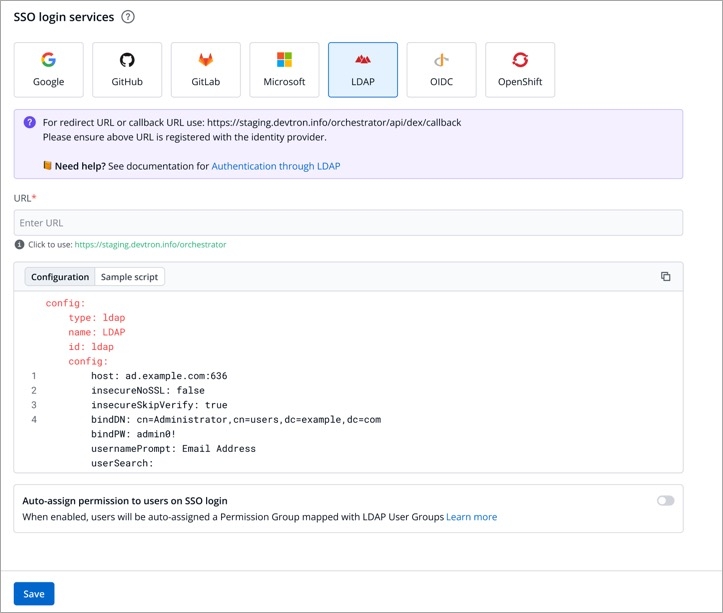
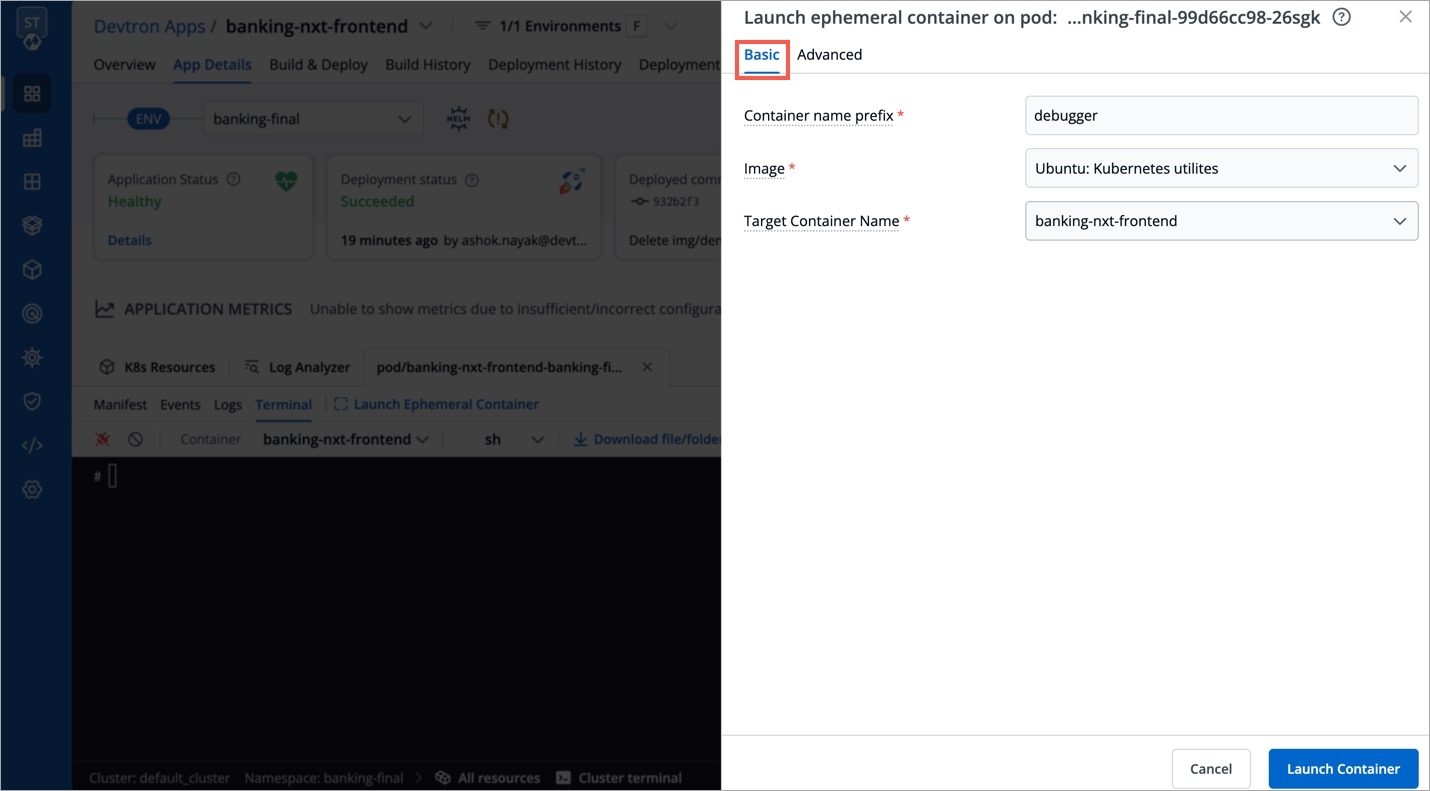
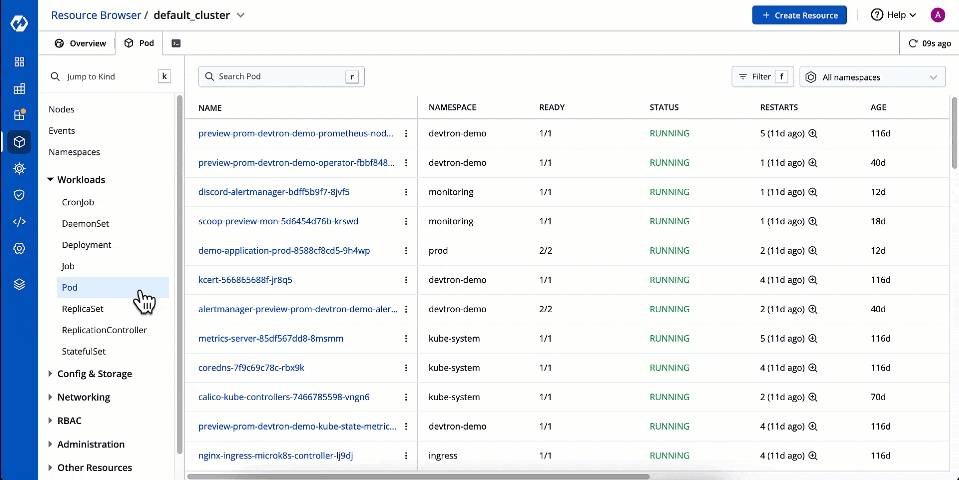
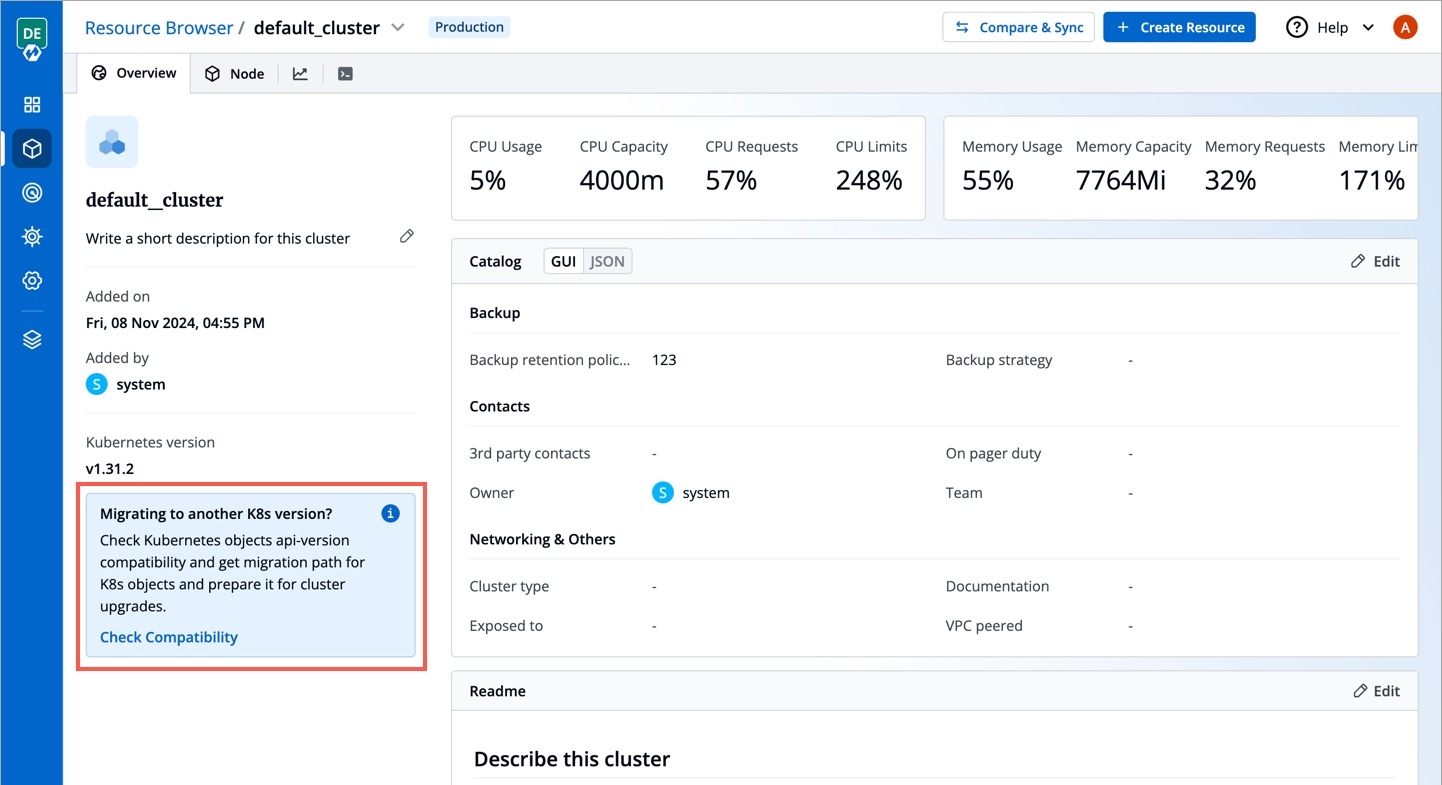
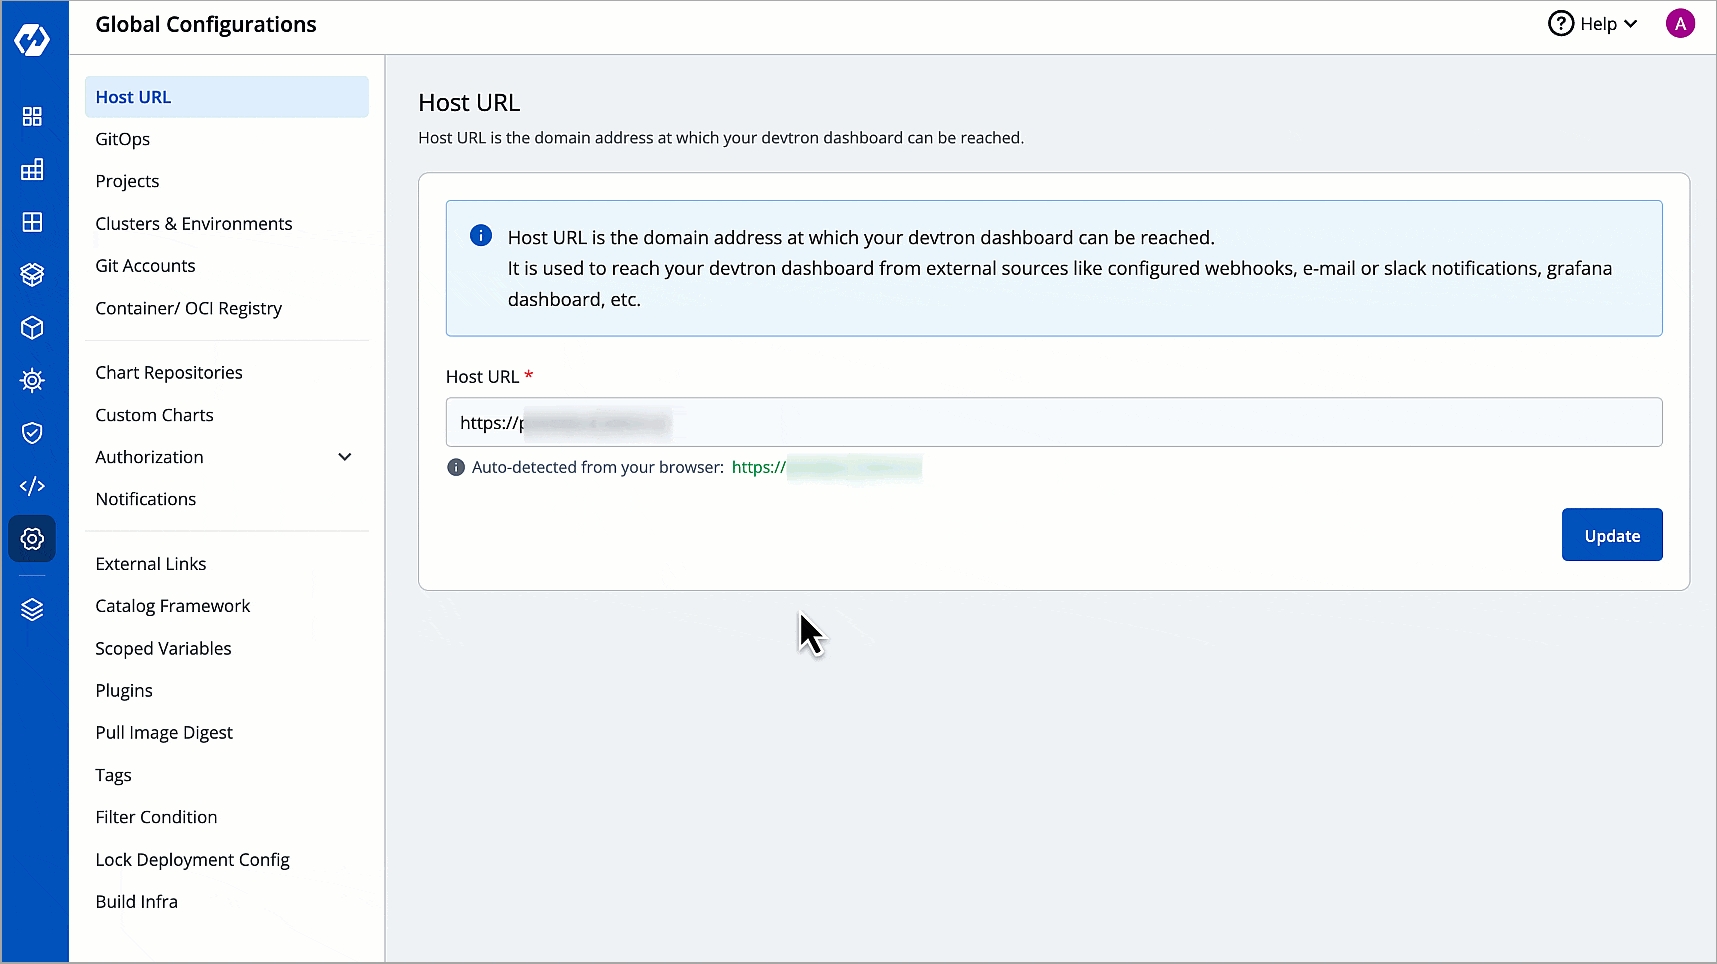
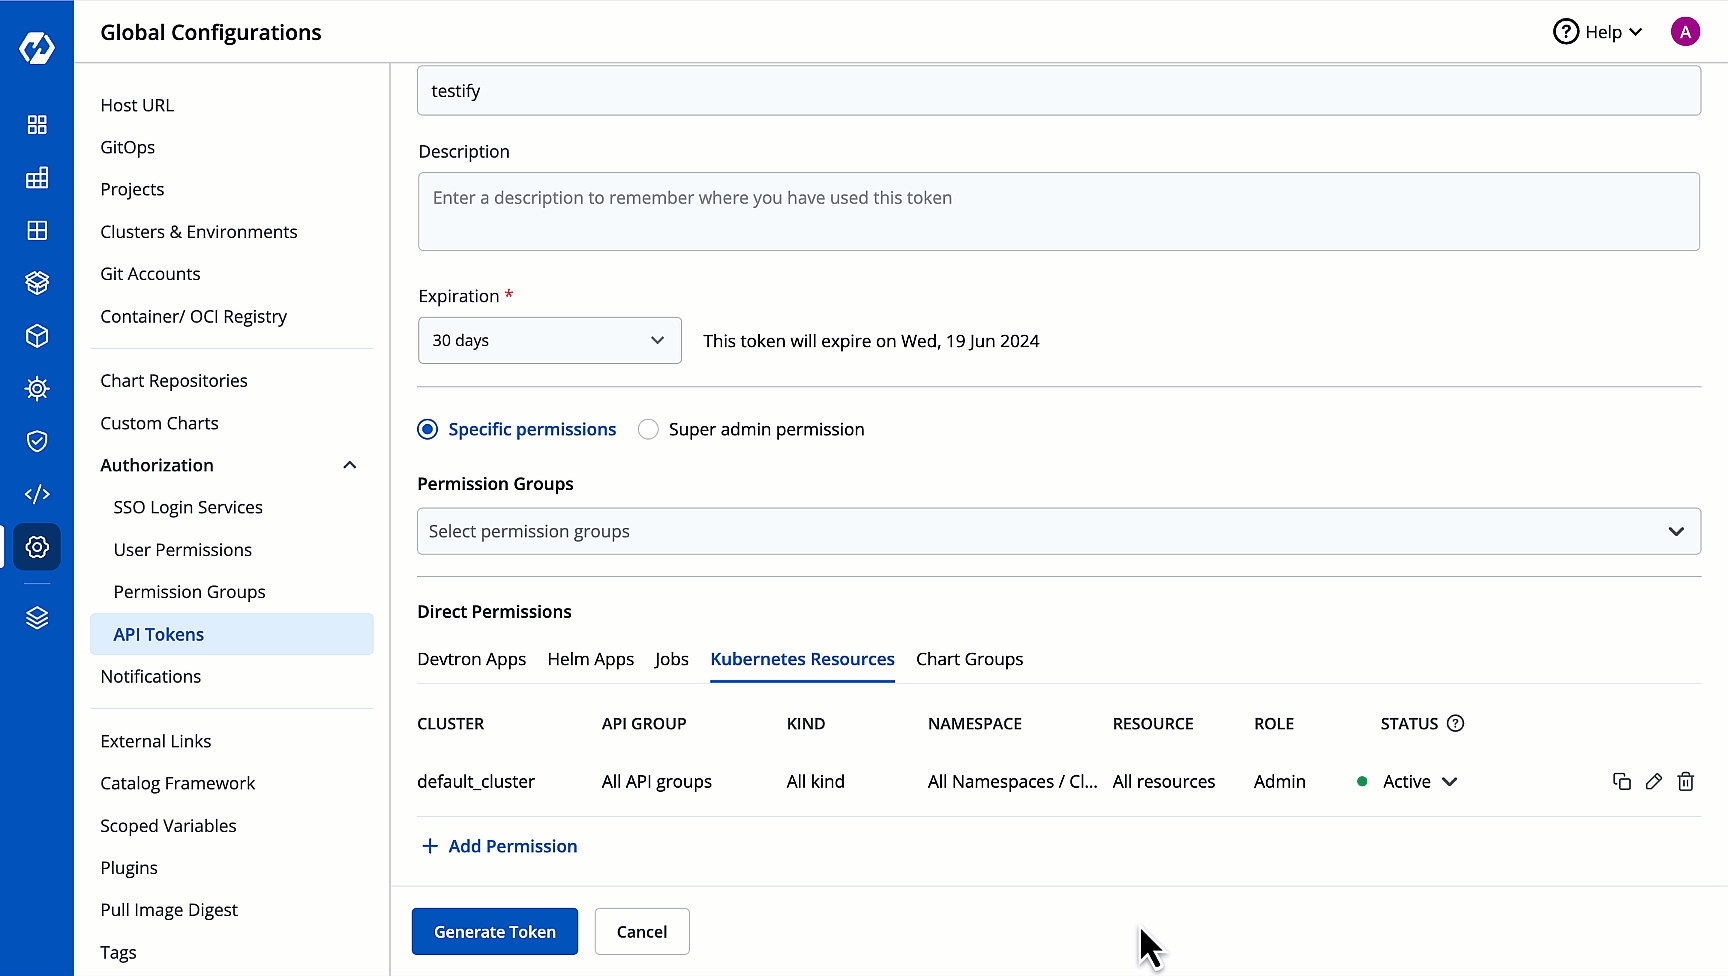
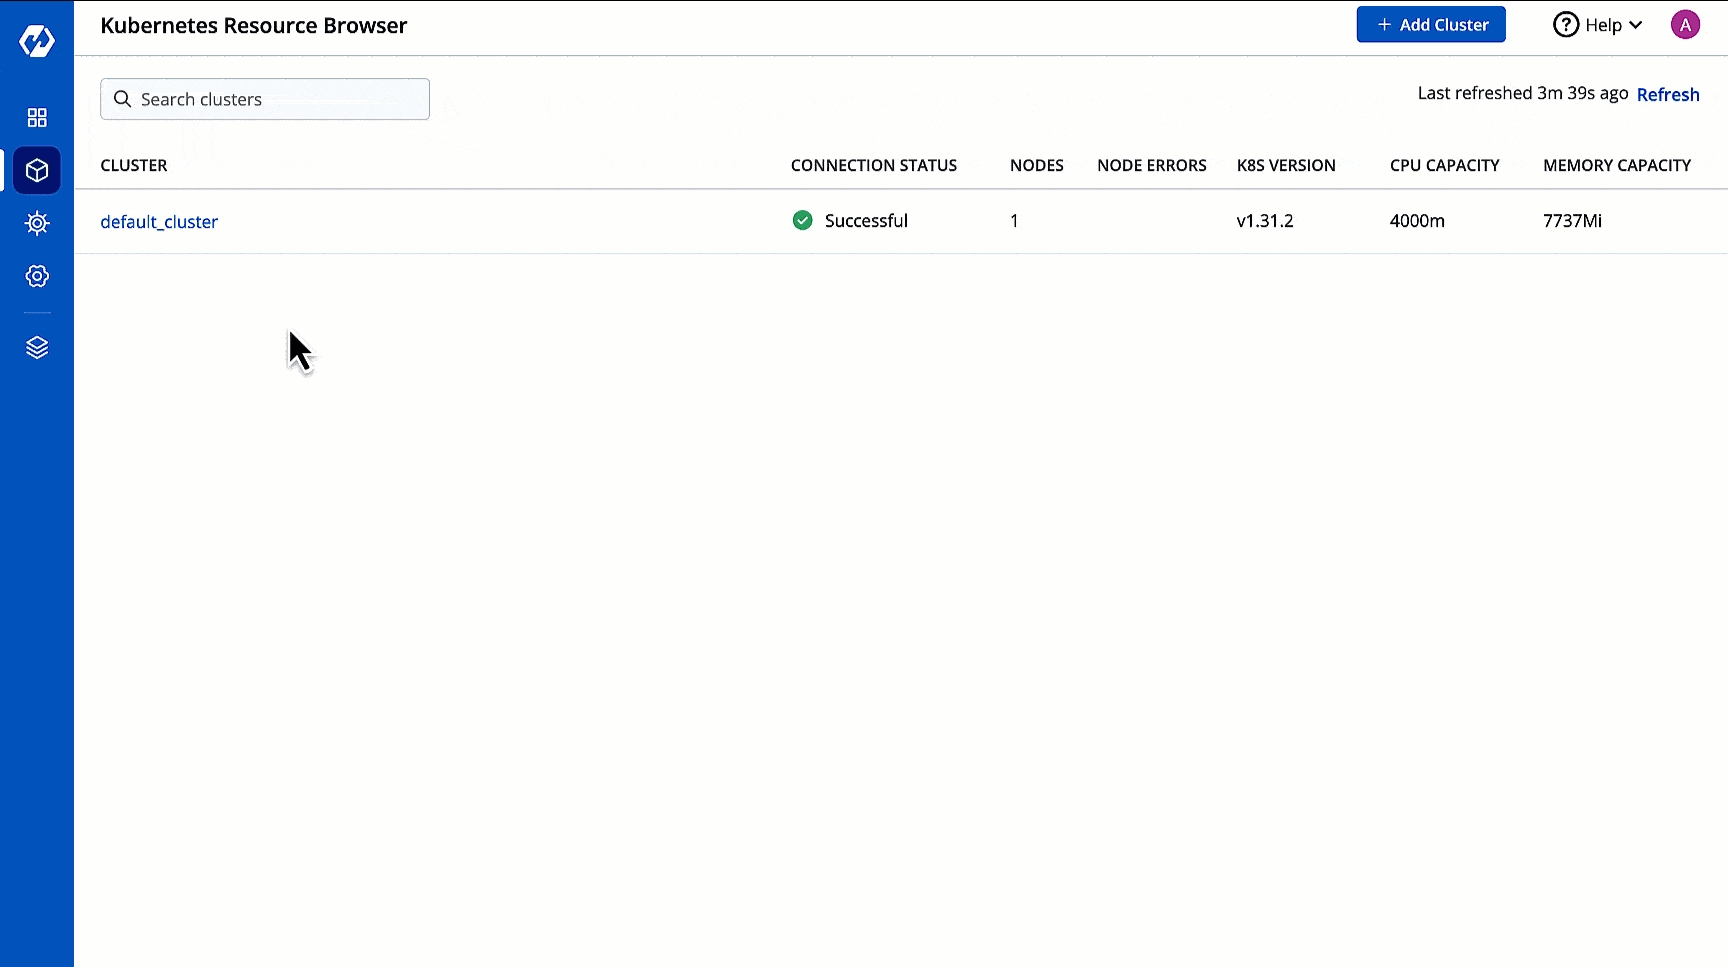
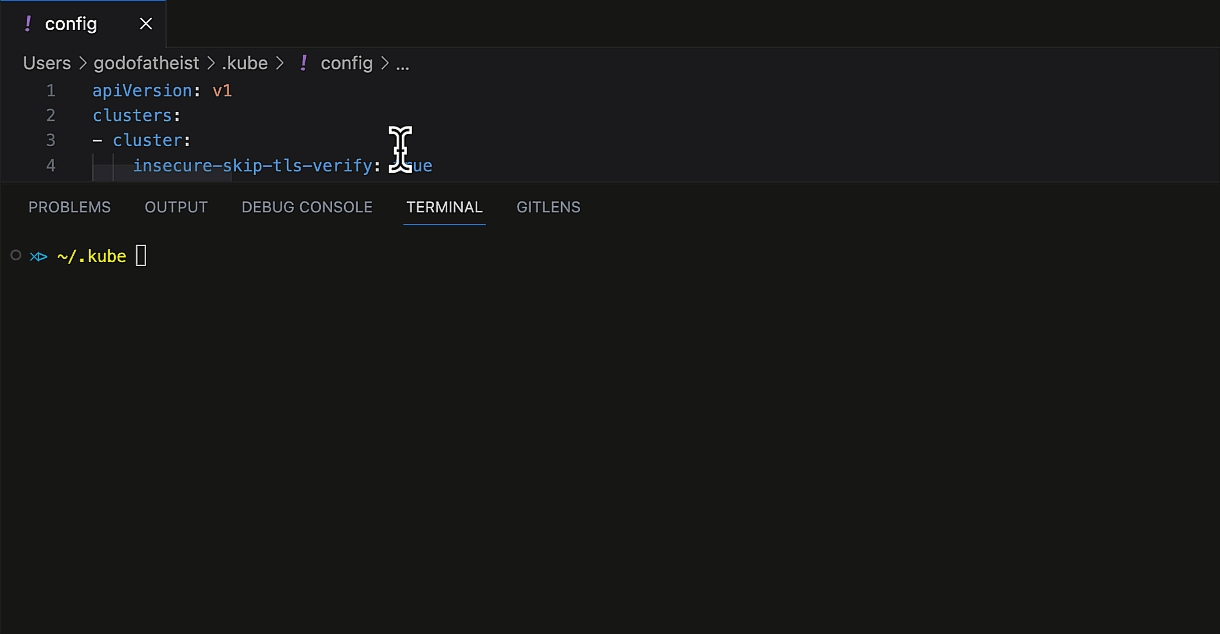
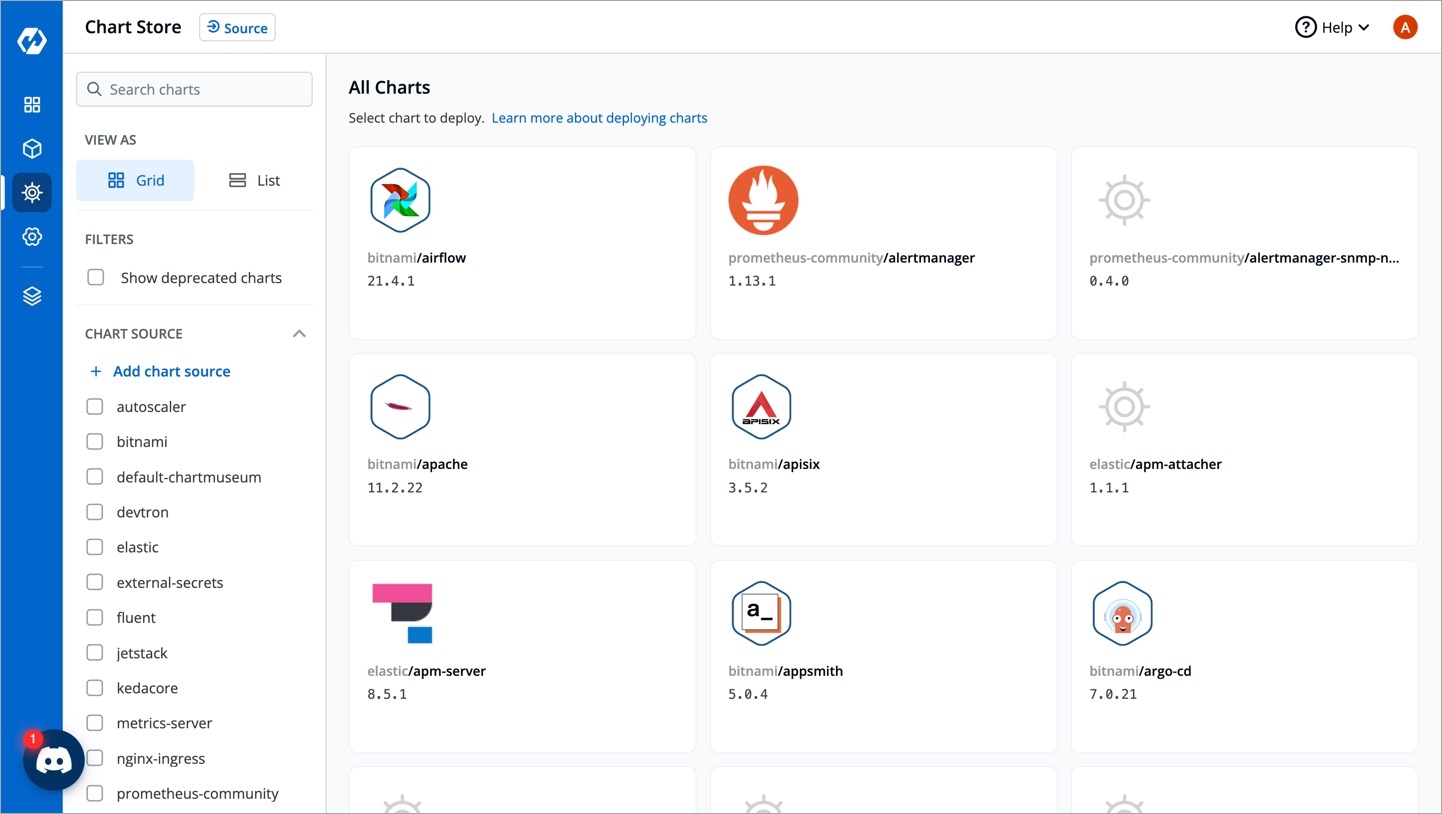
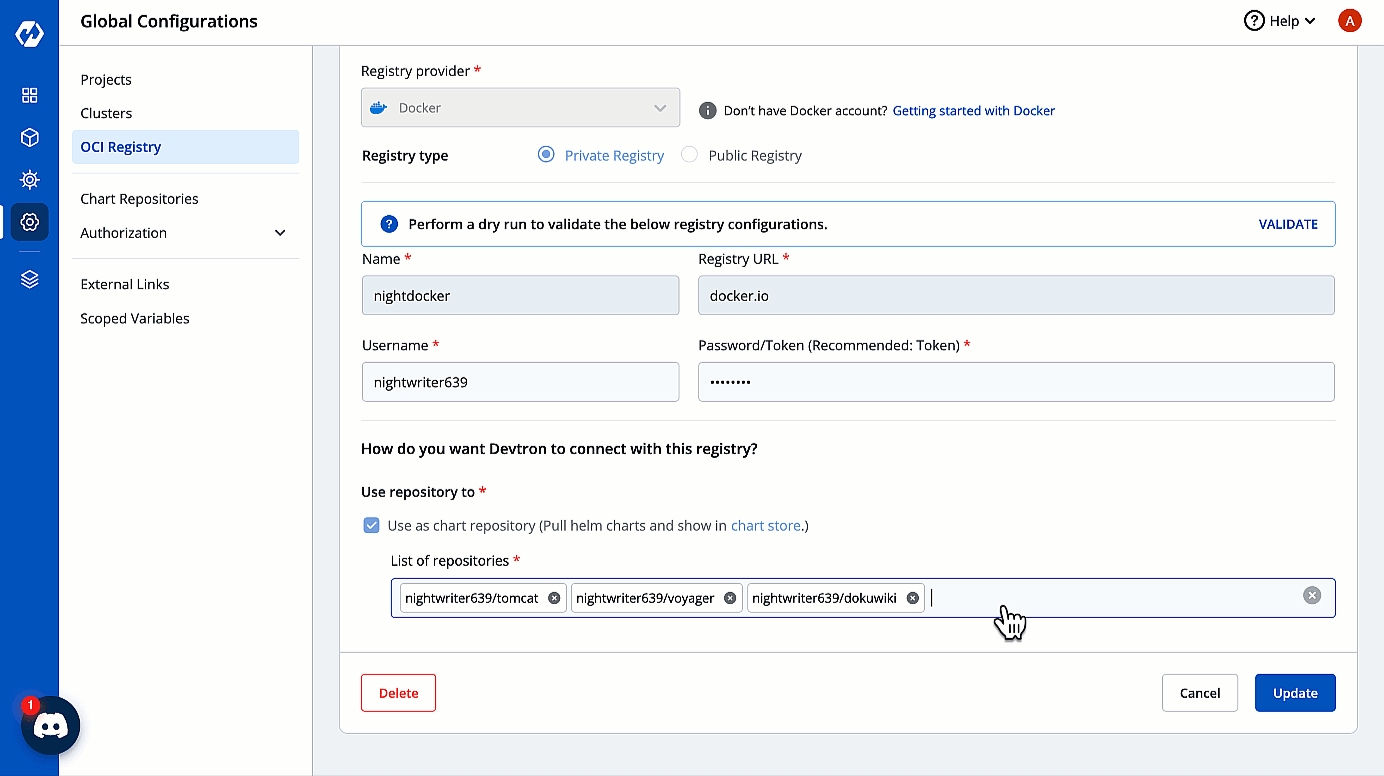
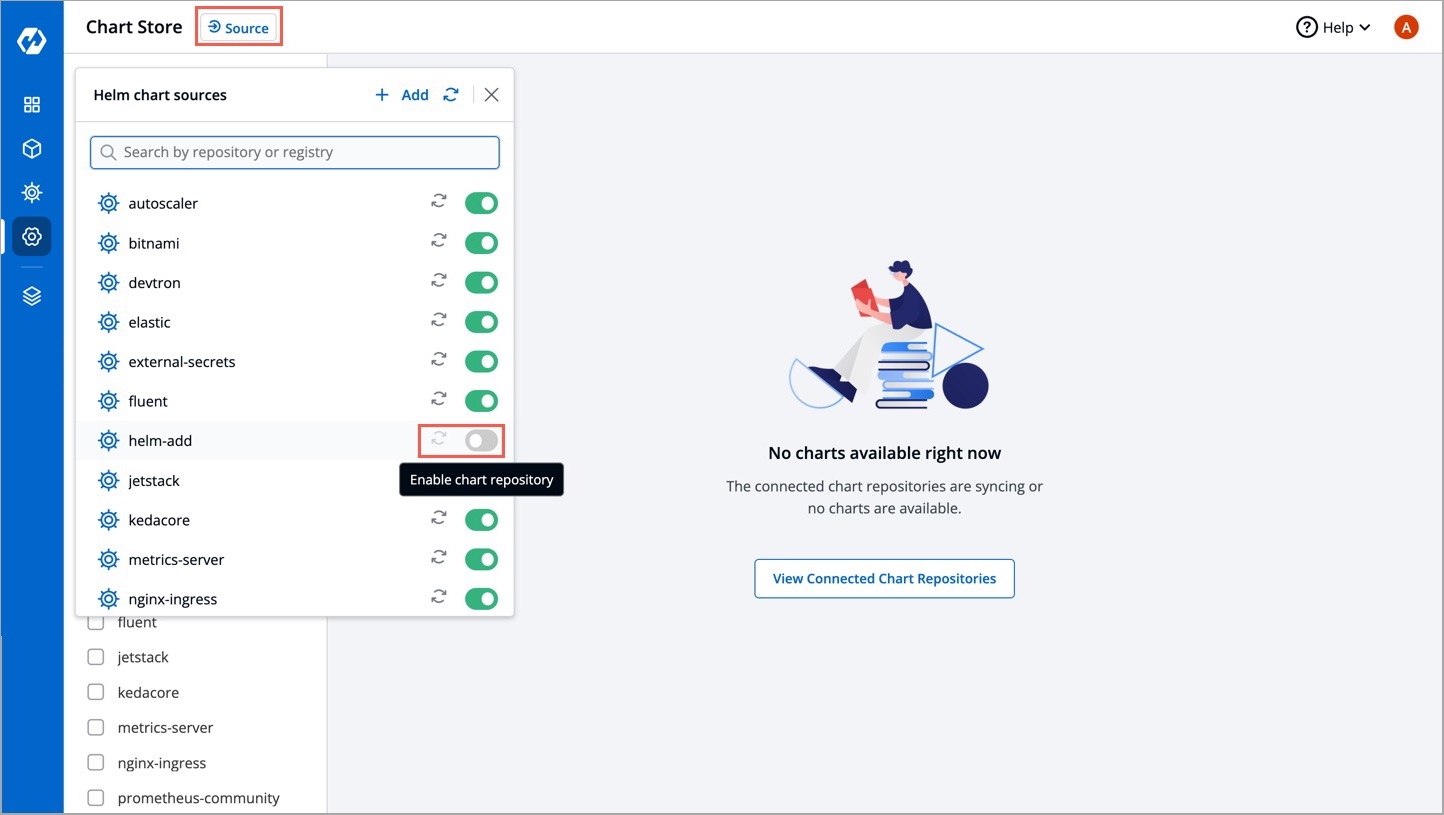

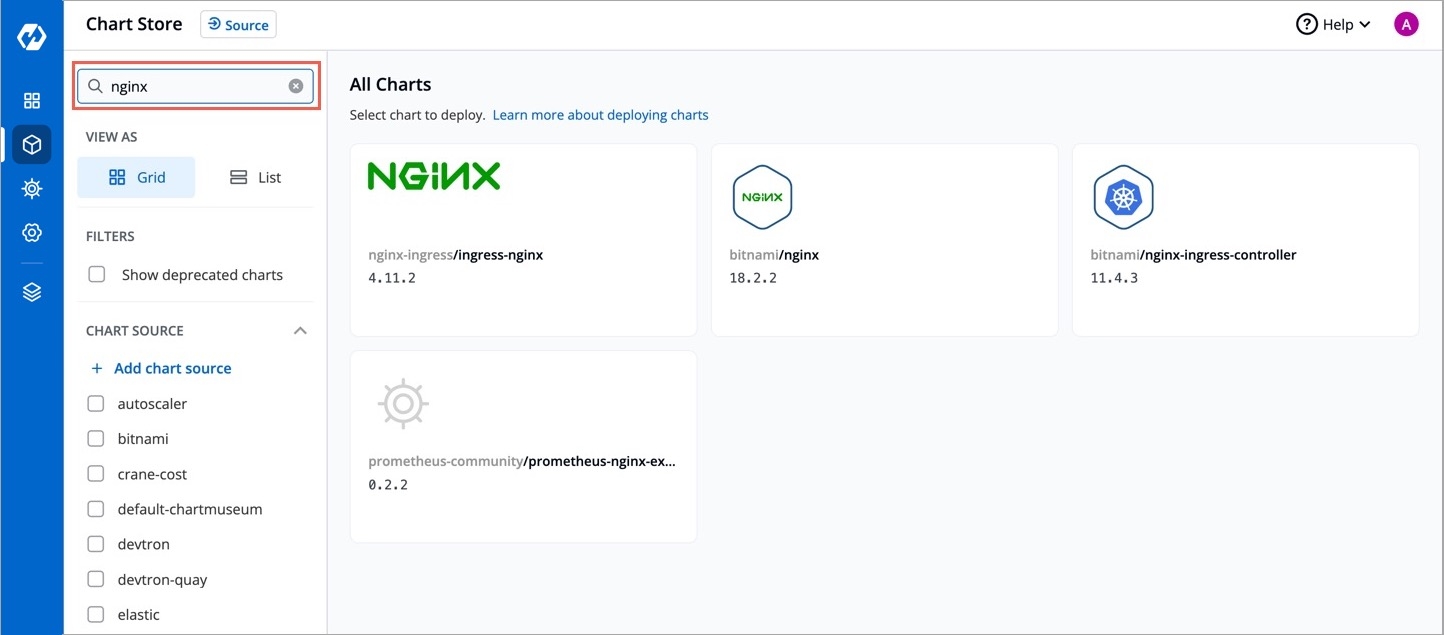


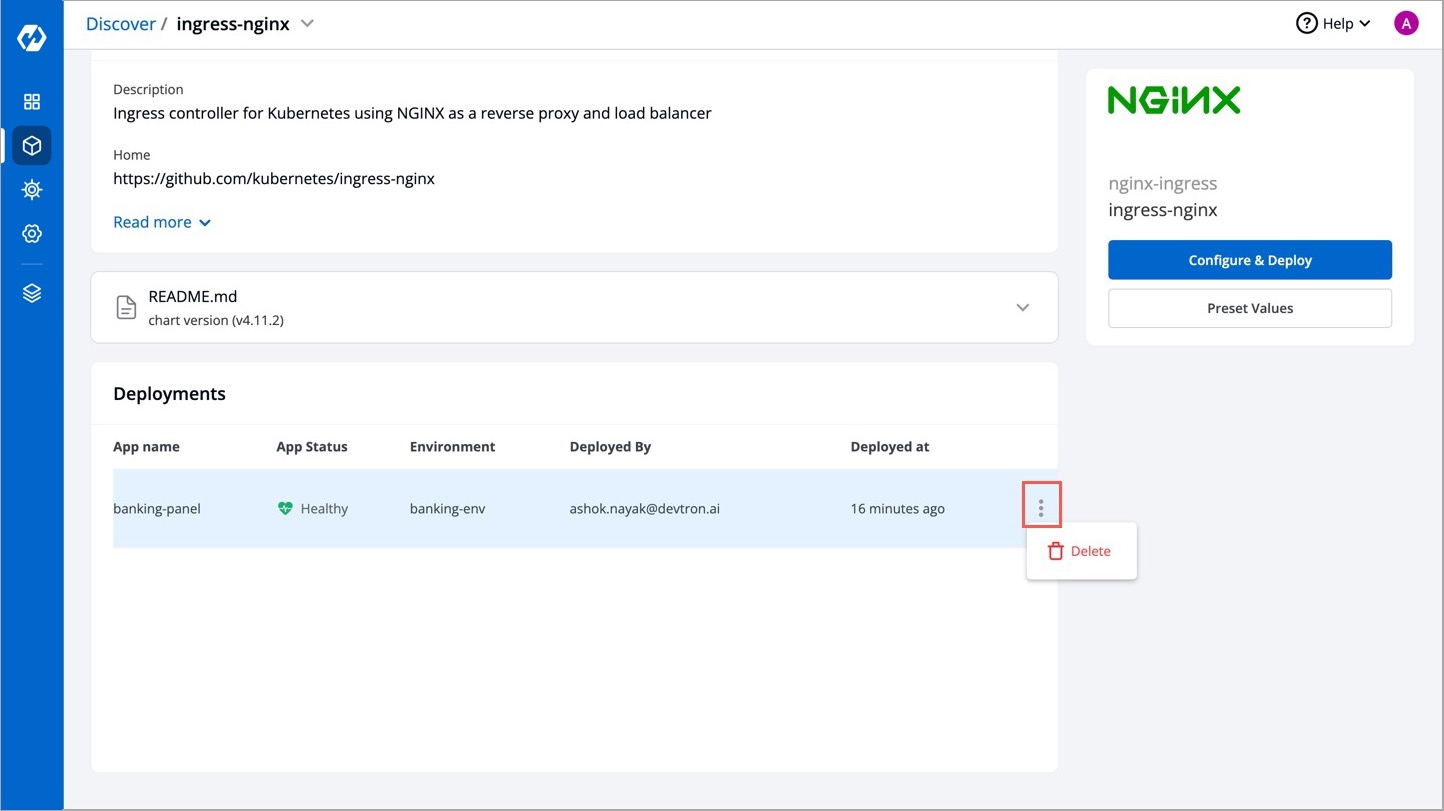
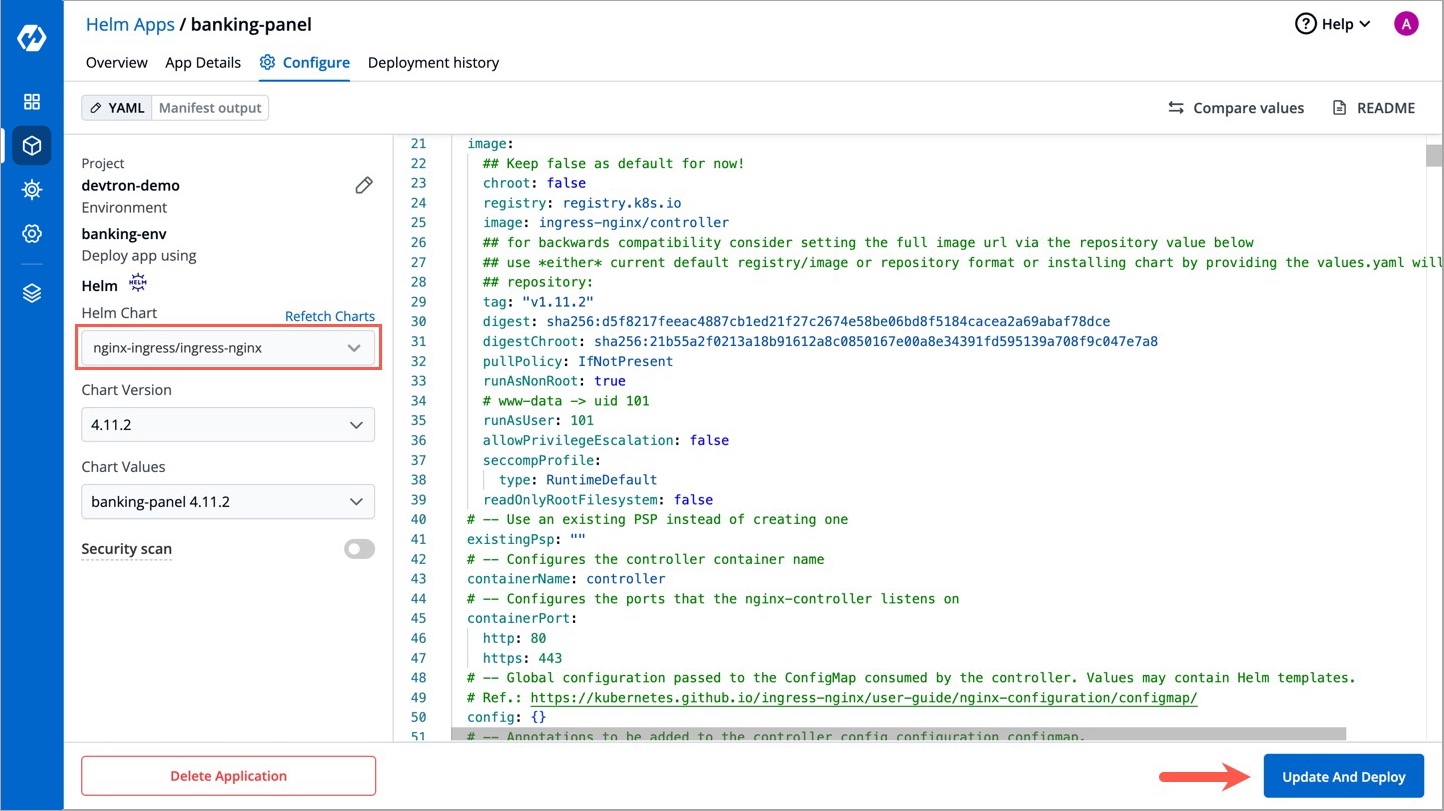
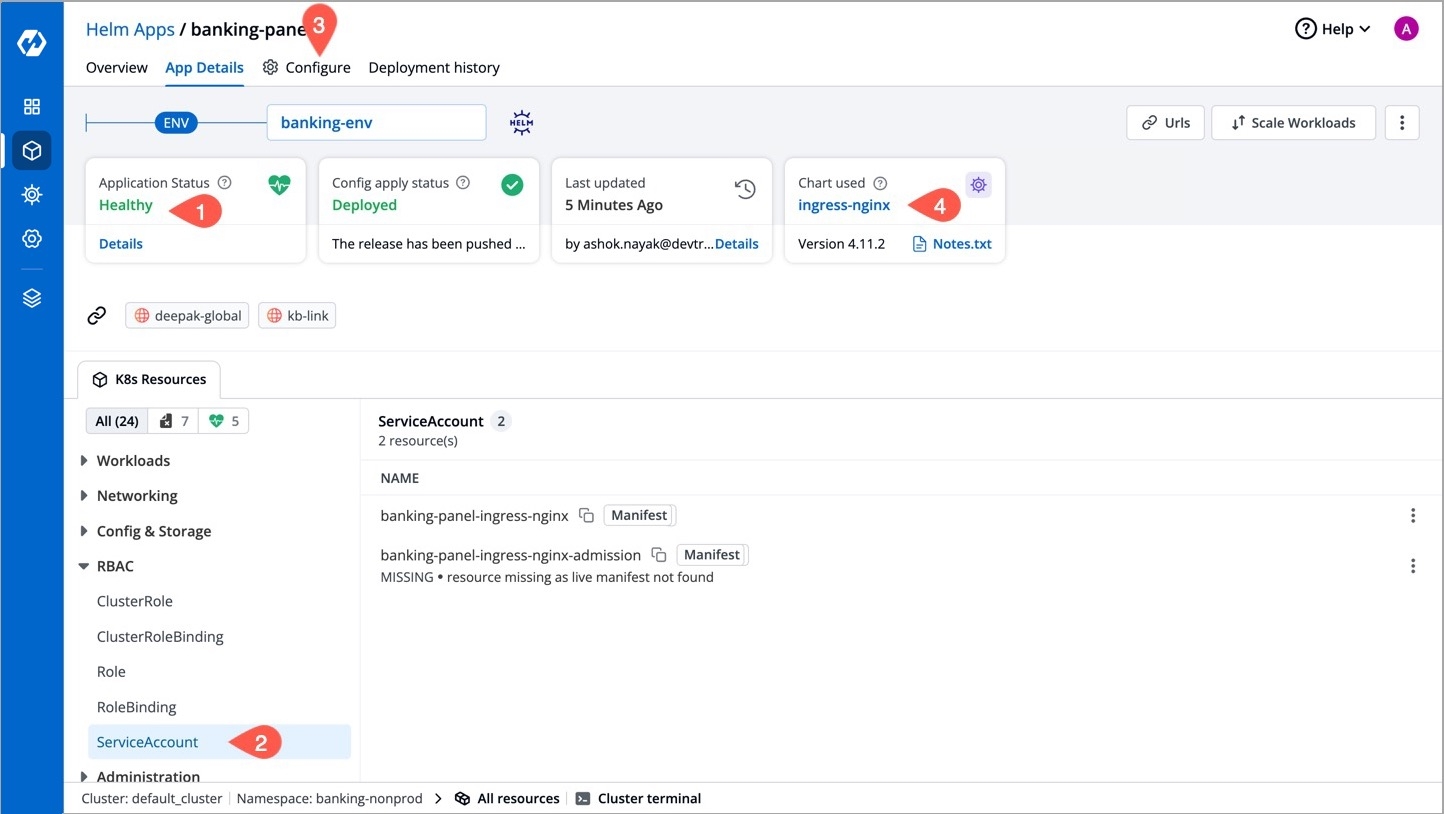
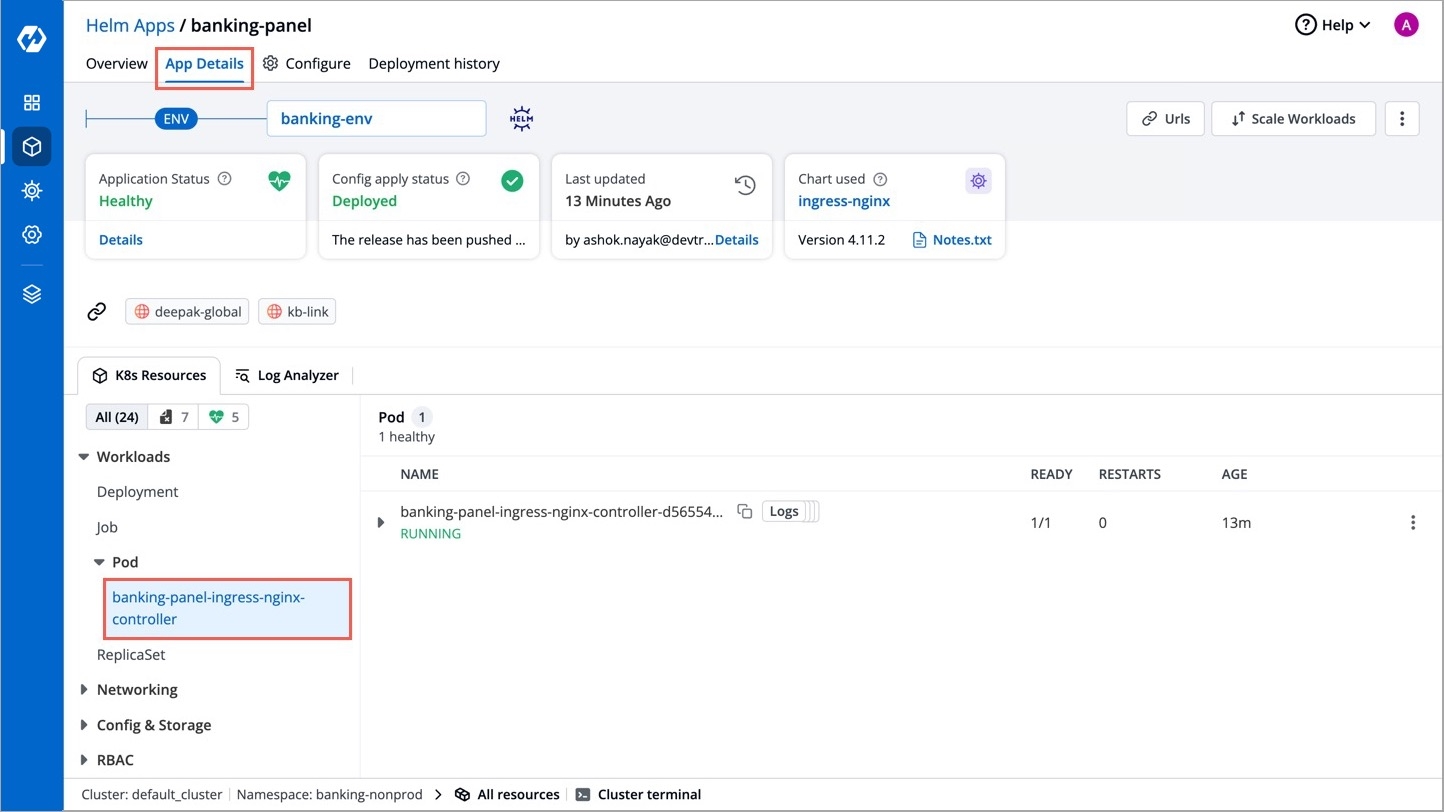
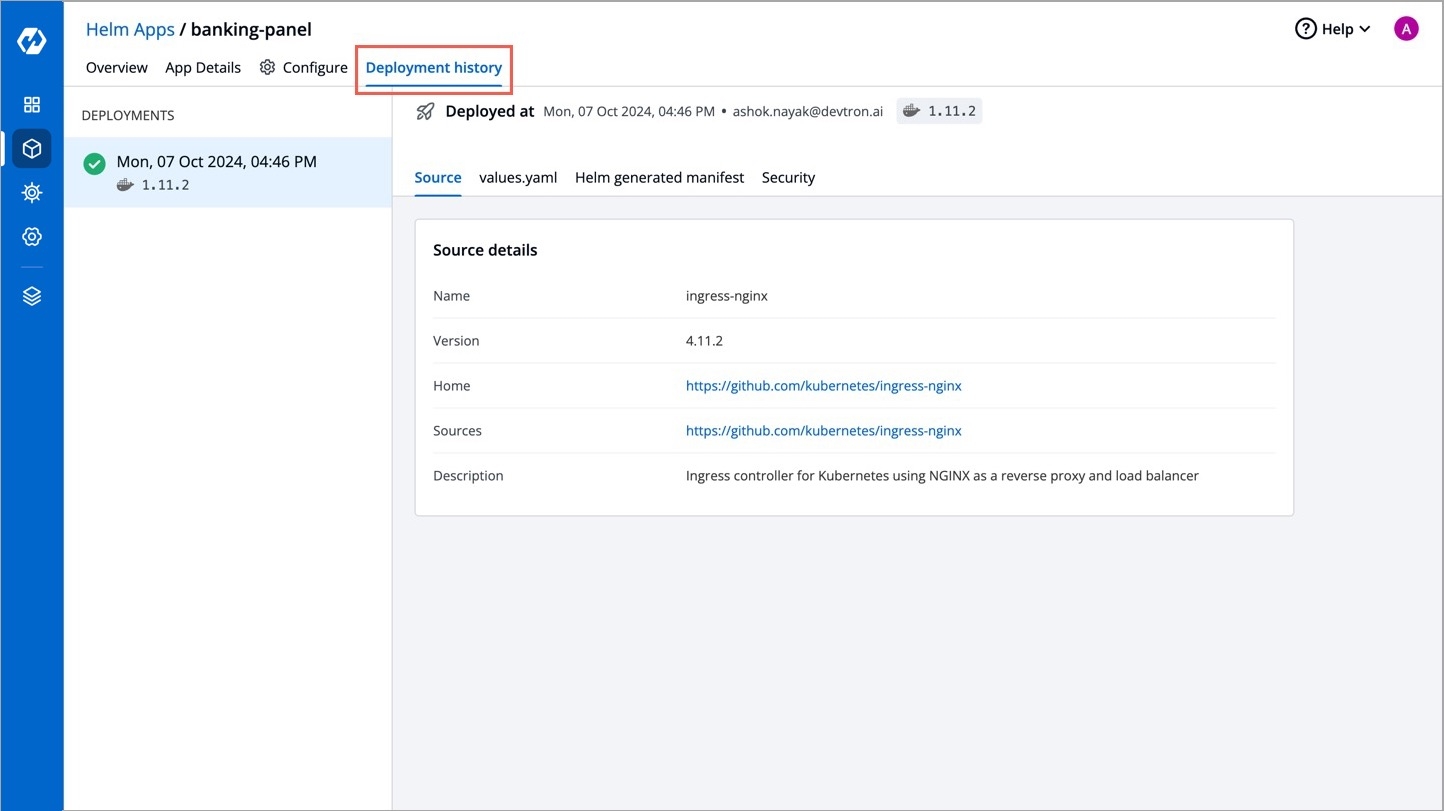
Click here to know where to find DEVTRON_BASE_URL.
redirectURI field, make sure to enter the same redirect URI you gave in step 4 of client creation.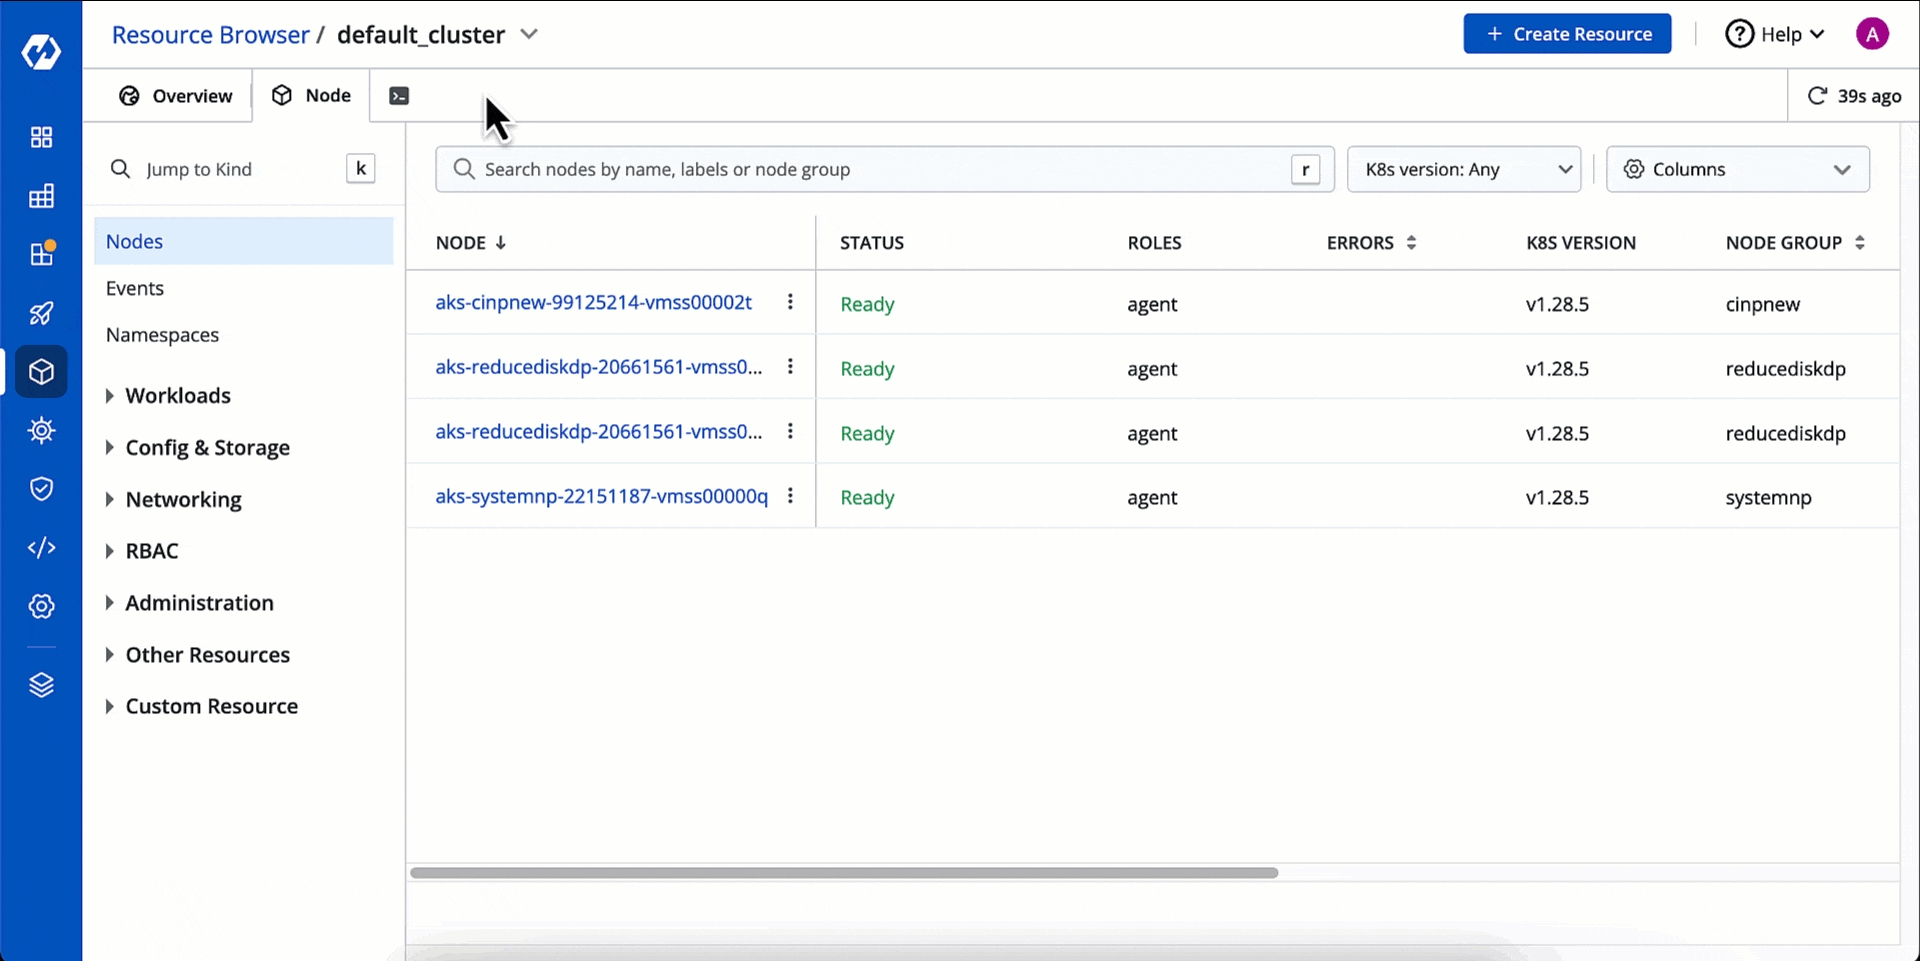


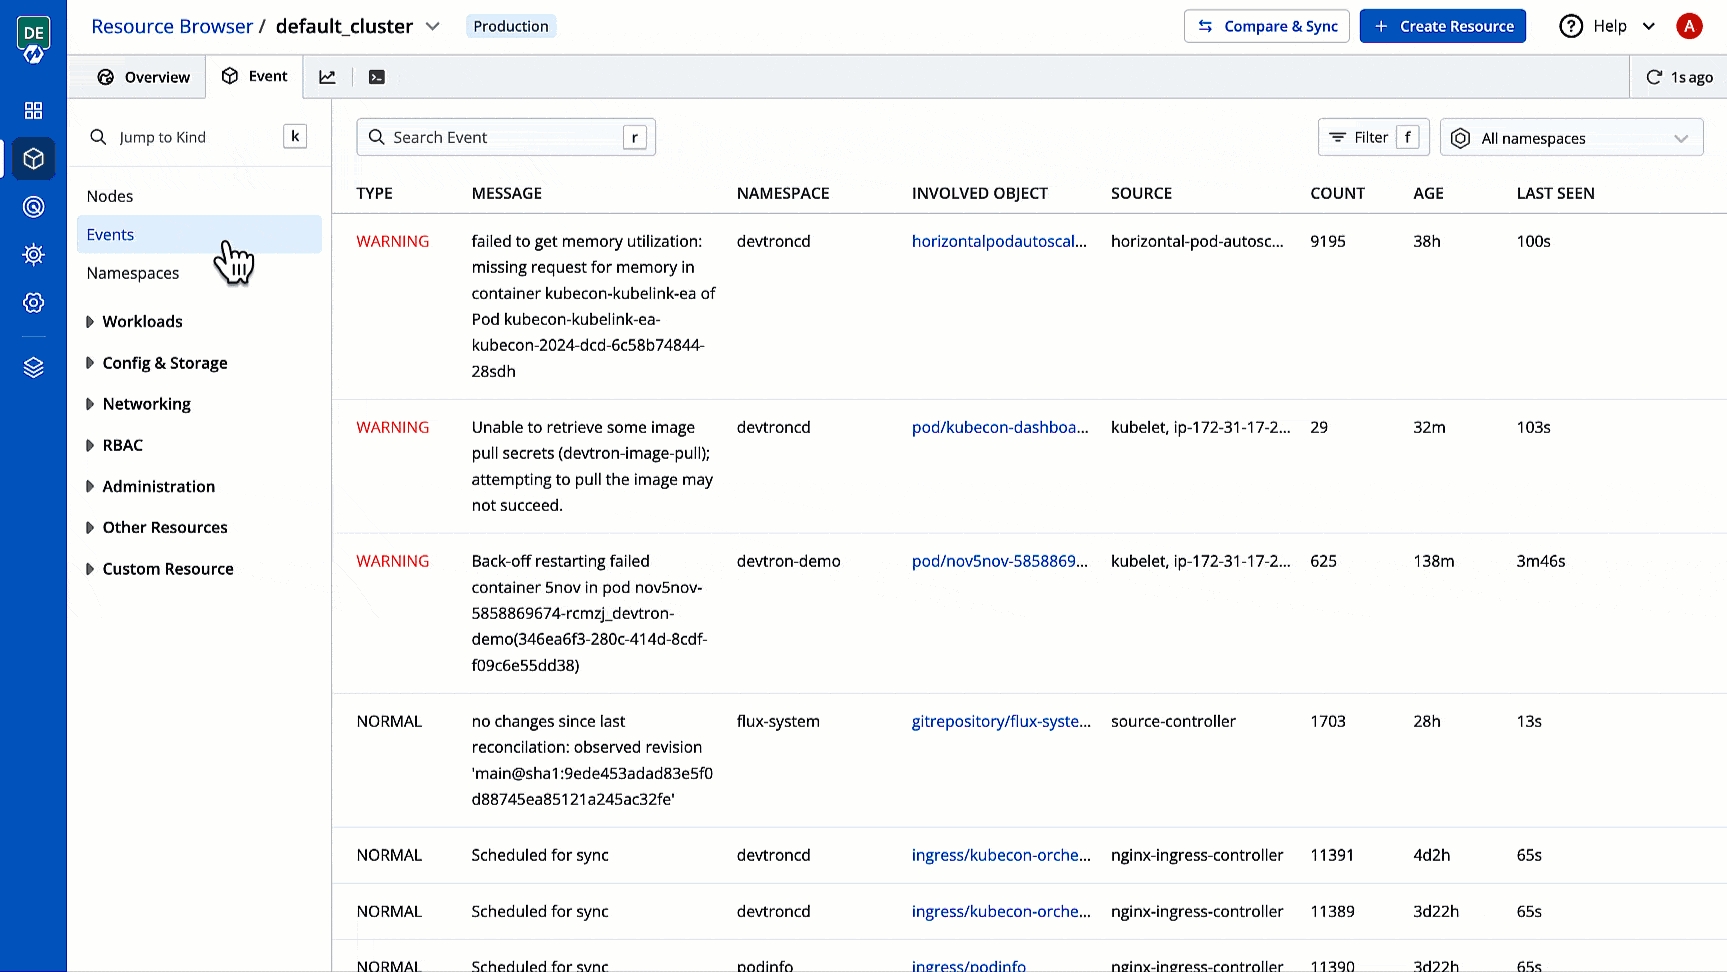
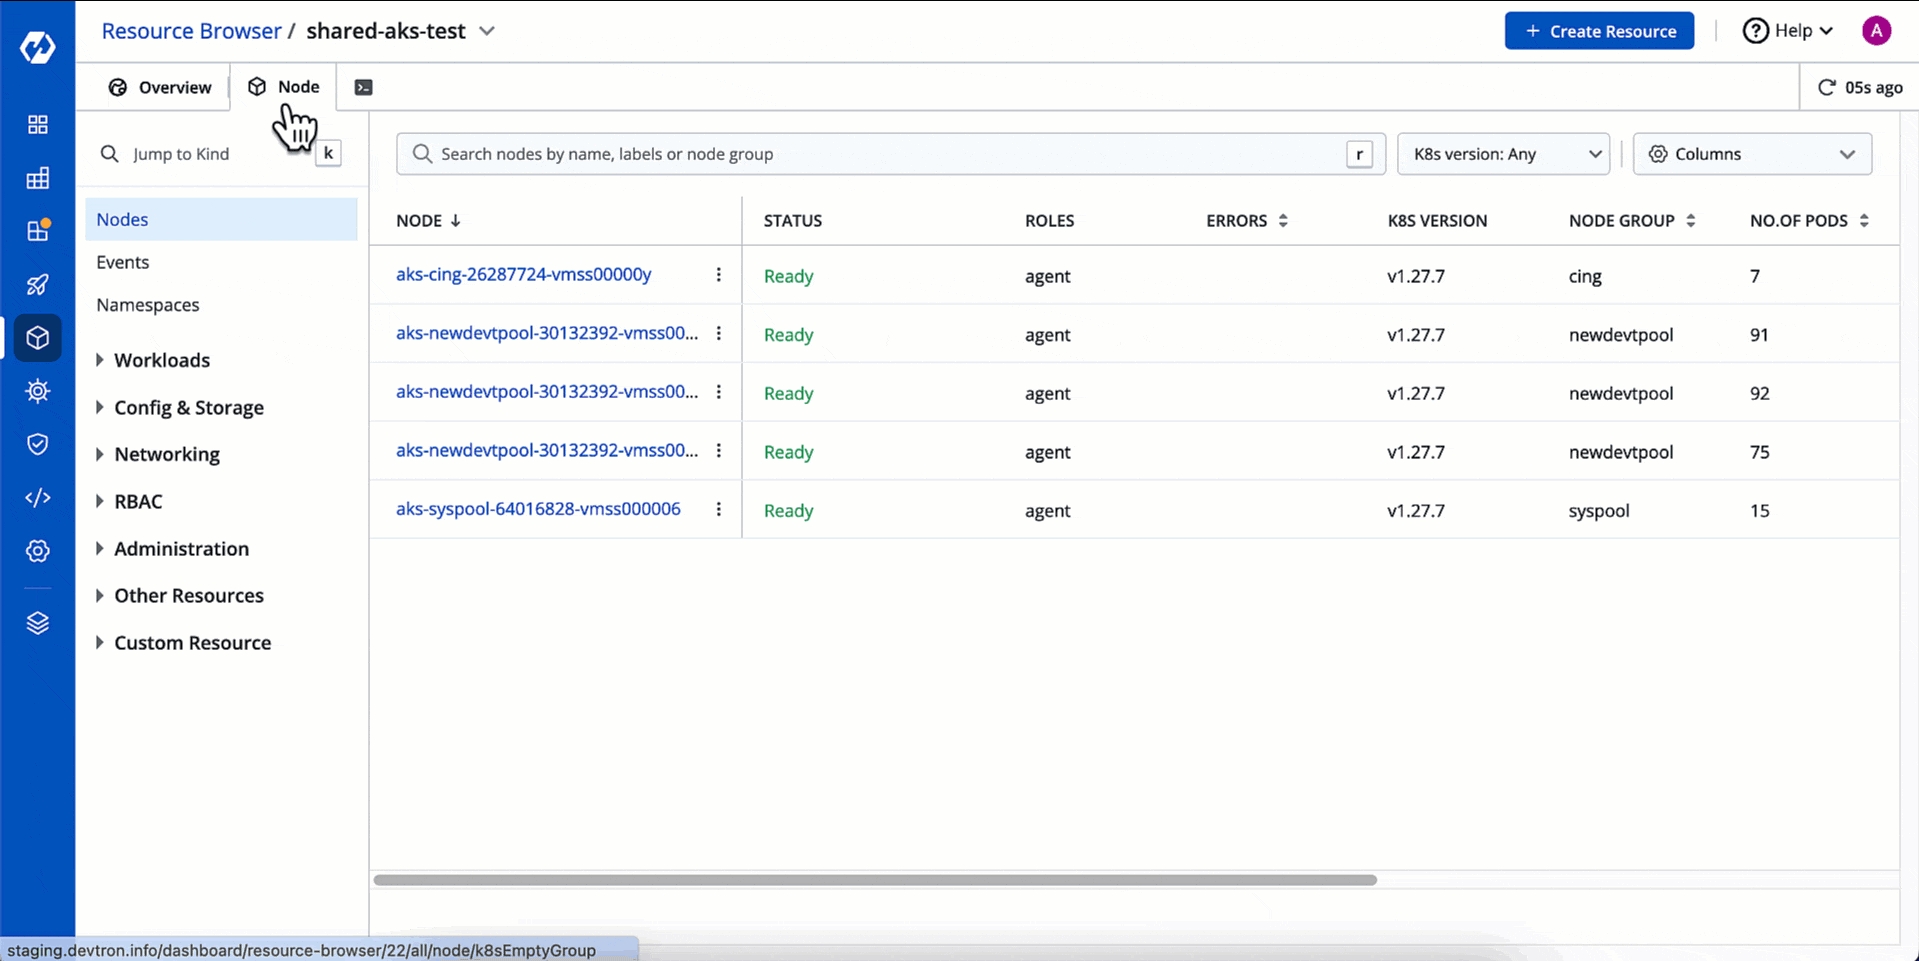

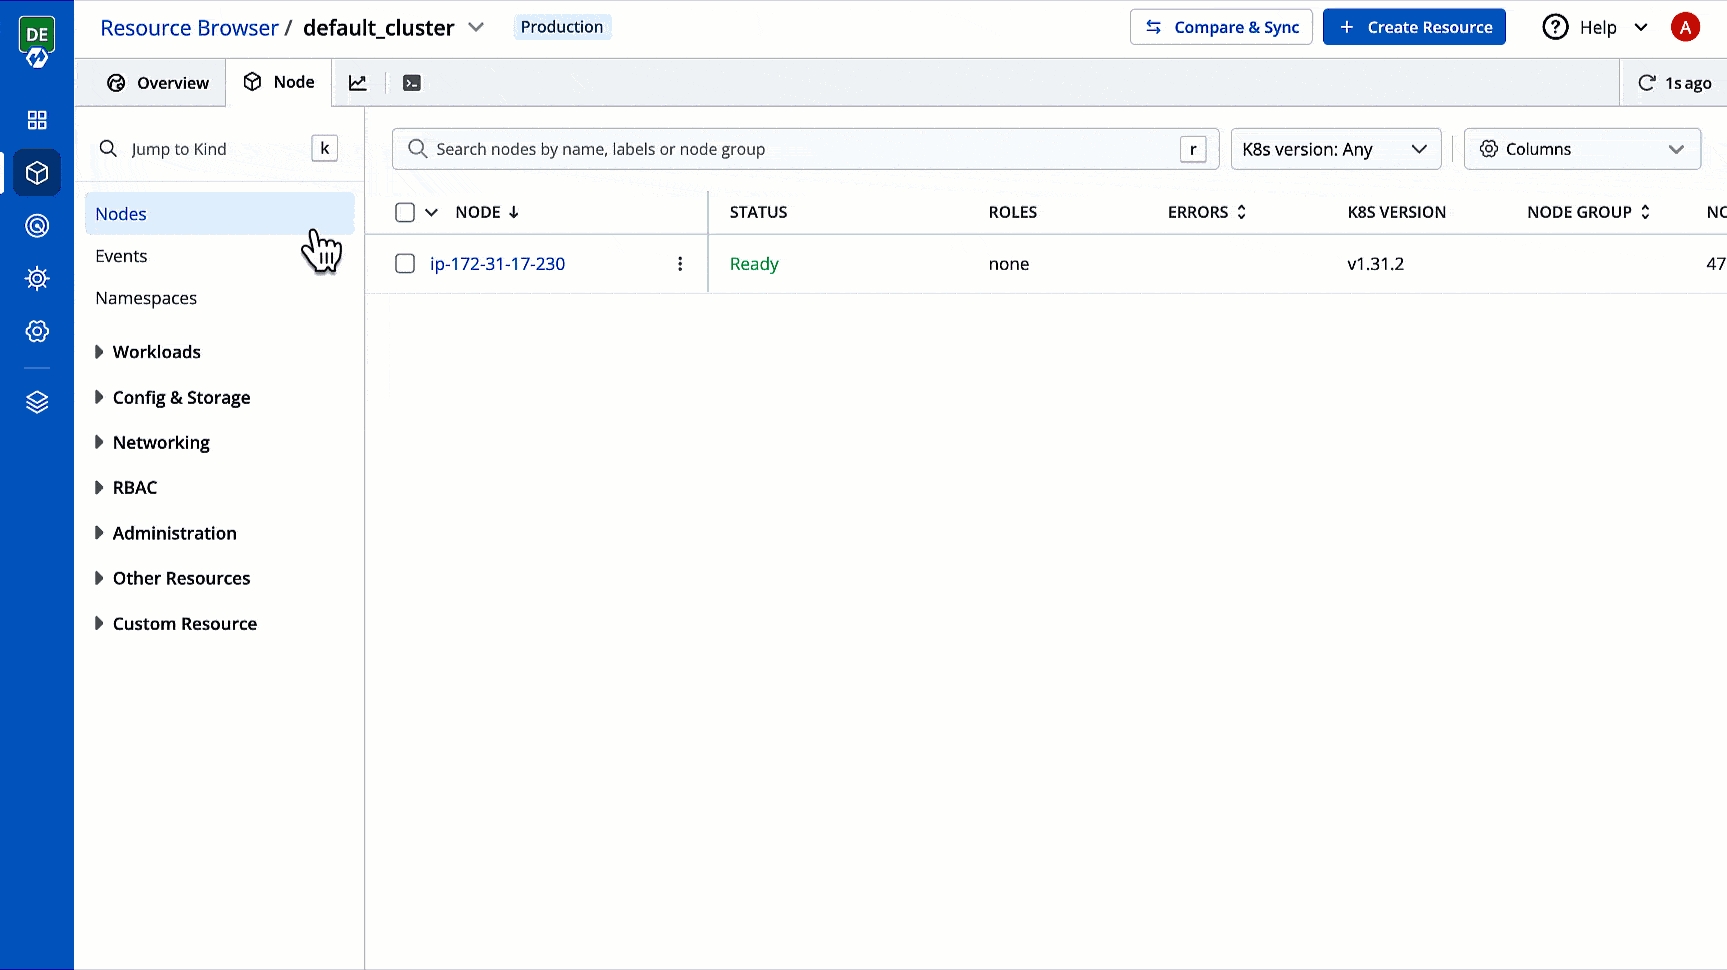
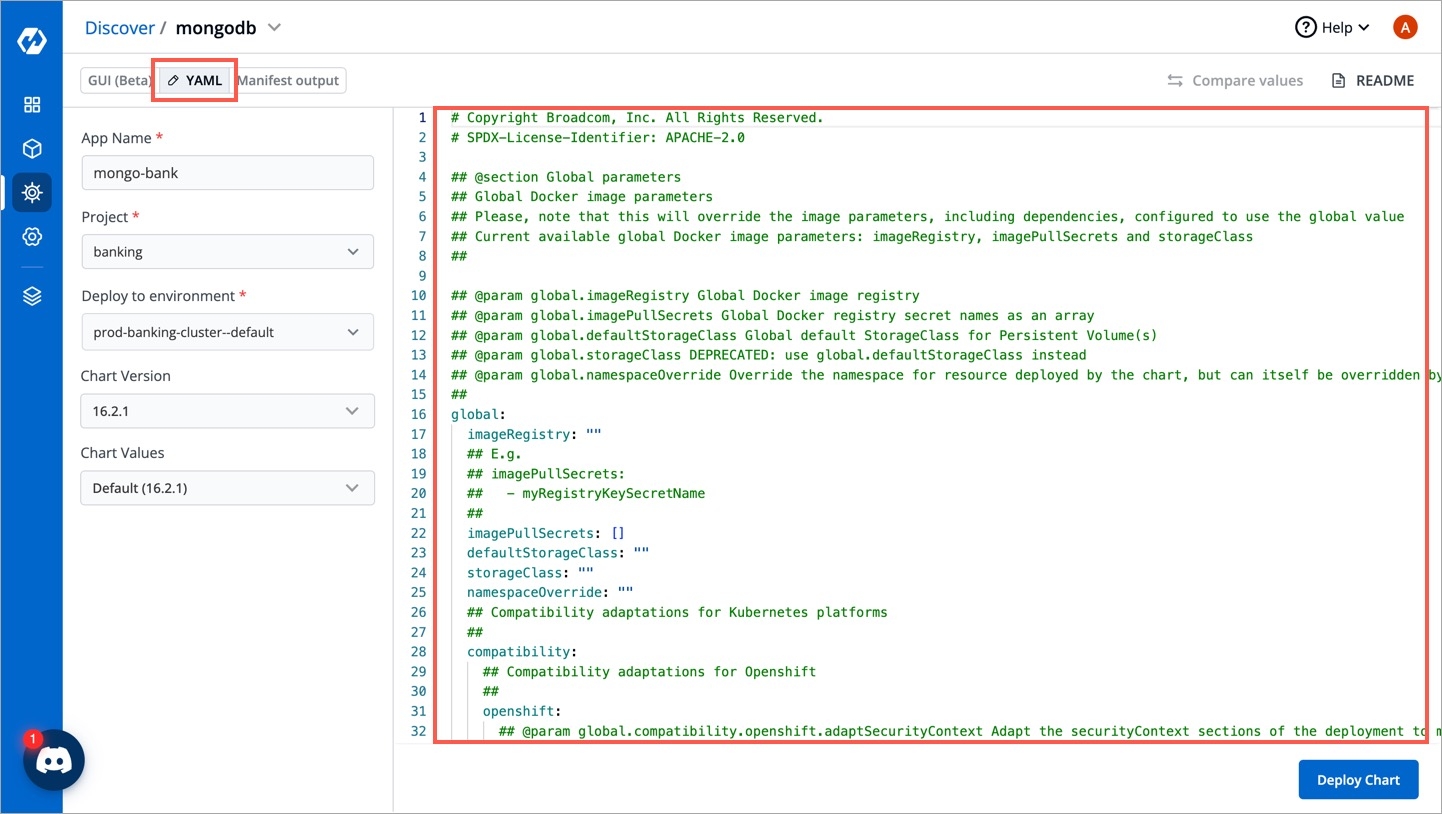
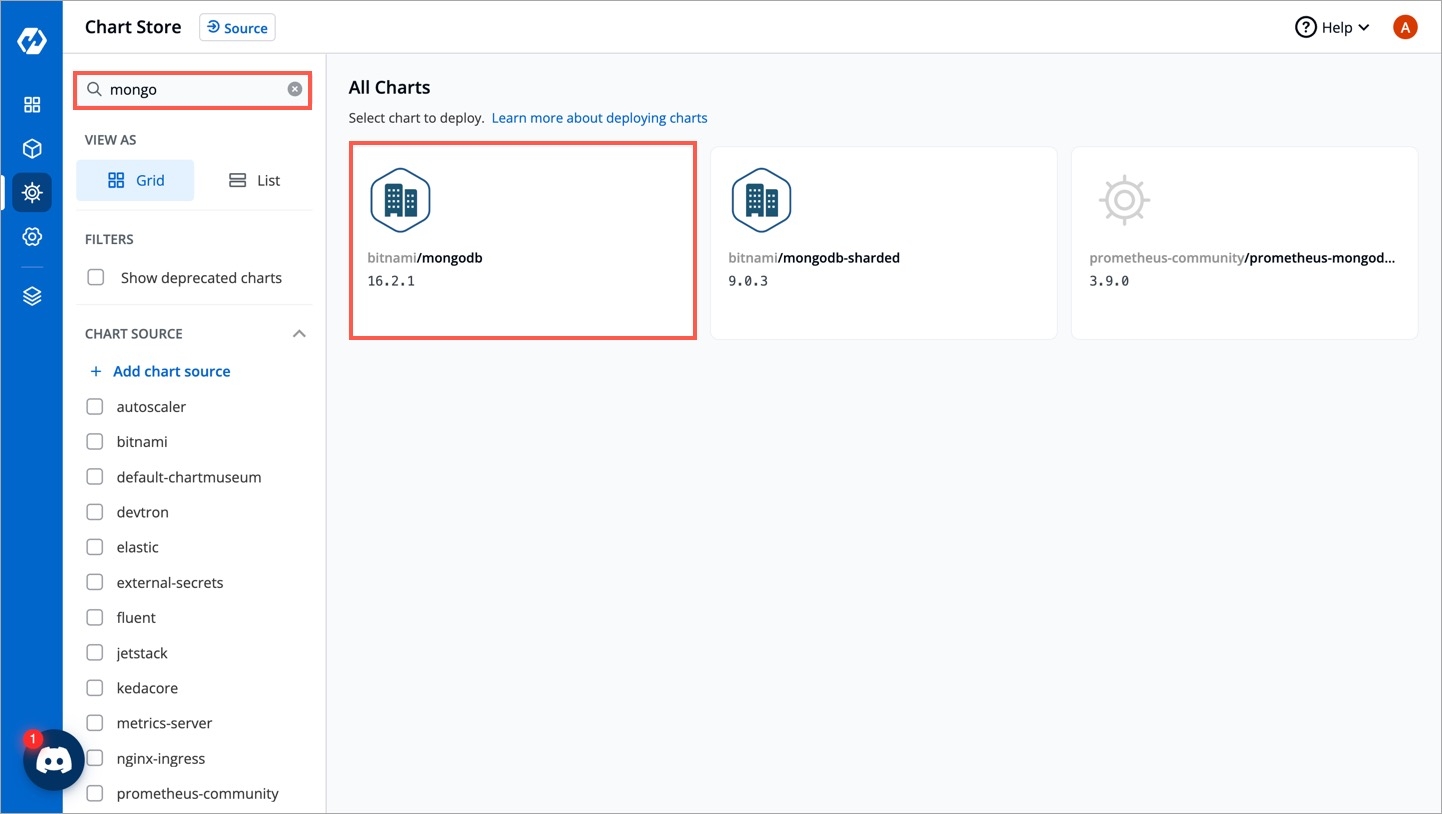
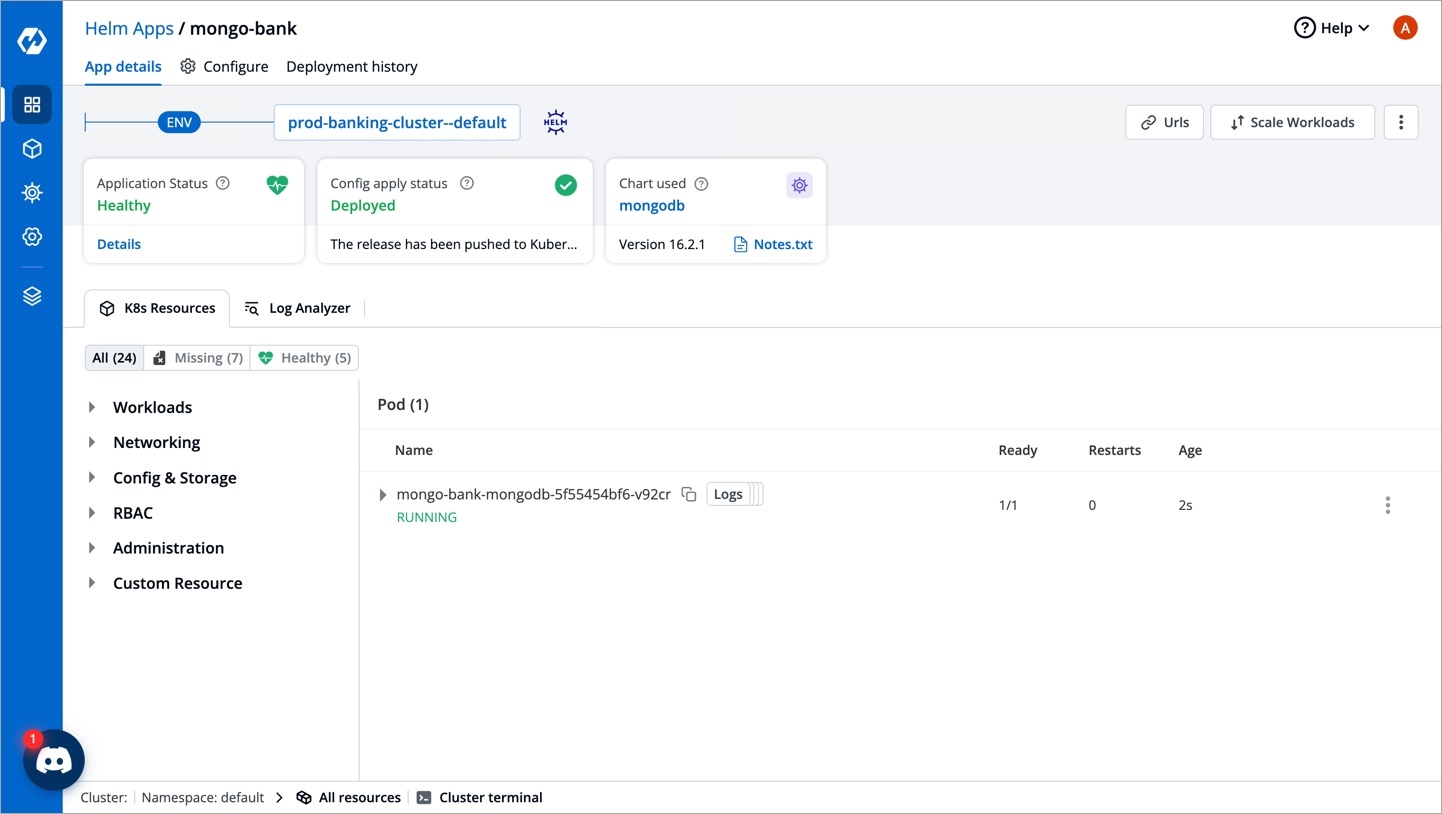
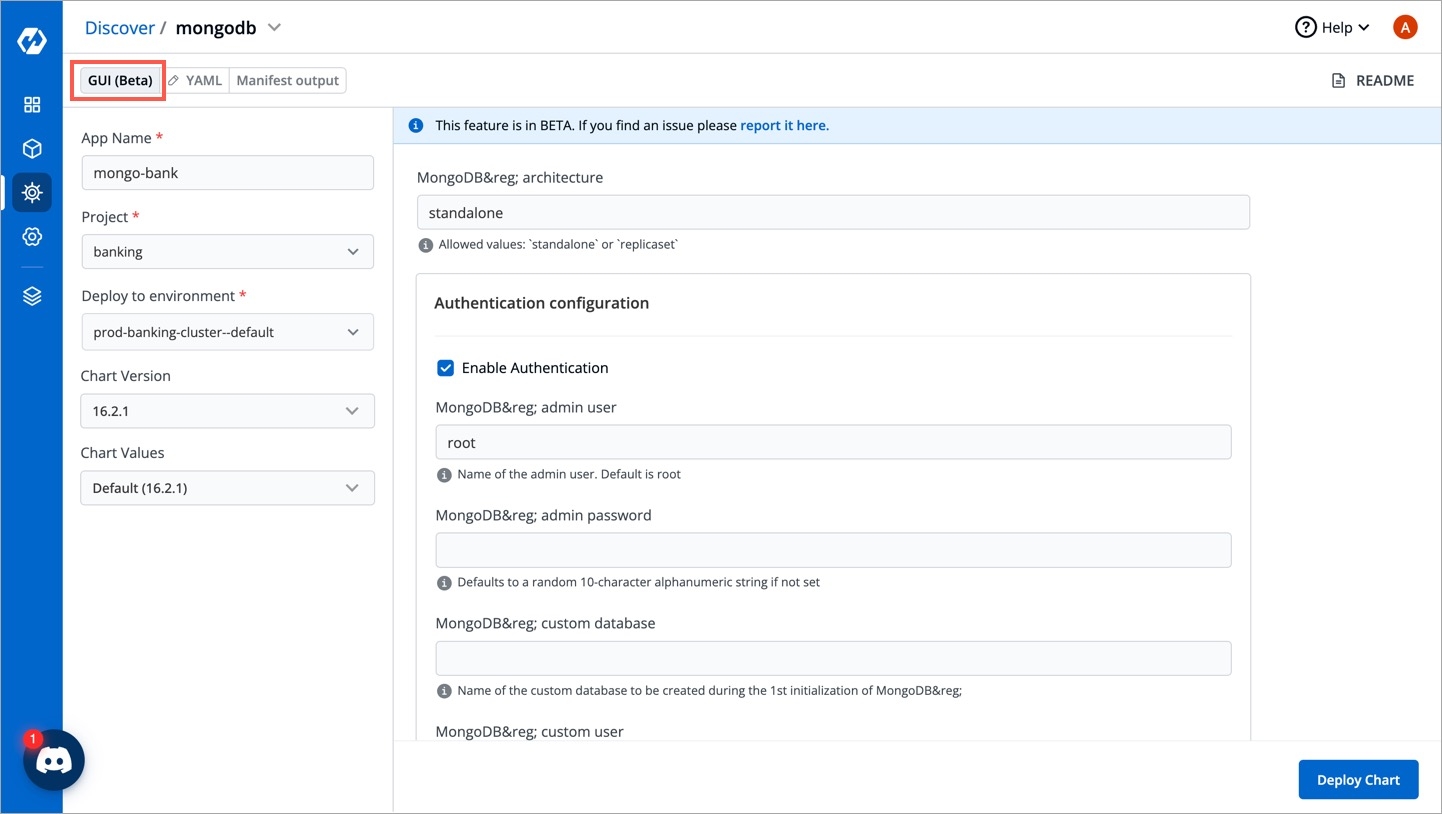
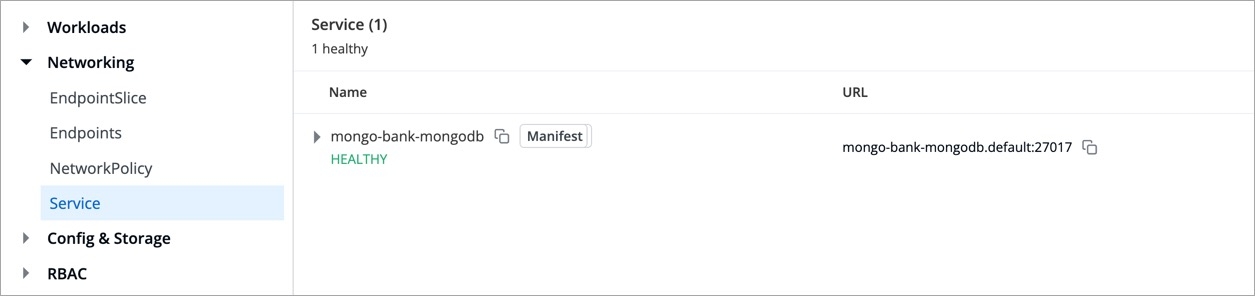

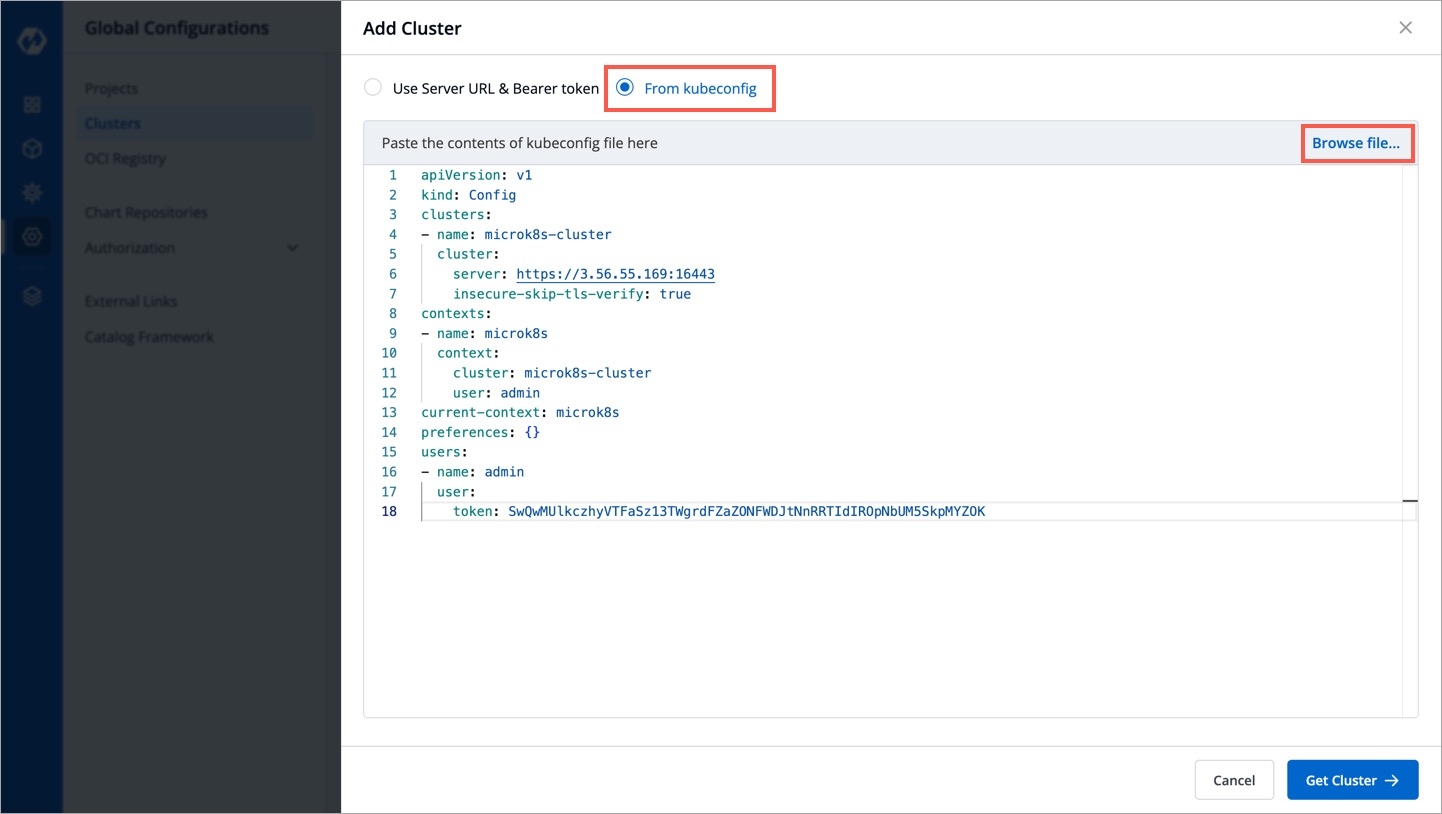
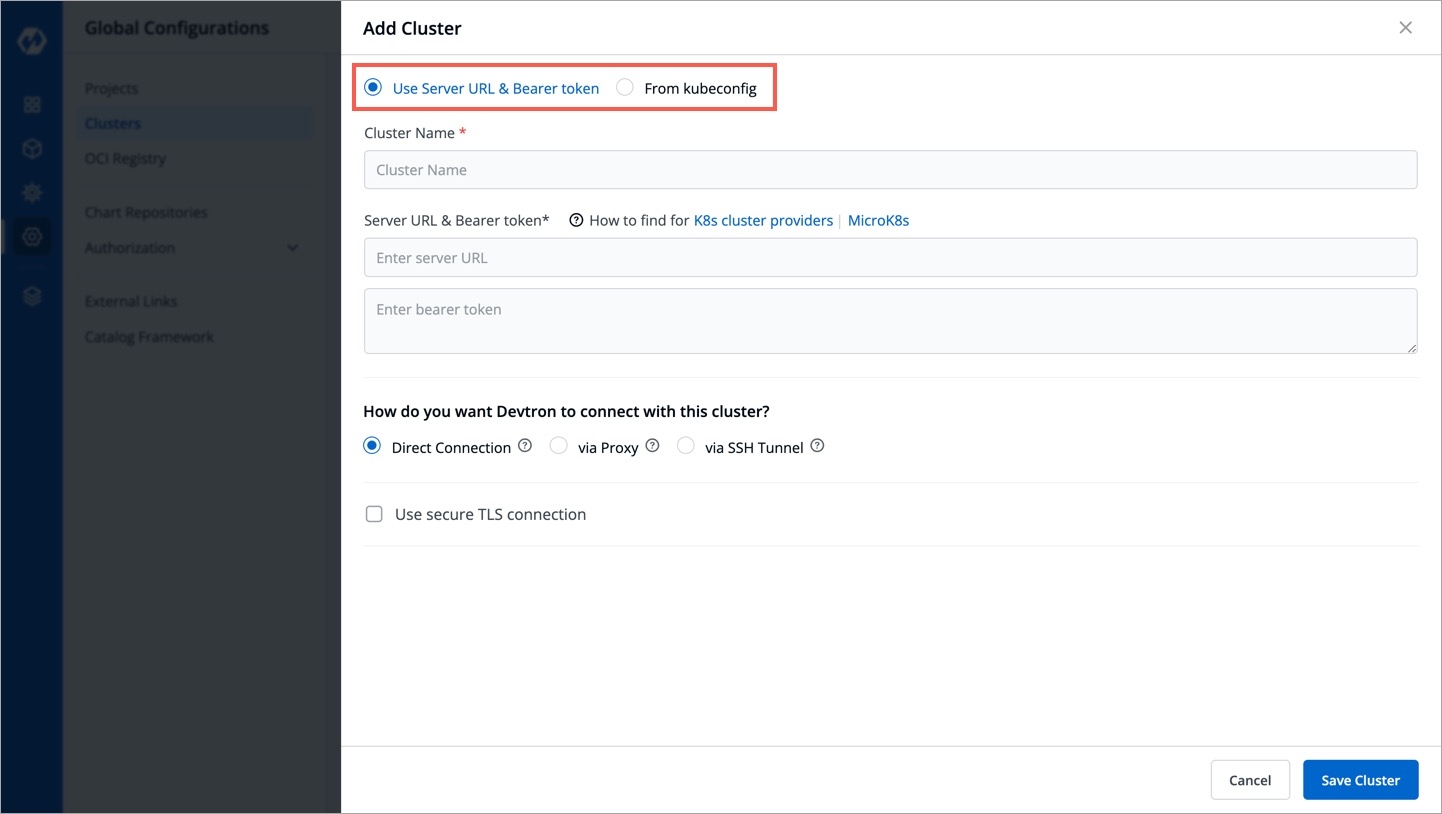
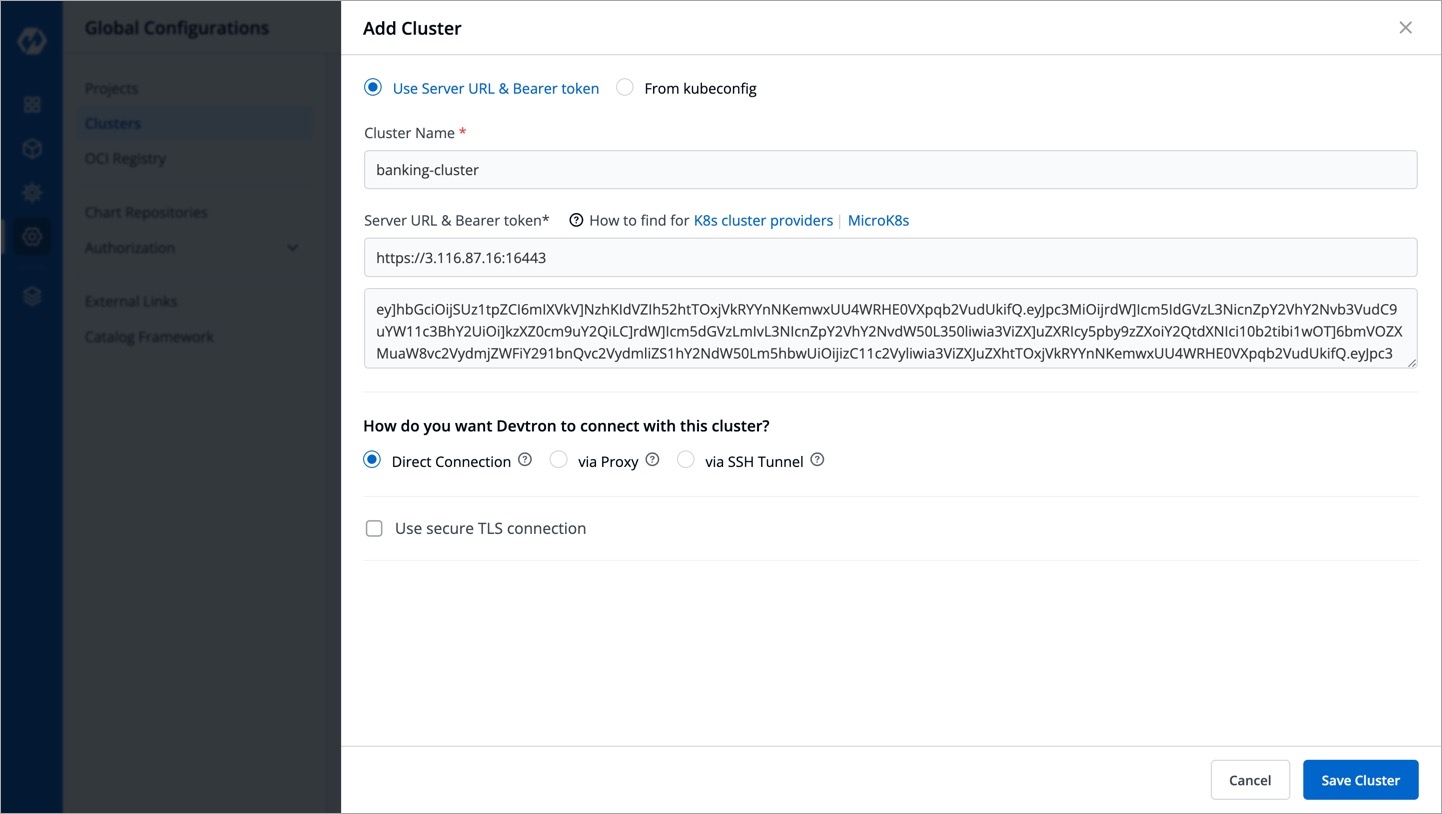
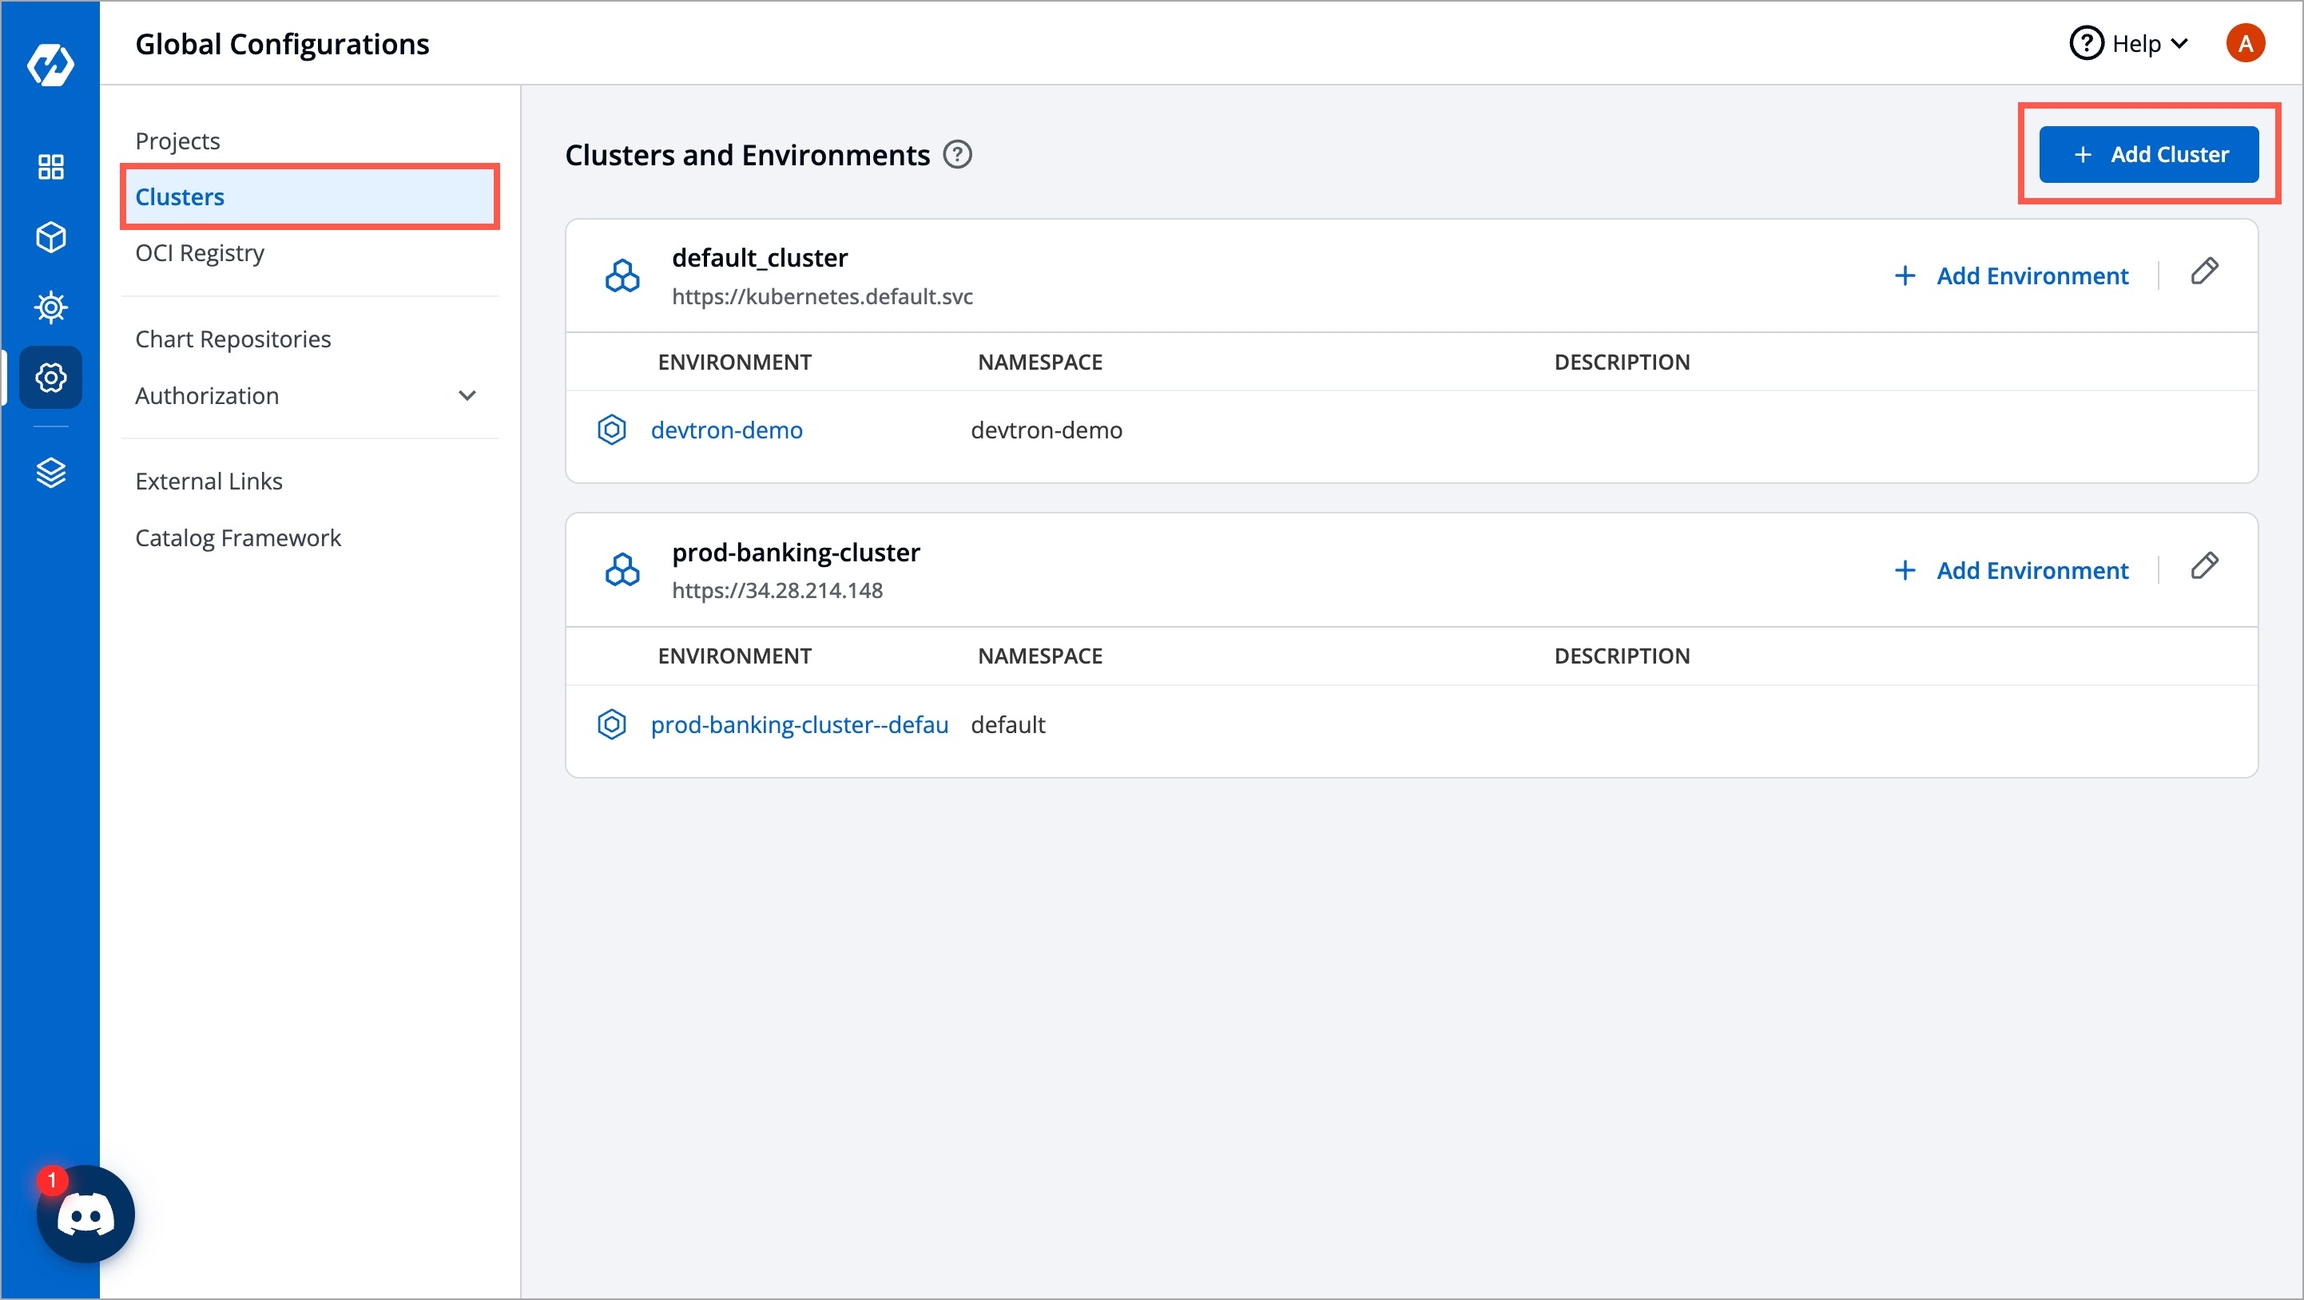
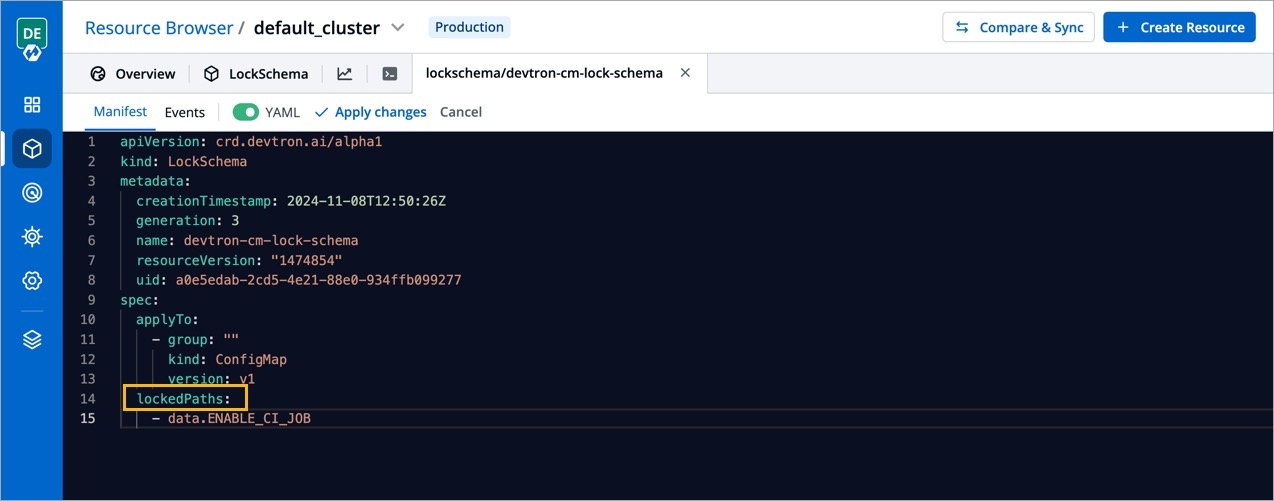
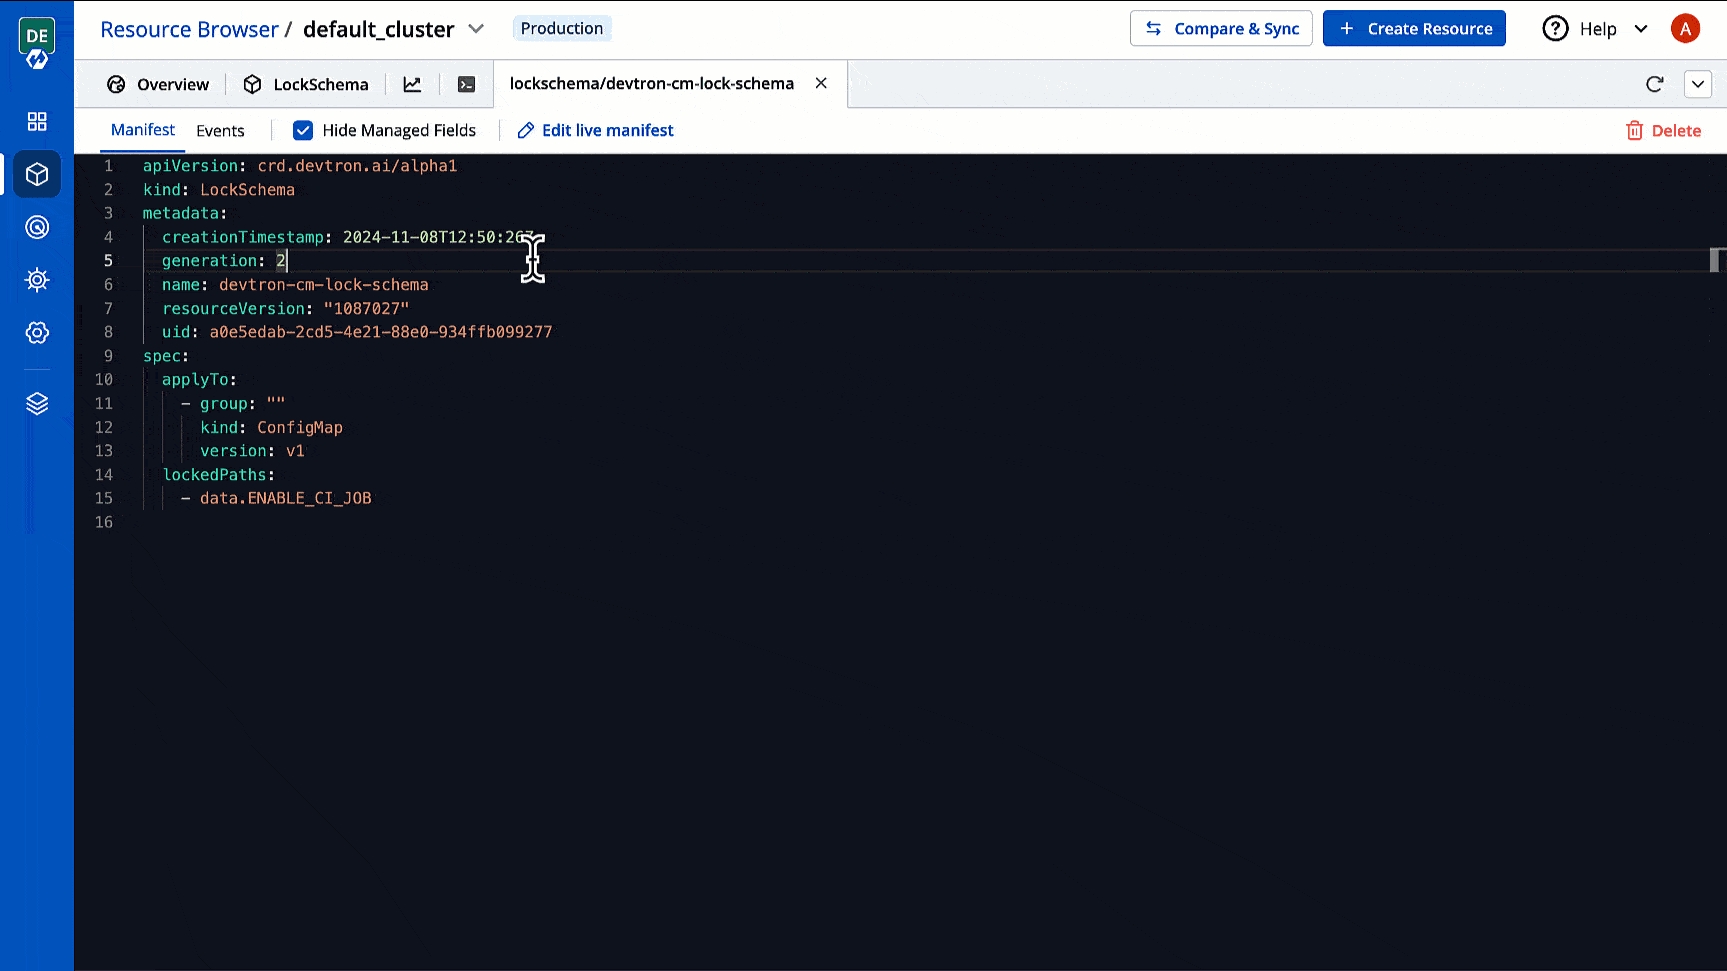
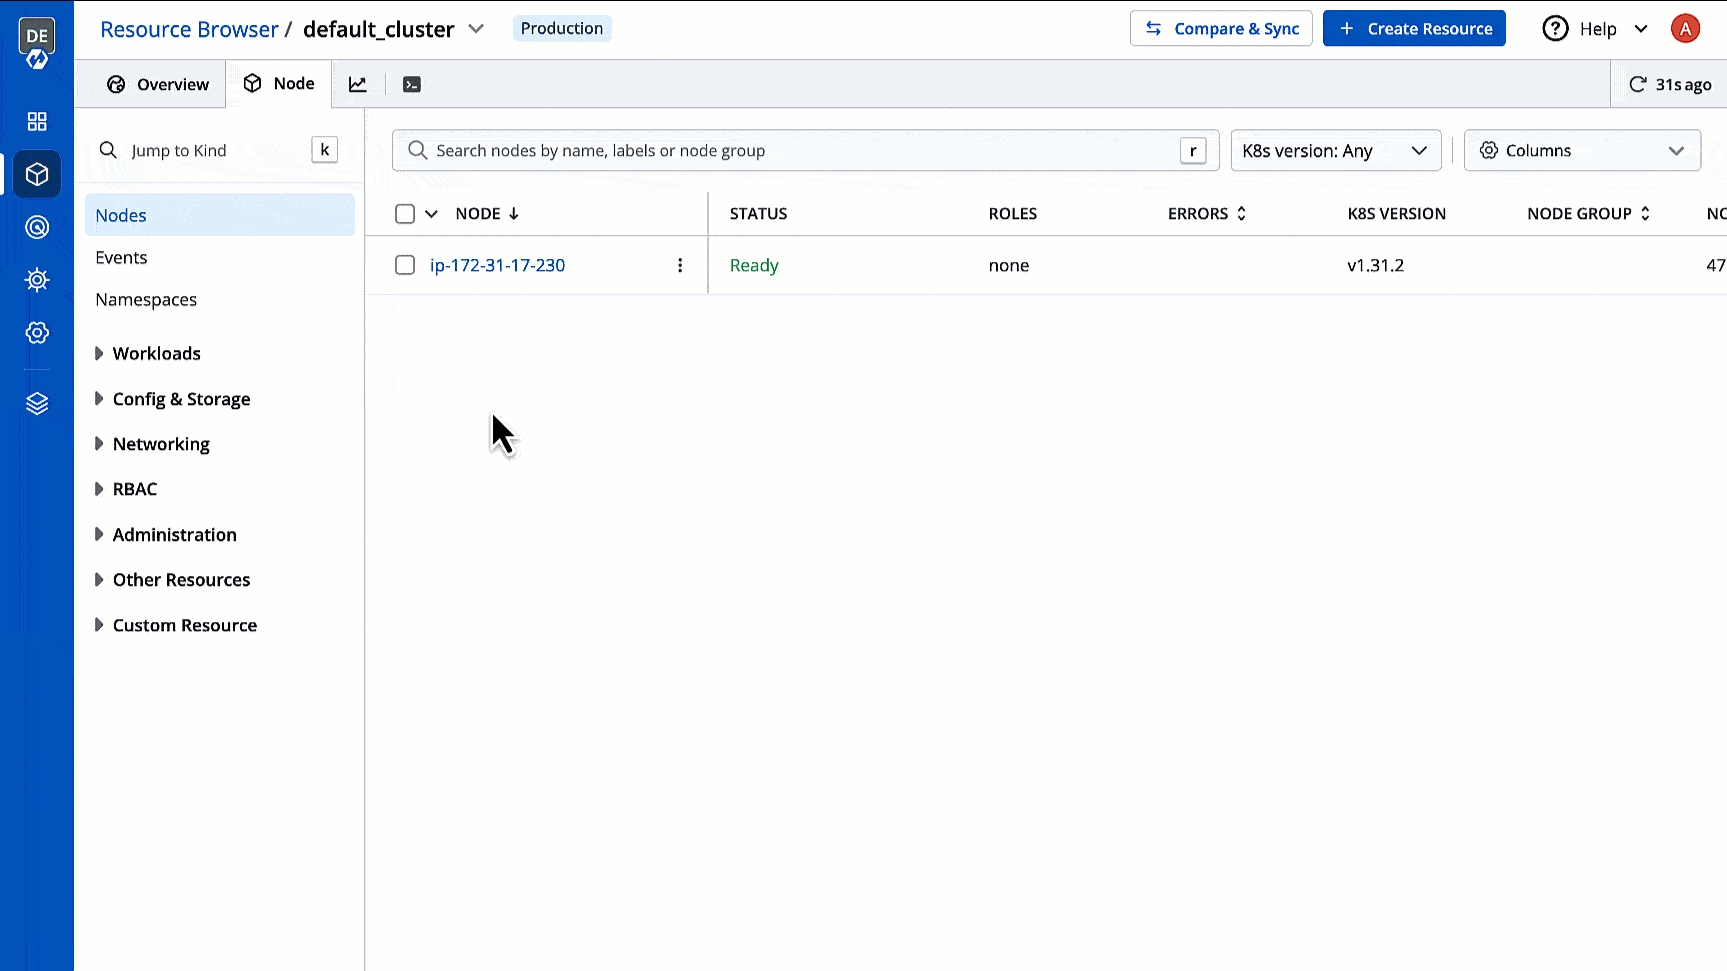
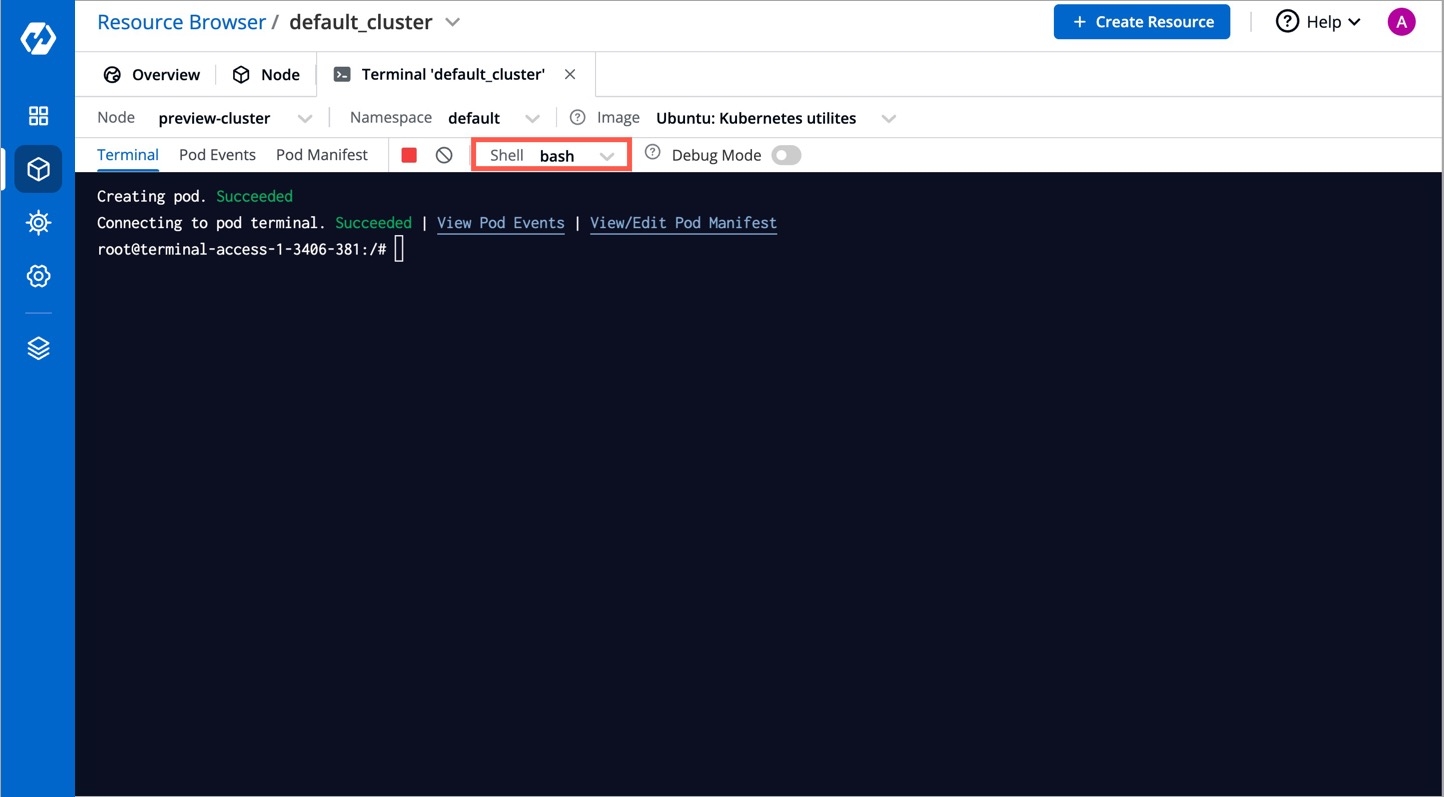
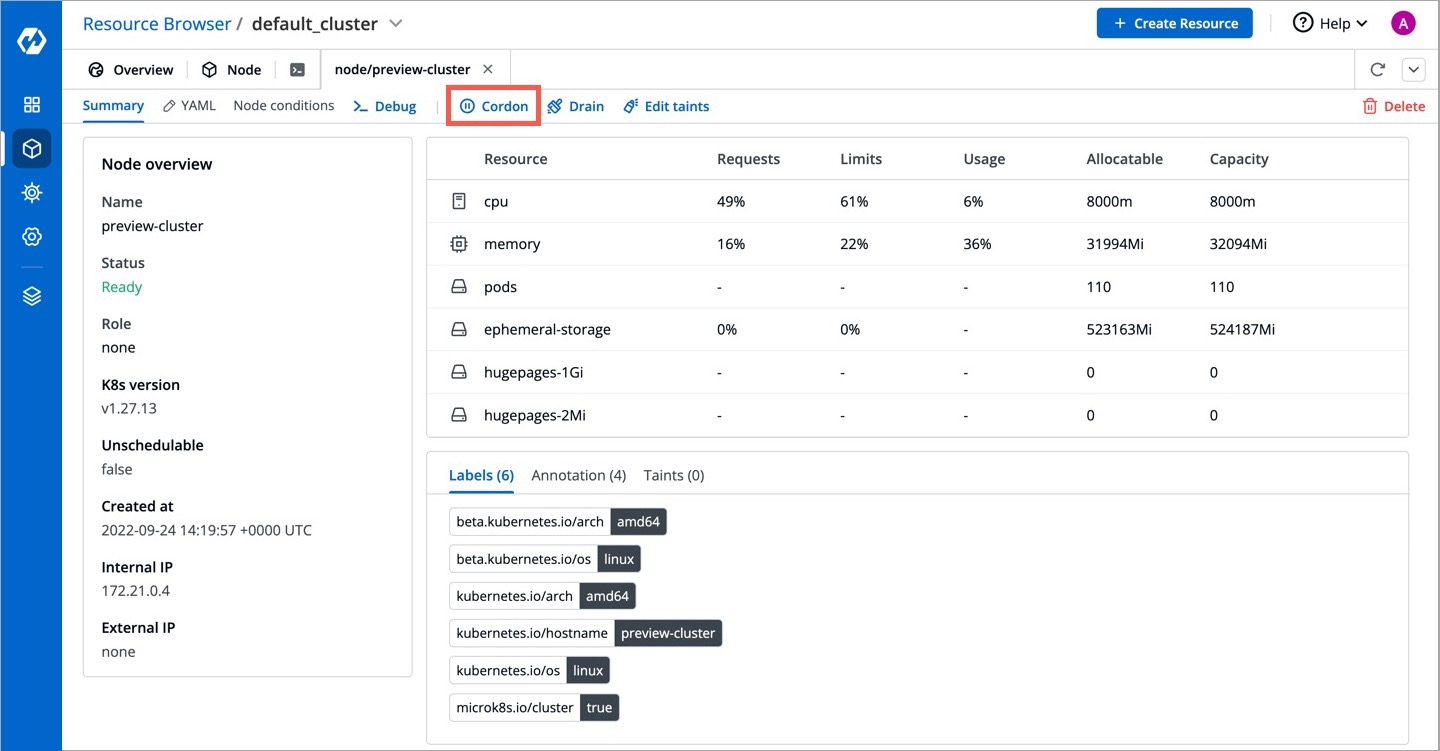
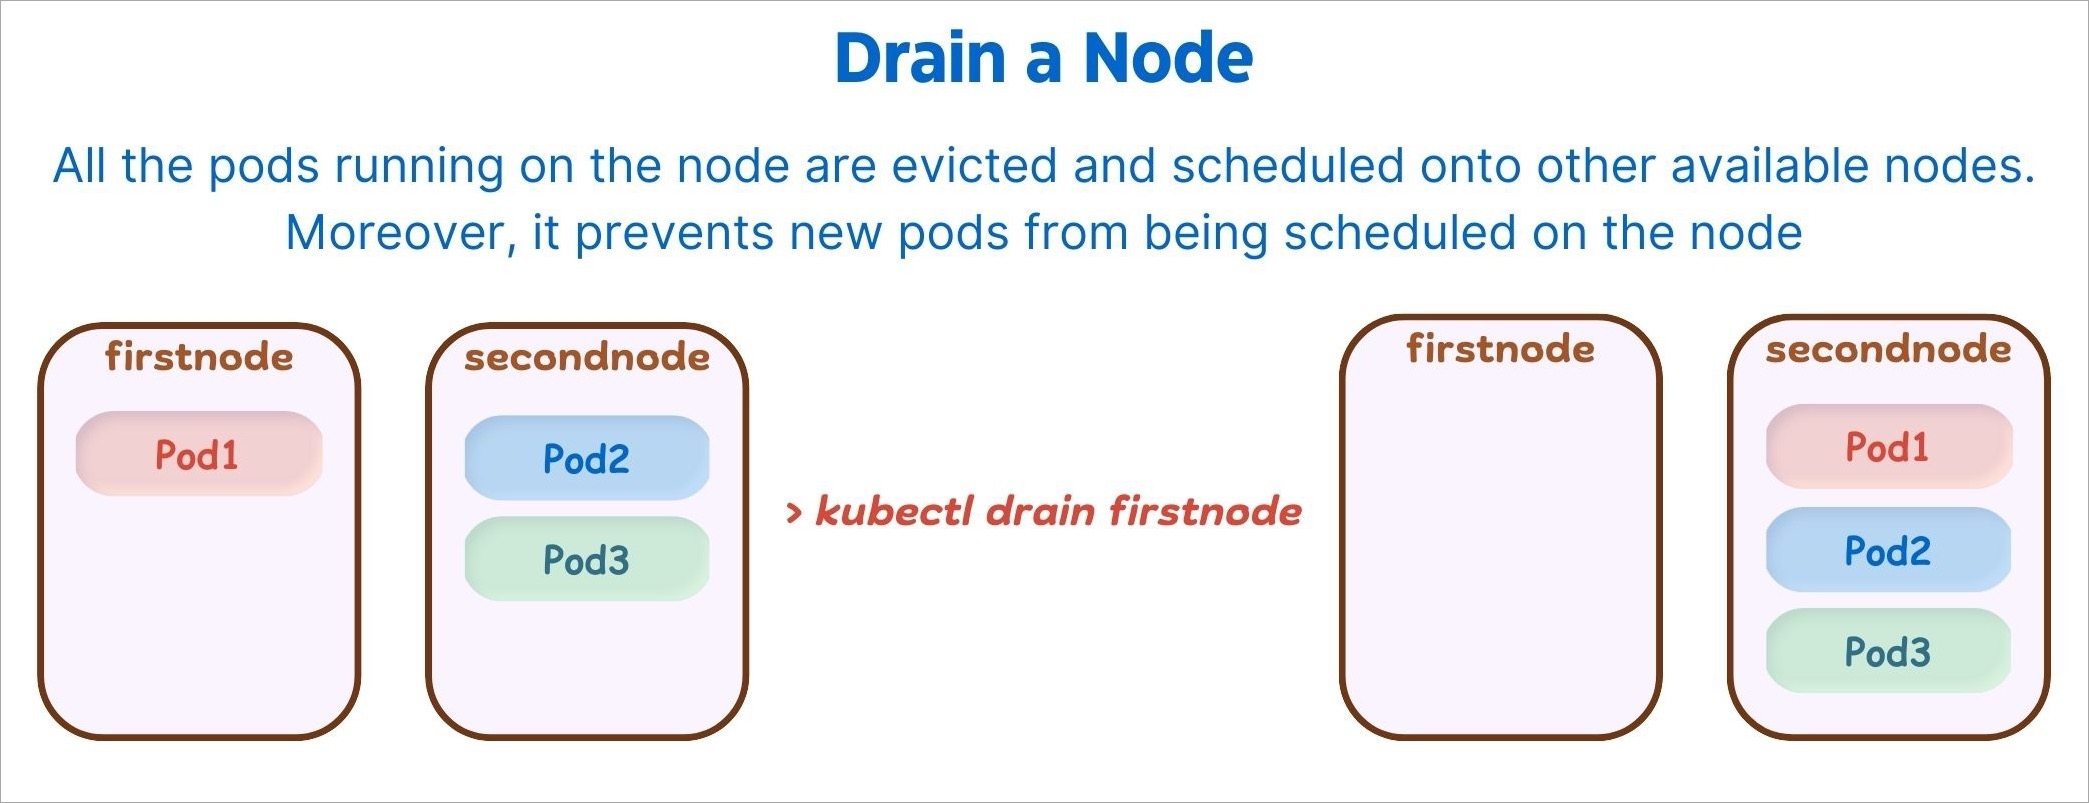
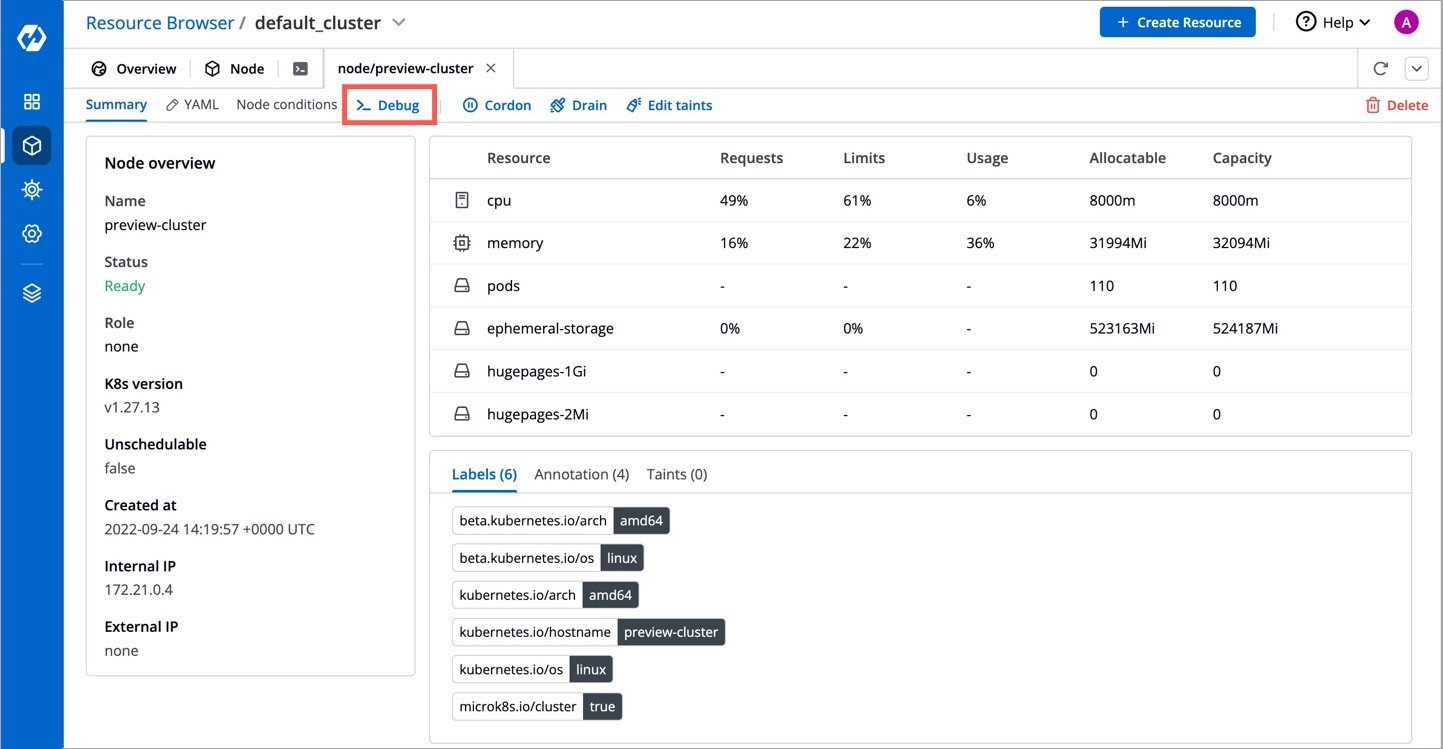
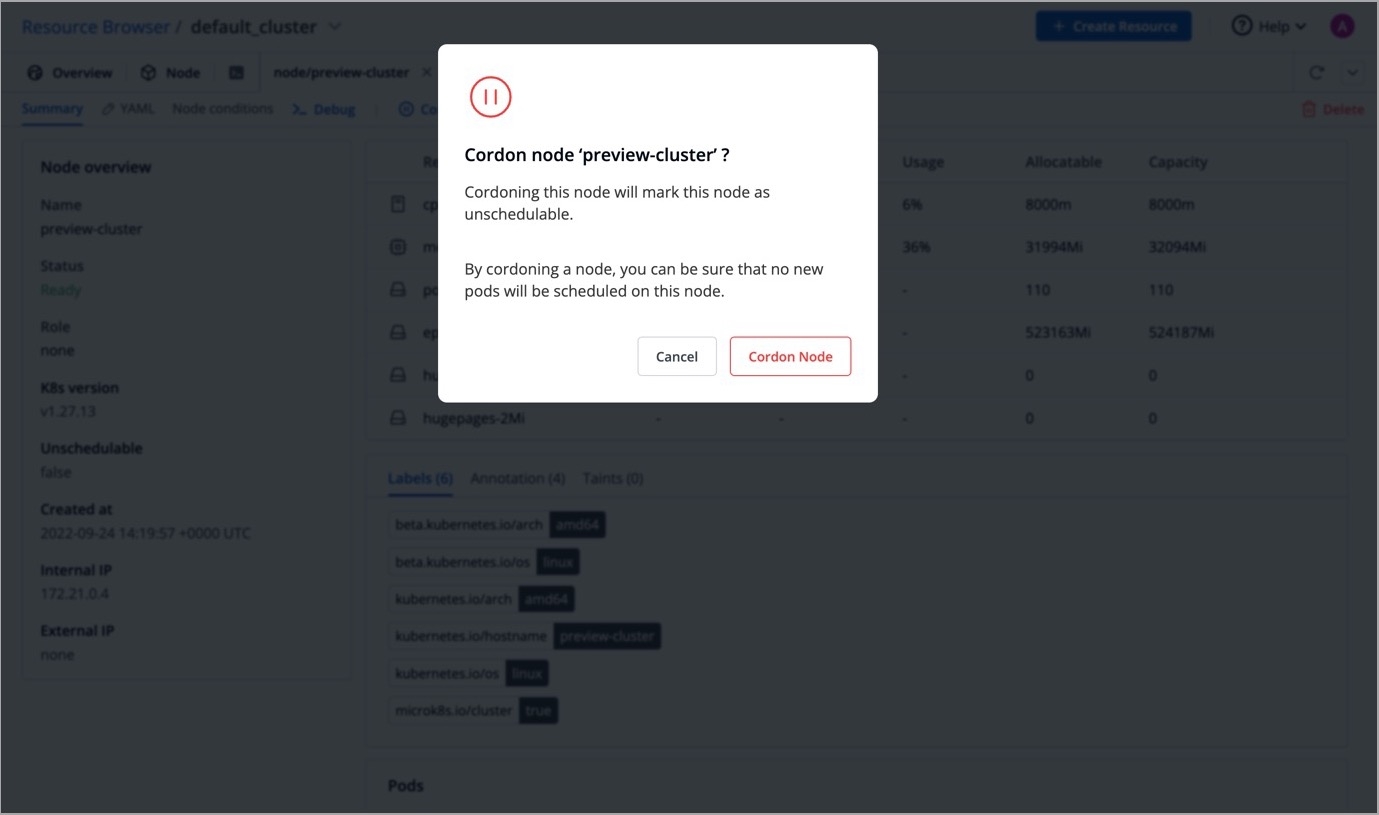

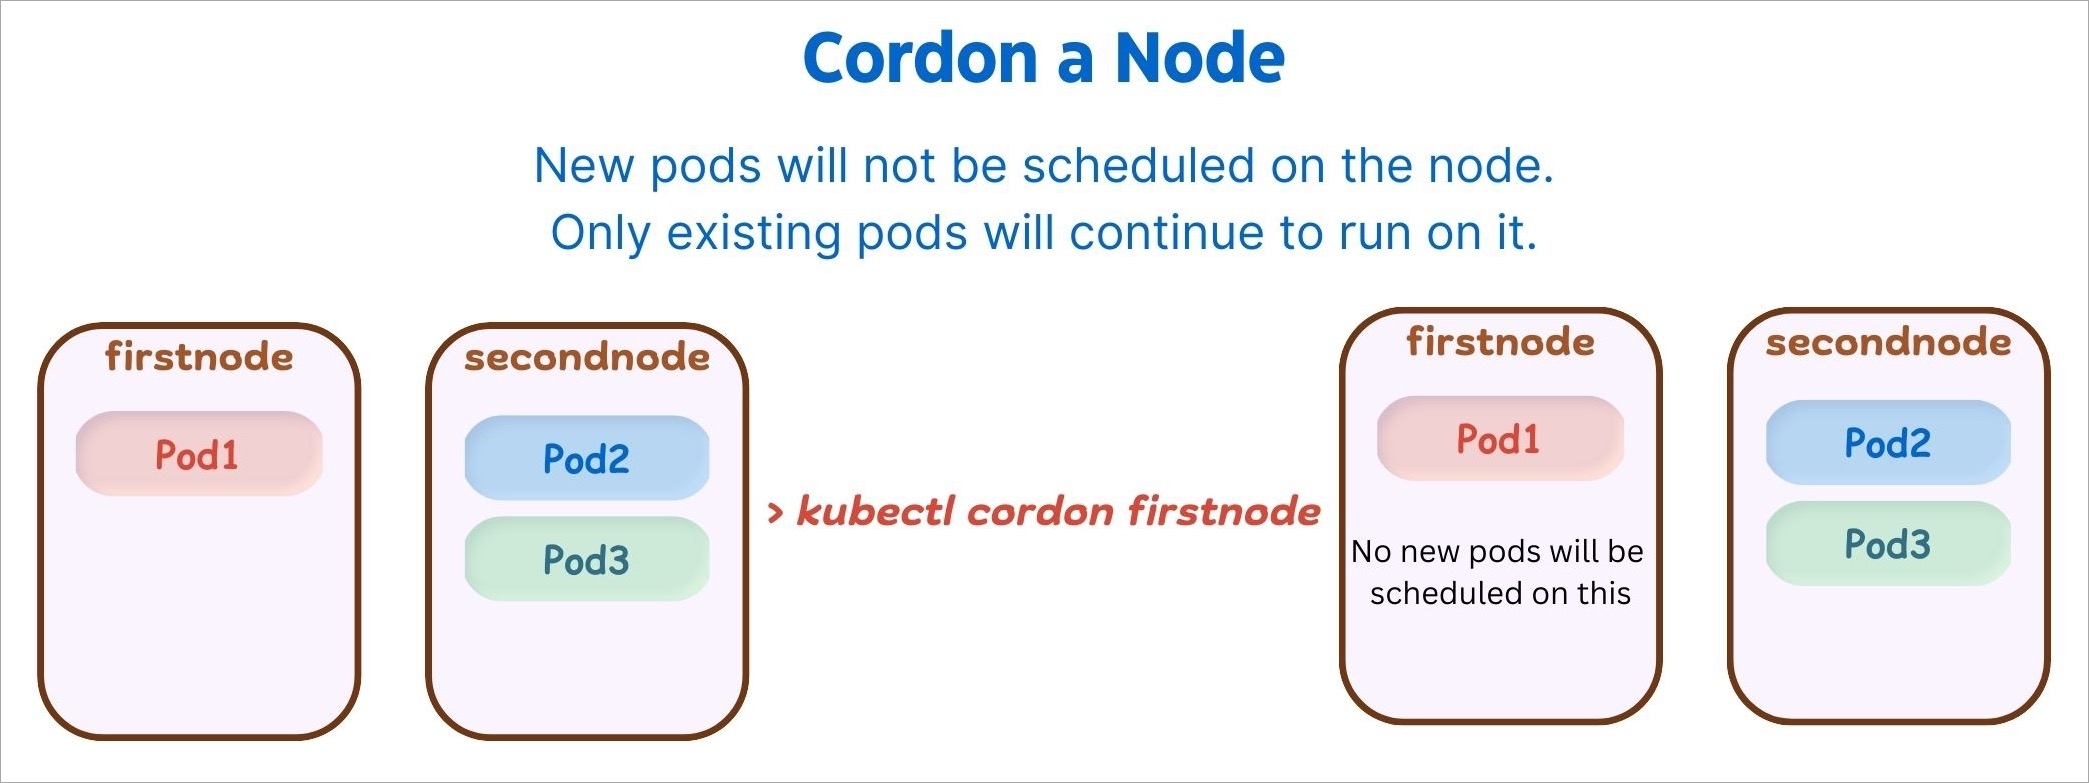
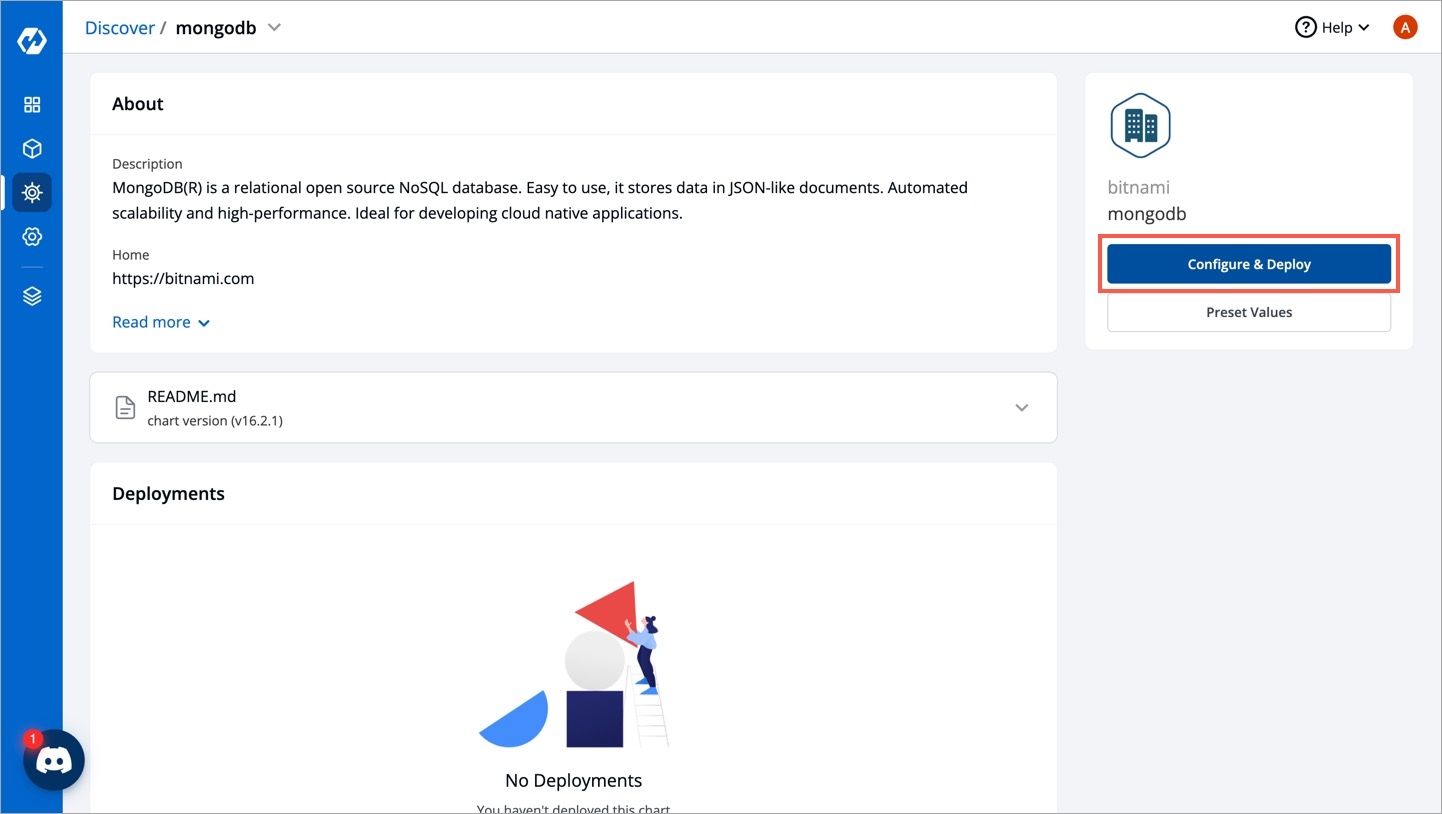
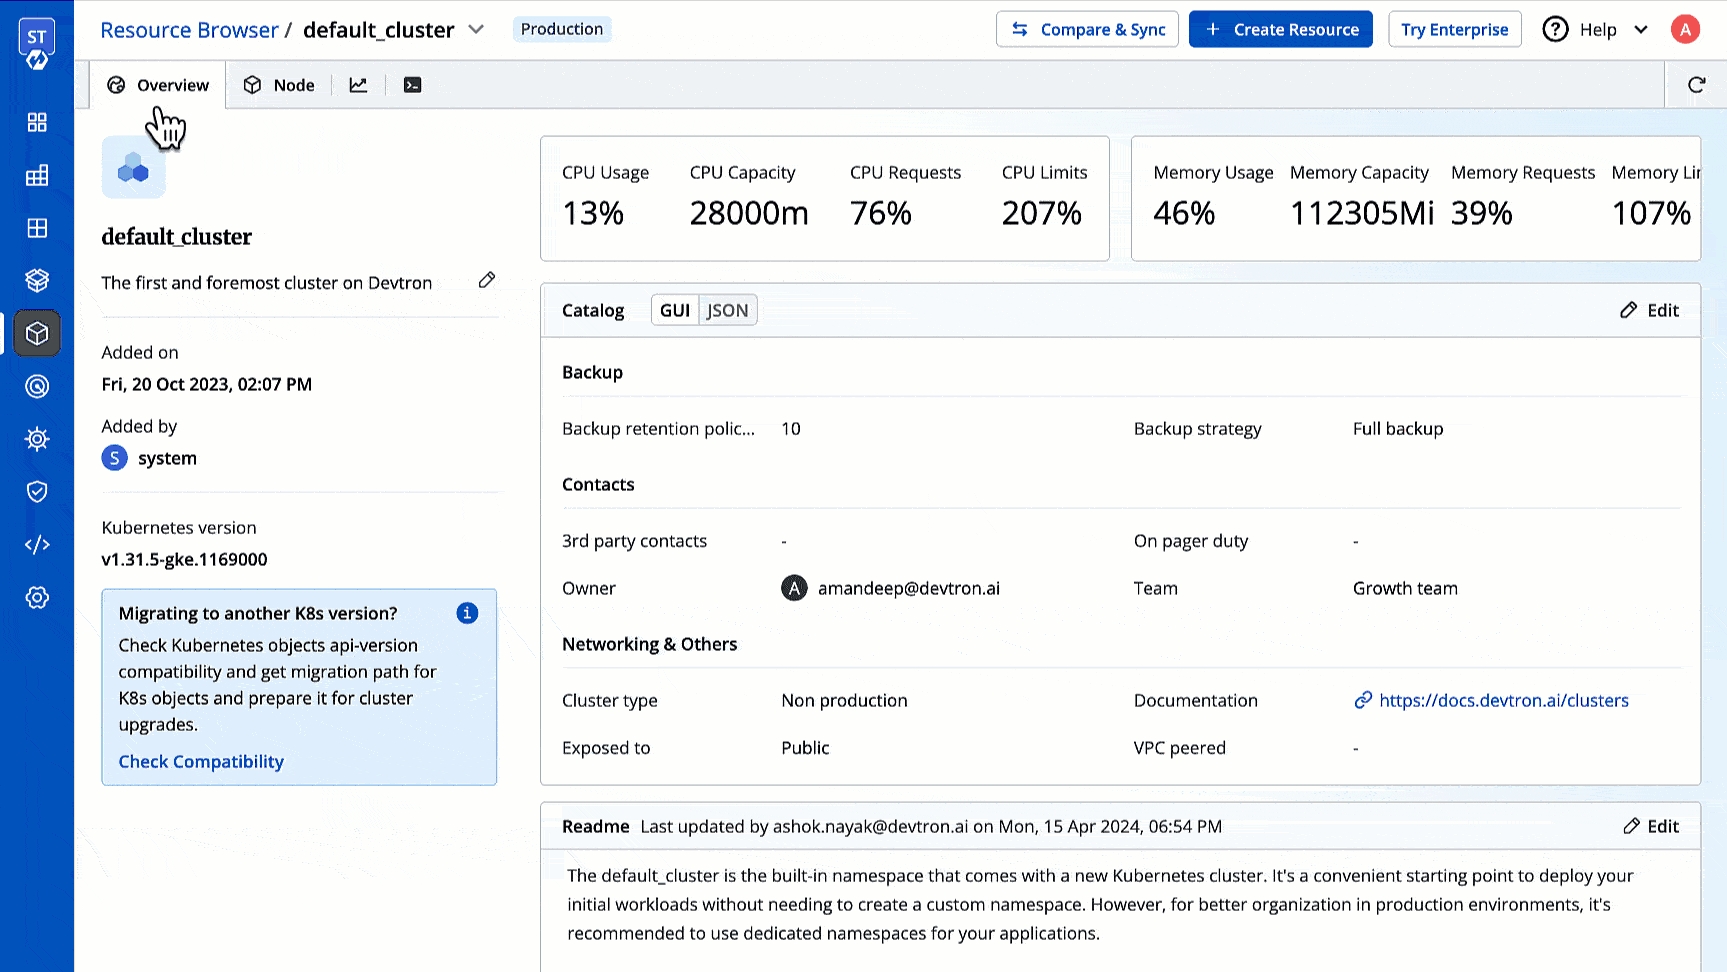
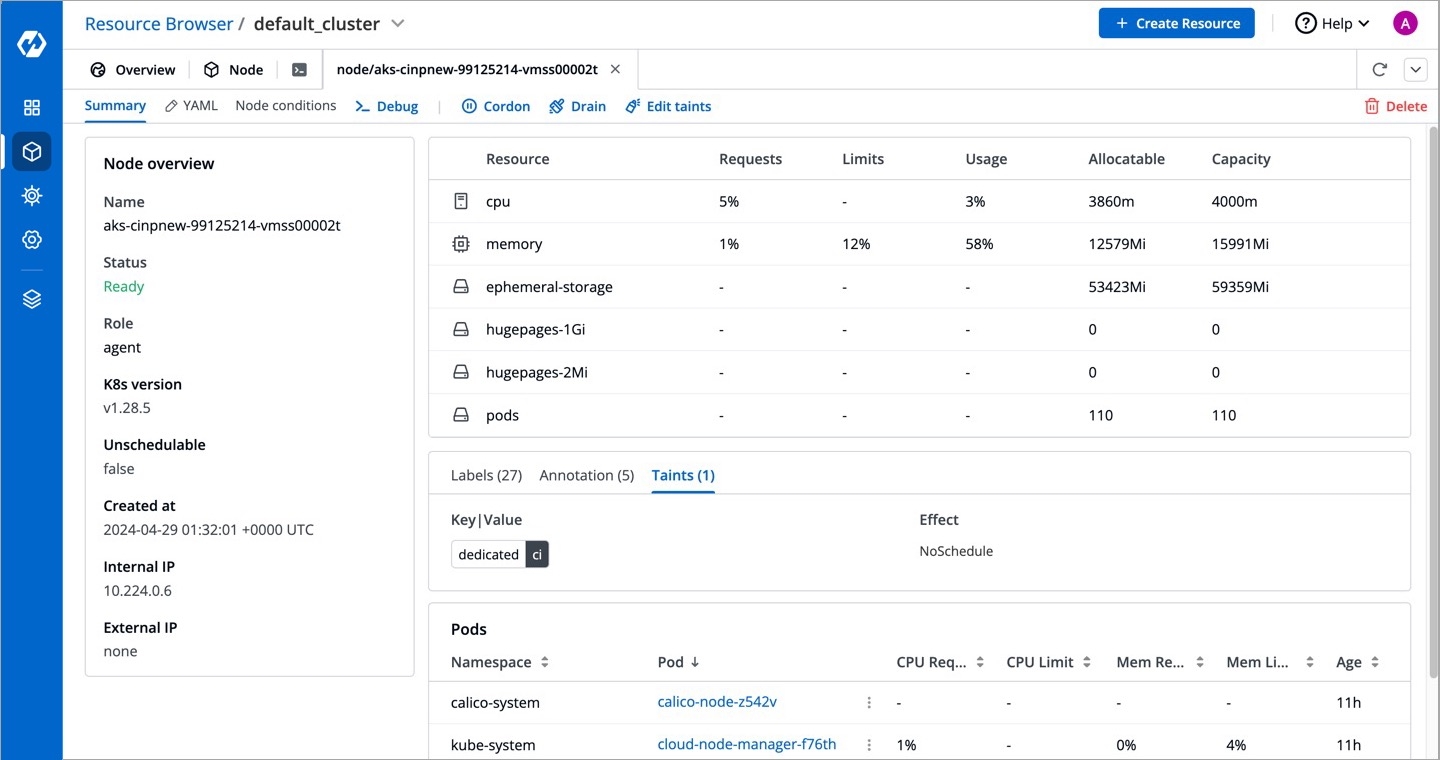
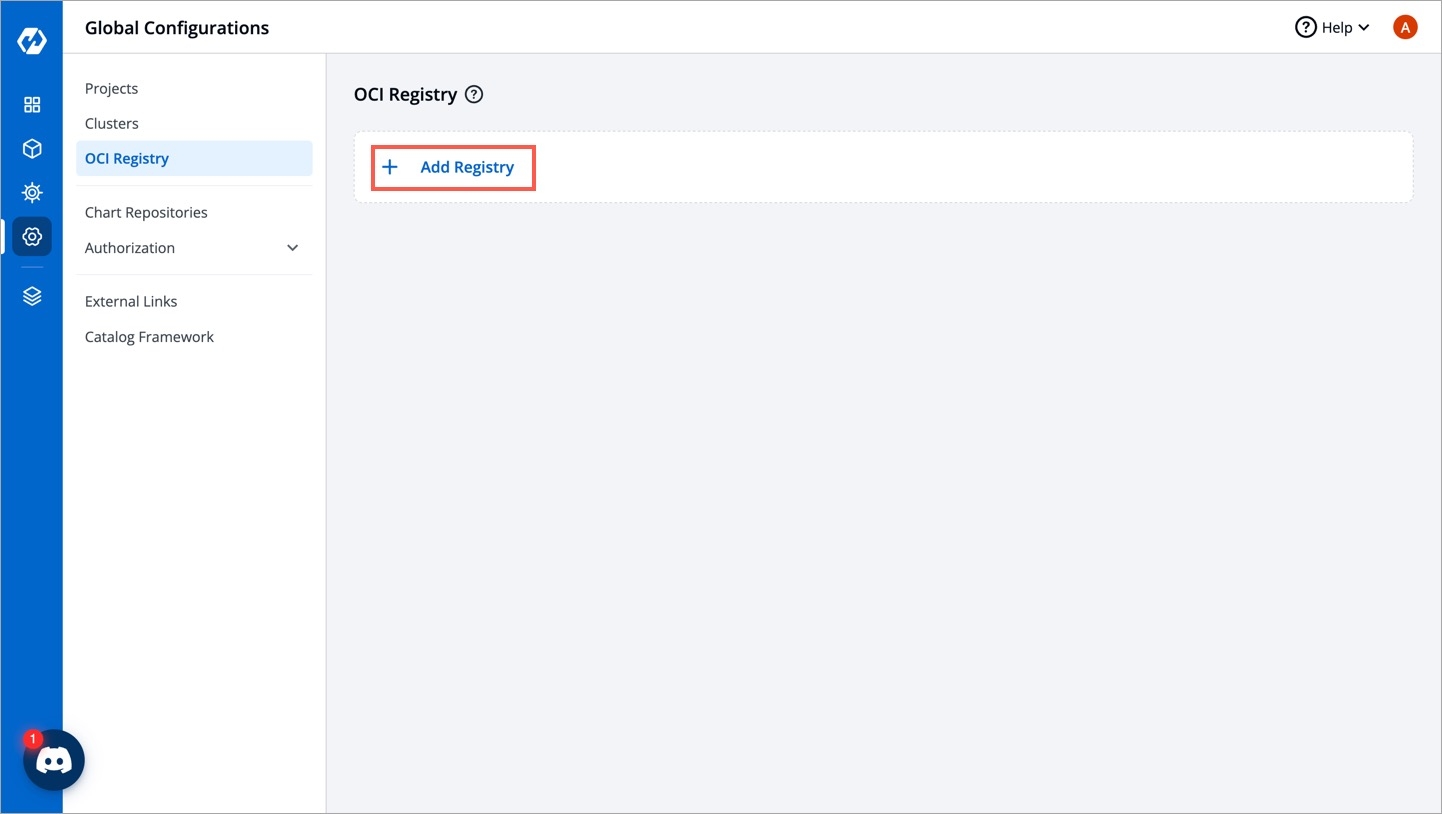
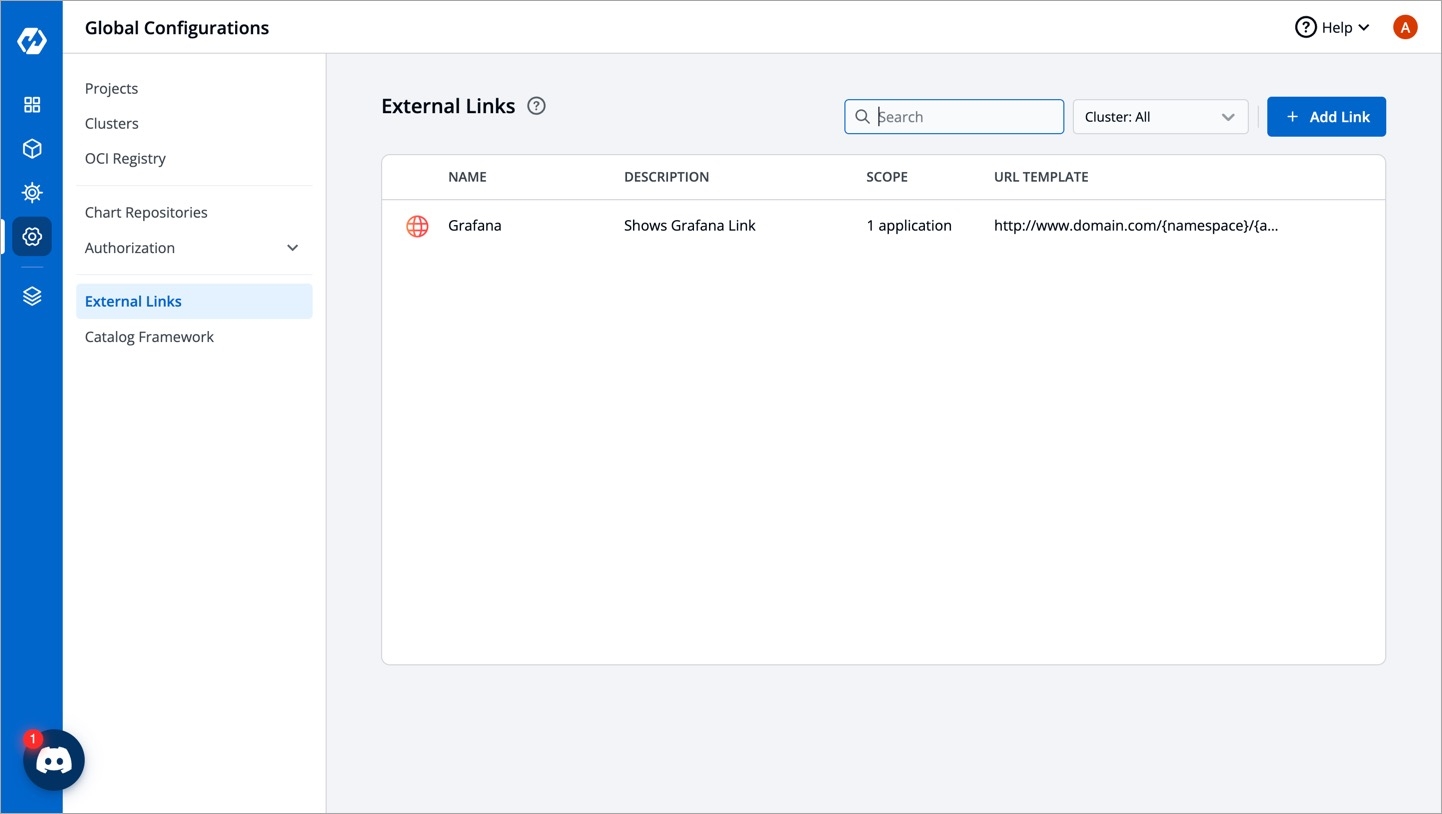
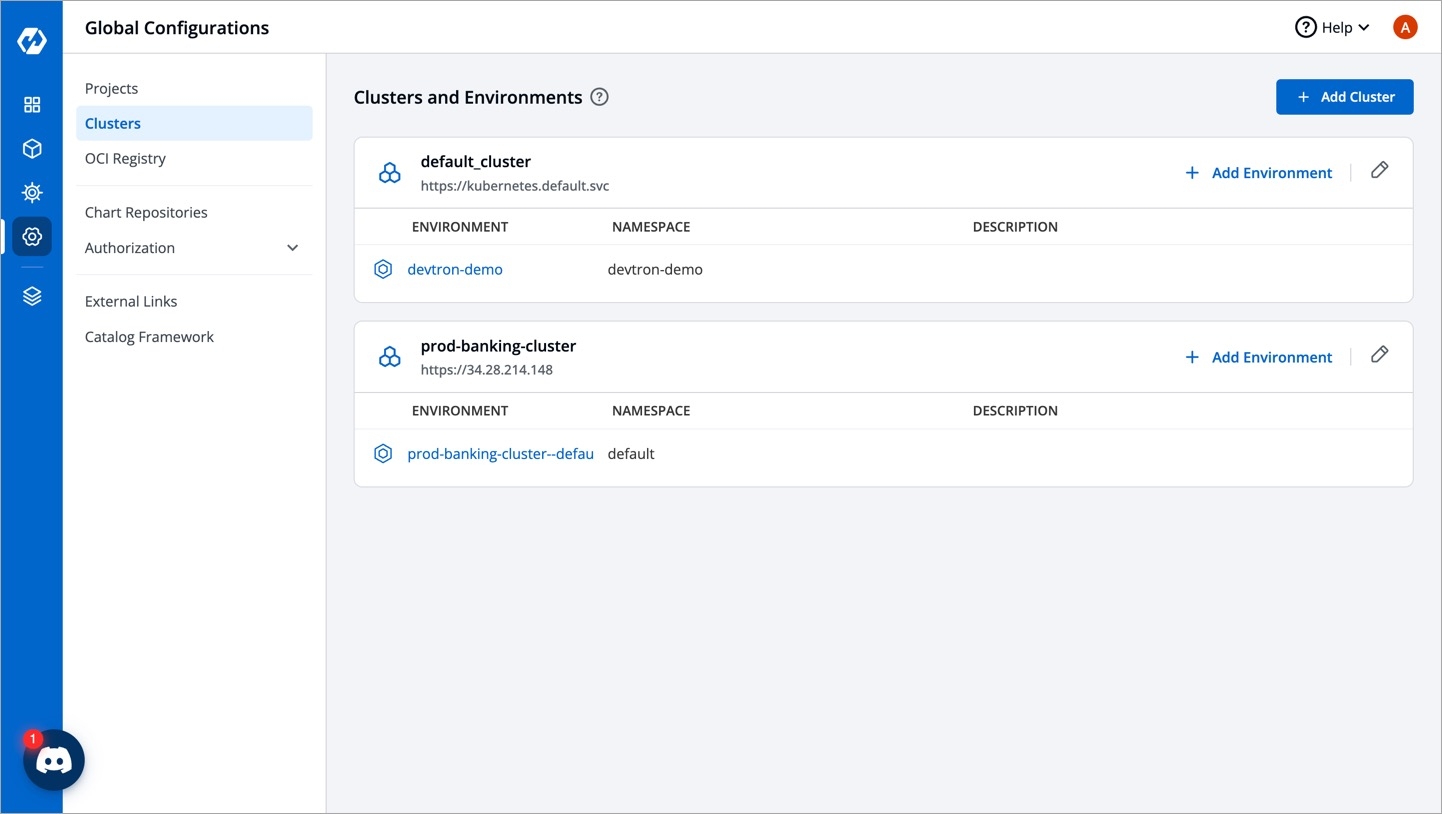
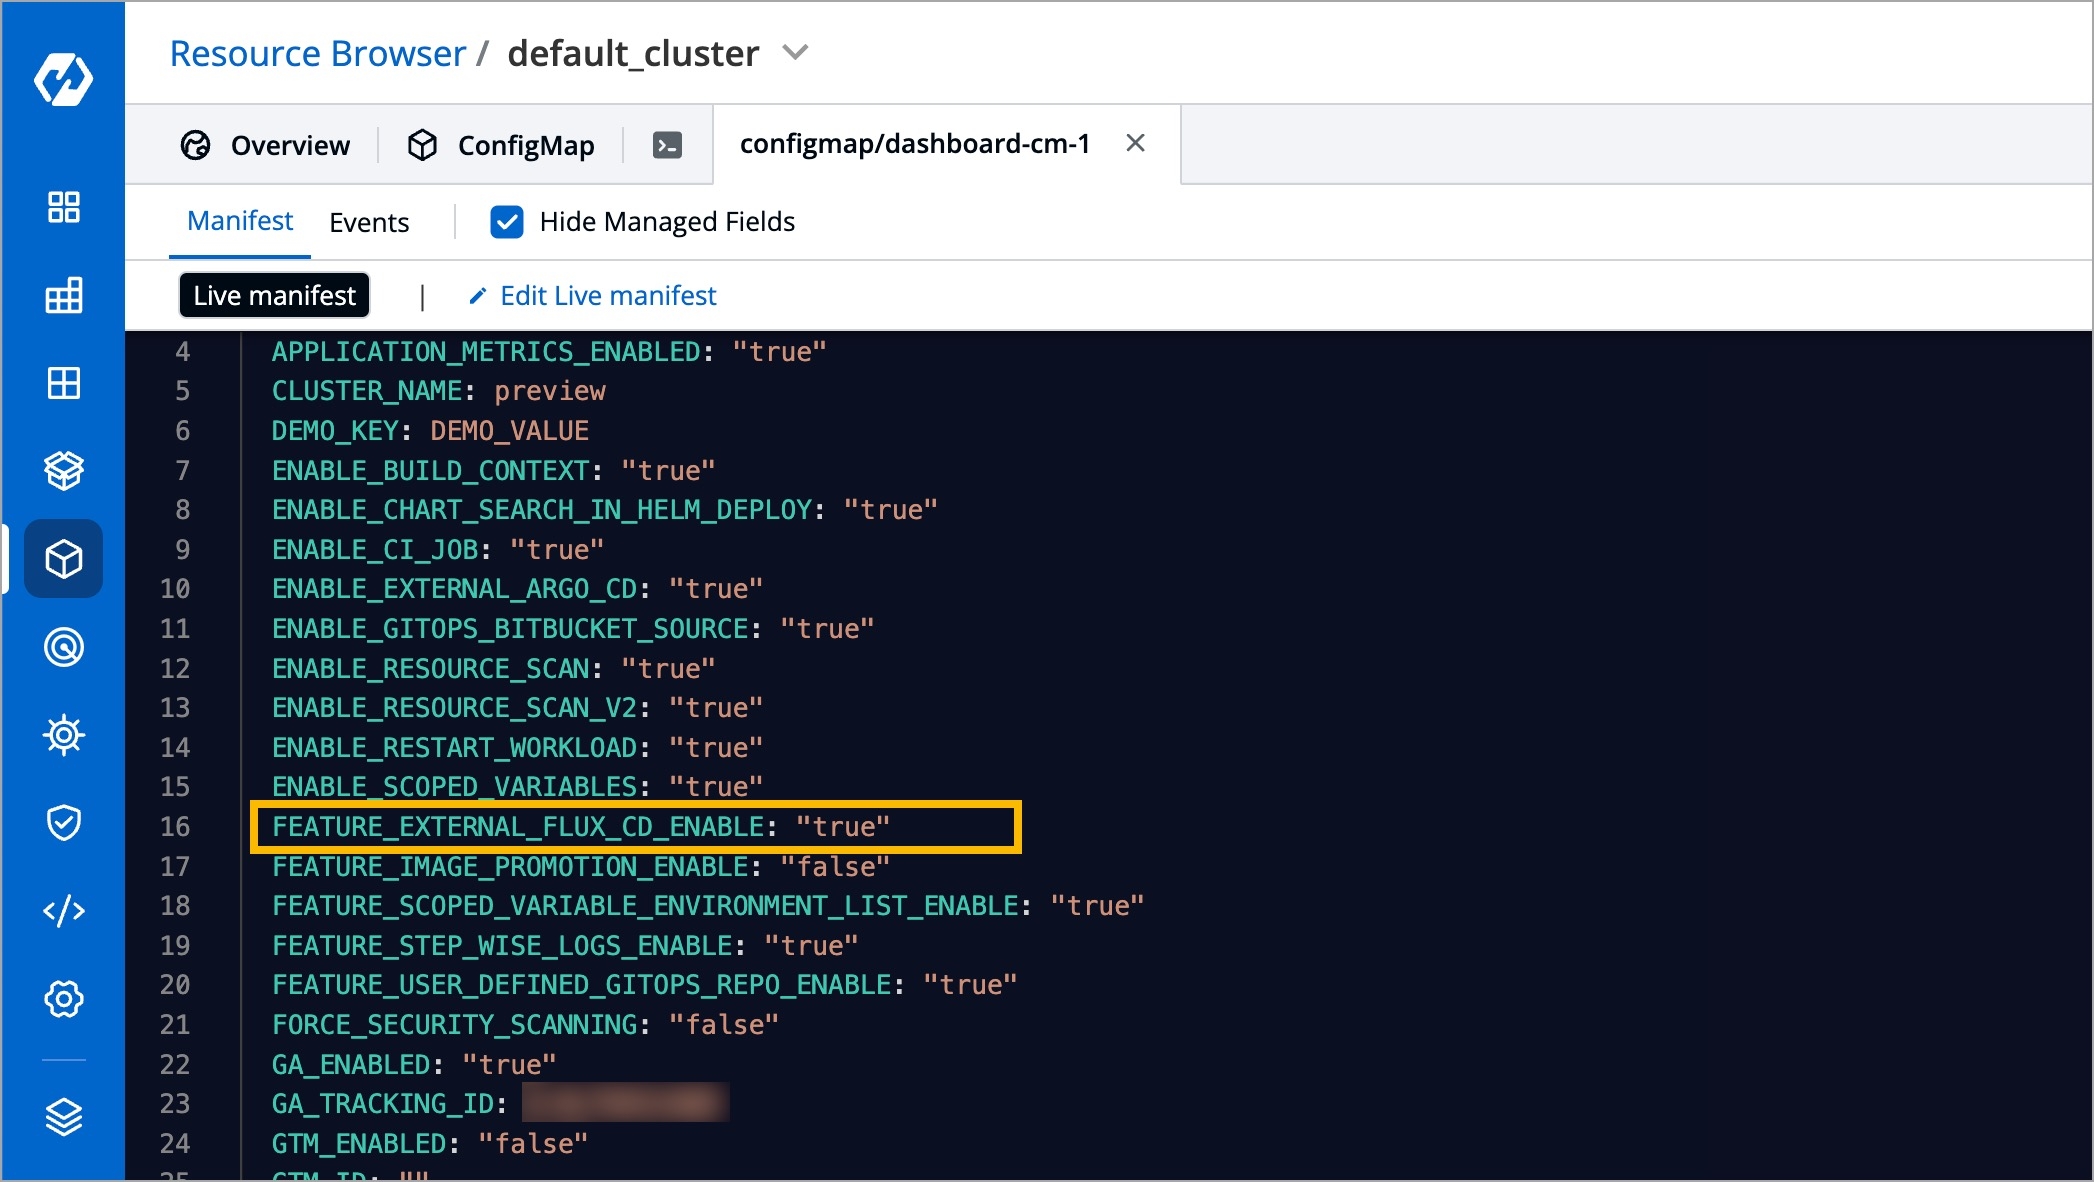
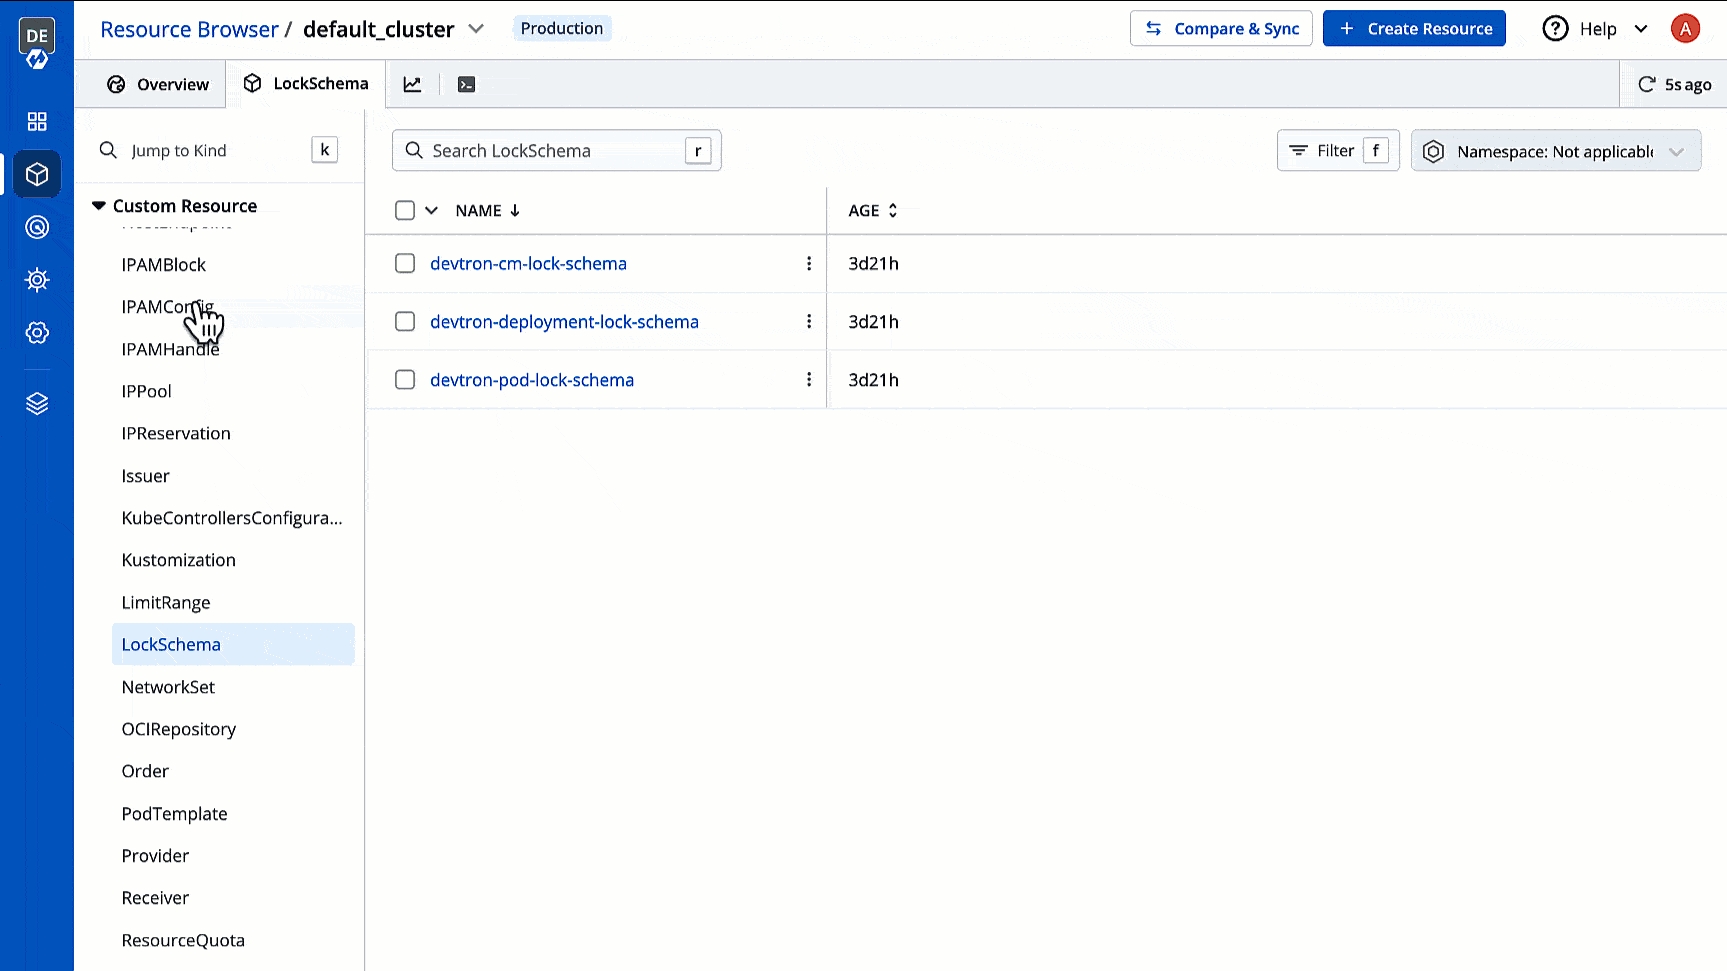
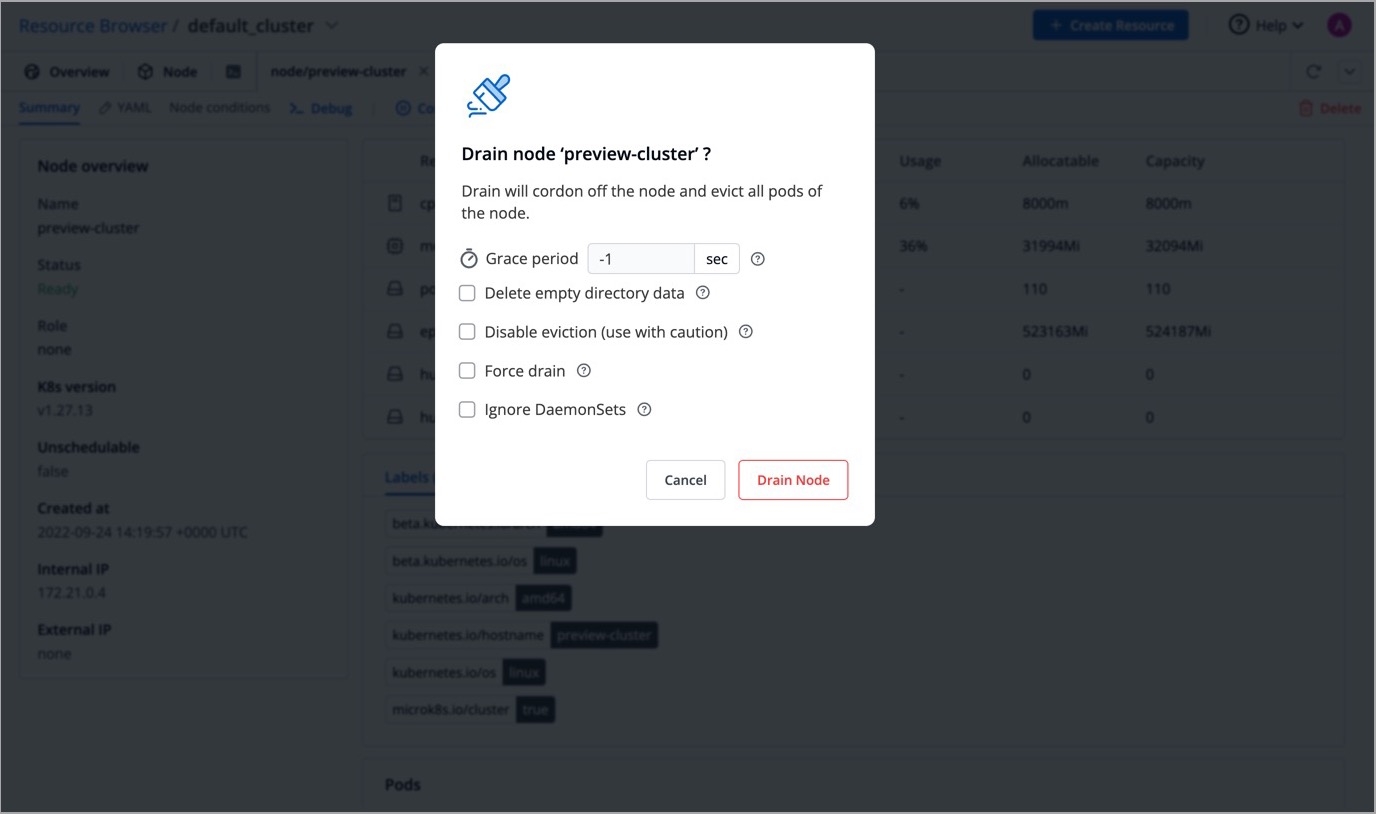
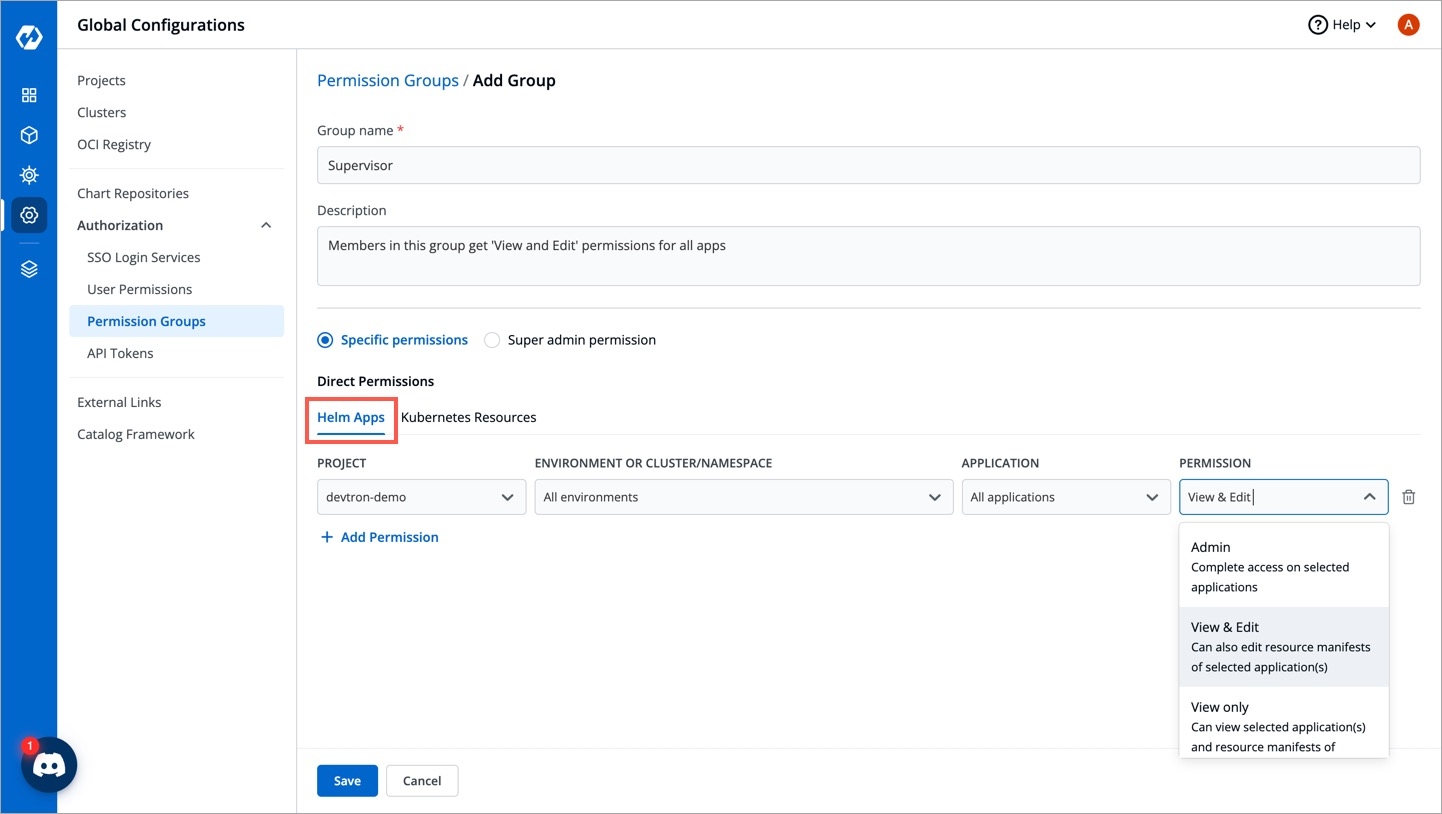
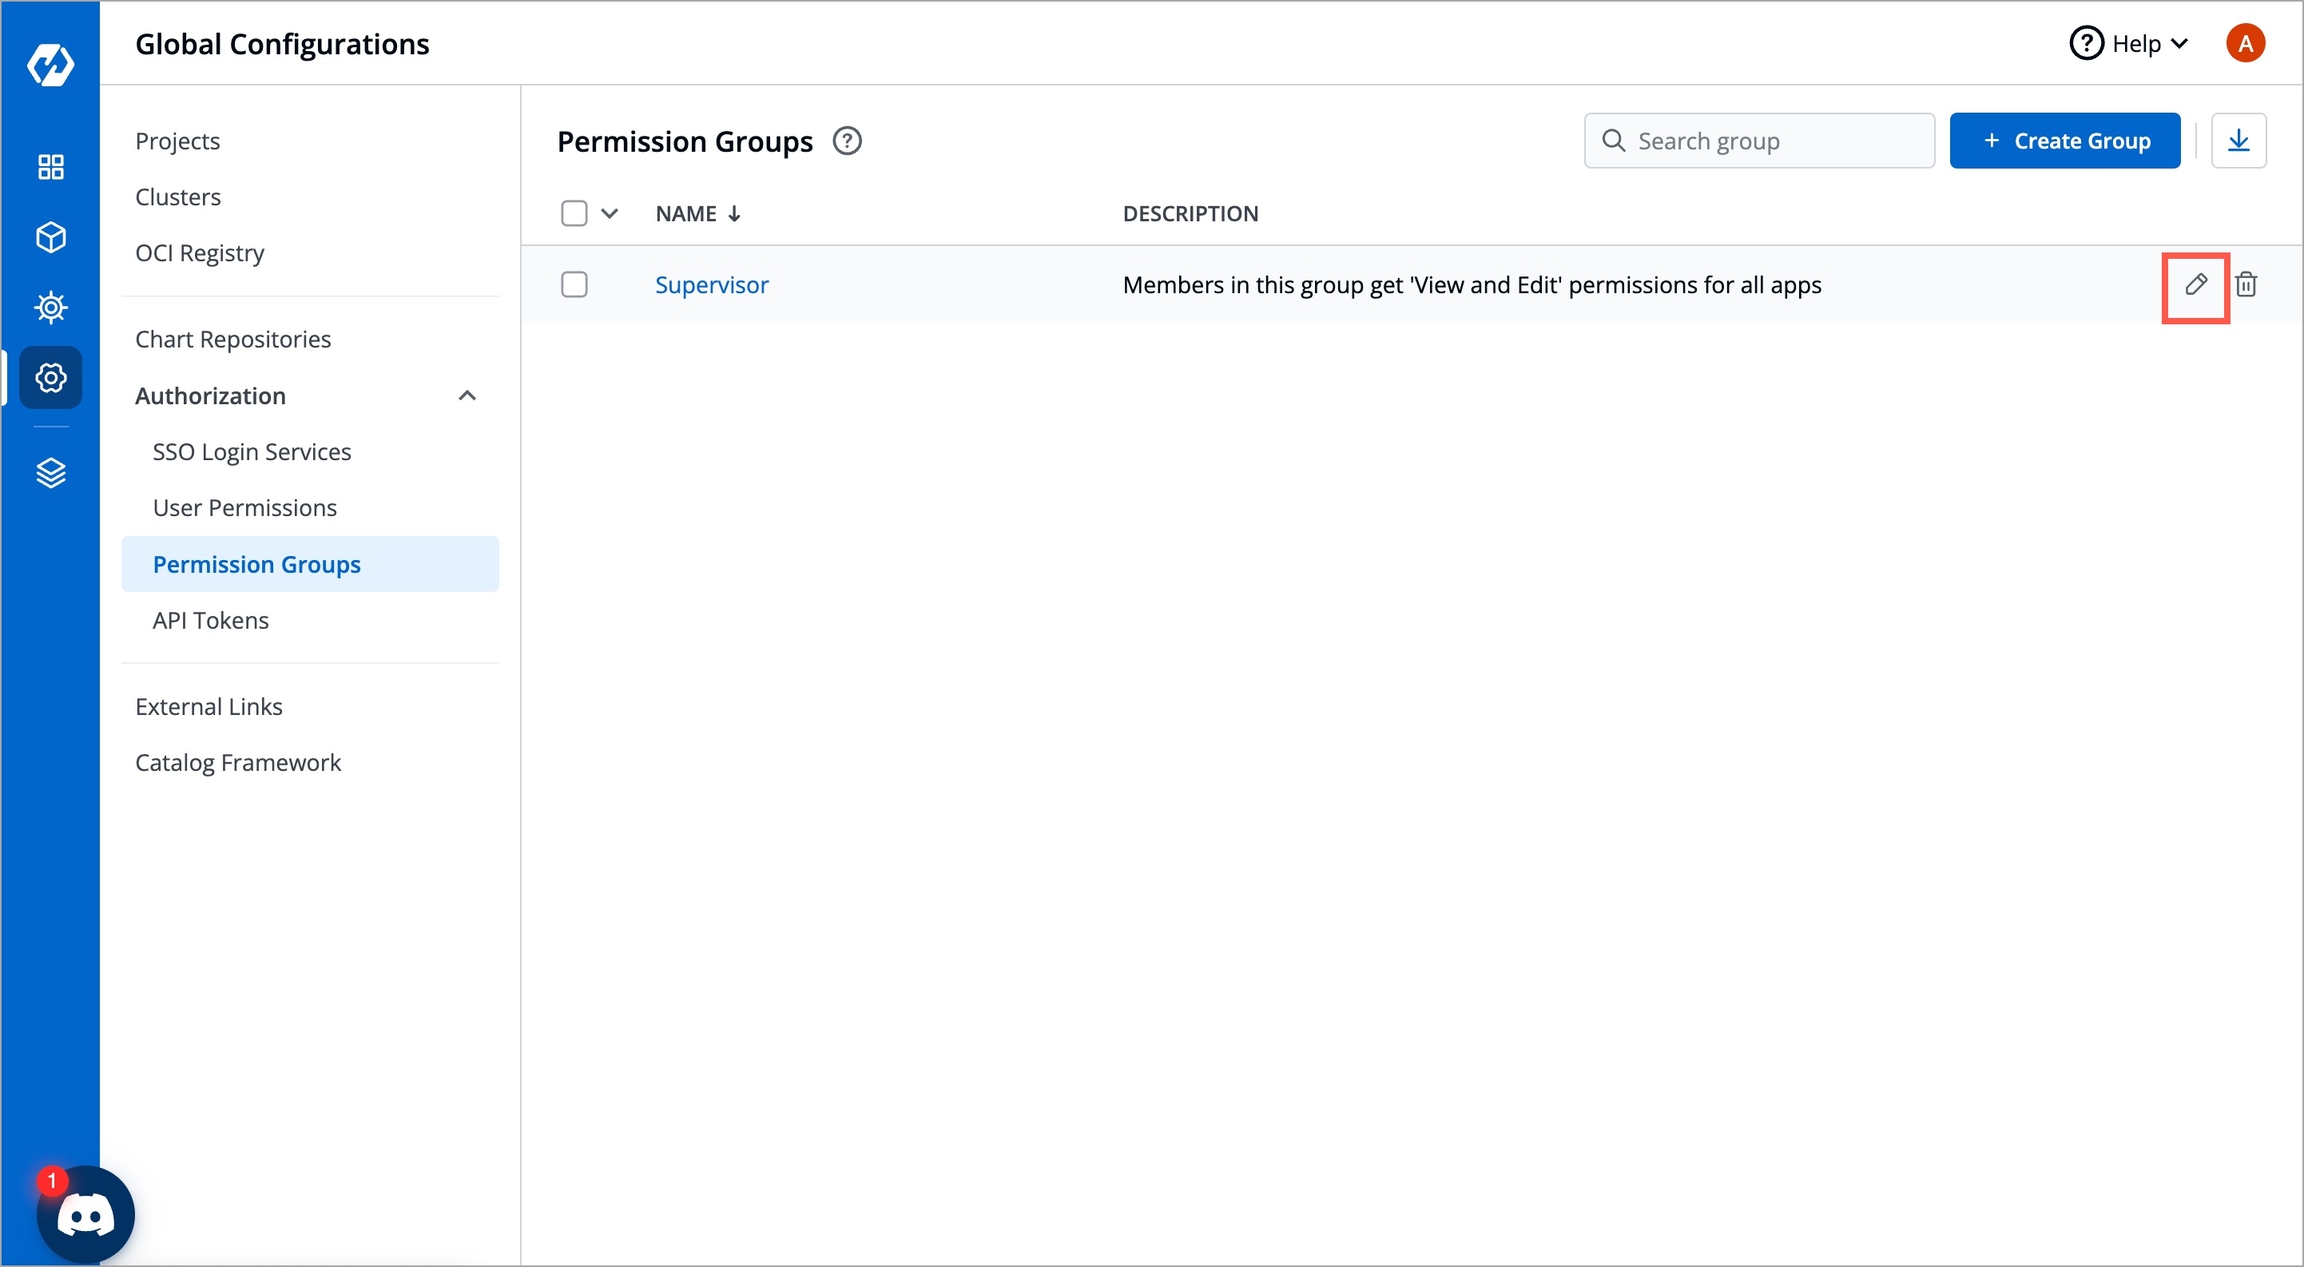

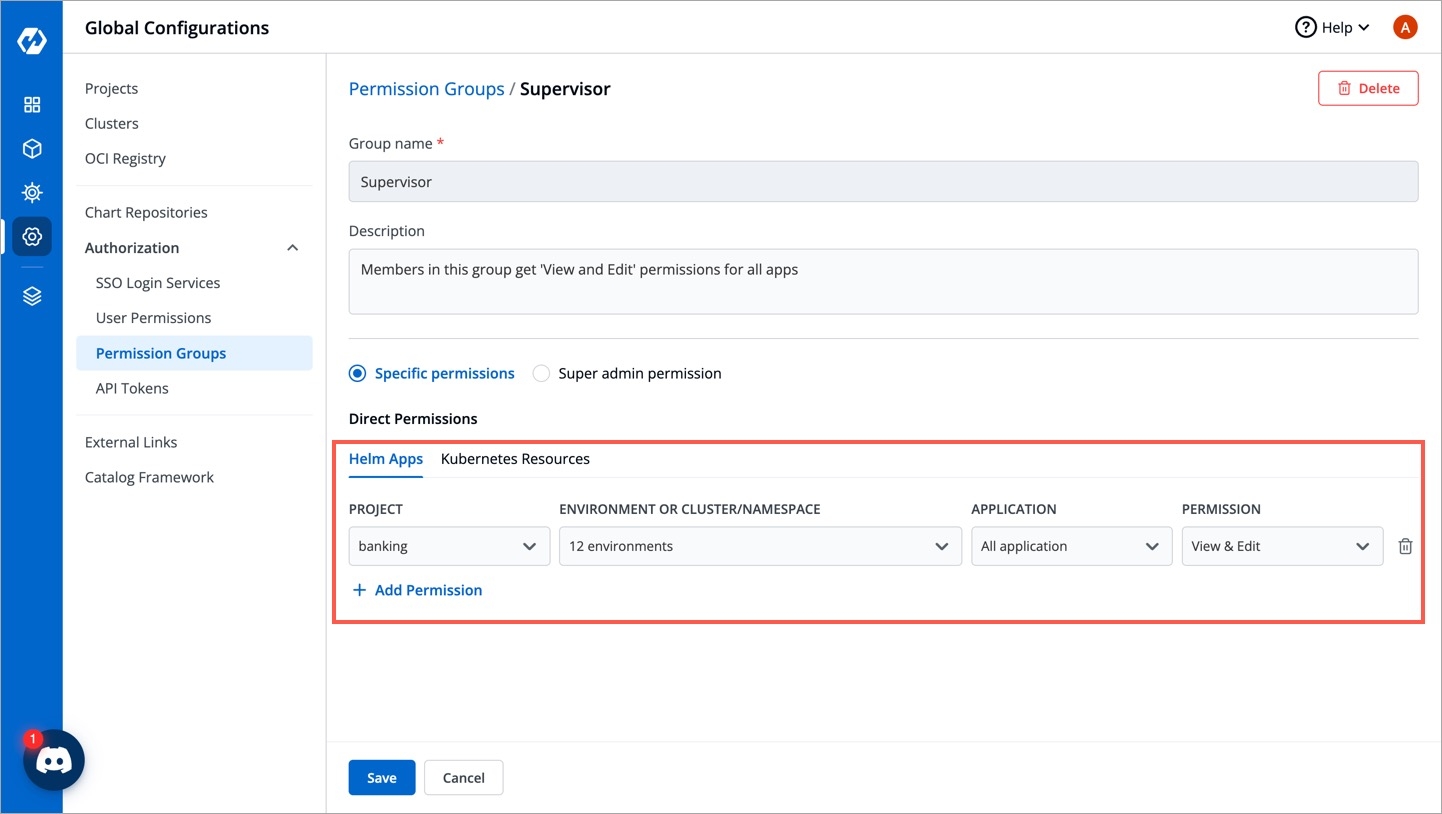
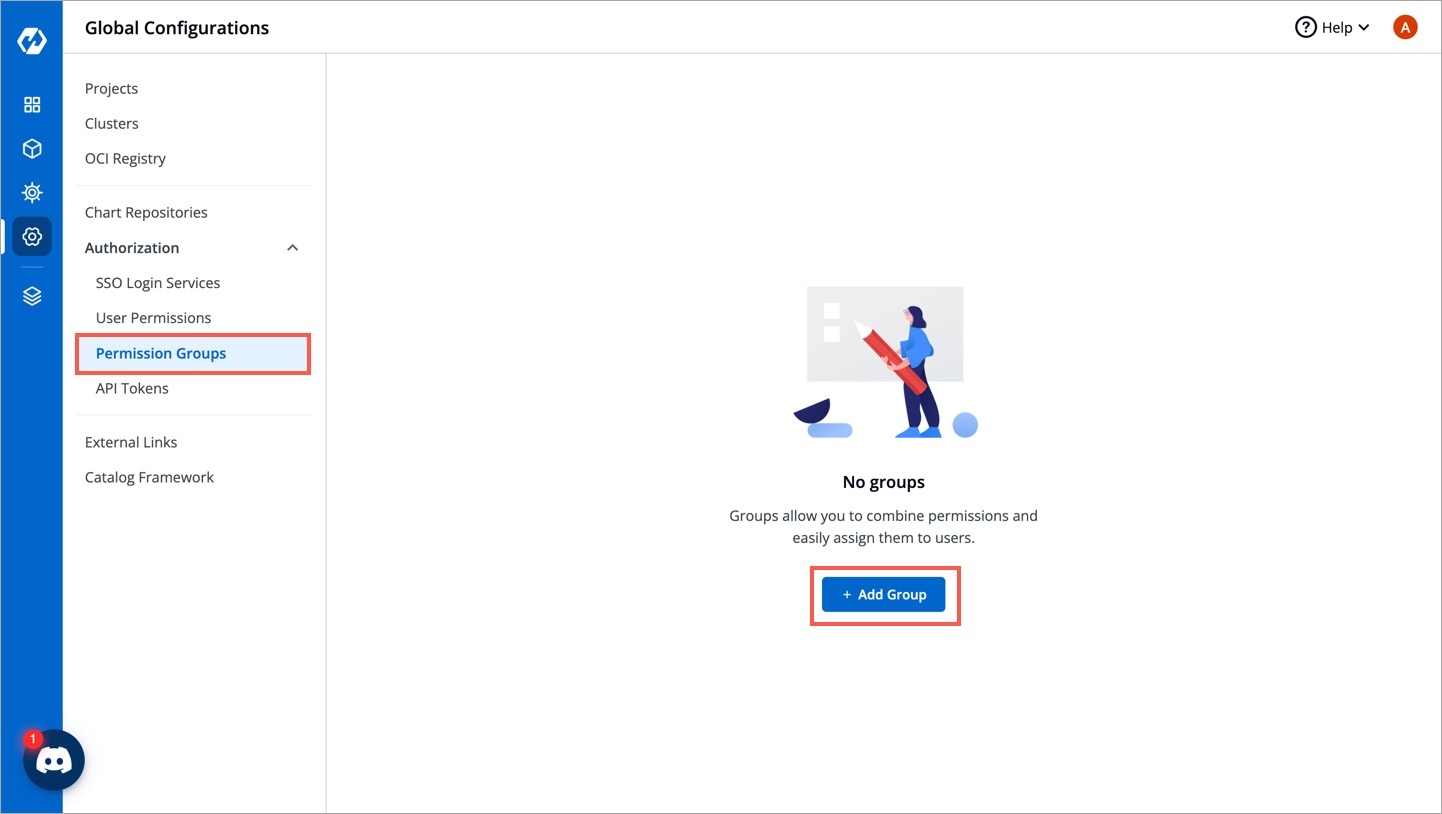
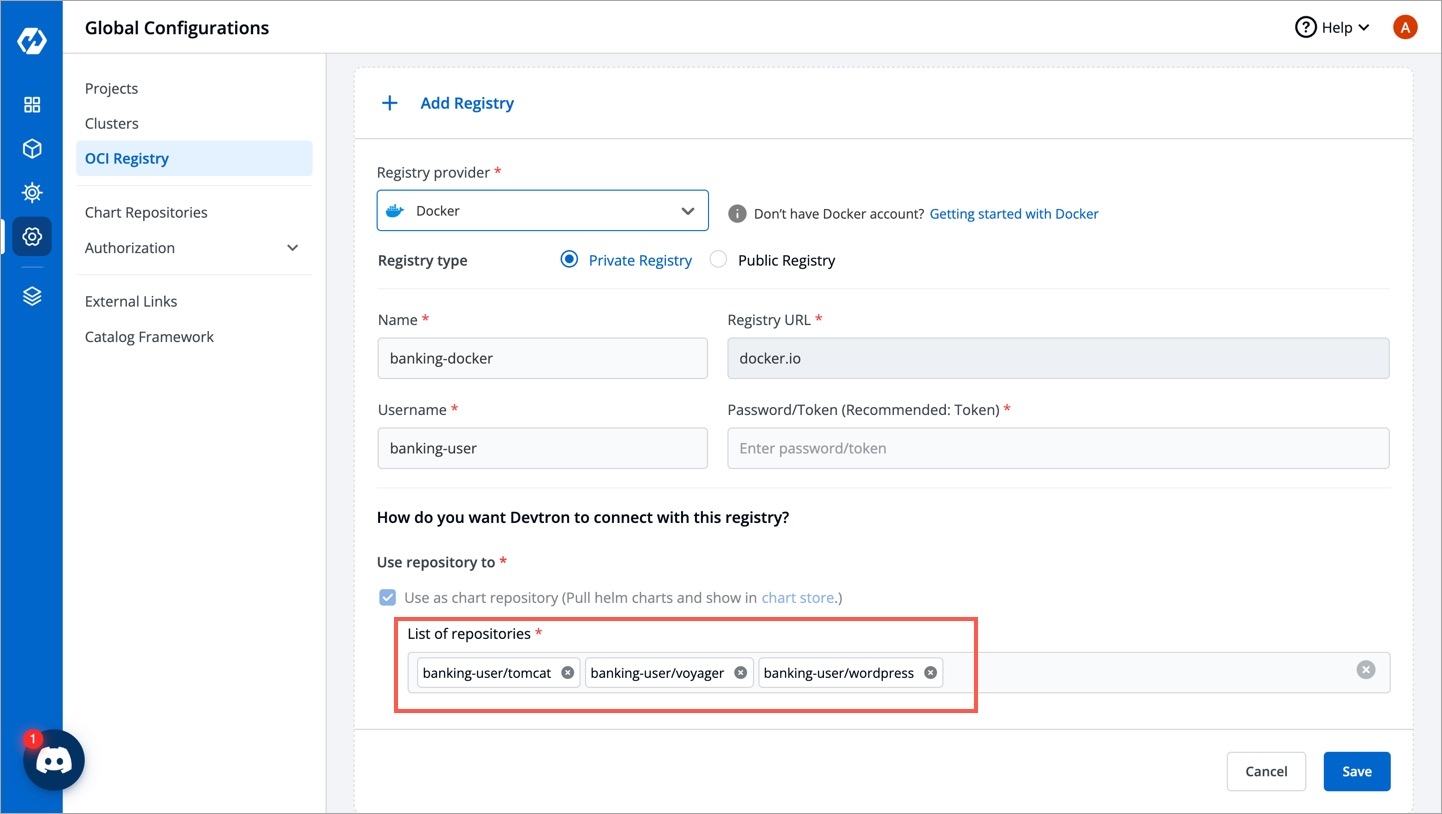
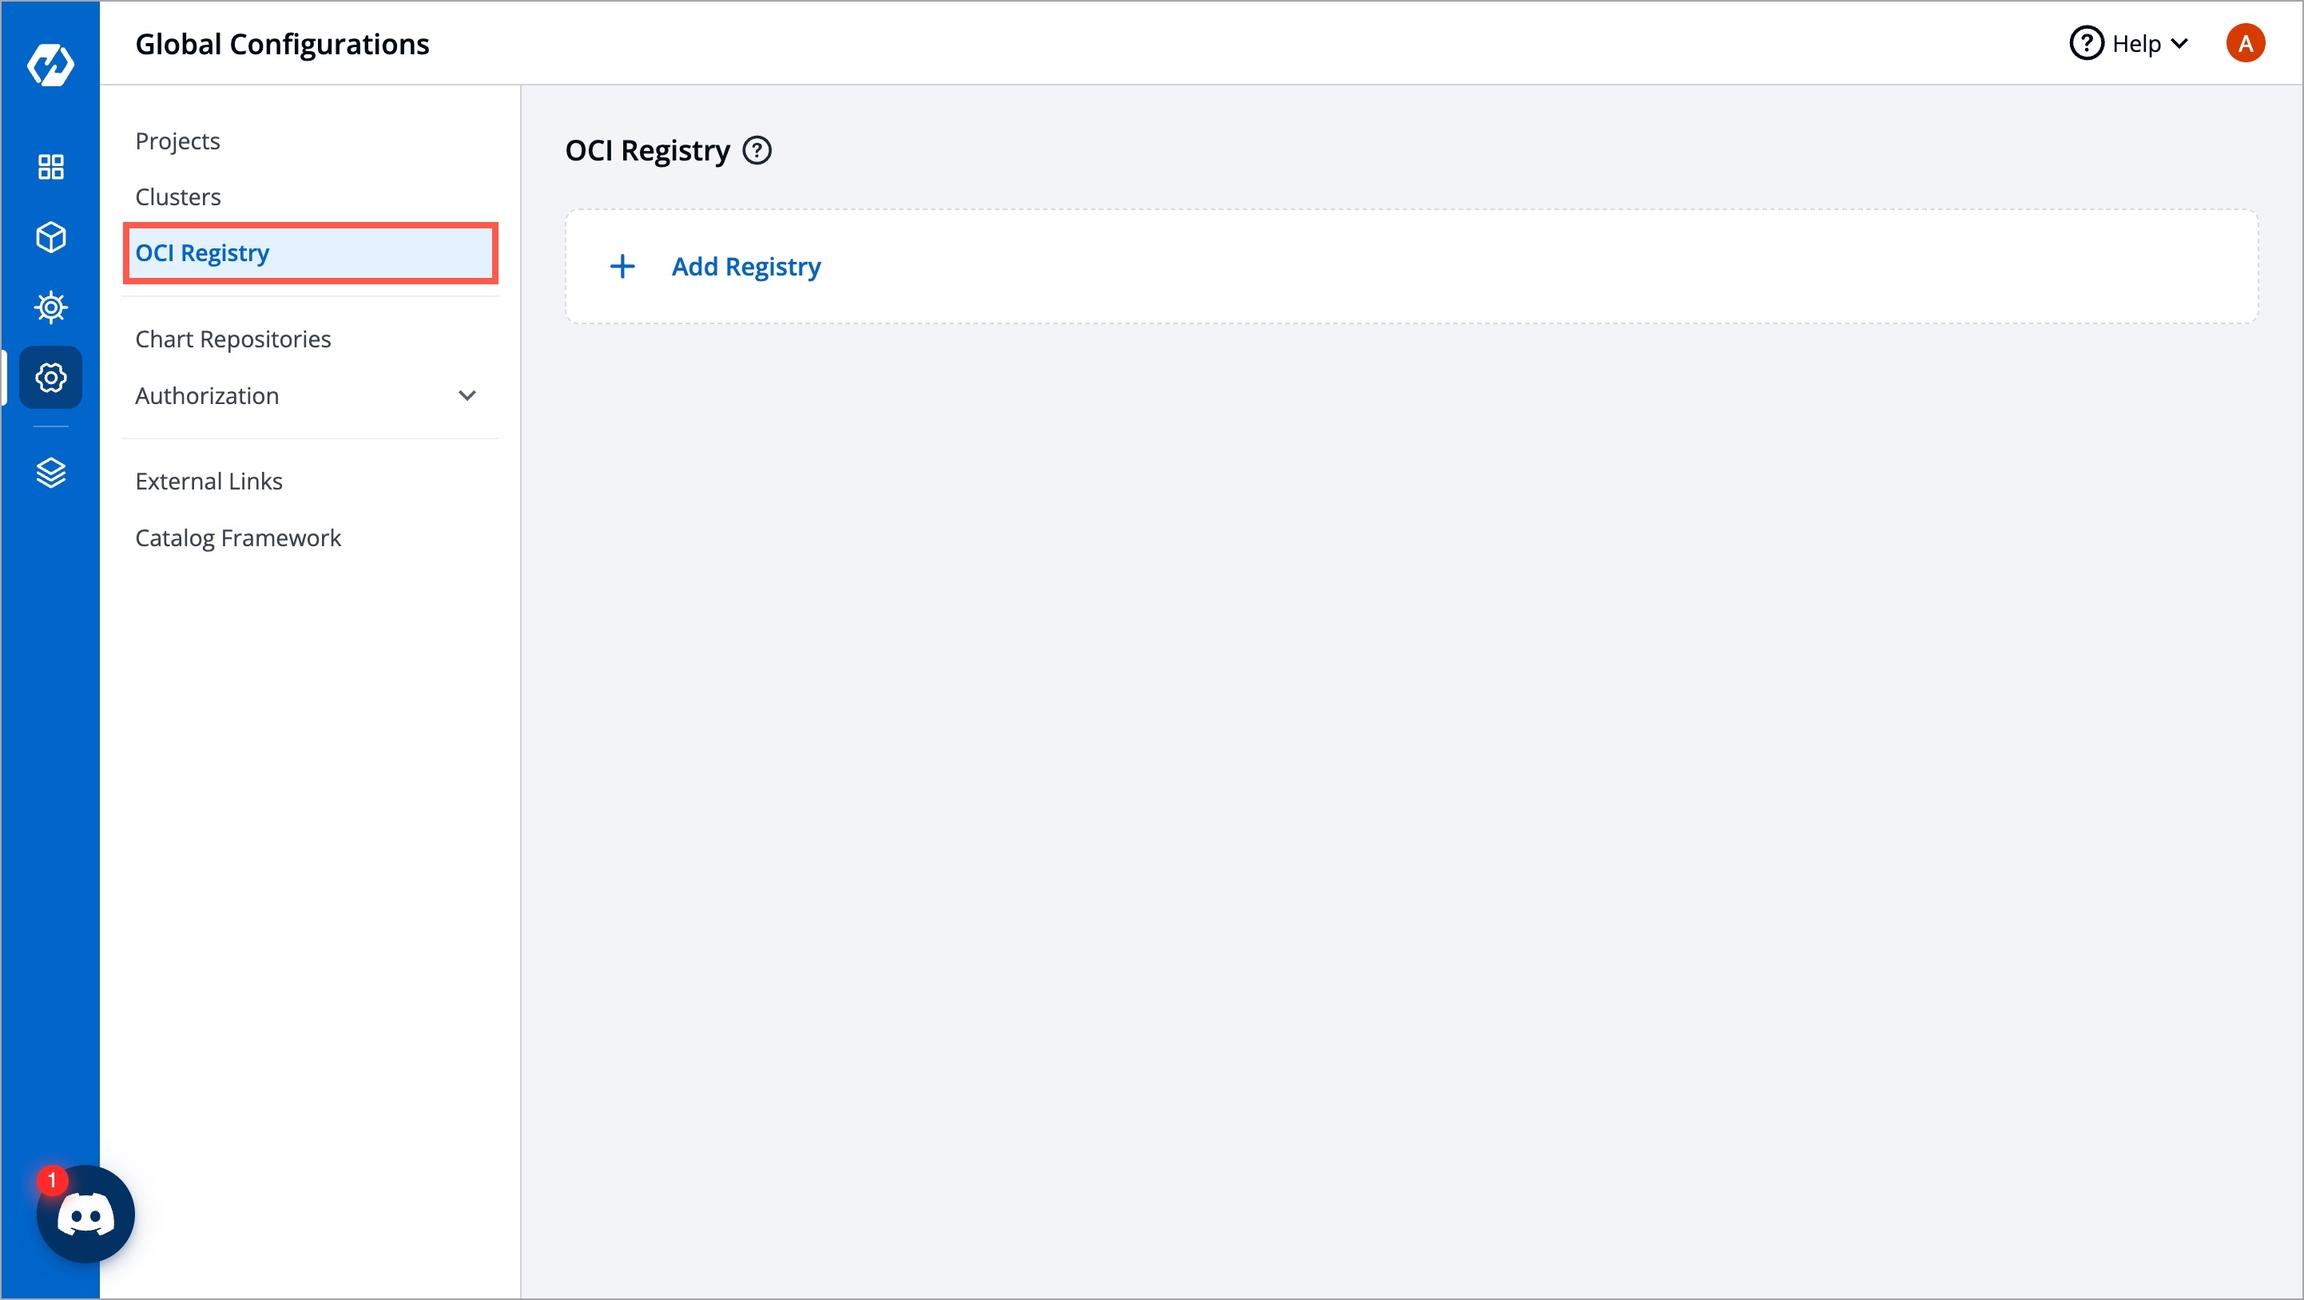
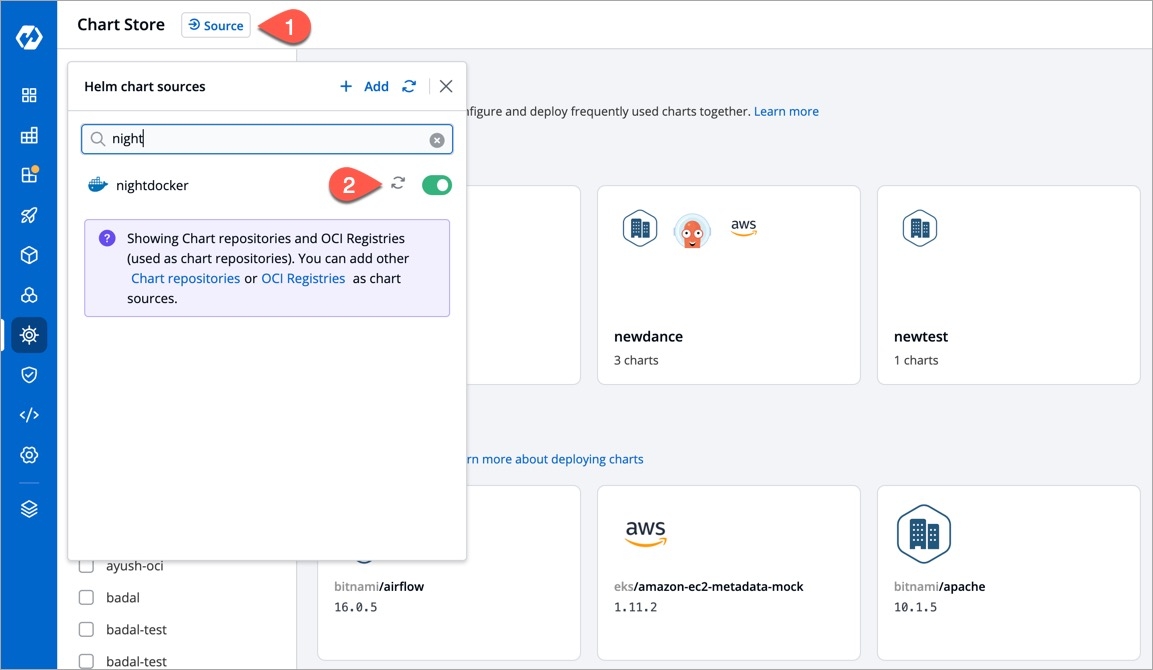
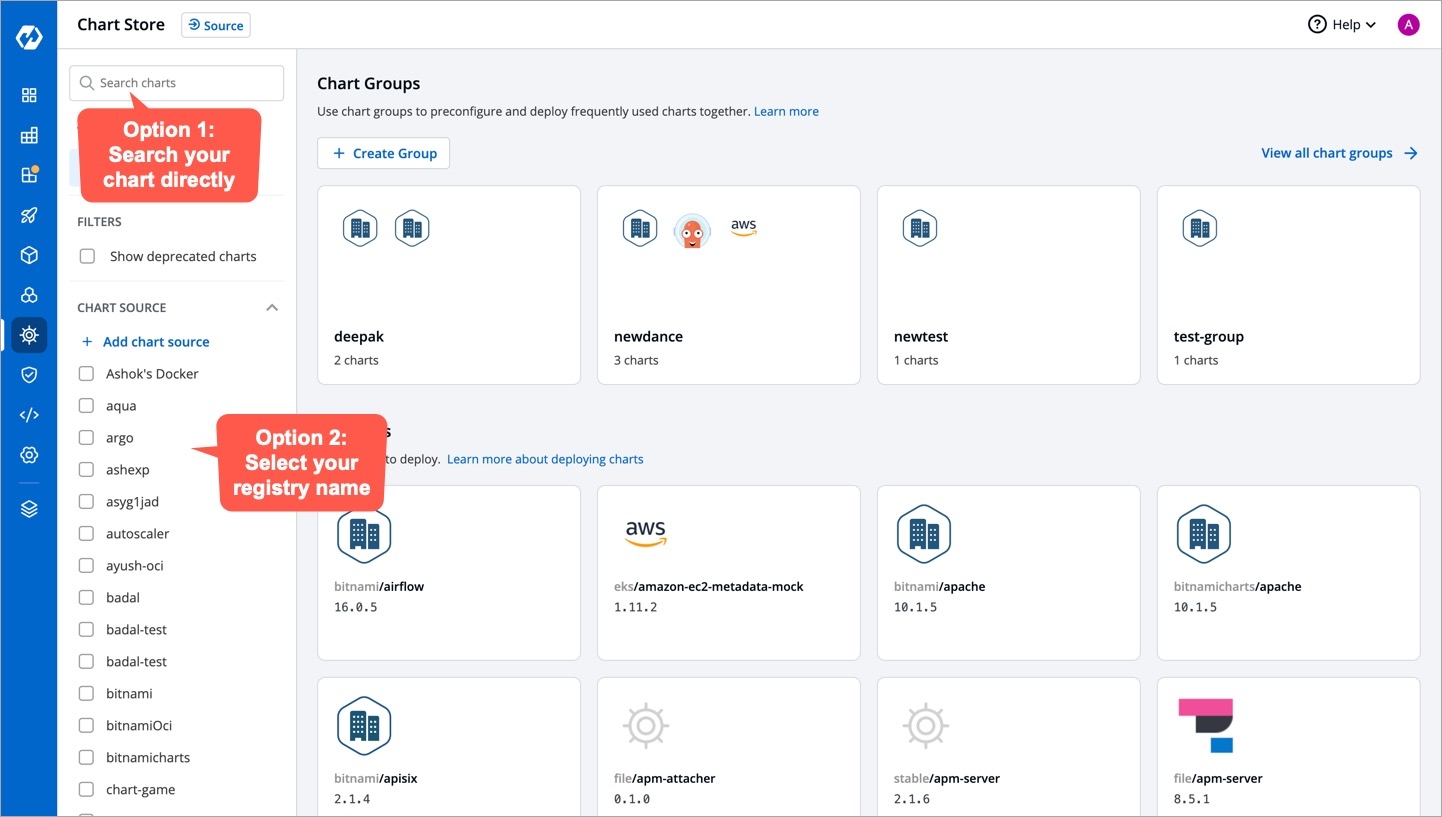

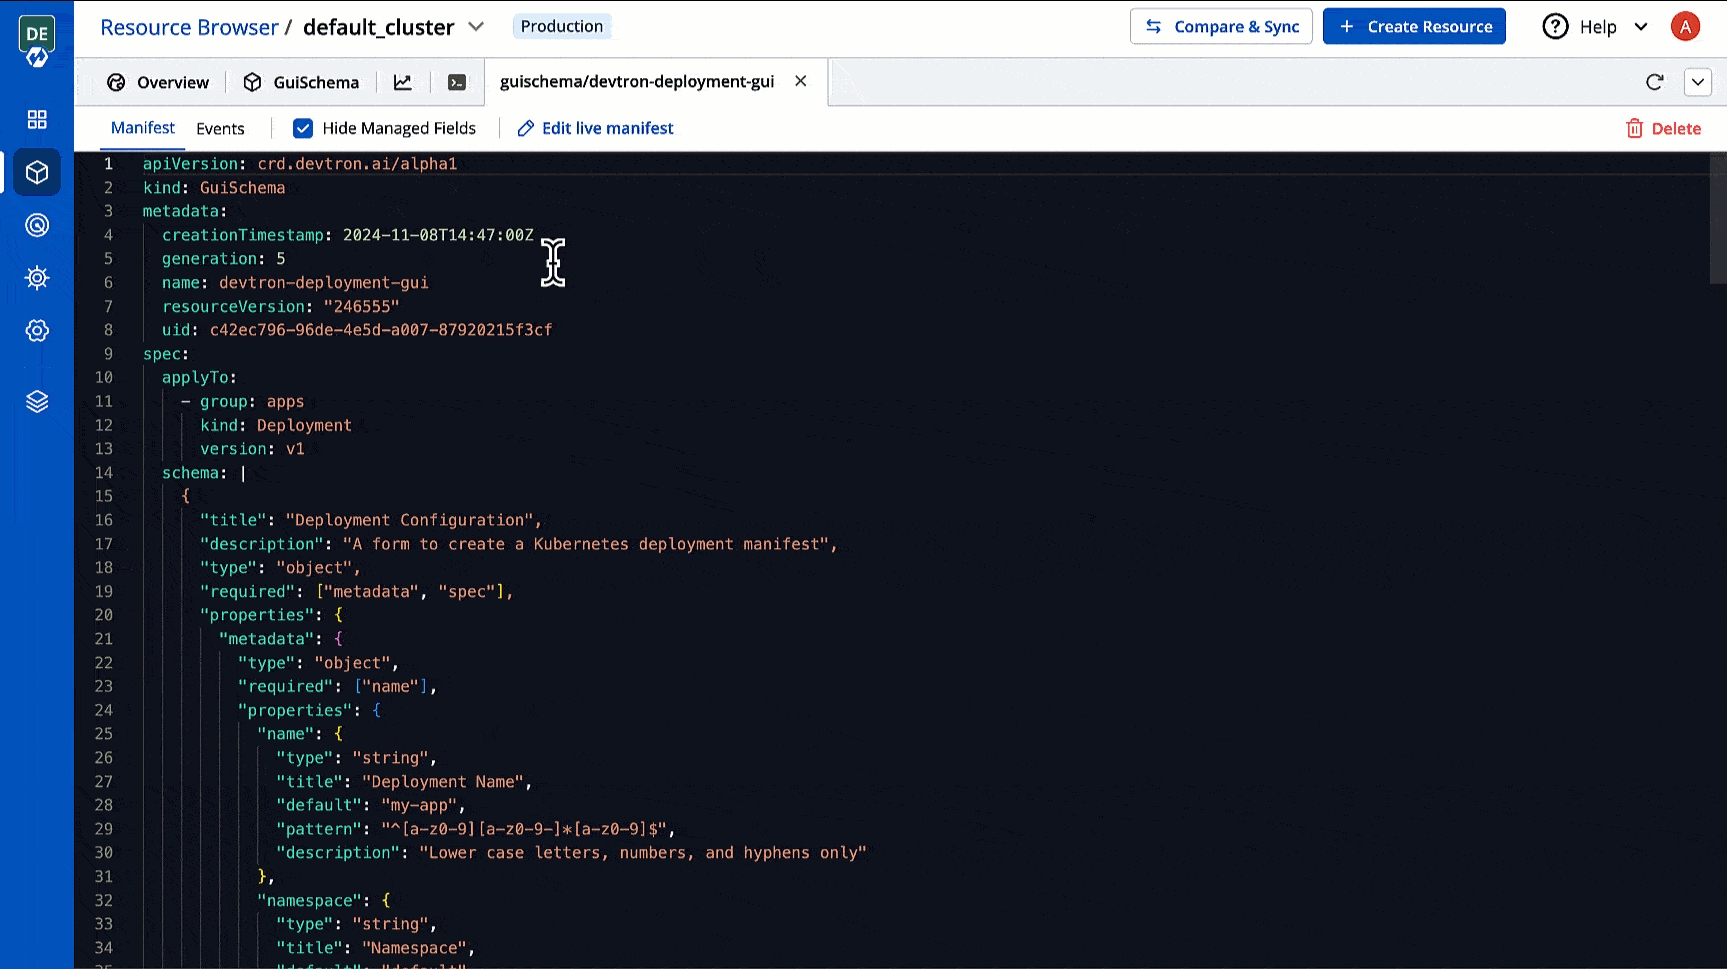
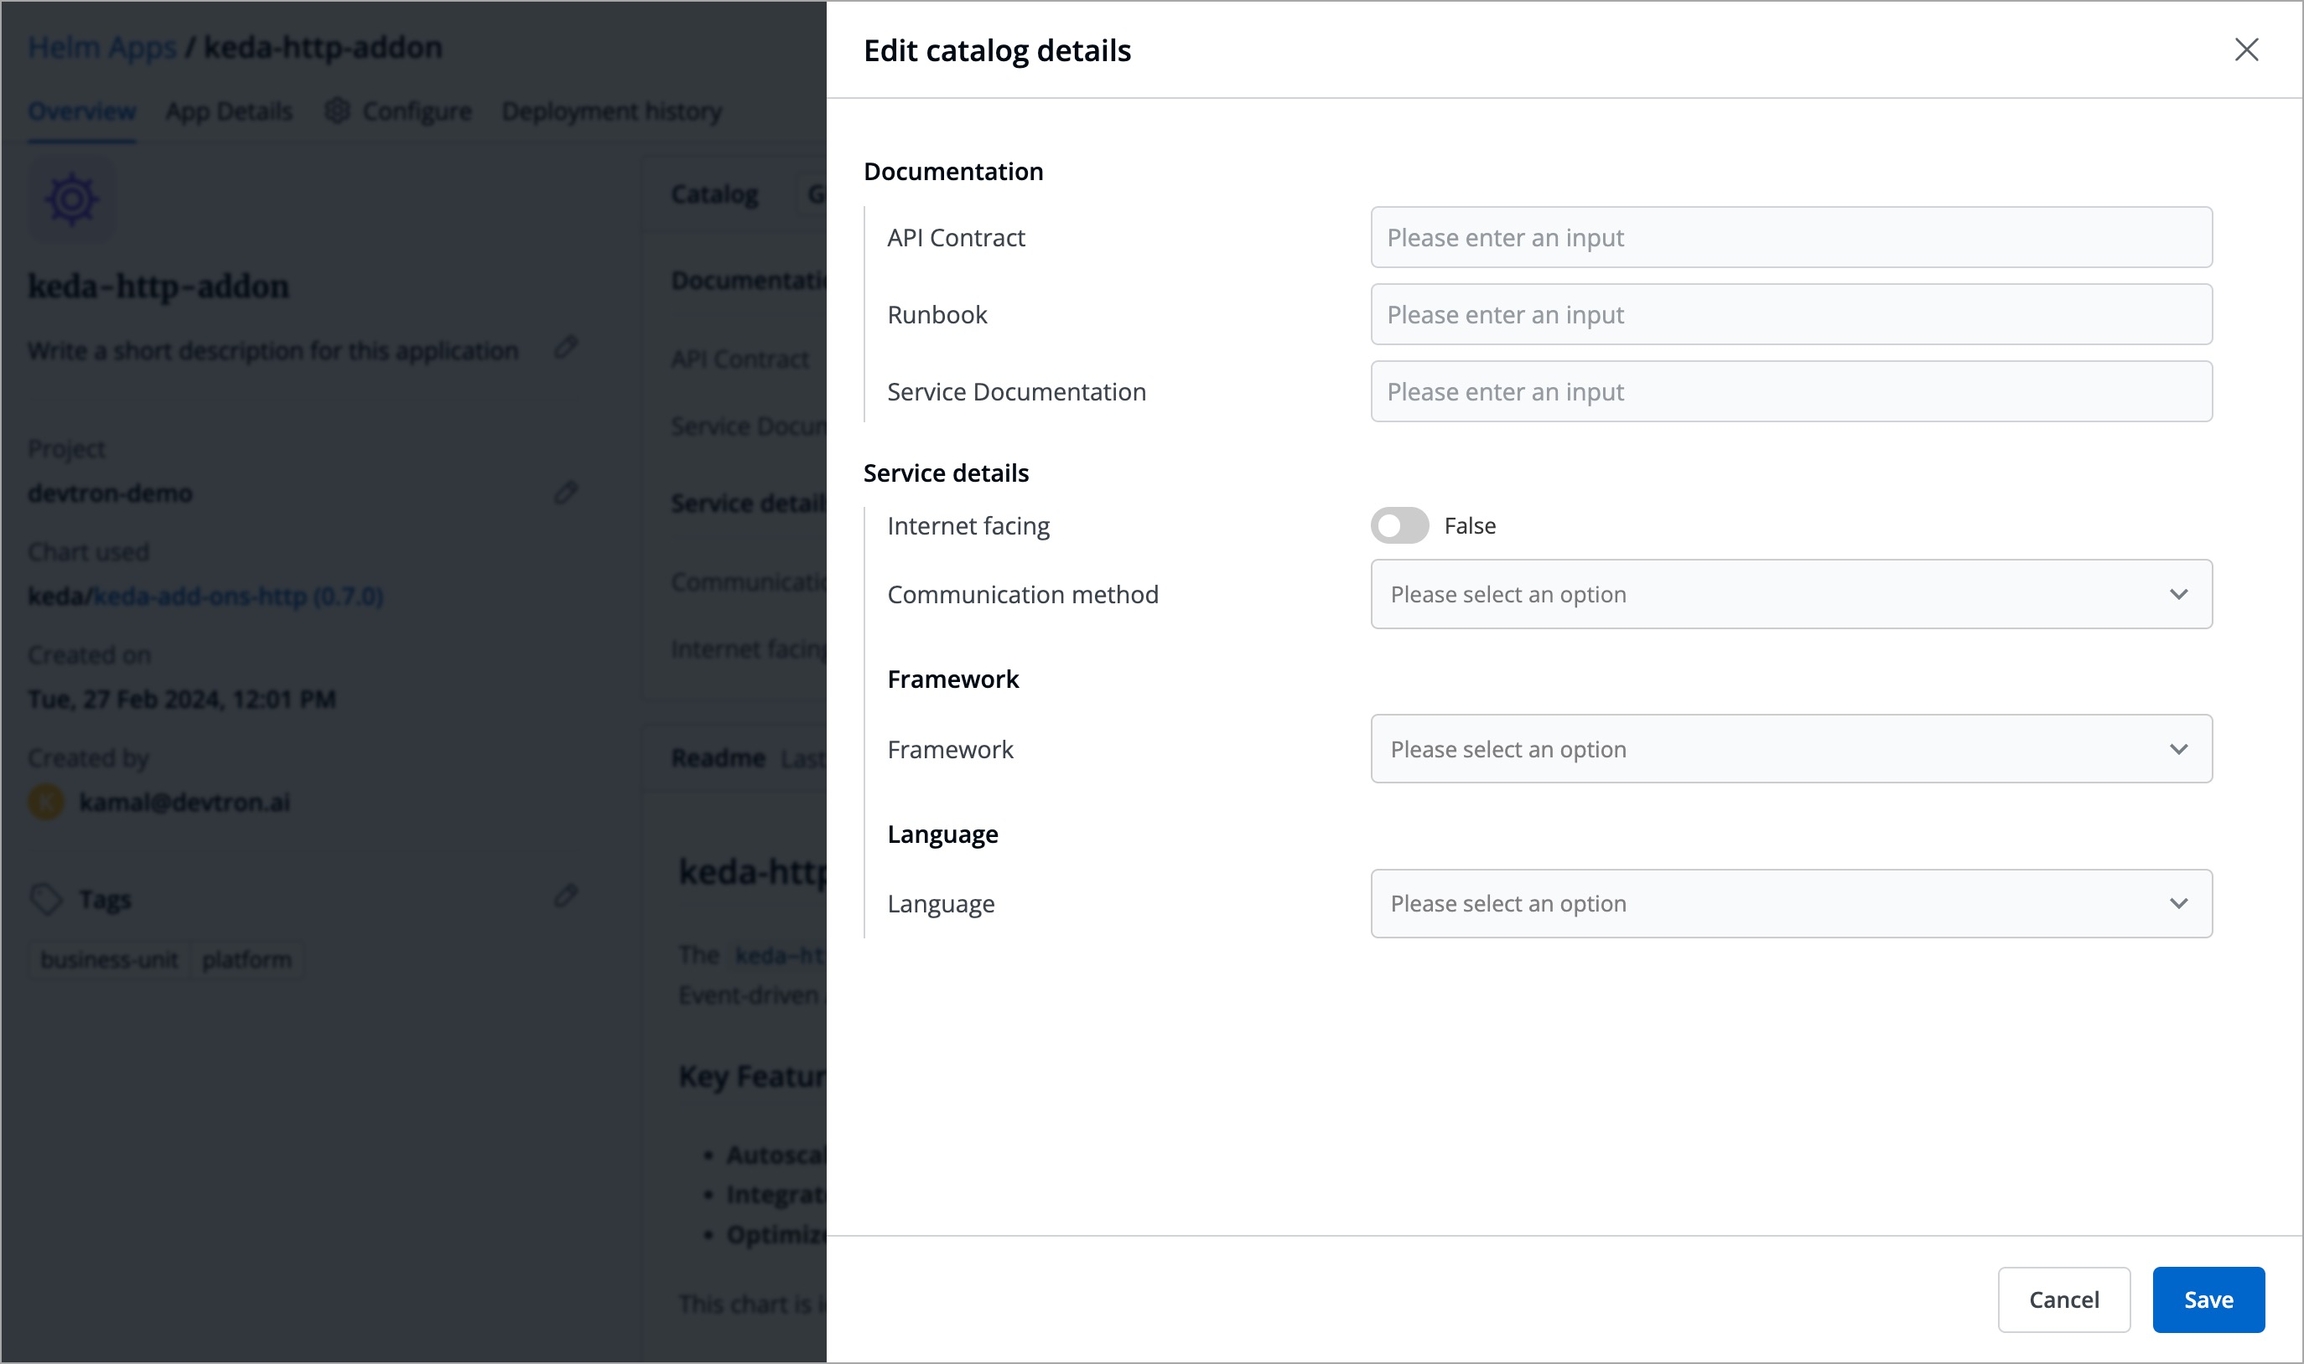
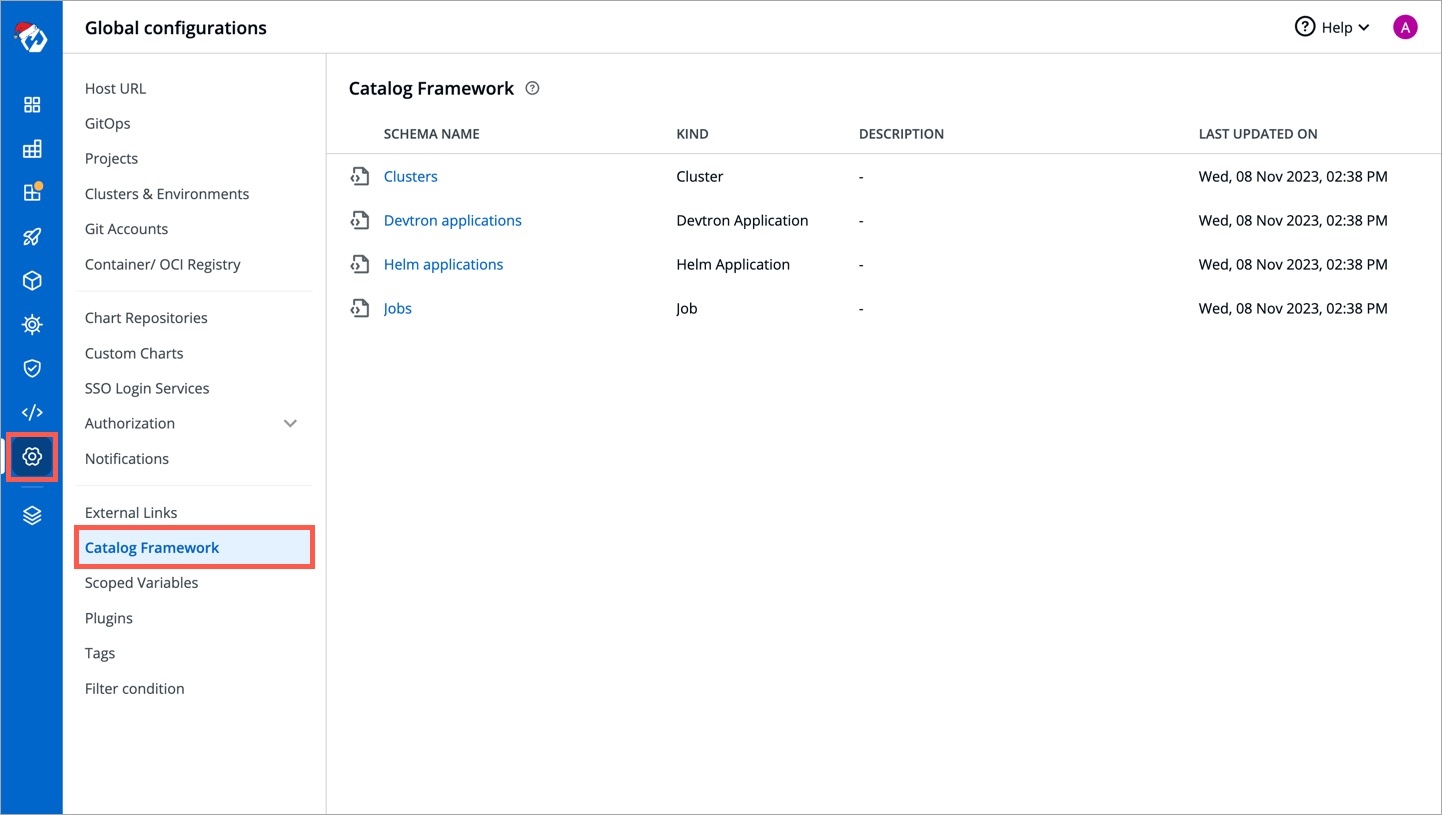
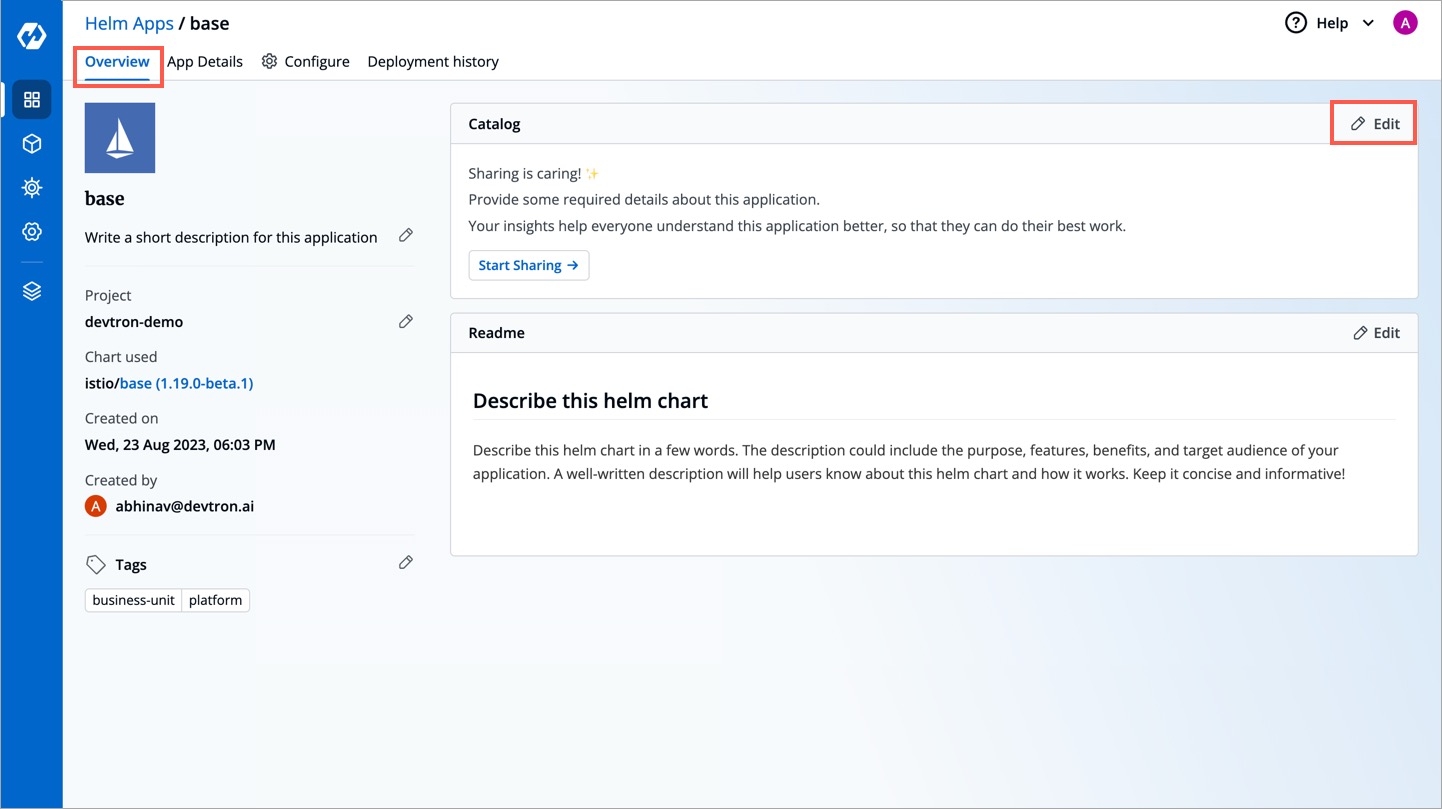
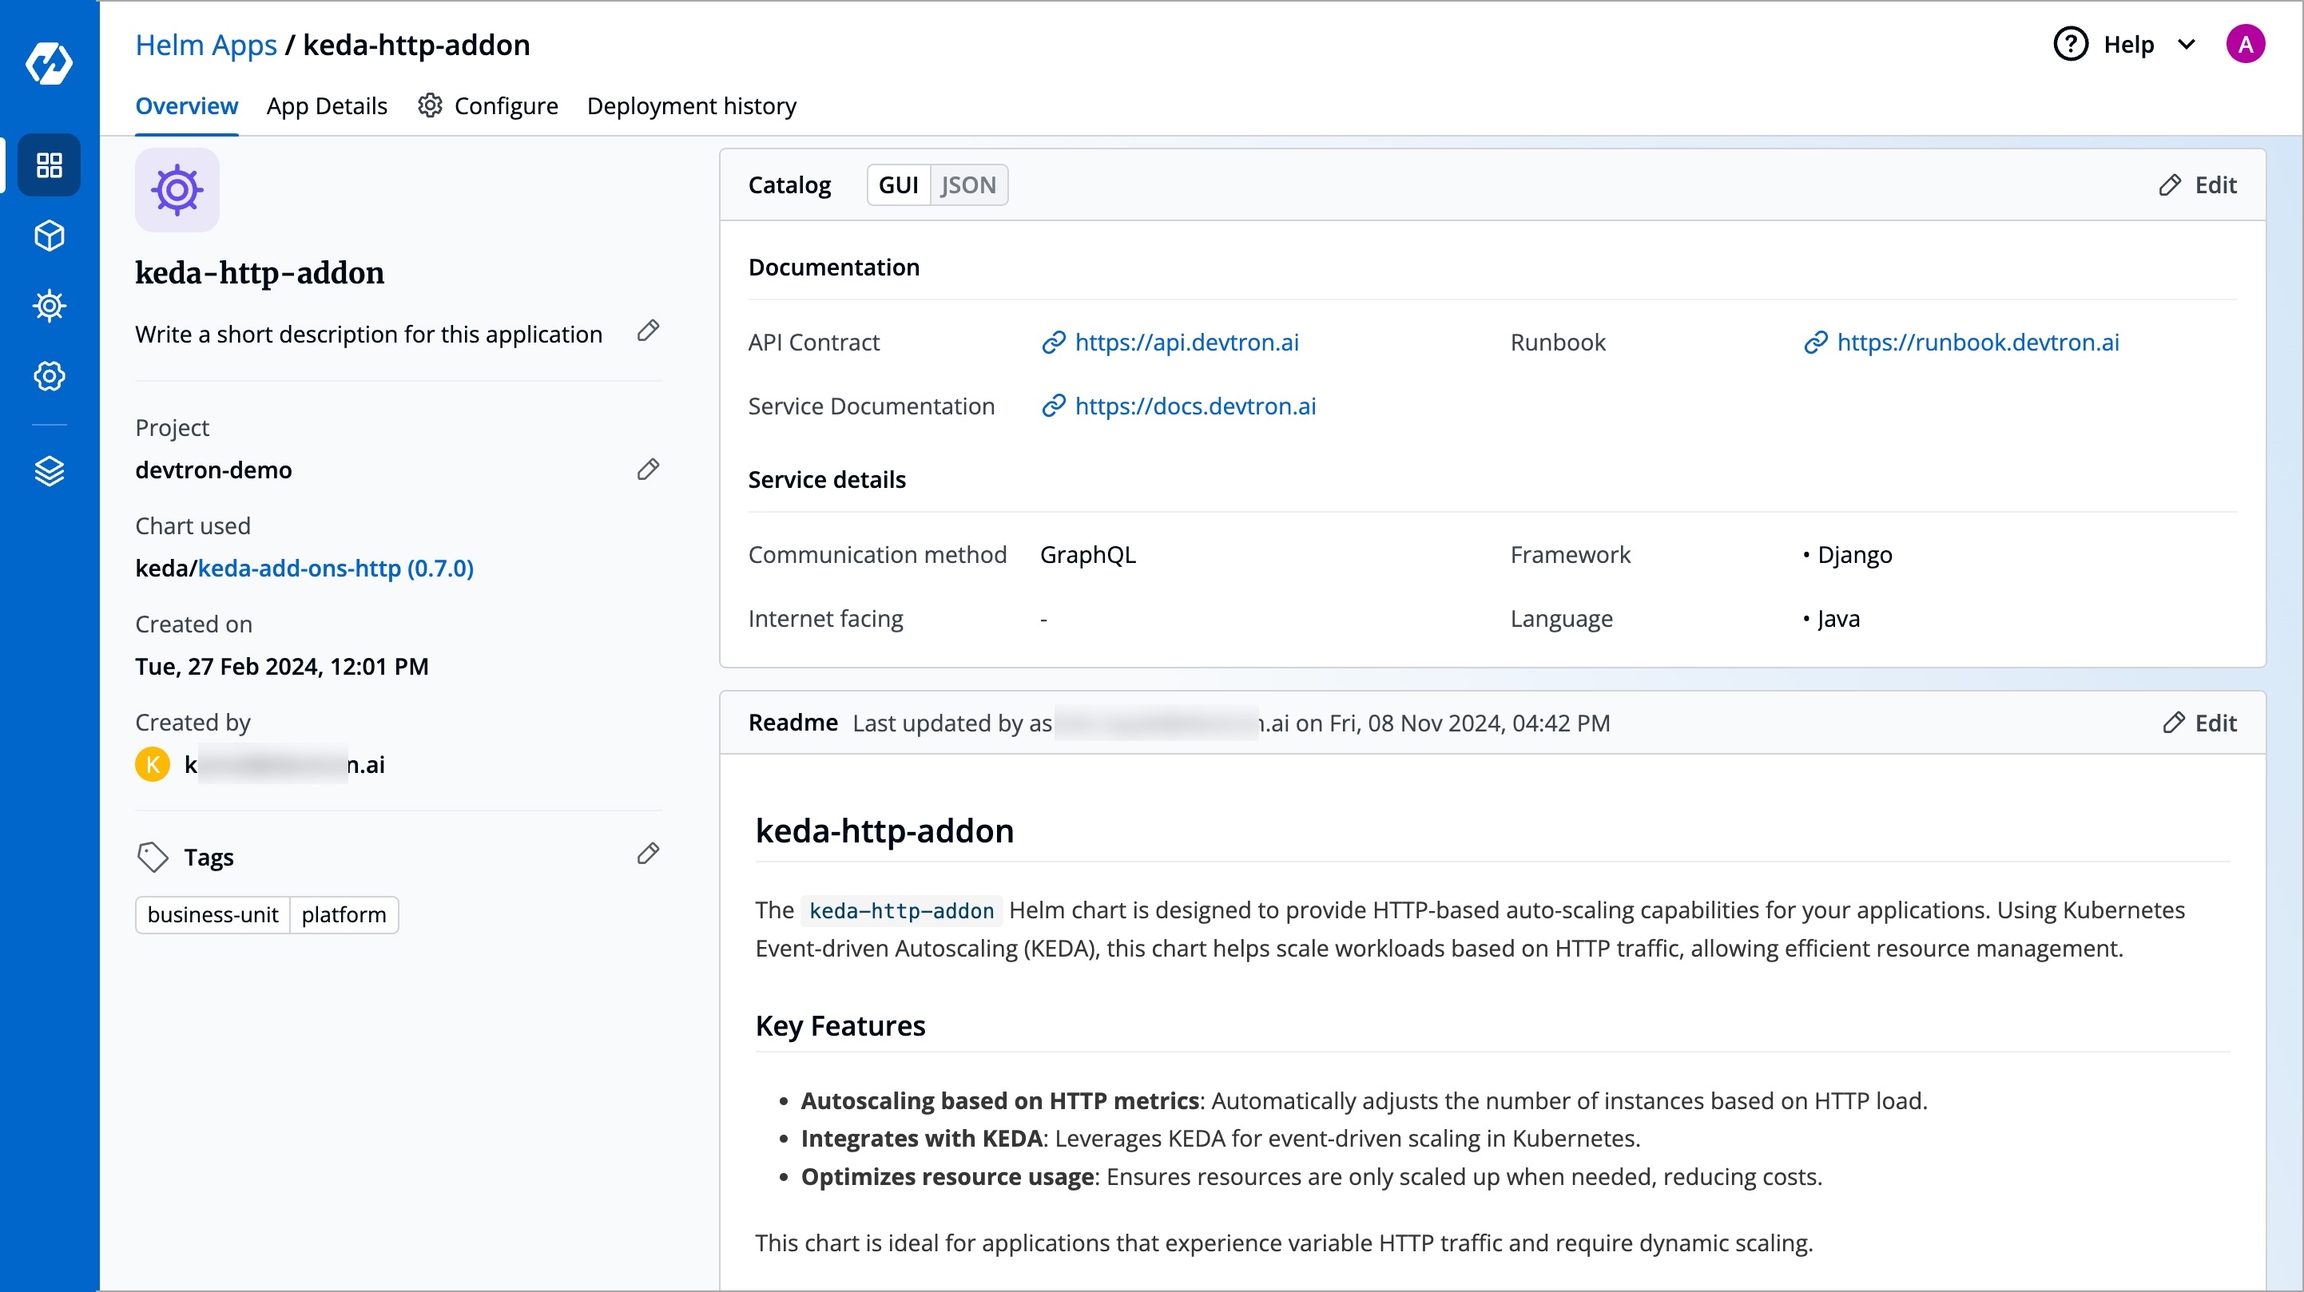

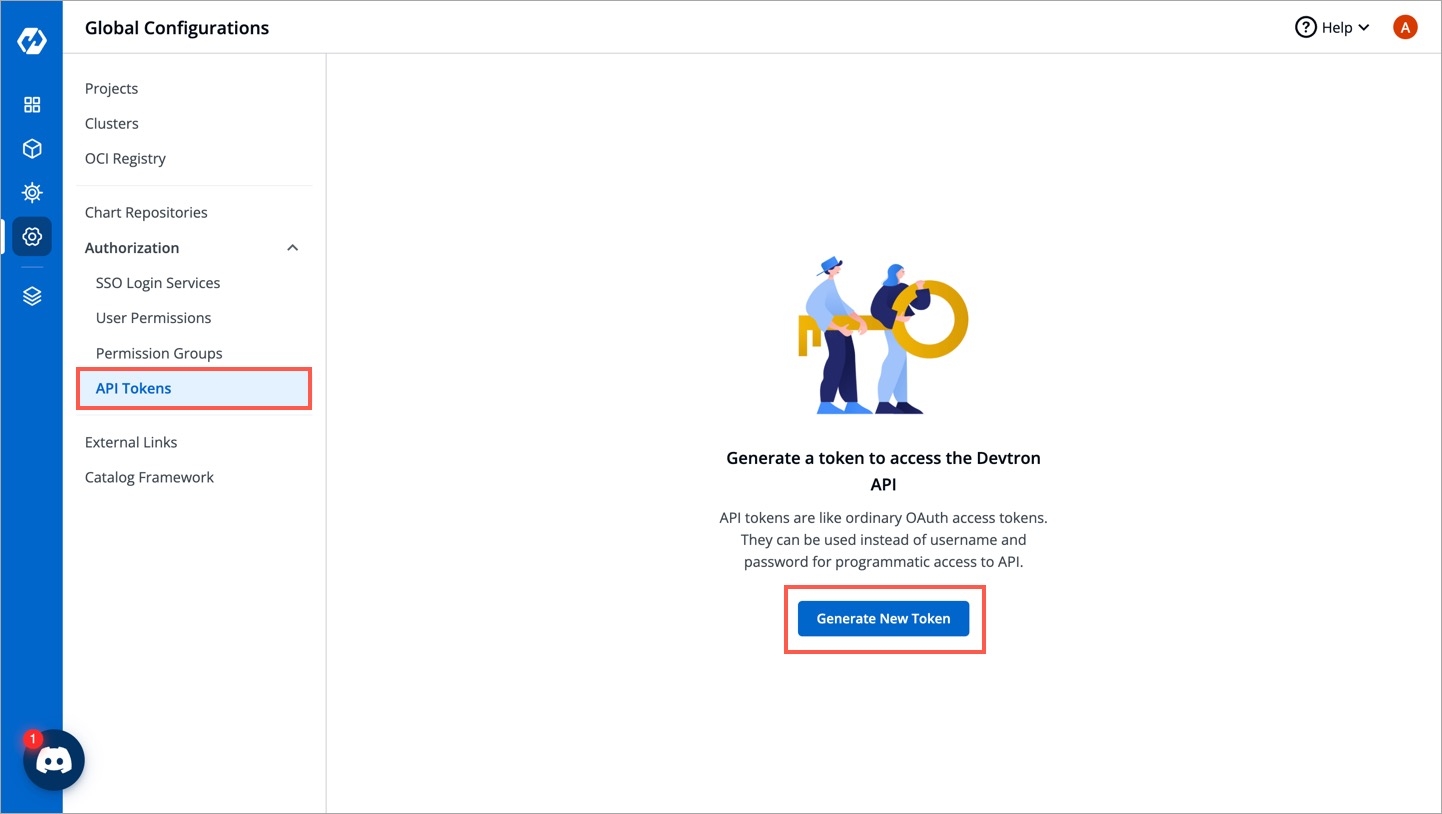
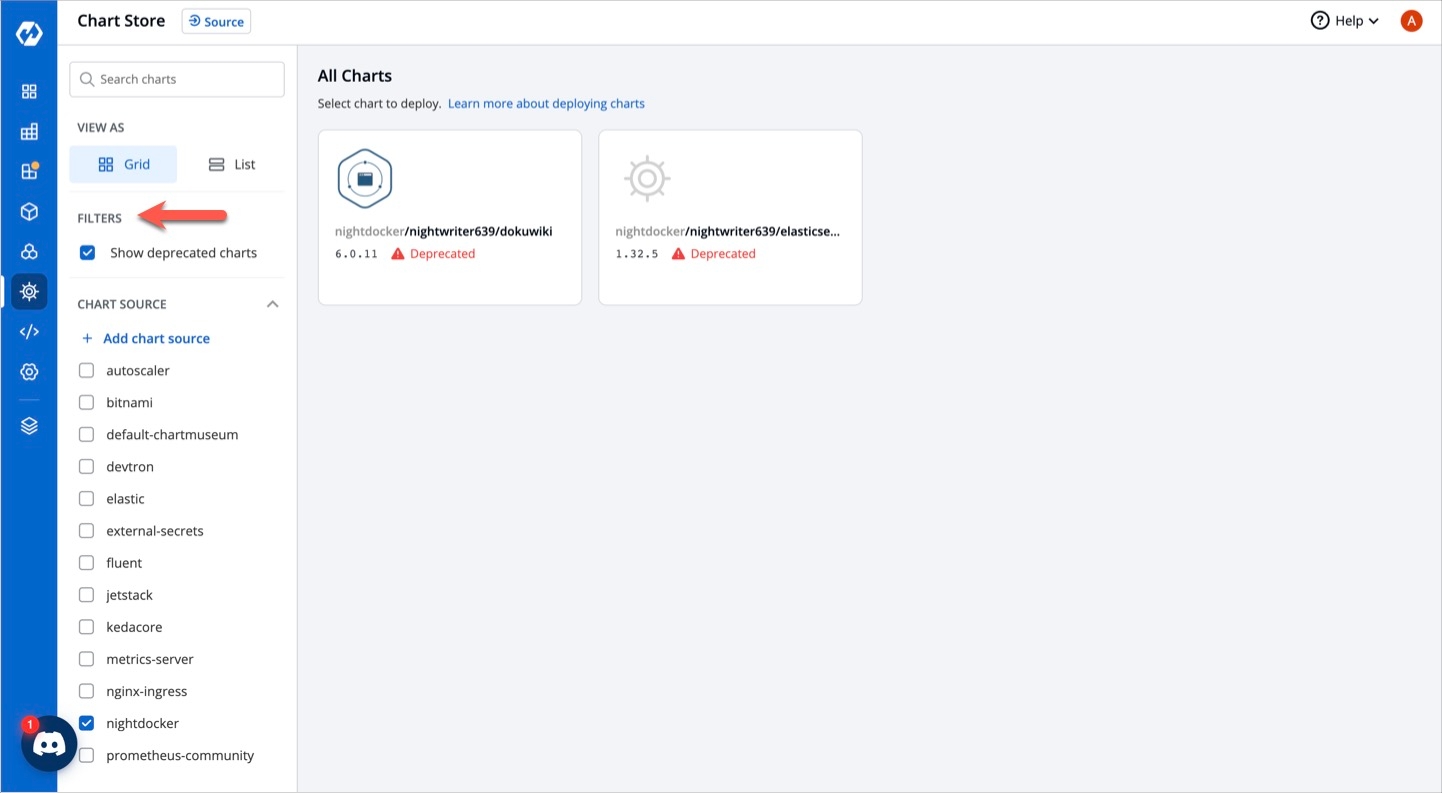
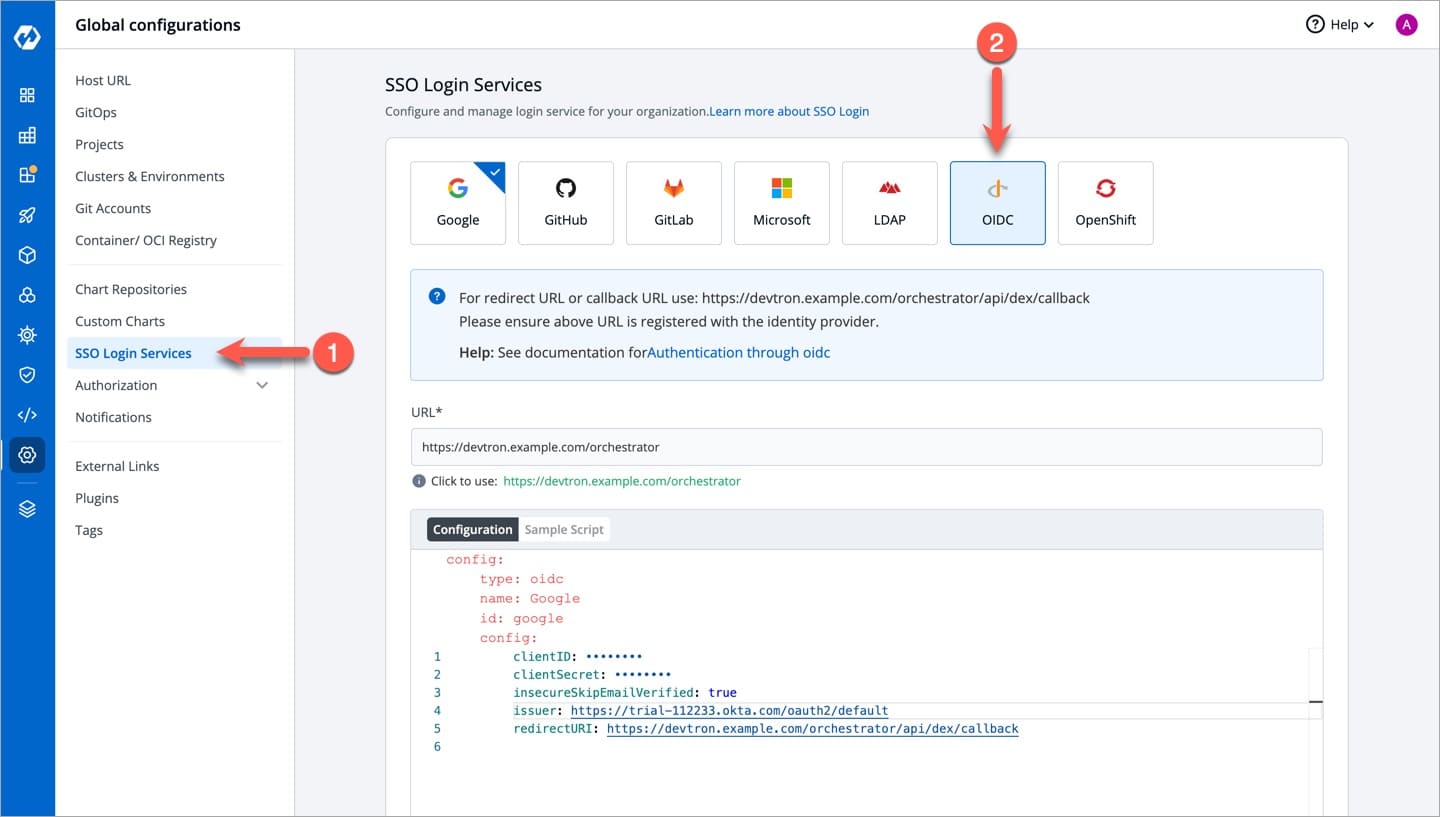
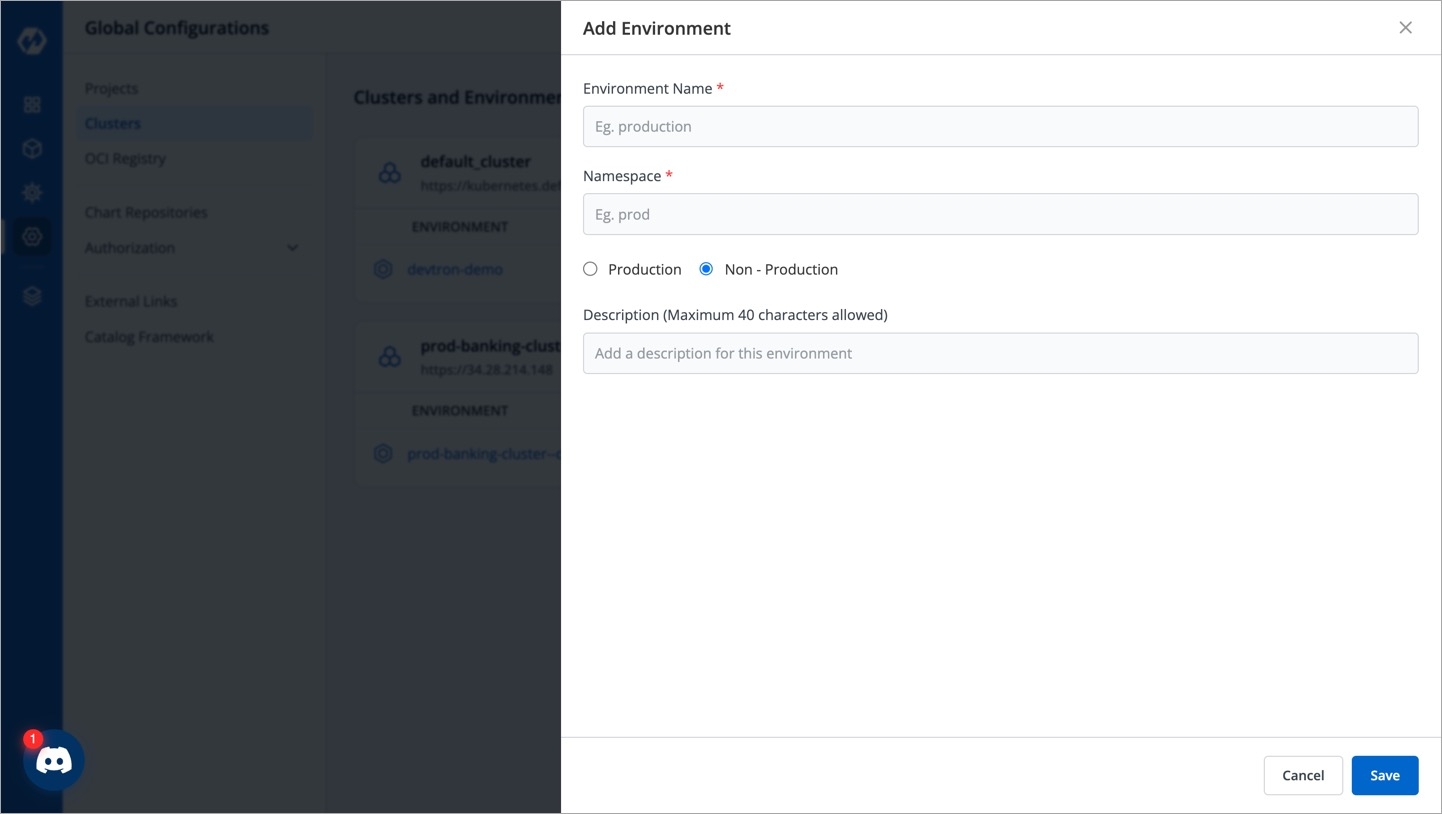

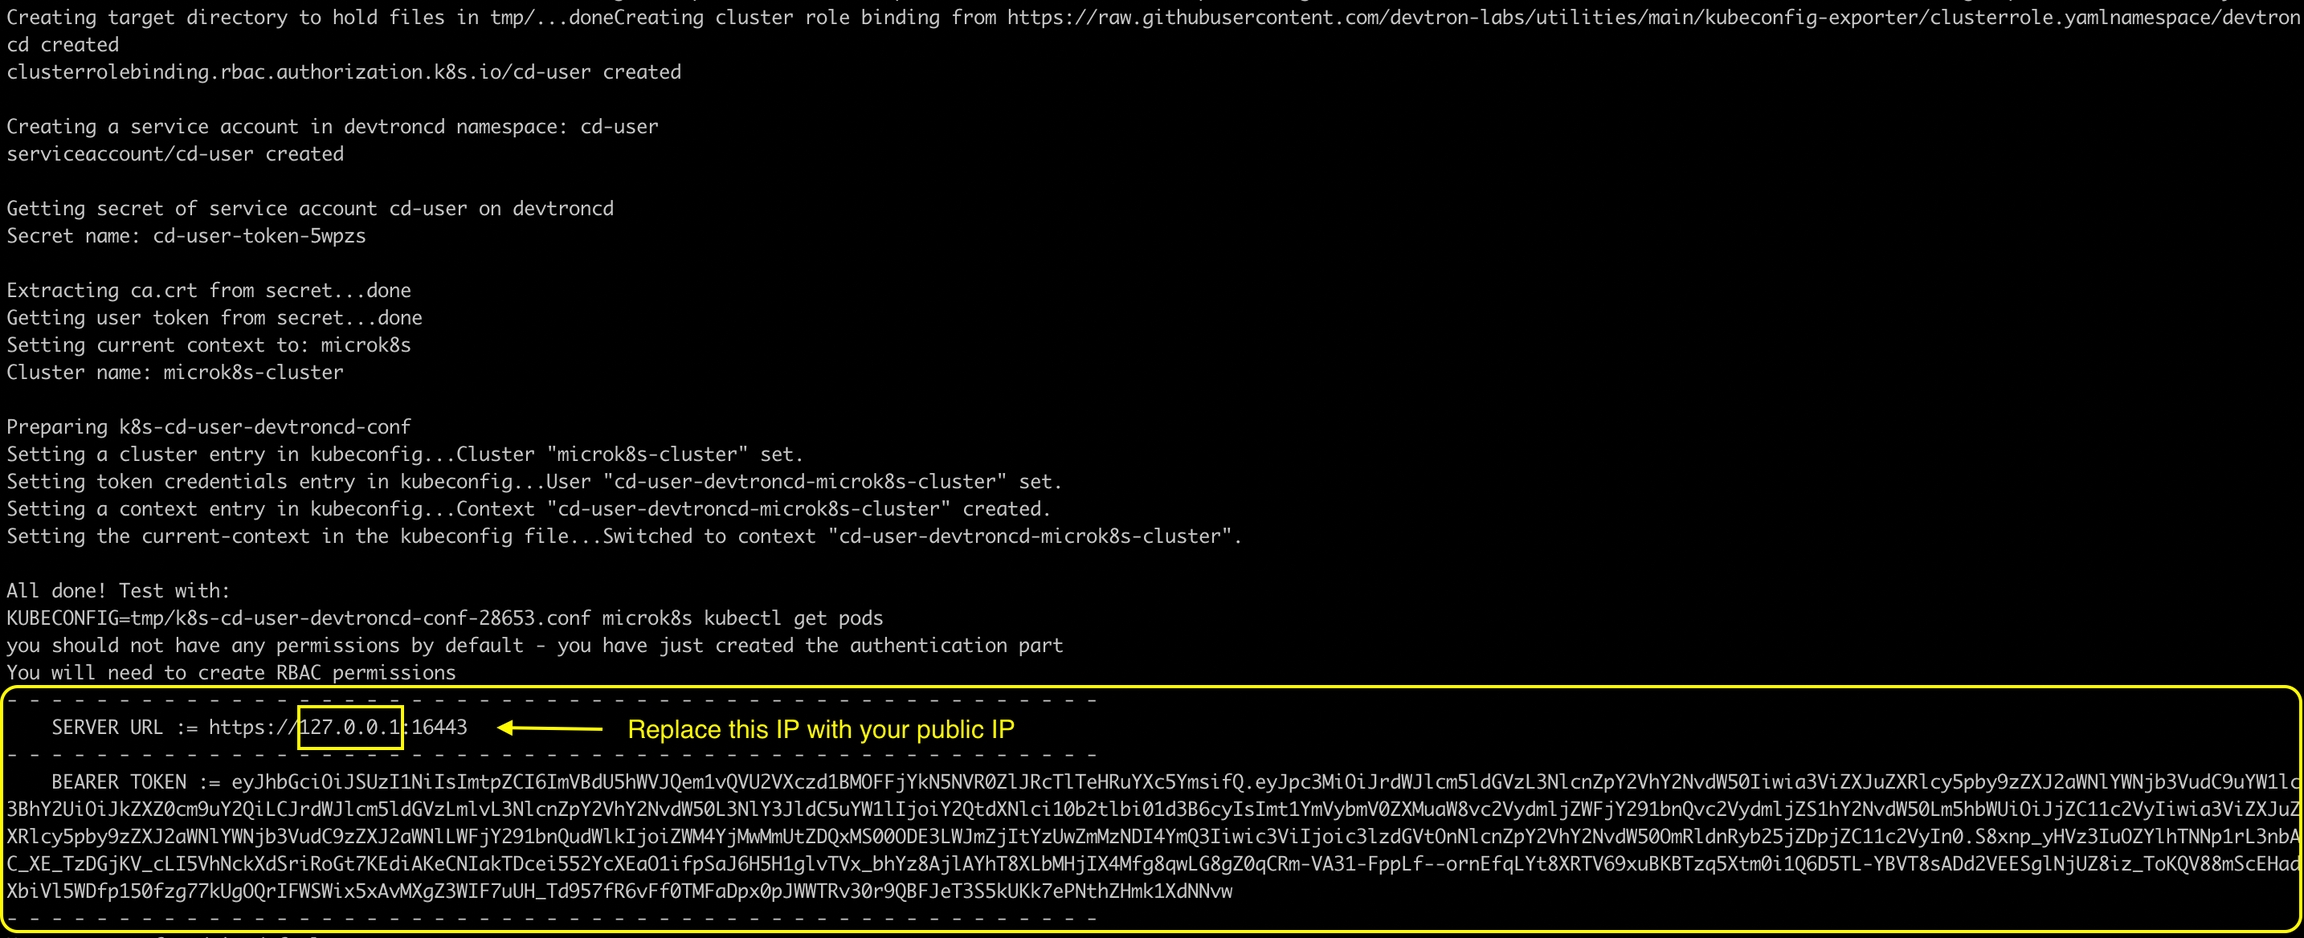
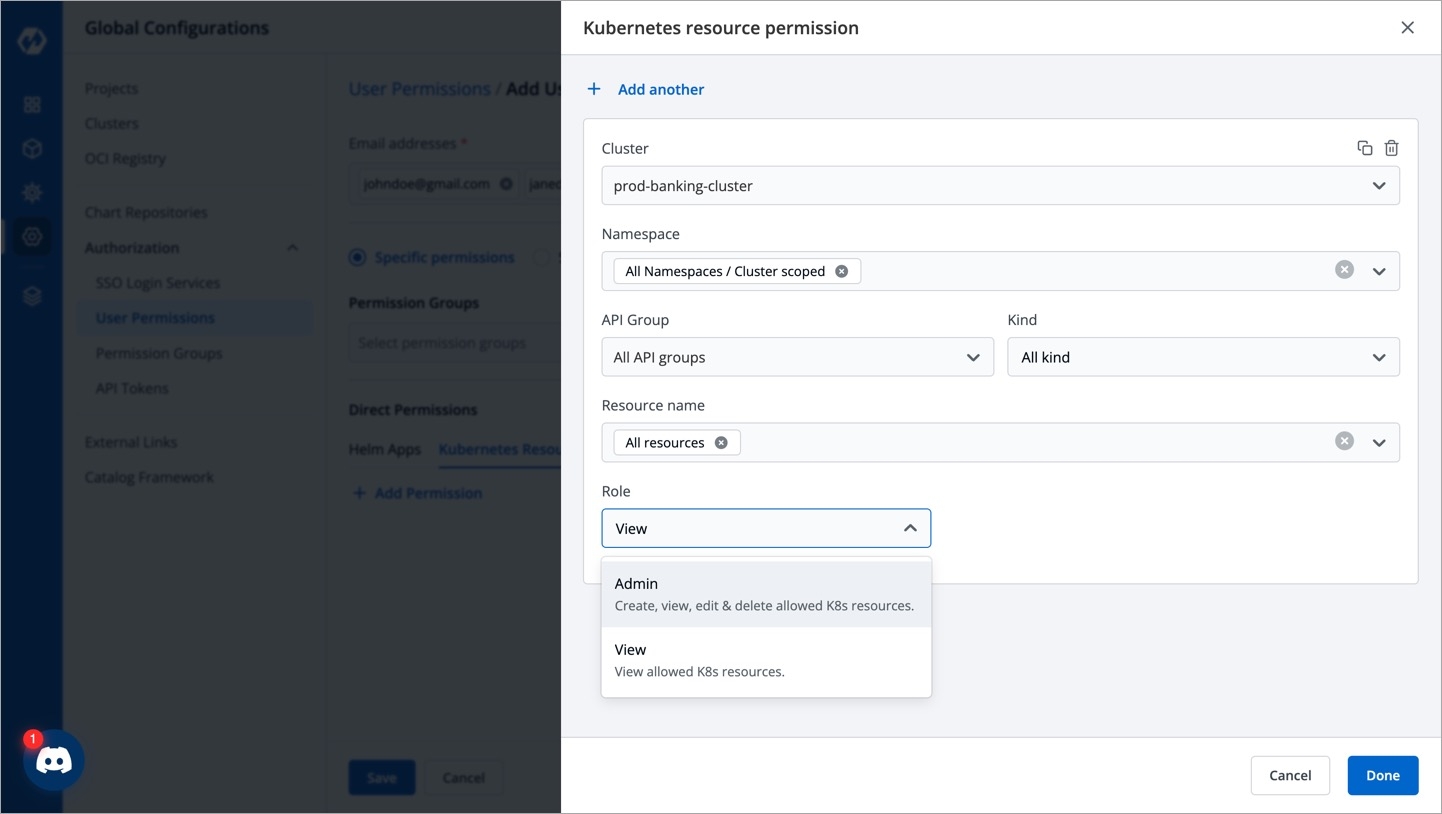
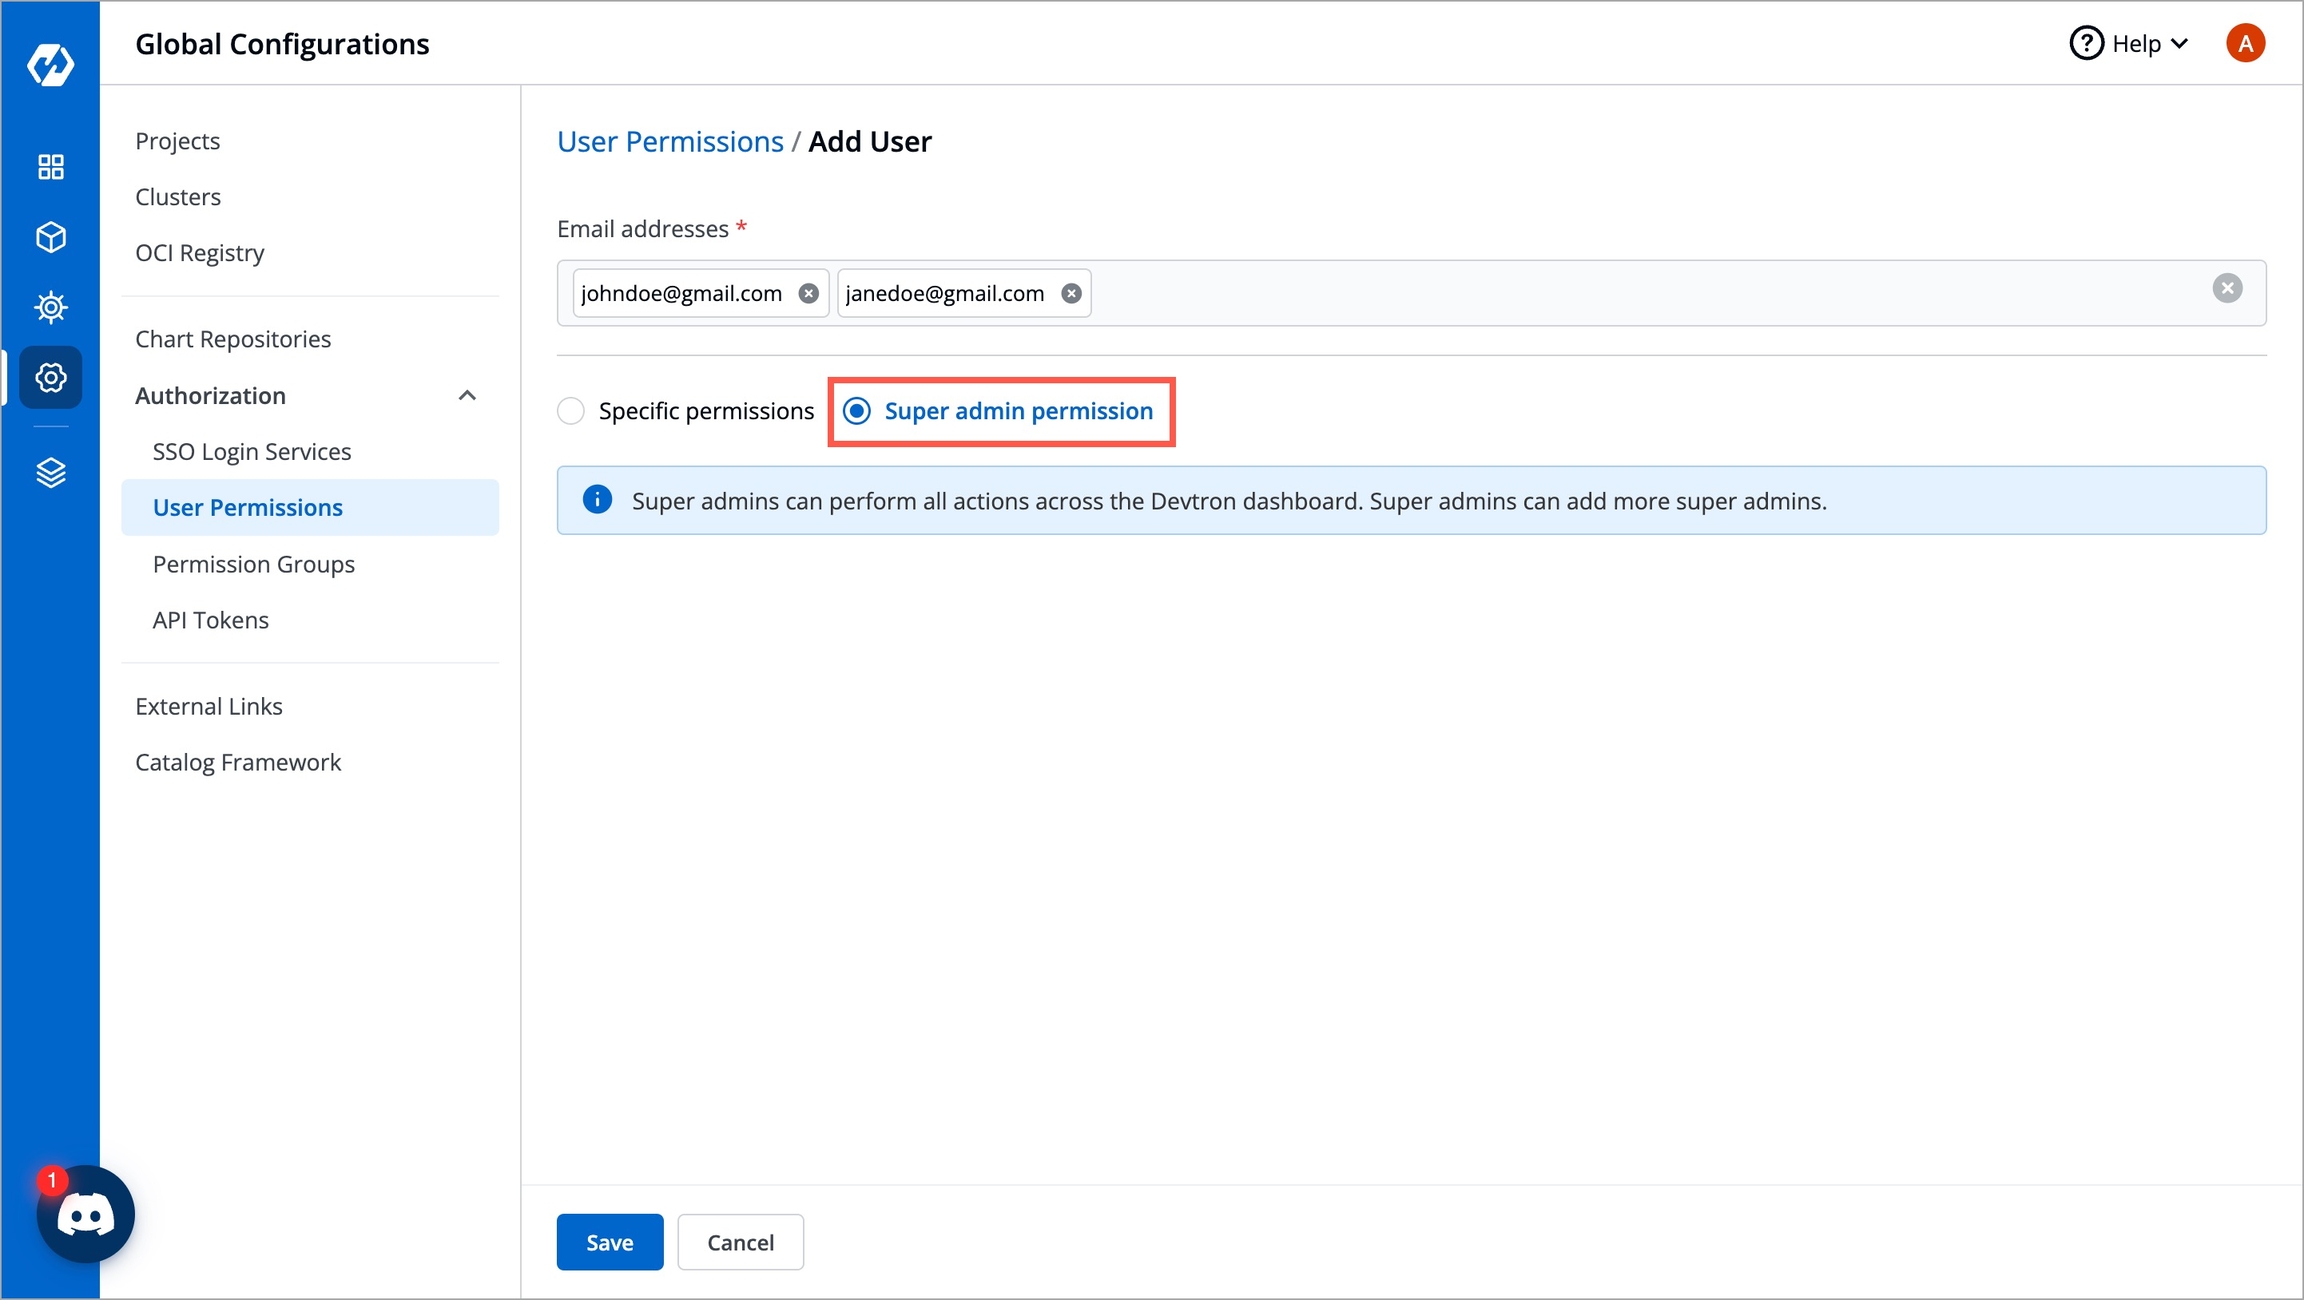
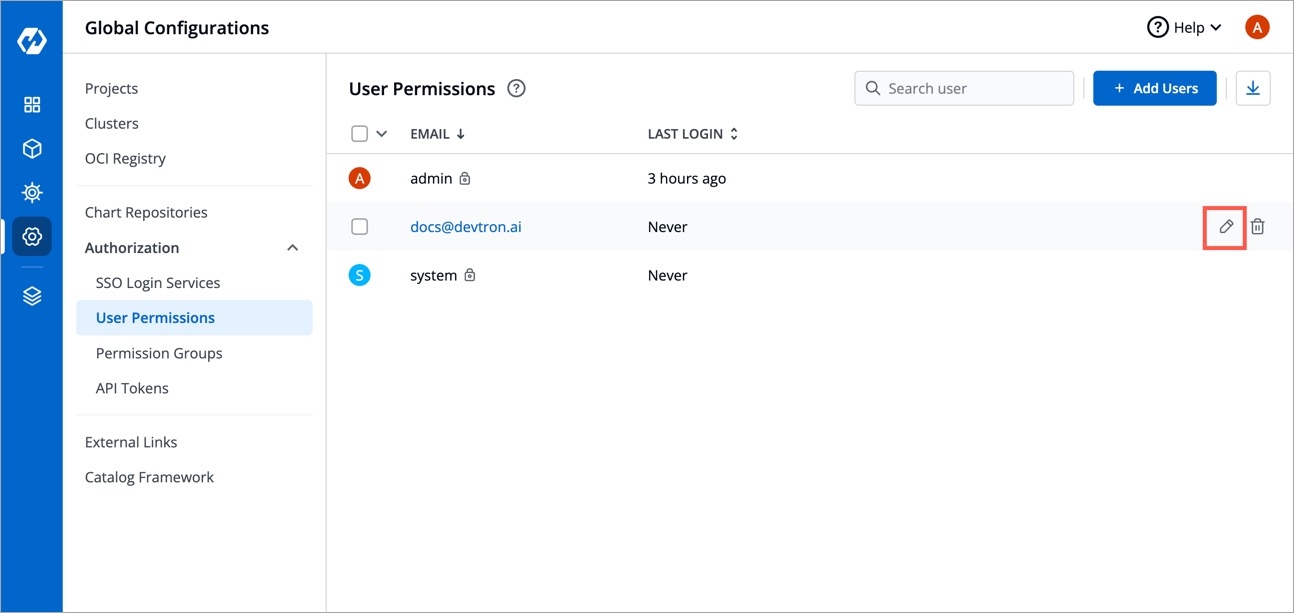
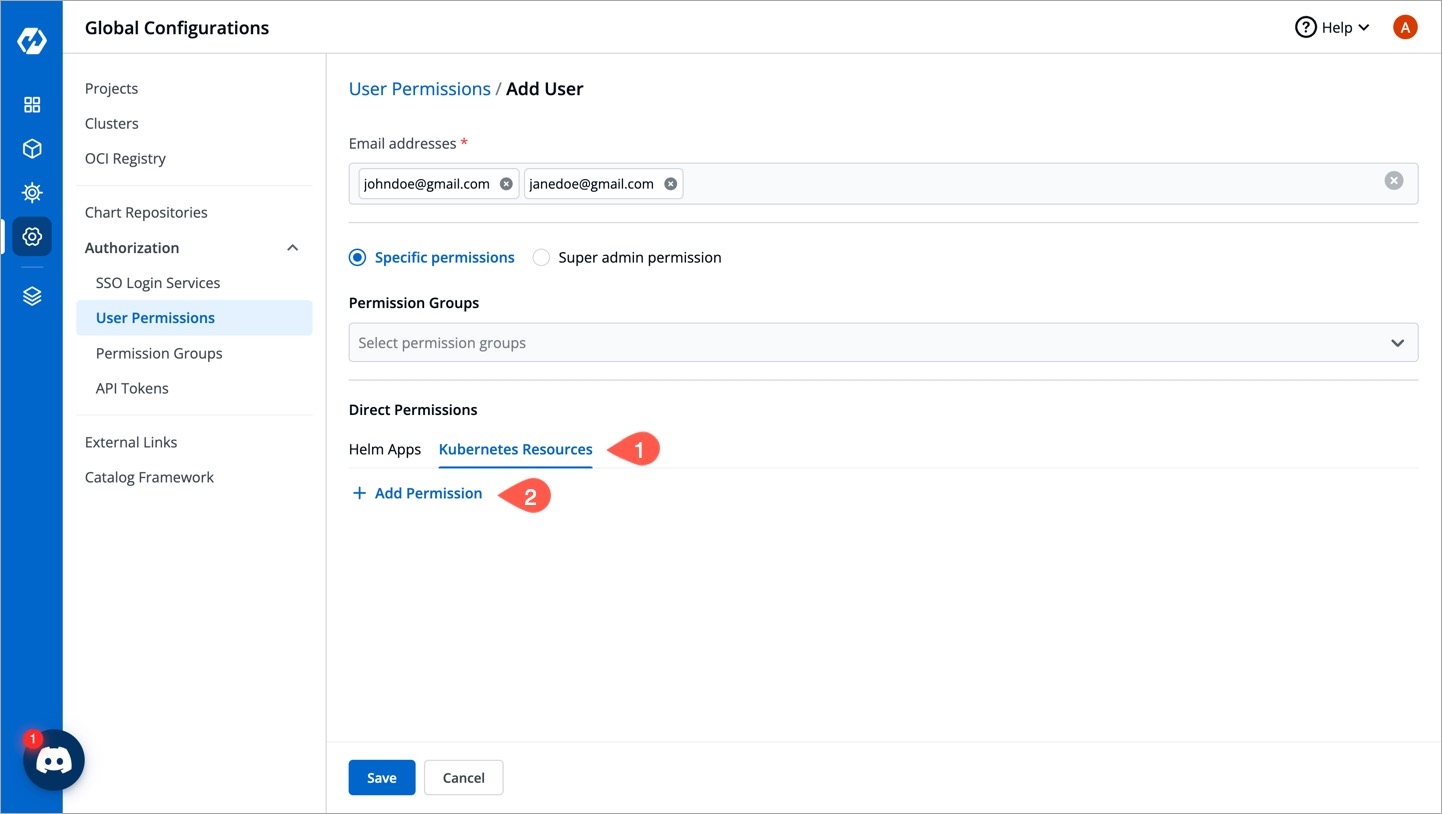
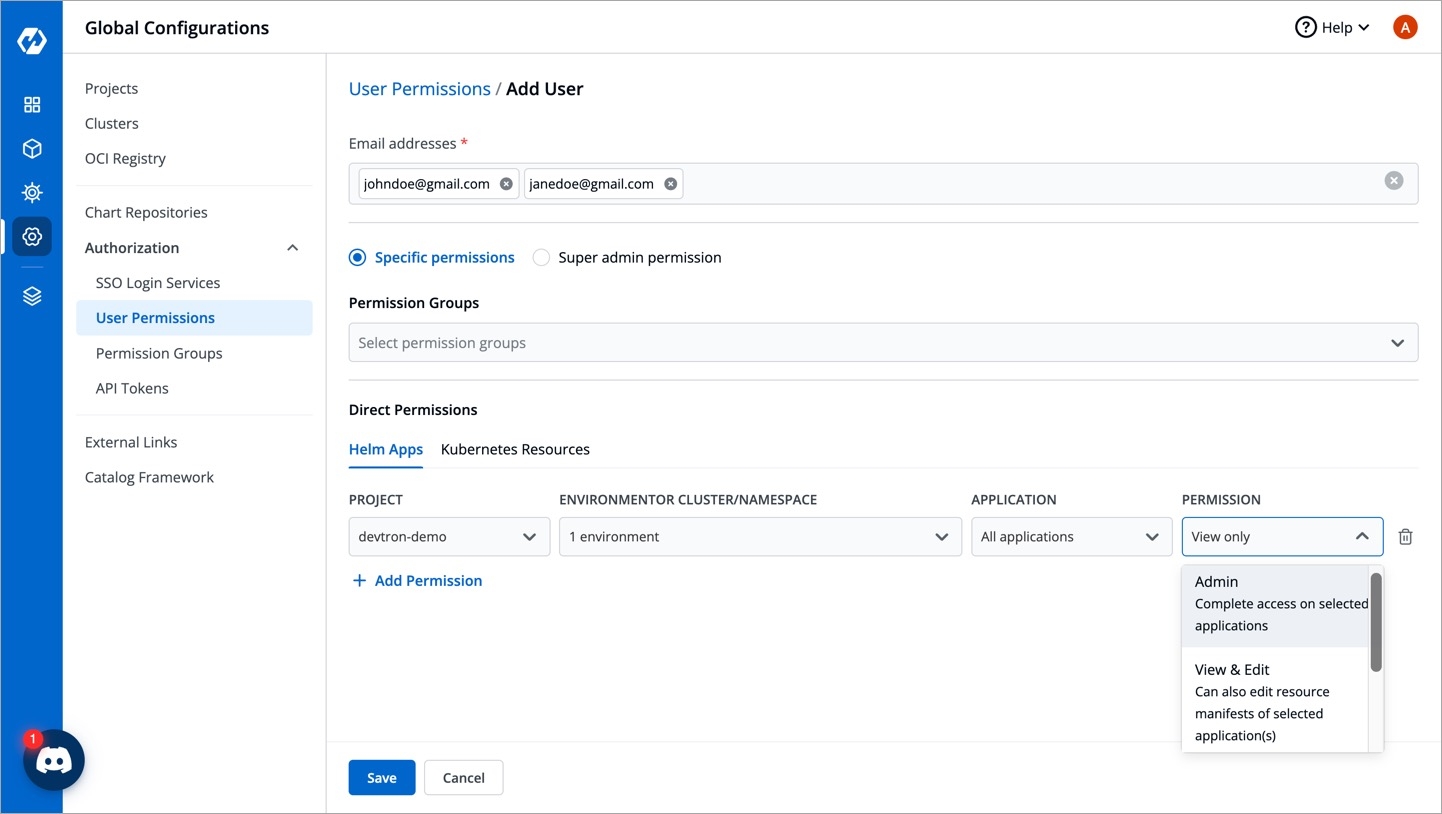
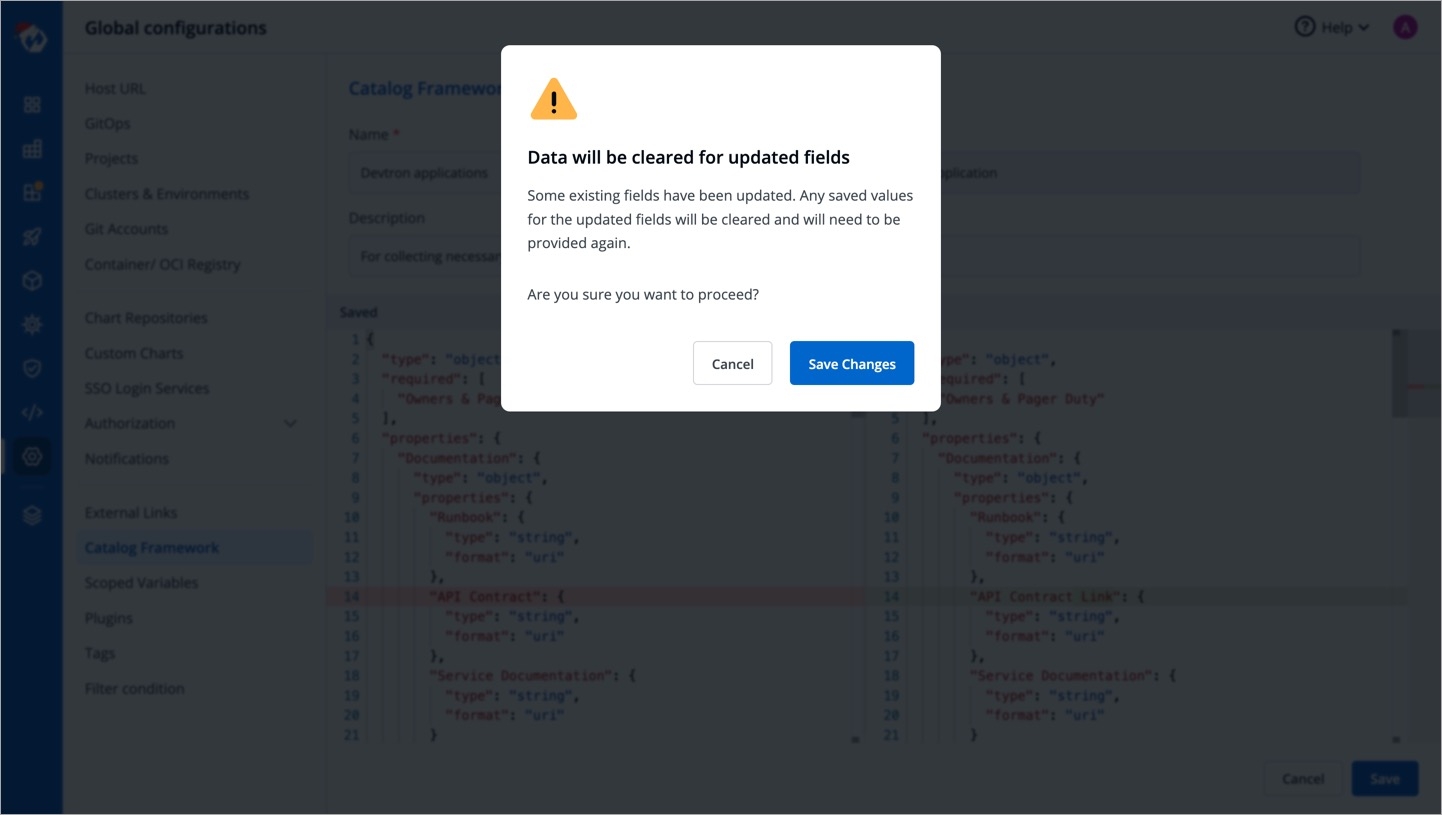
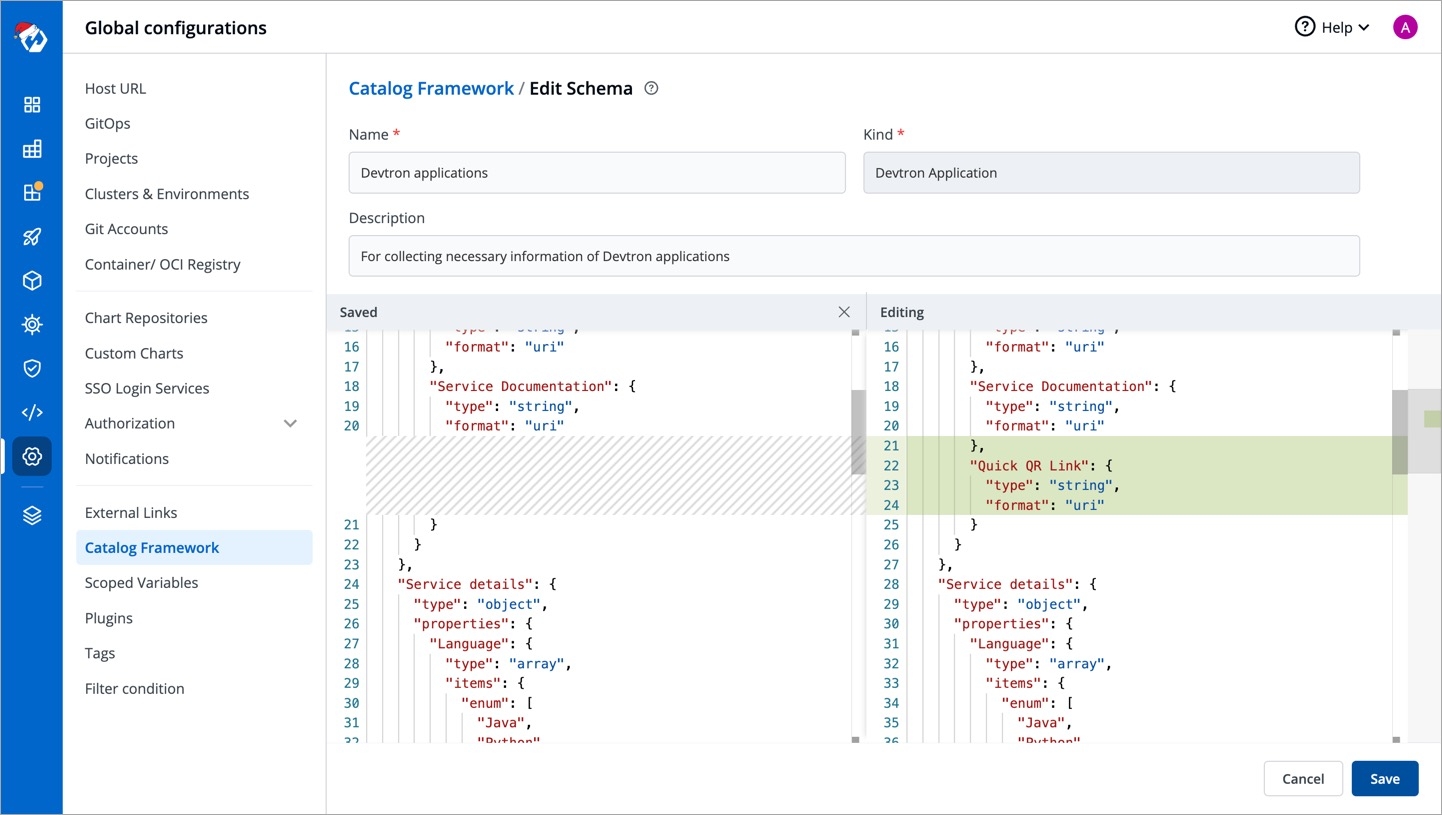
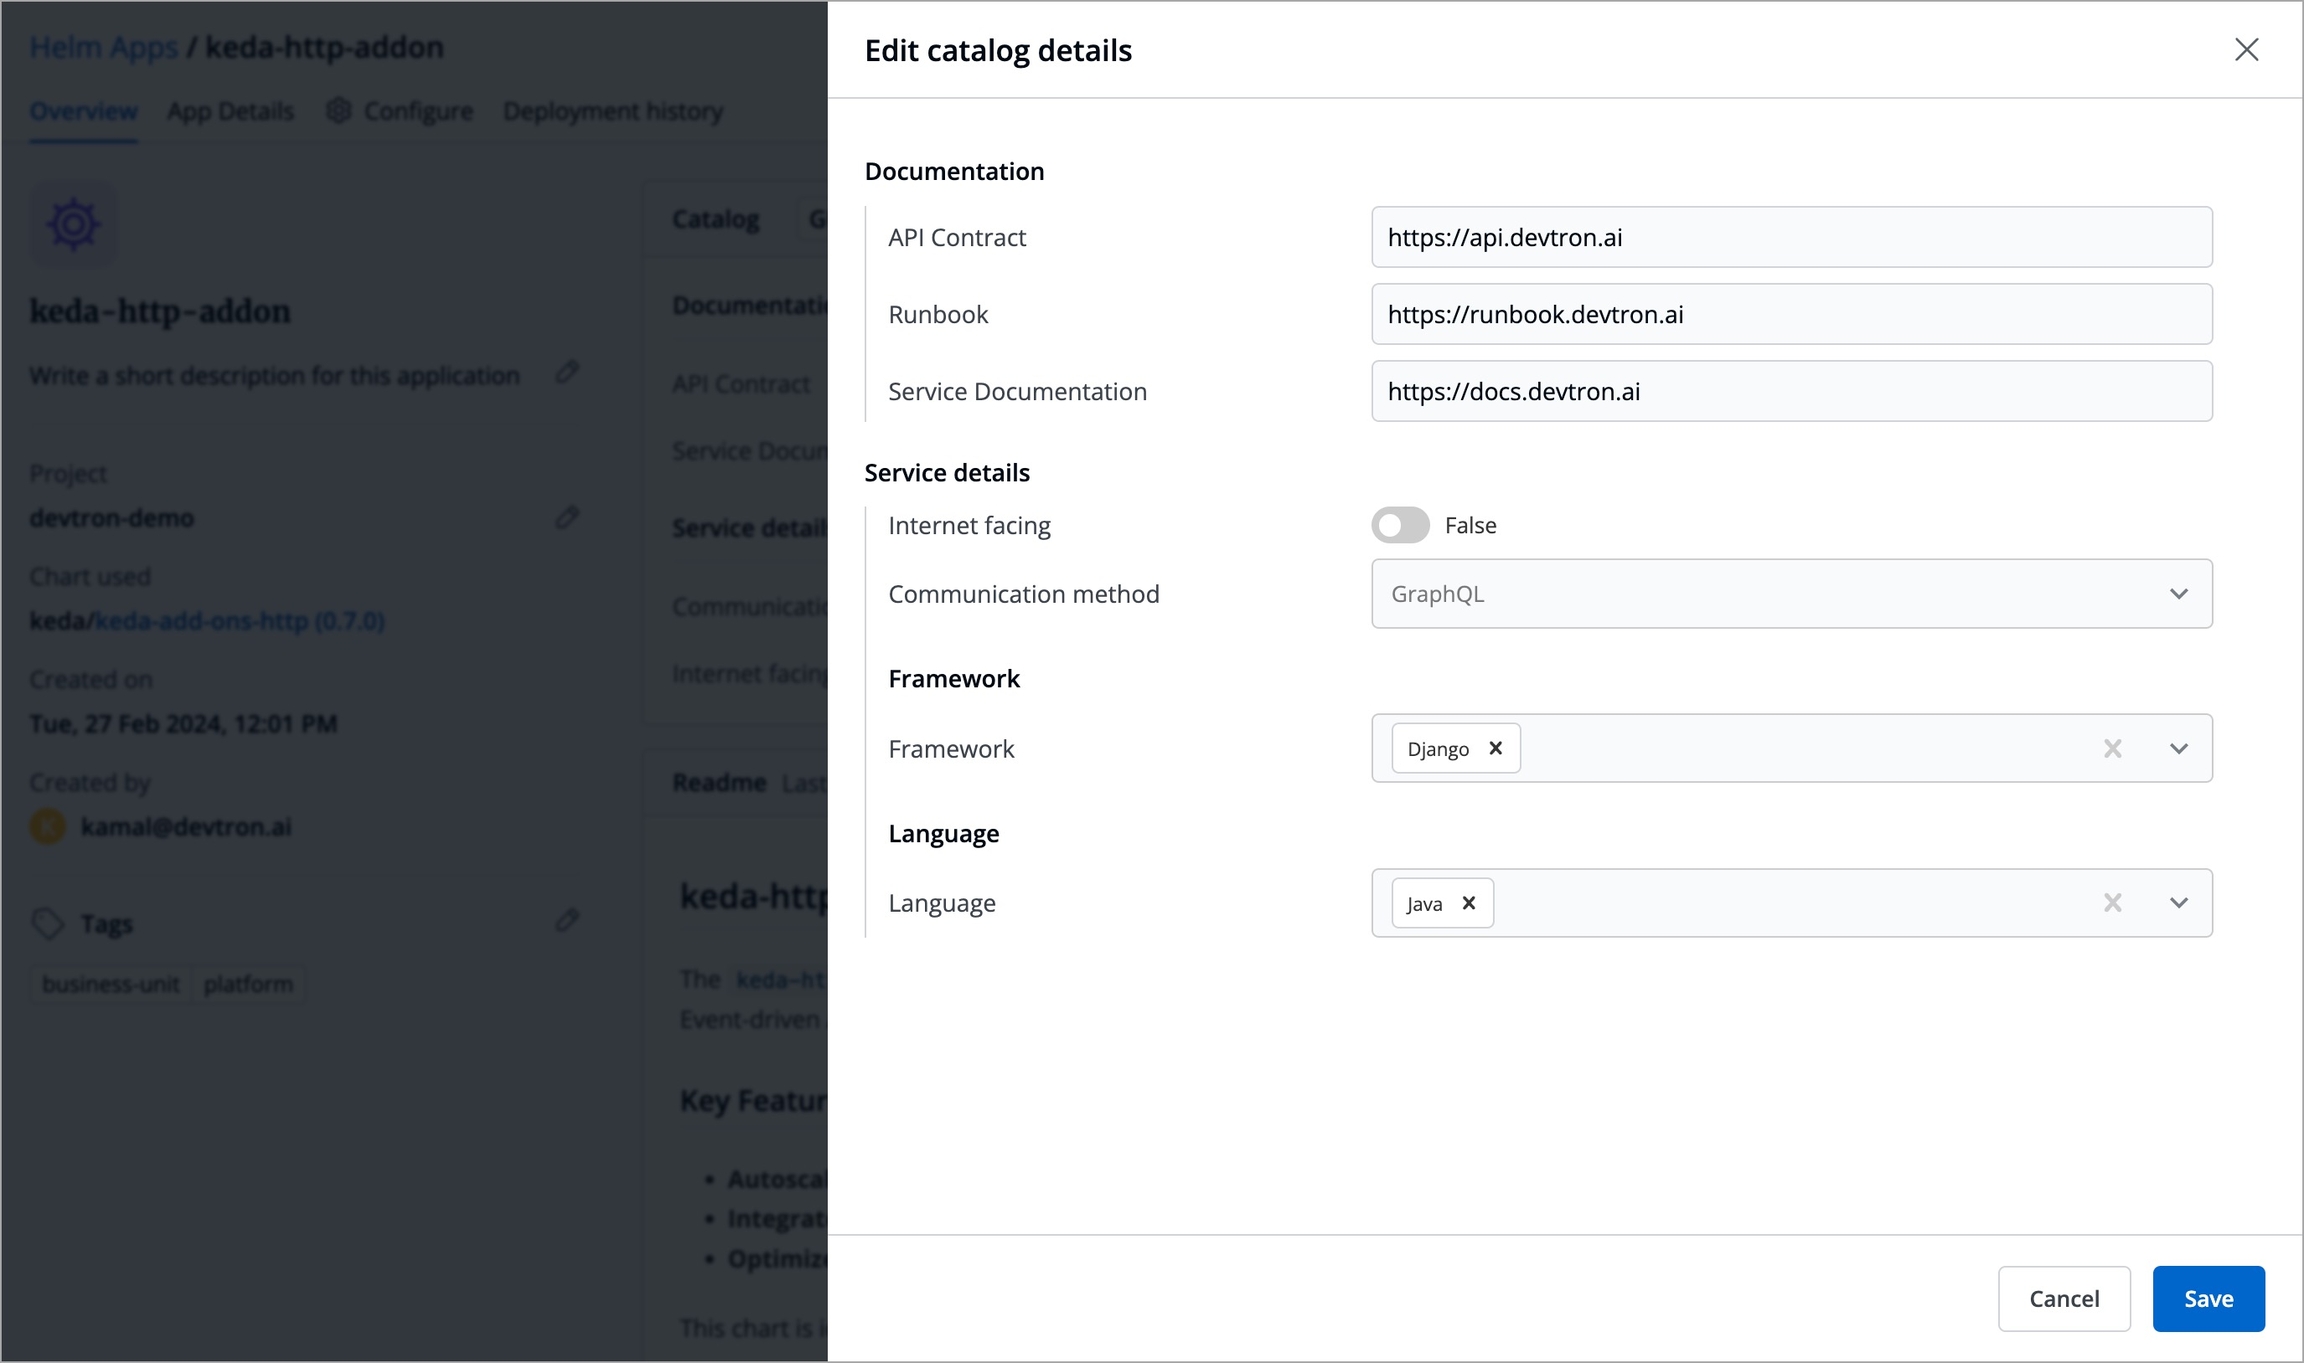
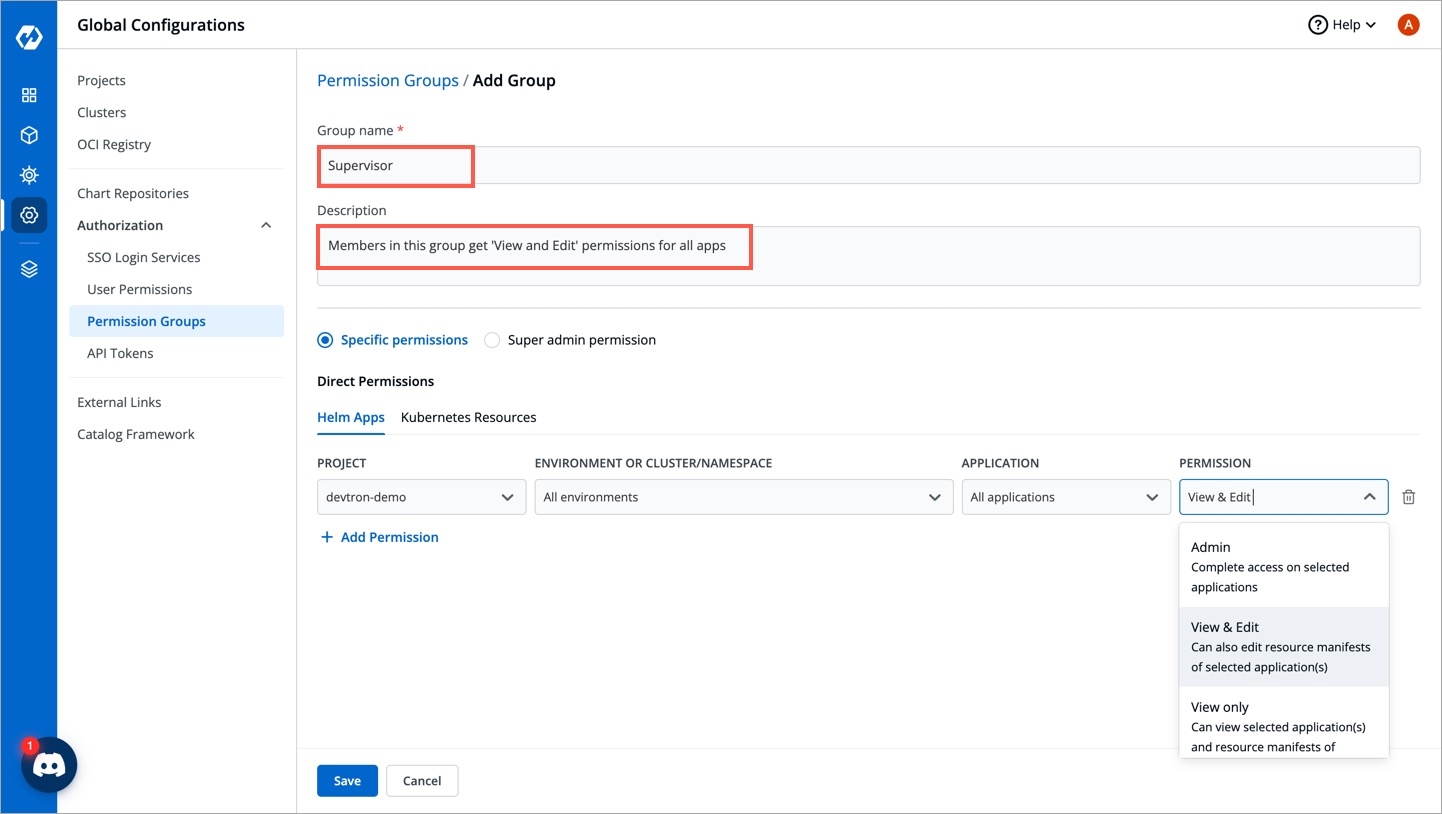
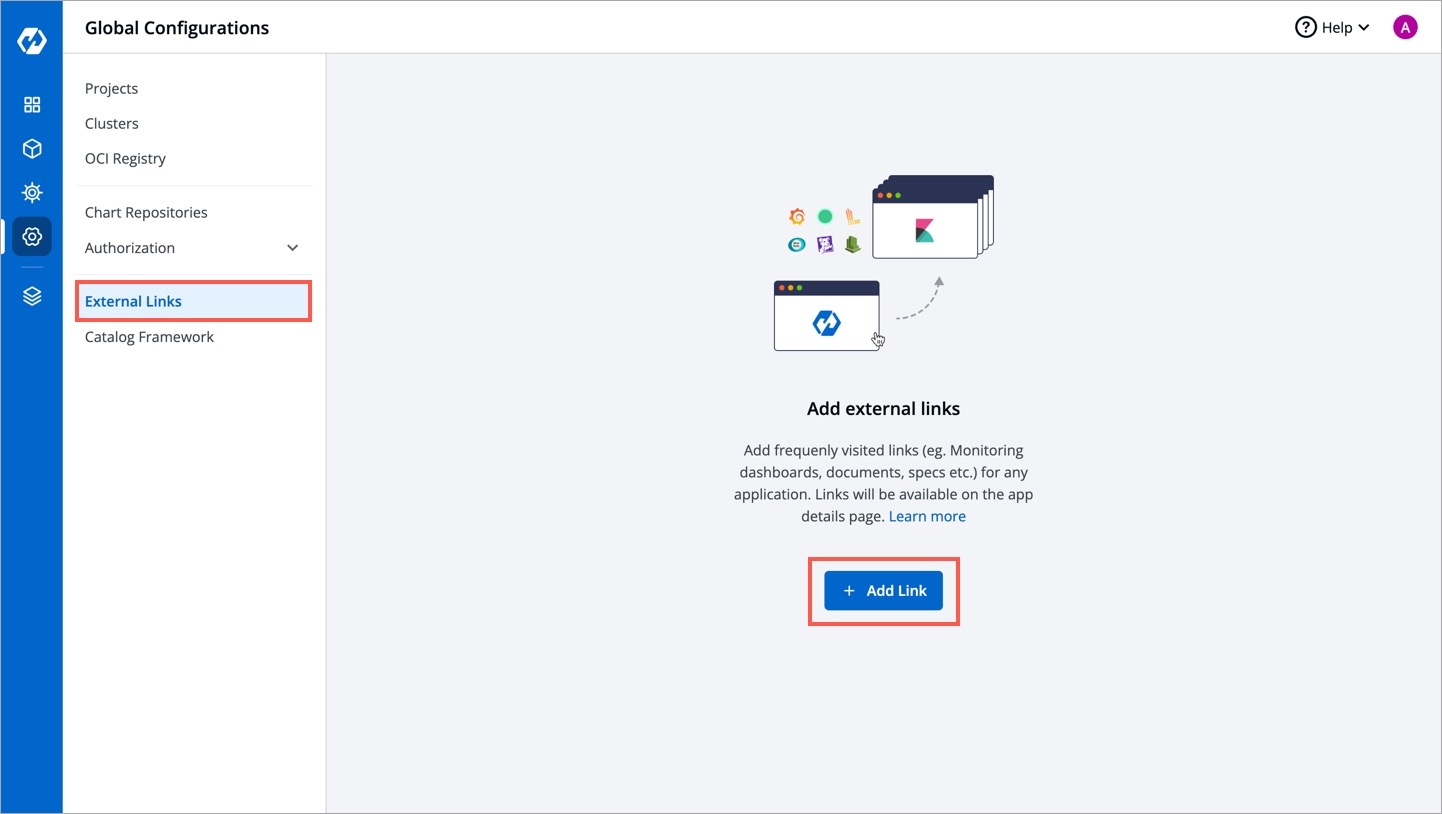
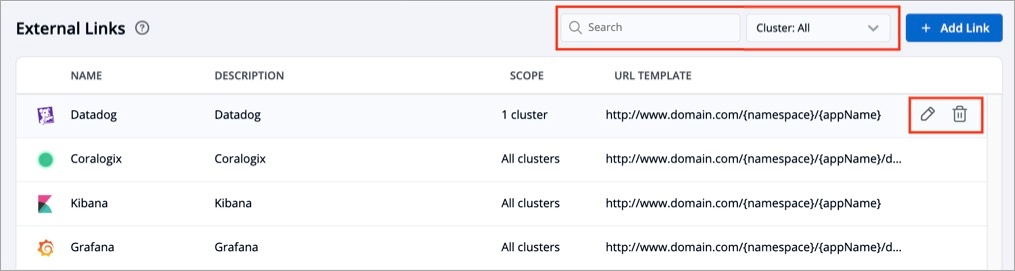
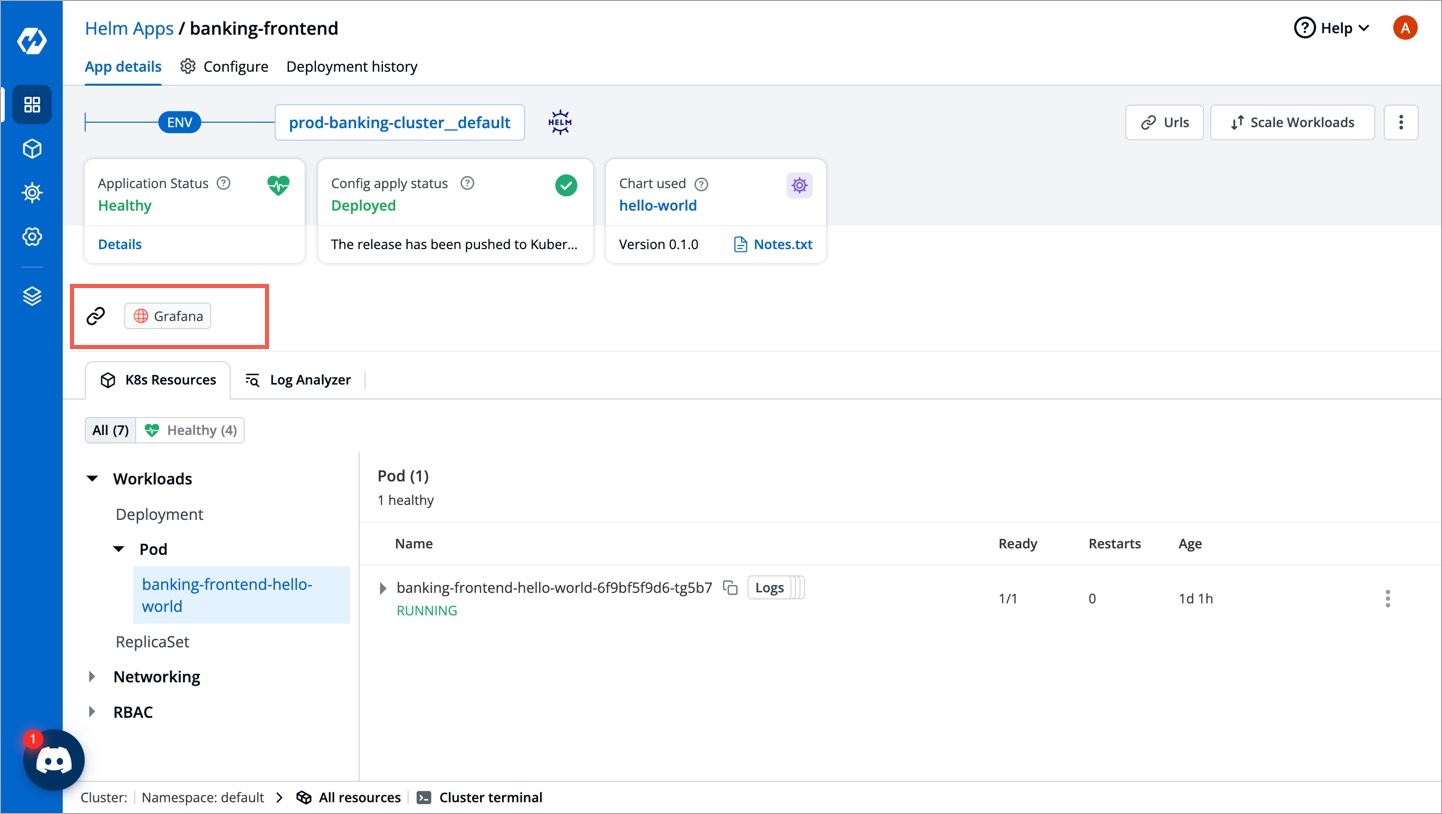
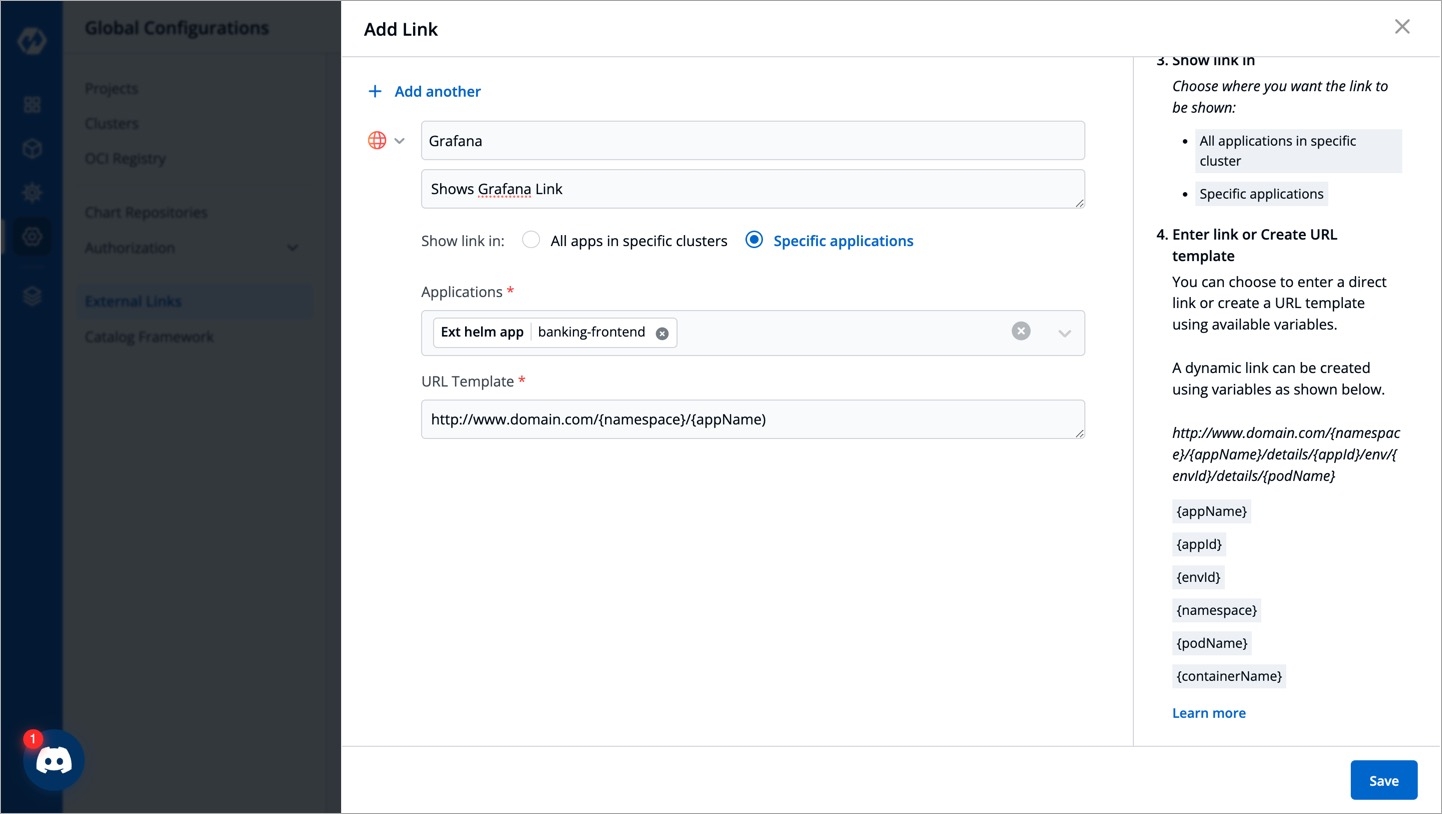
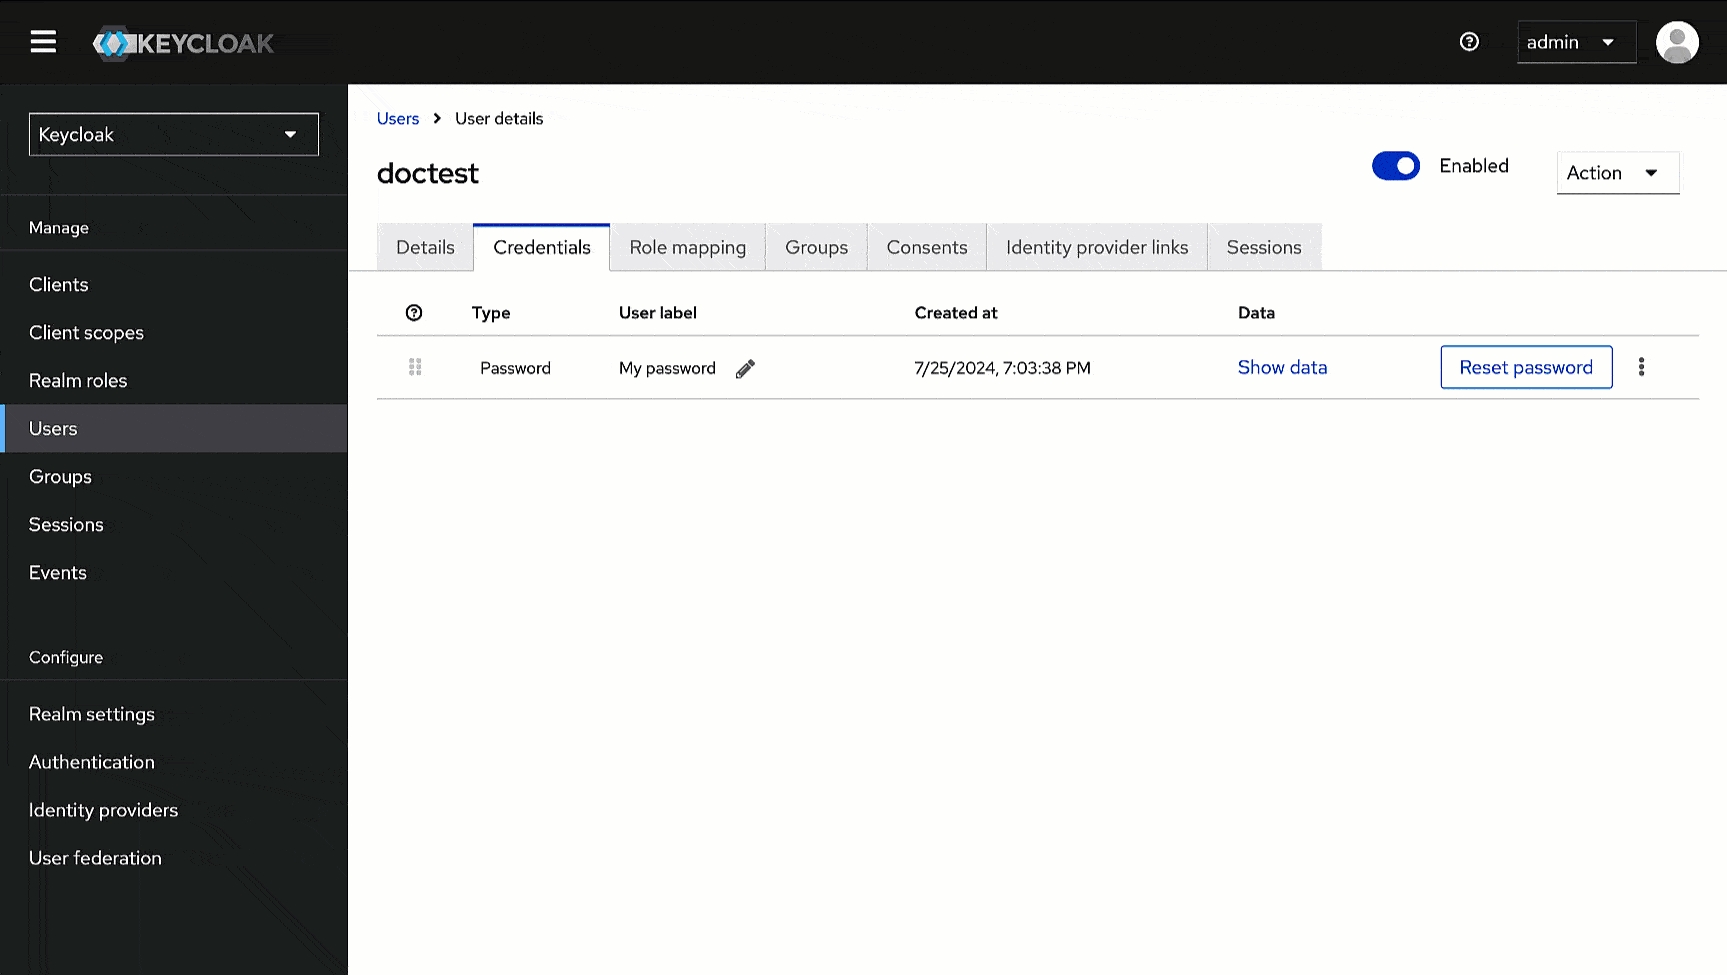

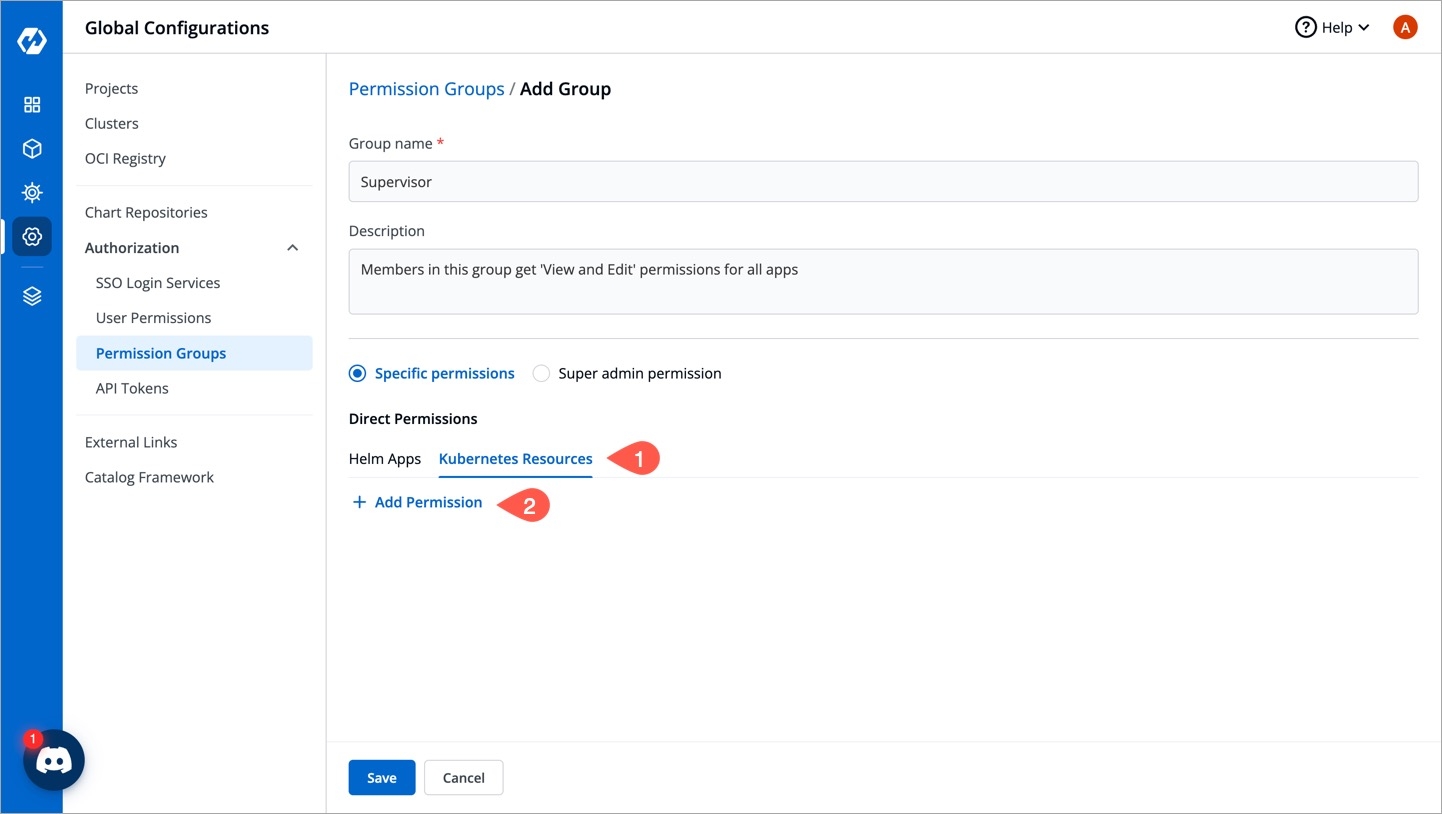

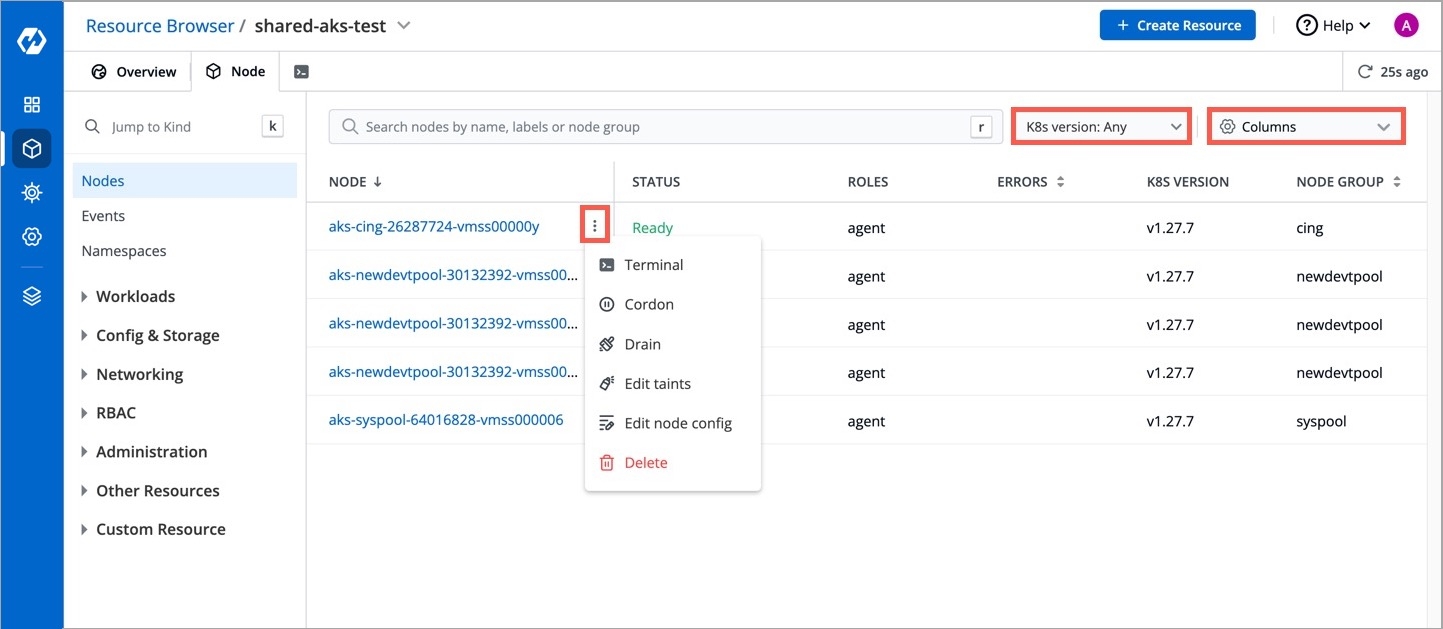
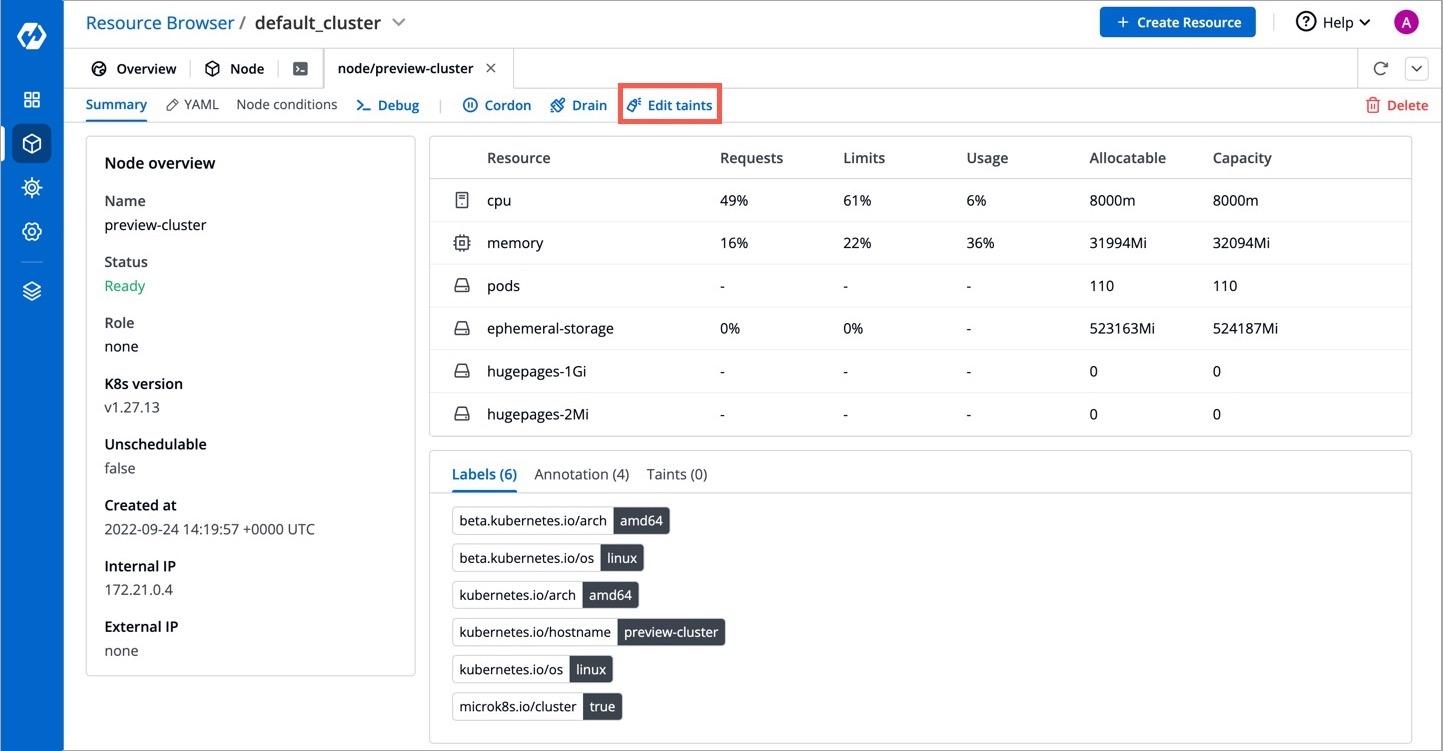
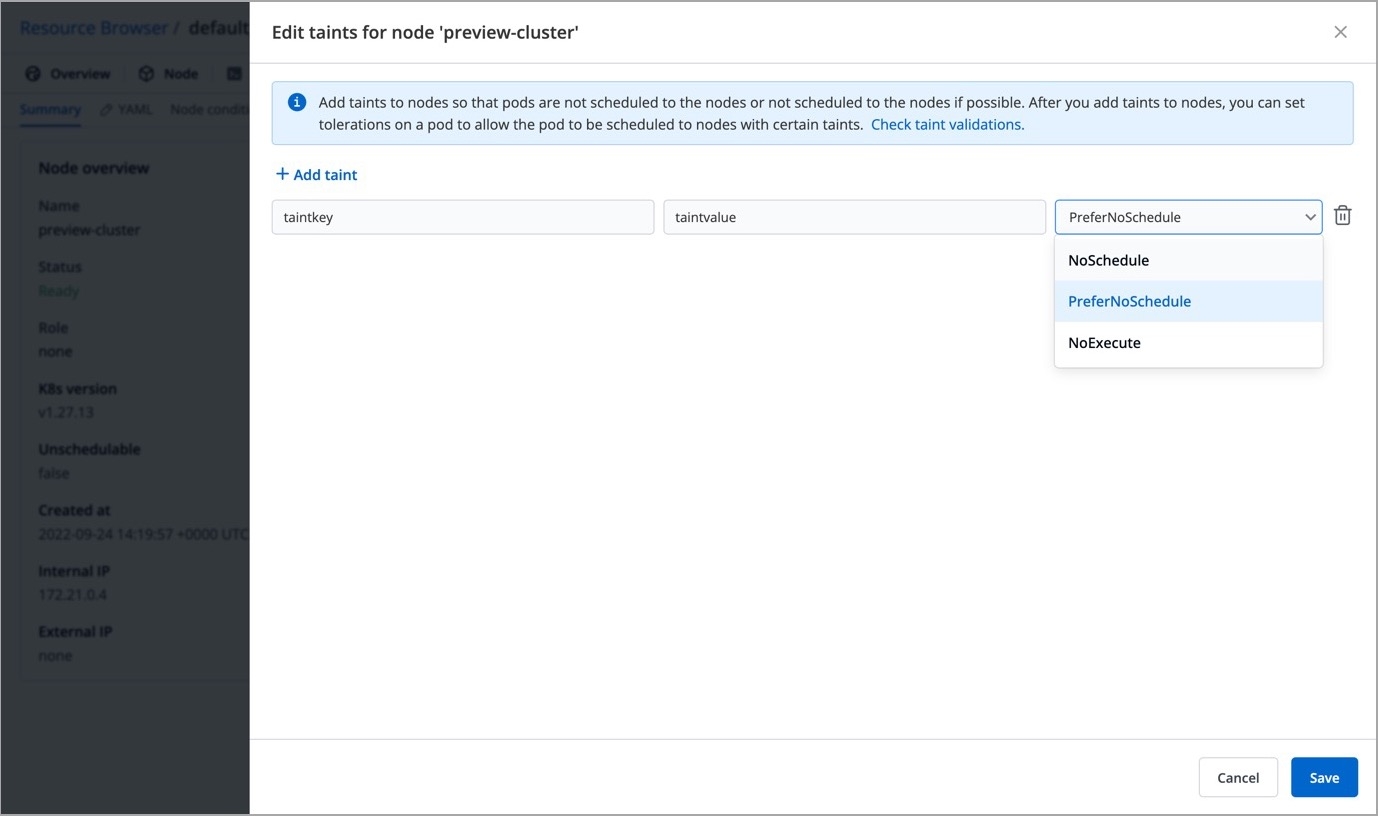
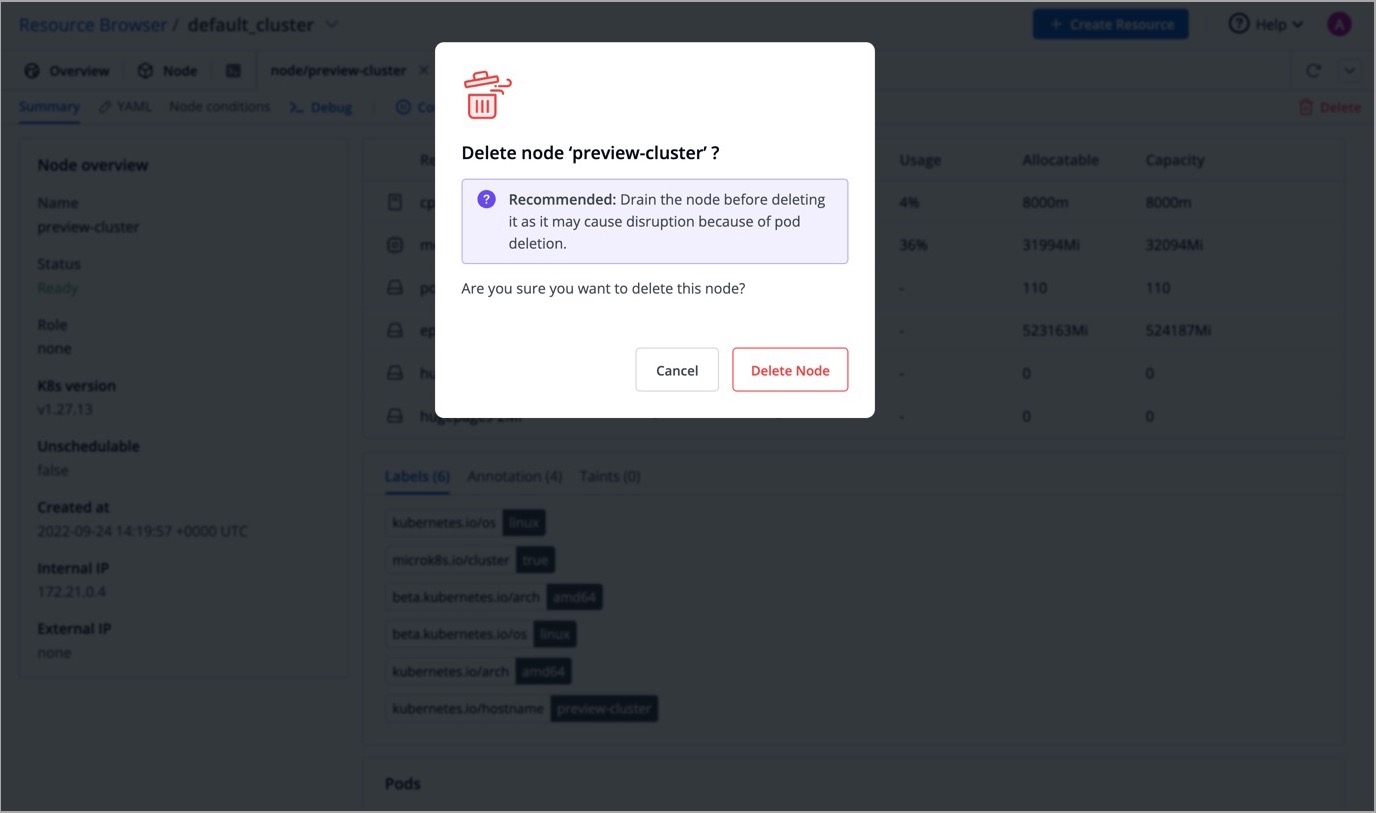
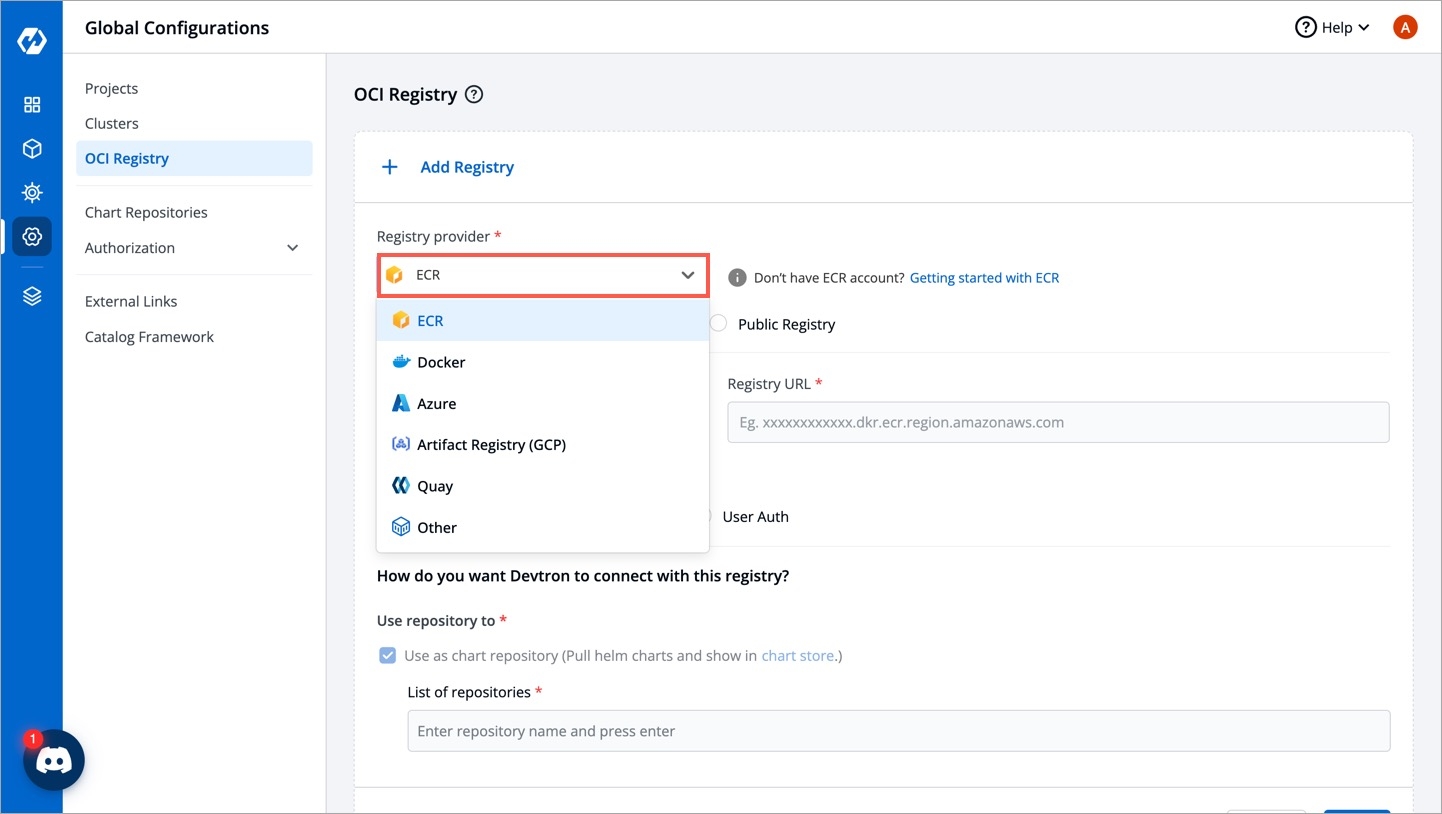
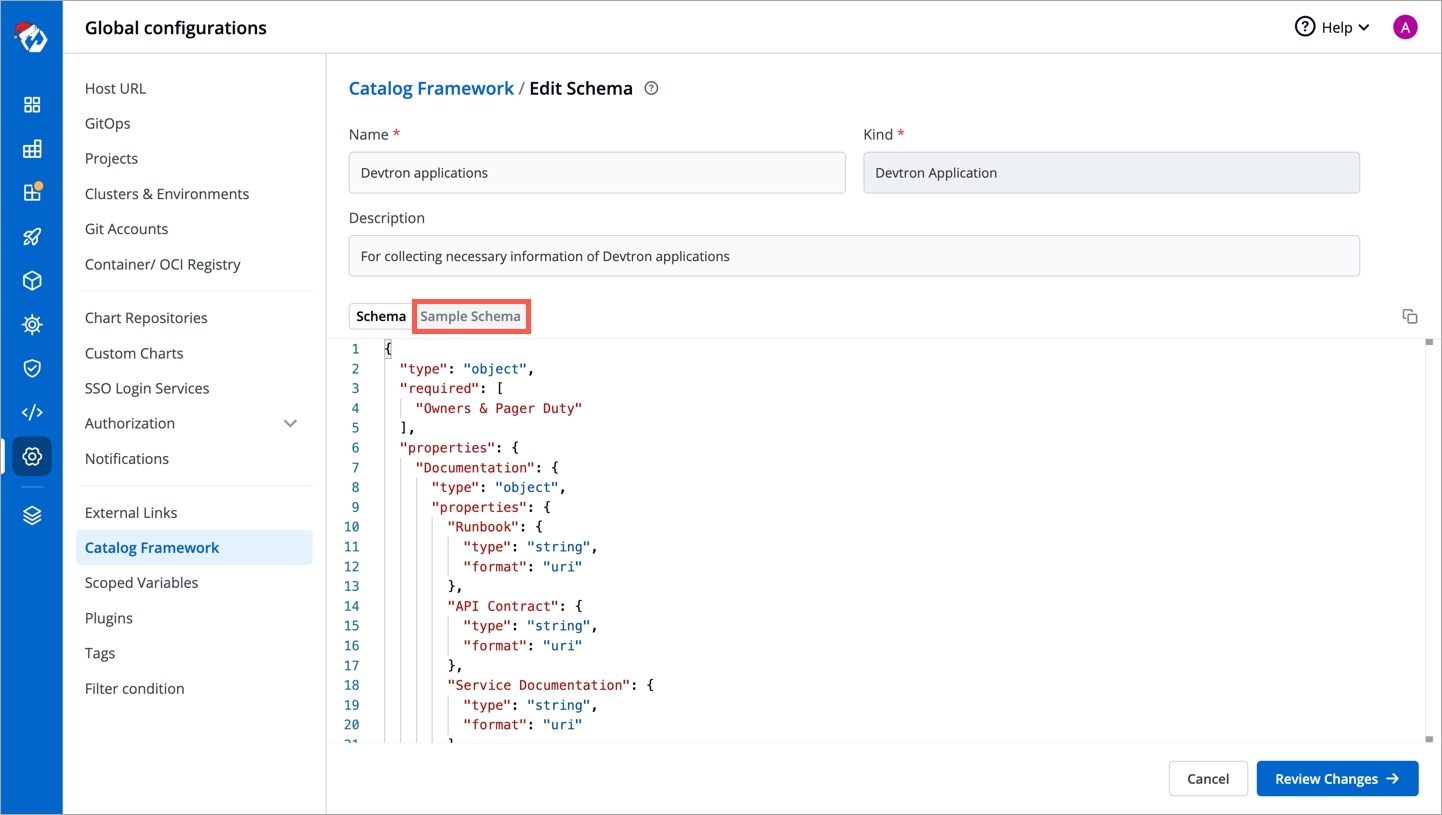
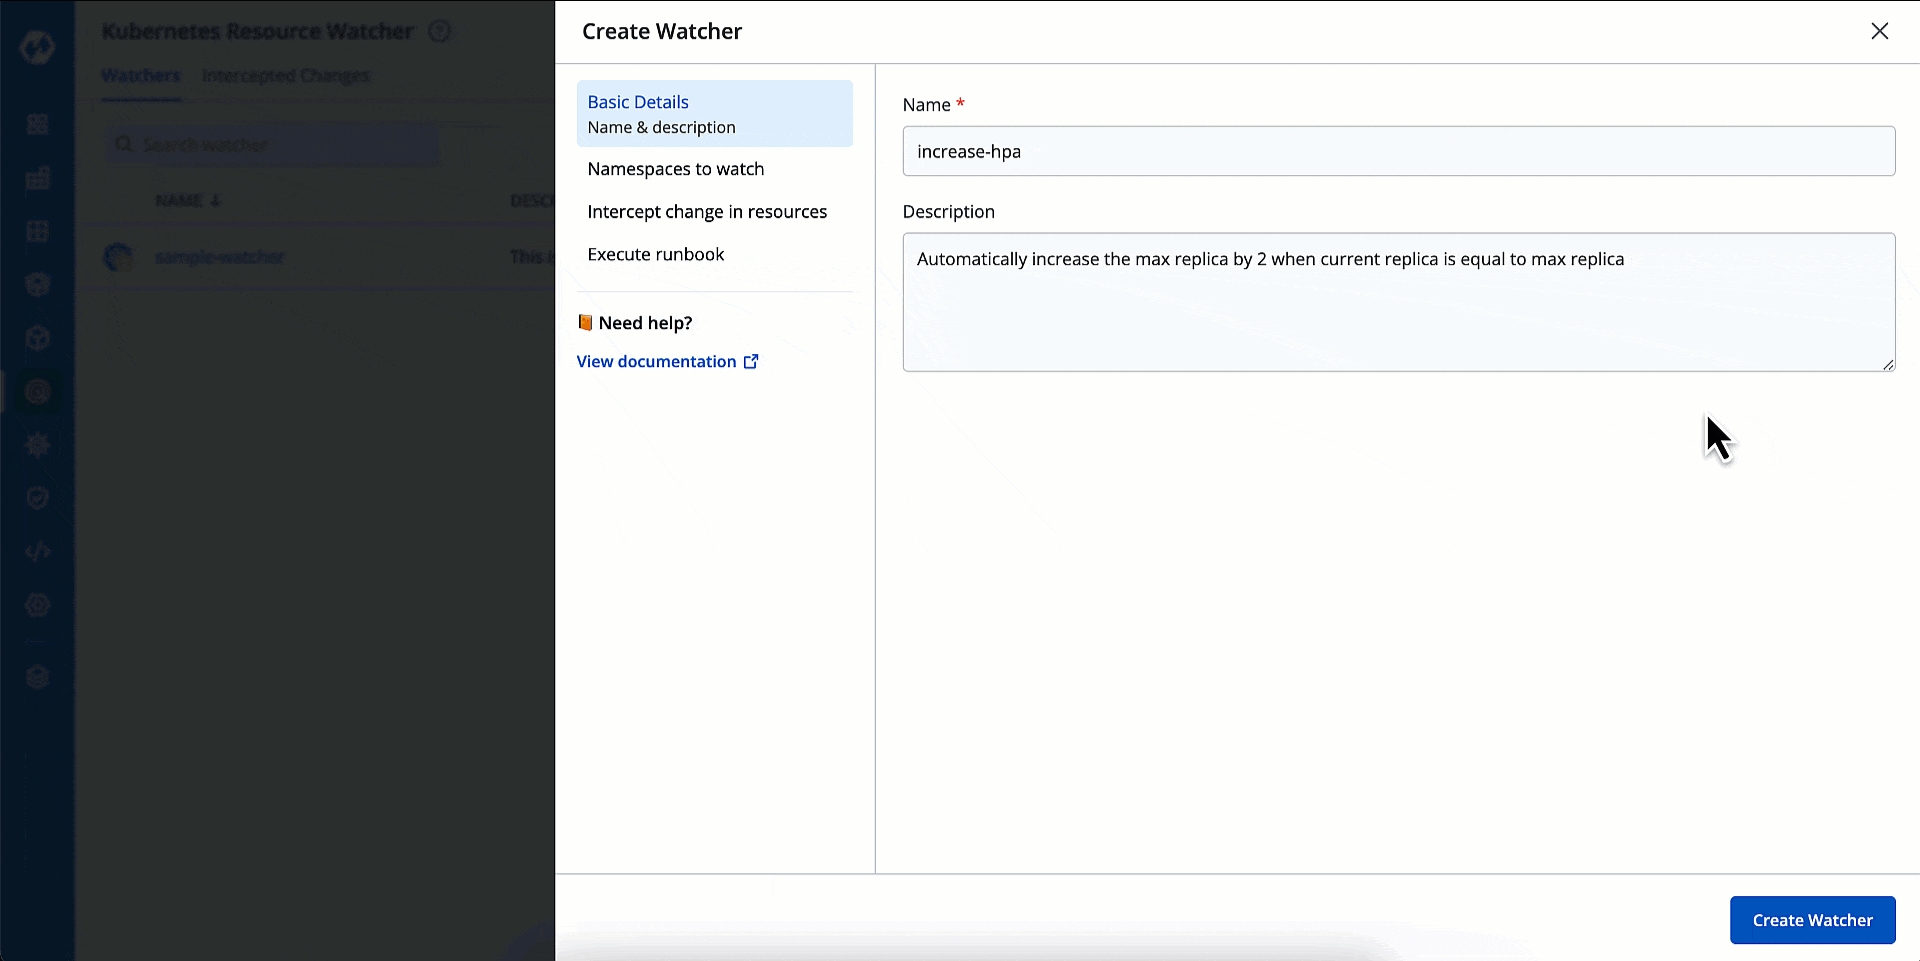
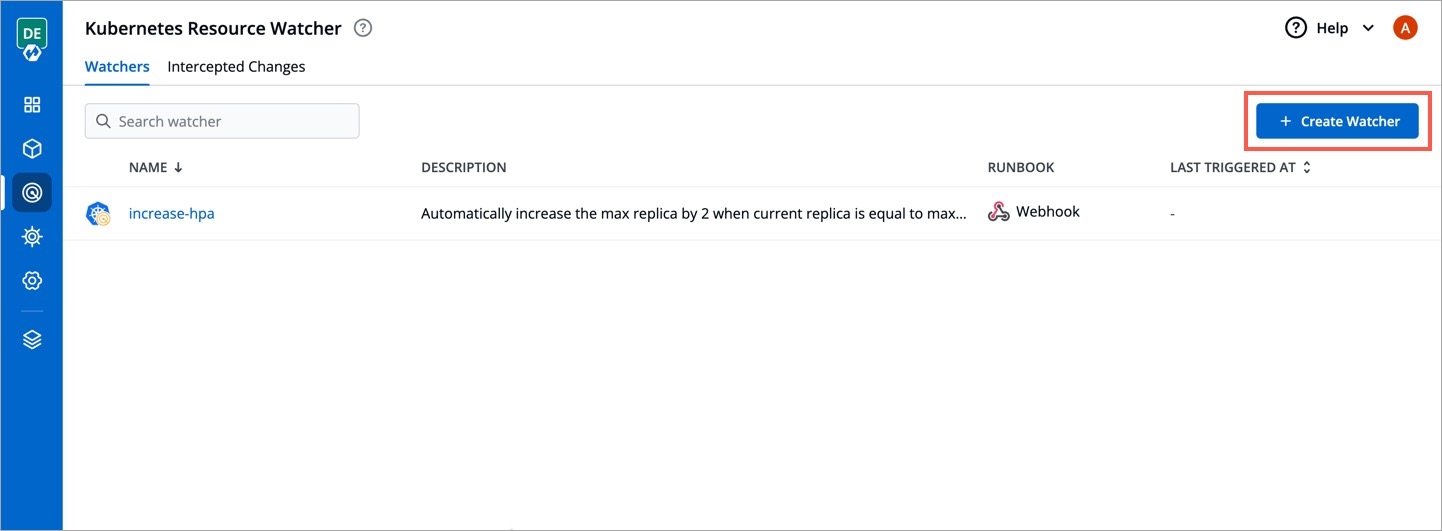
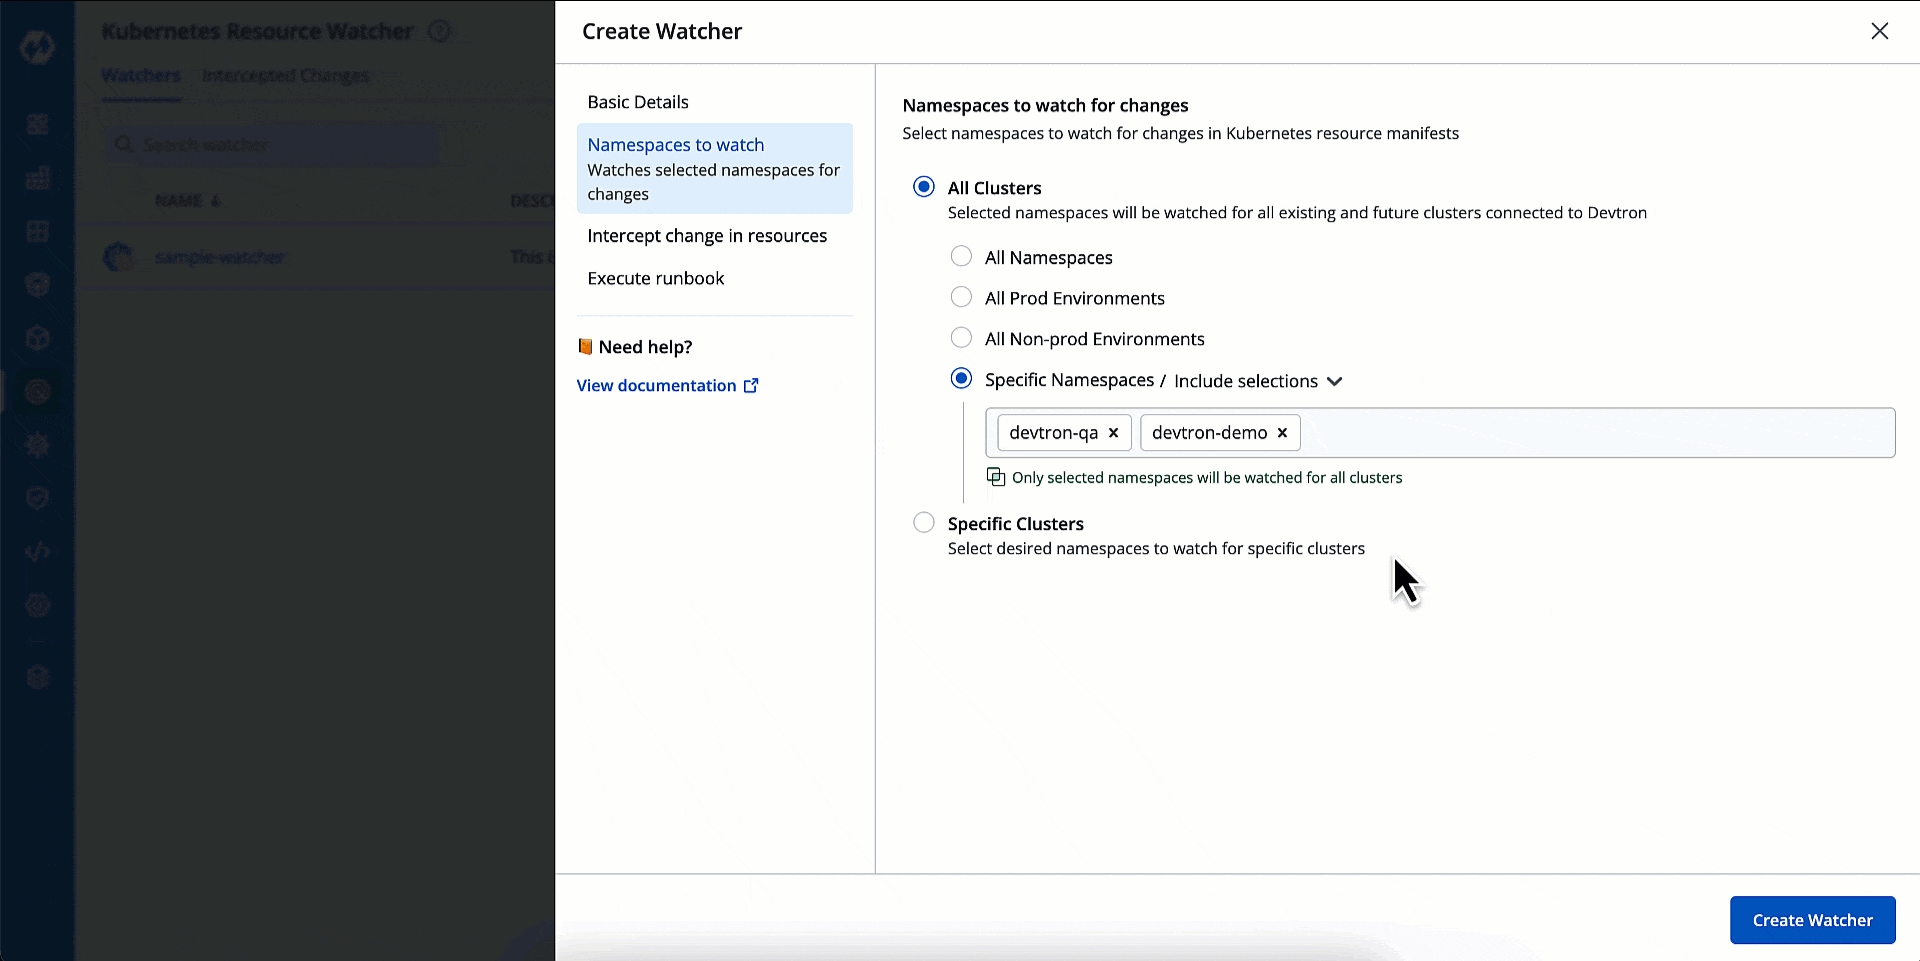

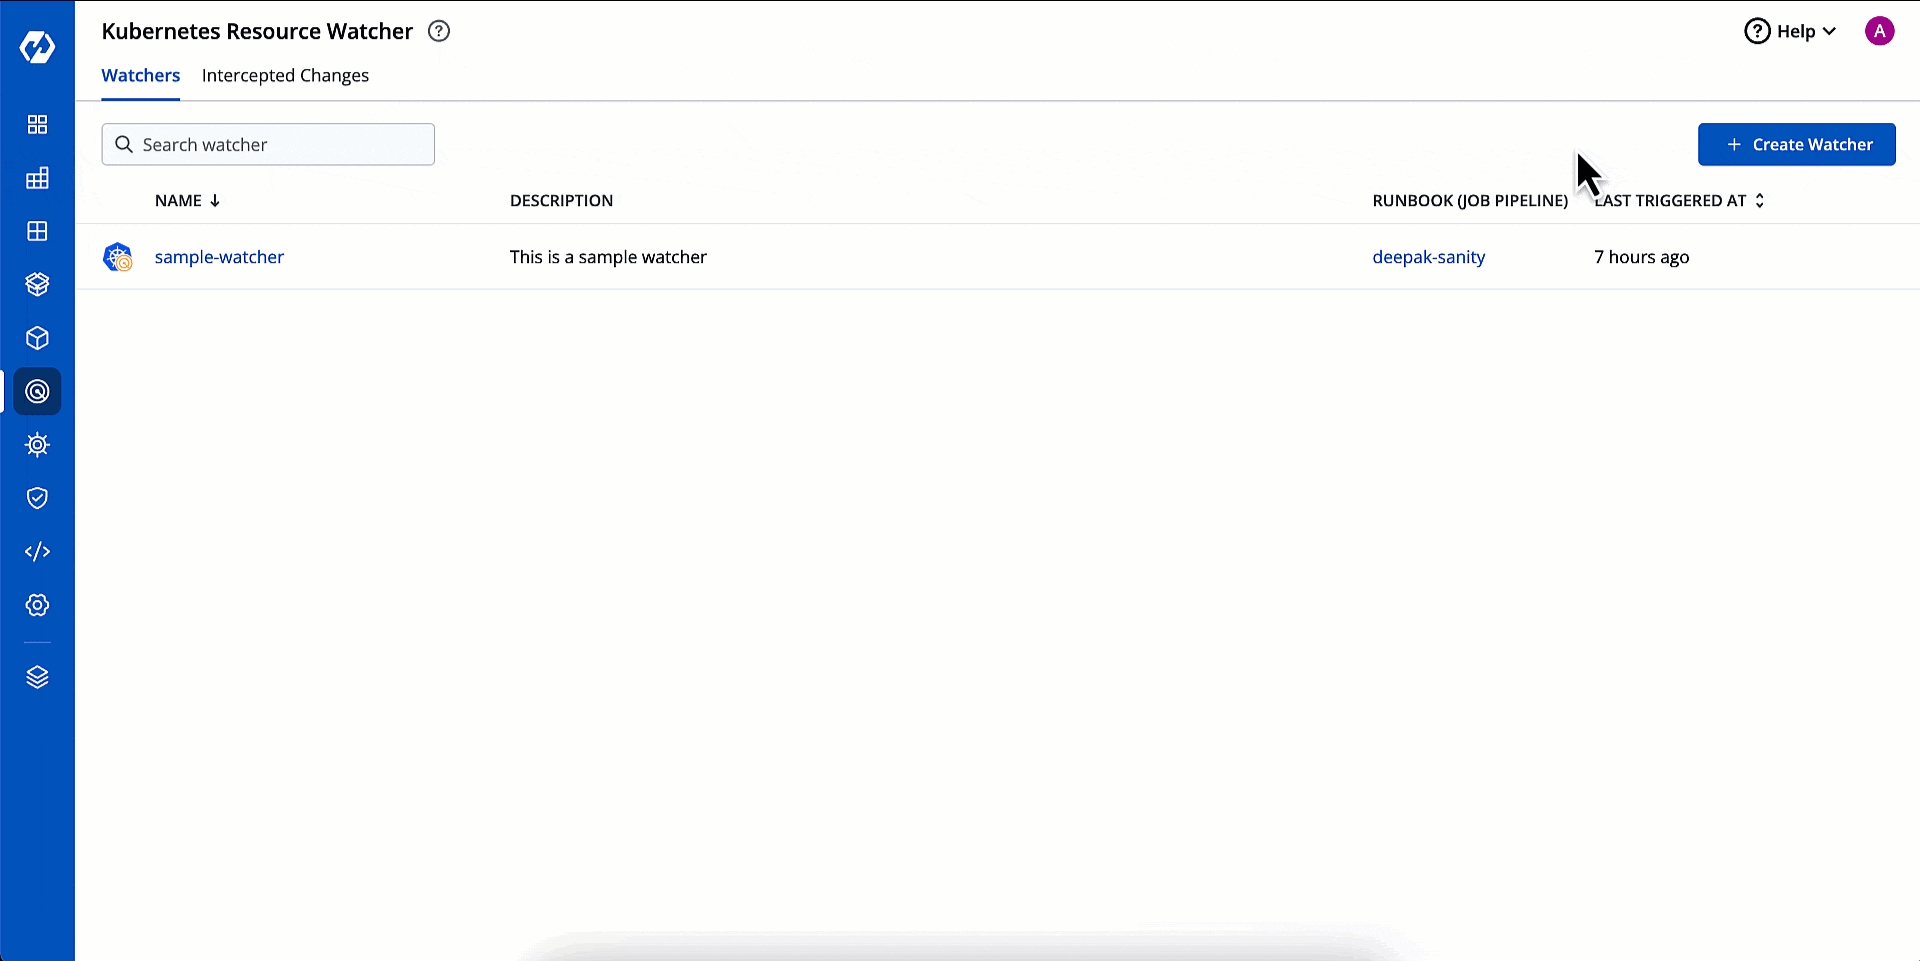
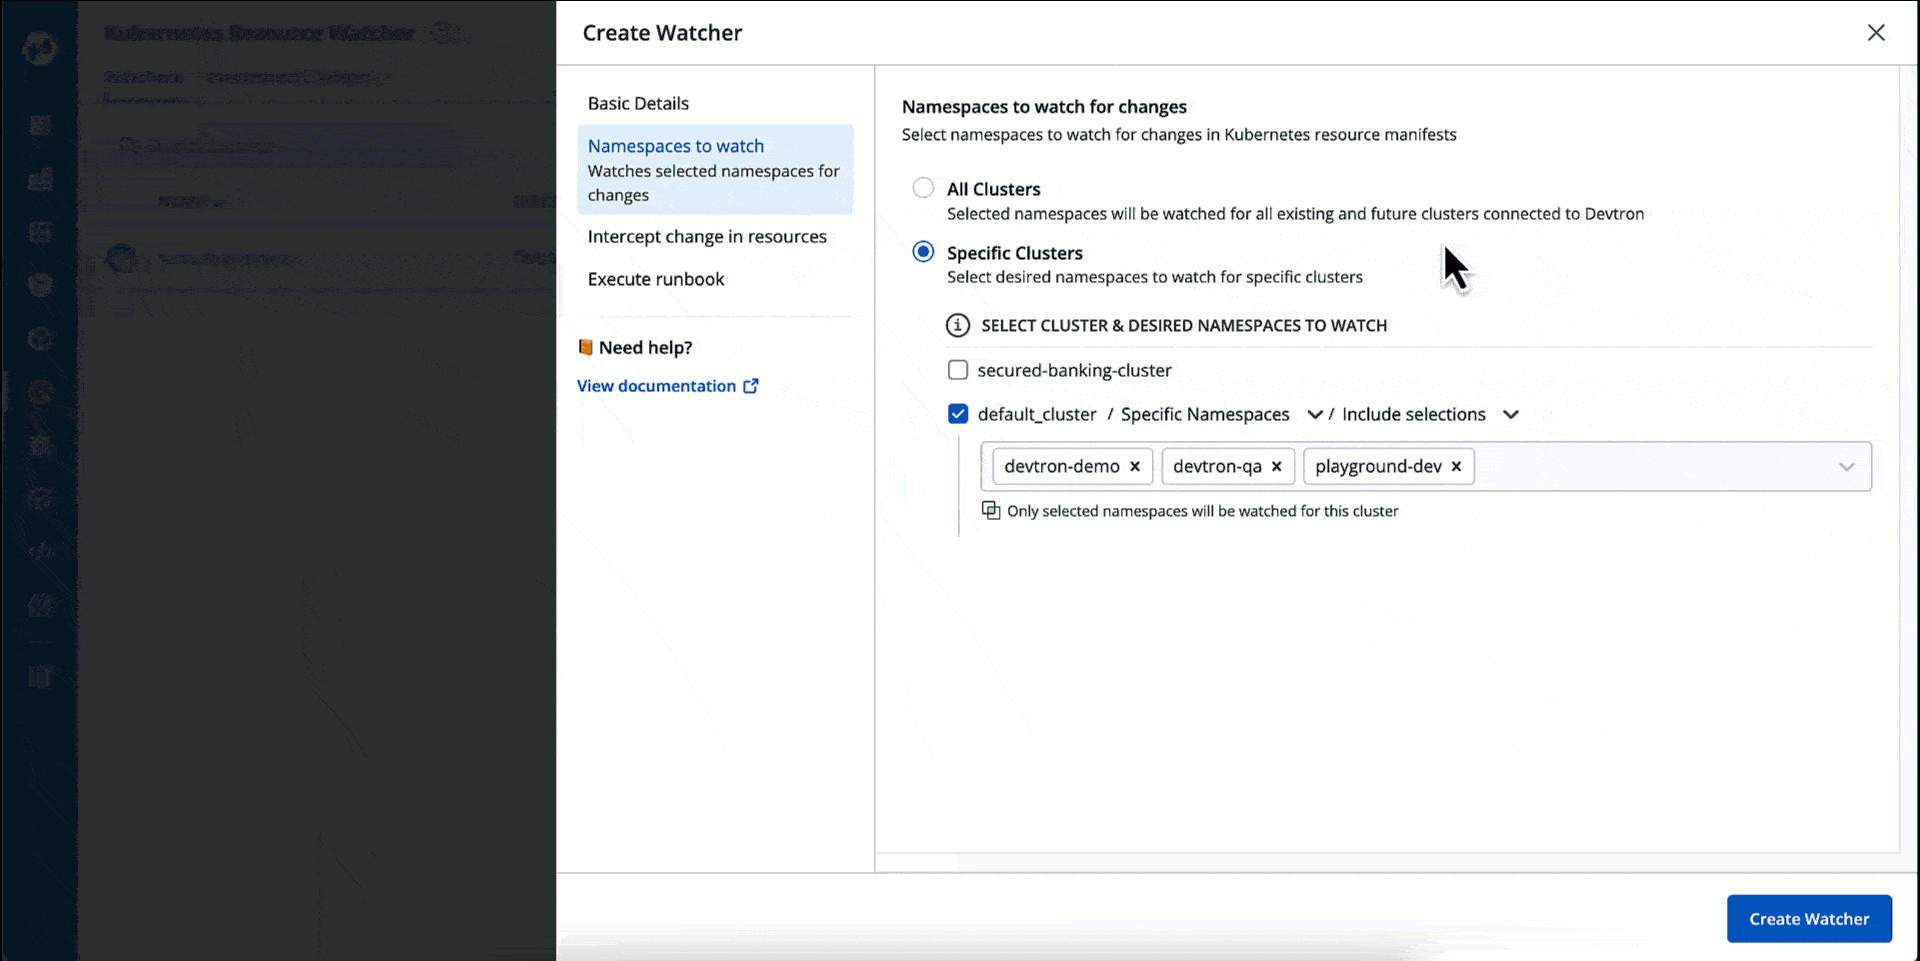
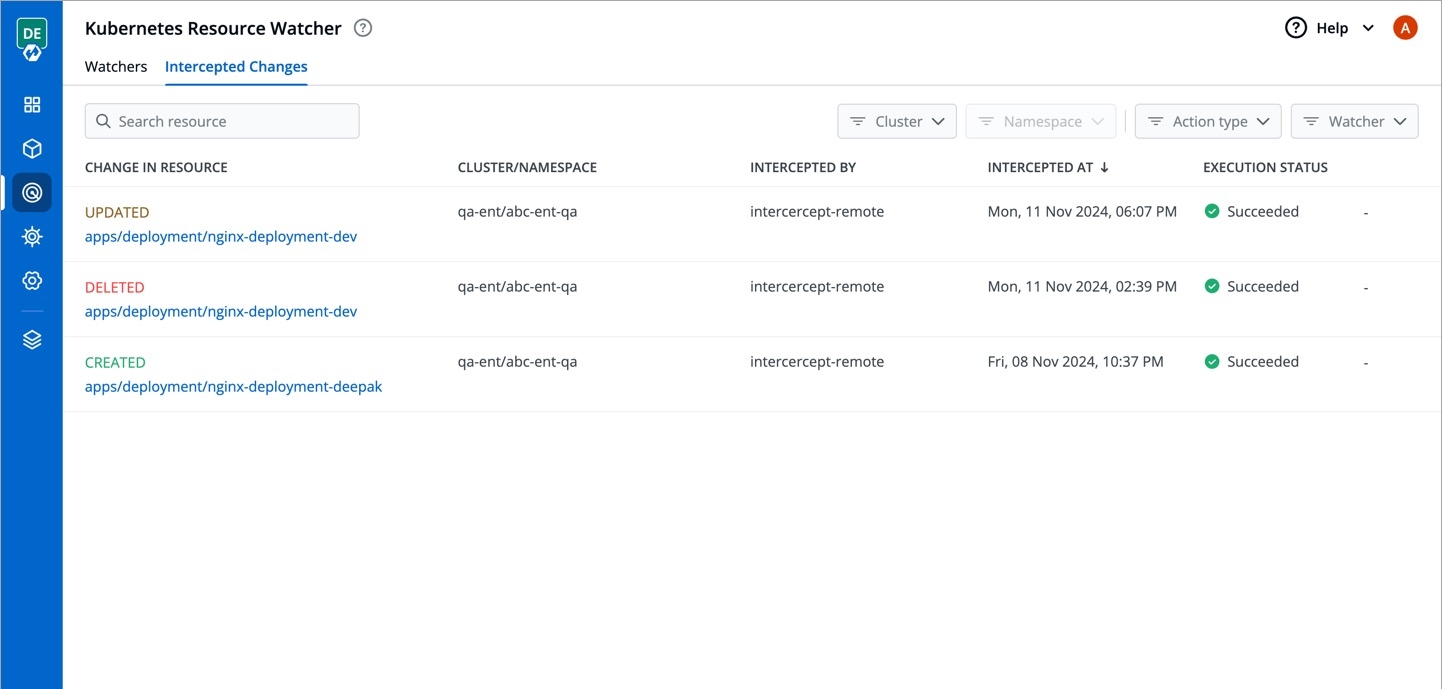
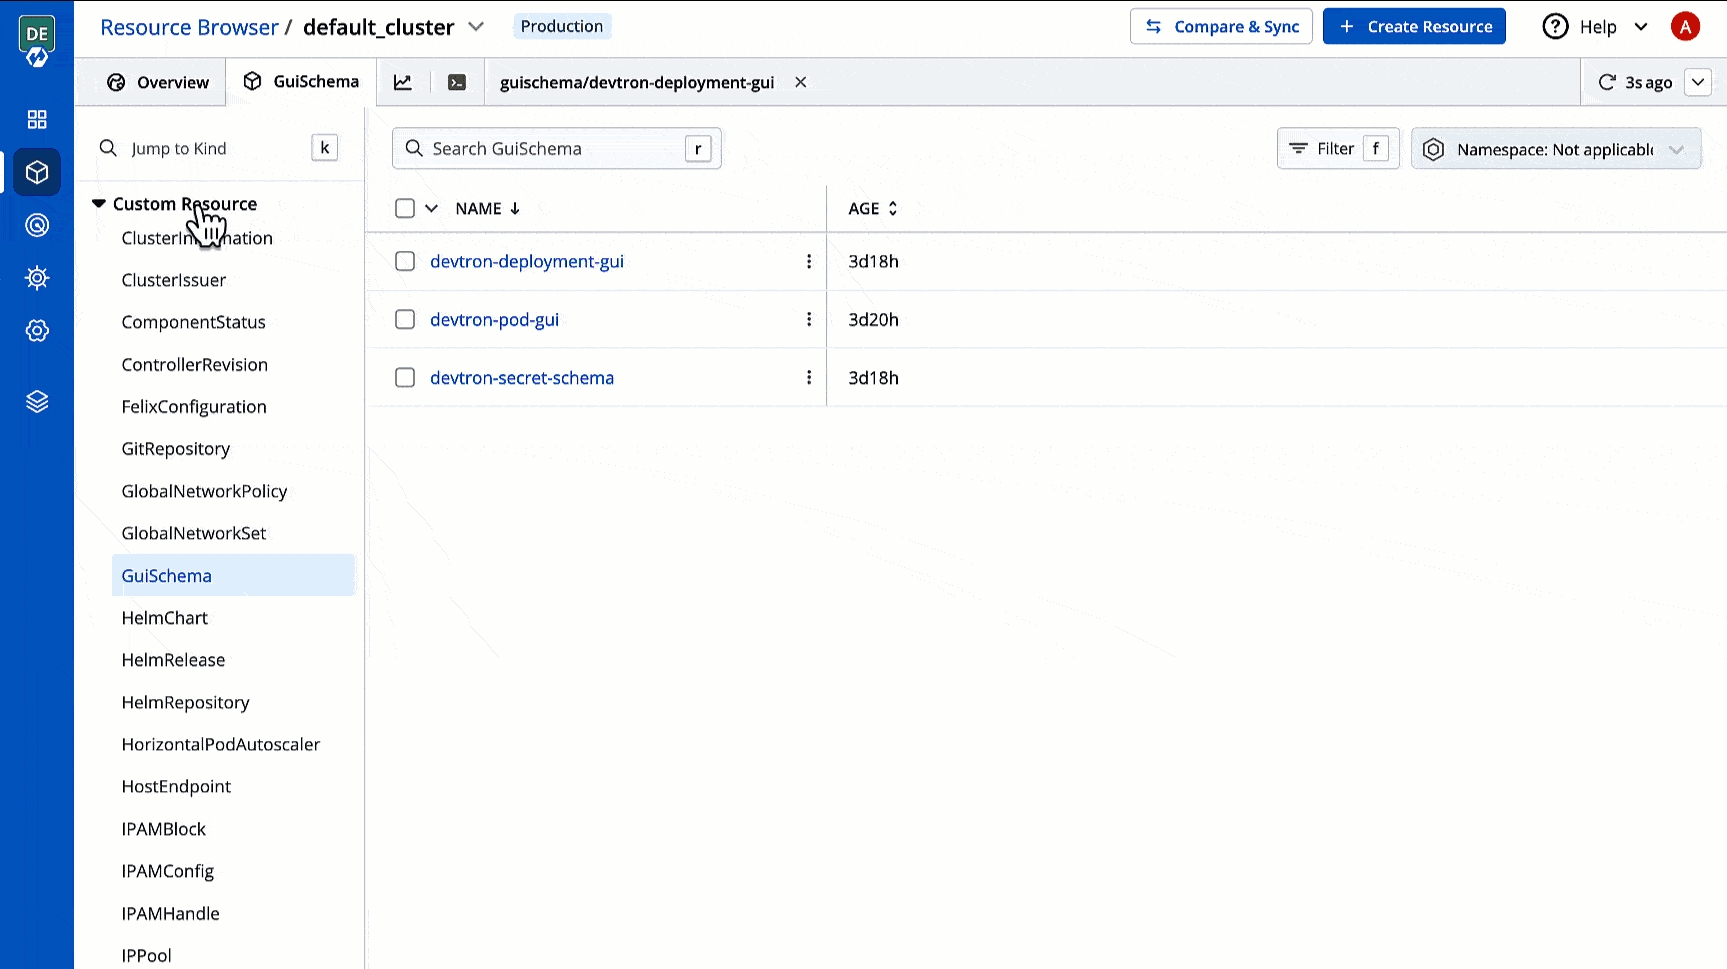
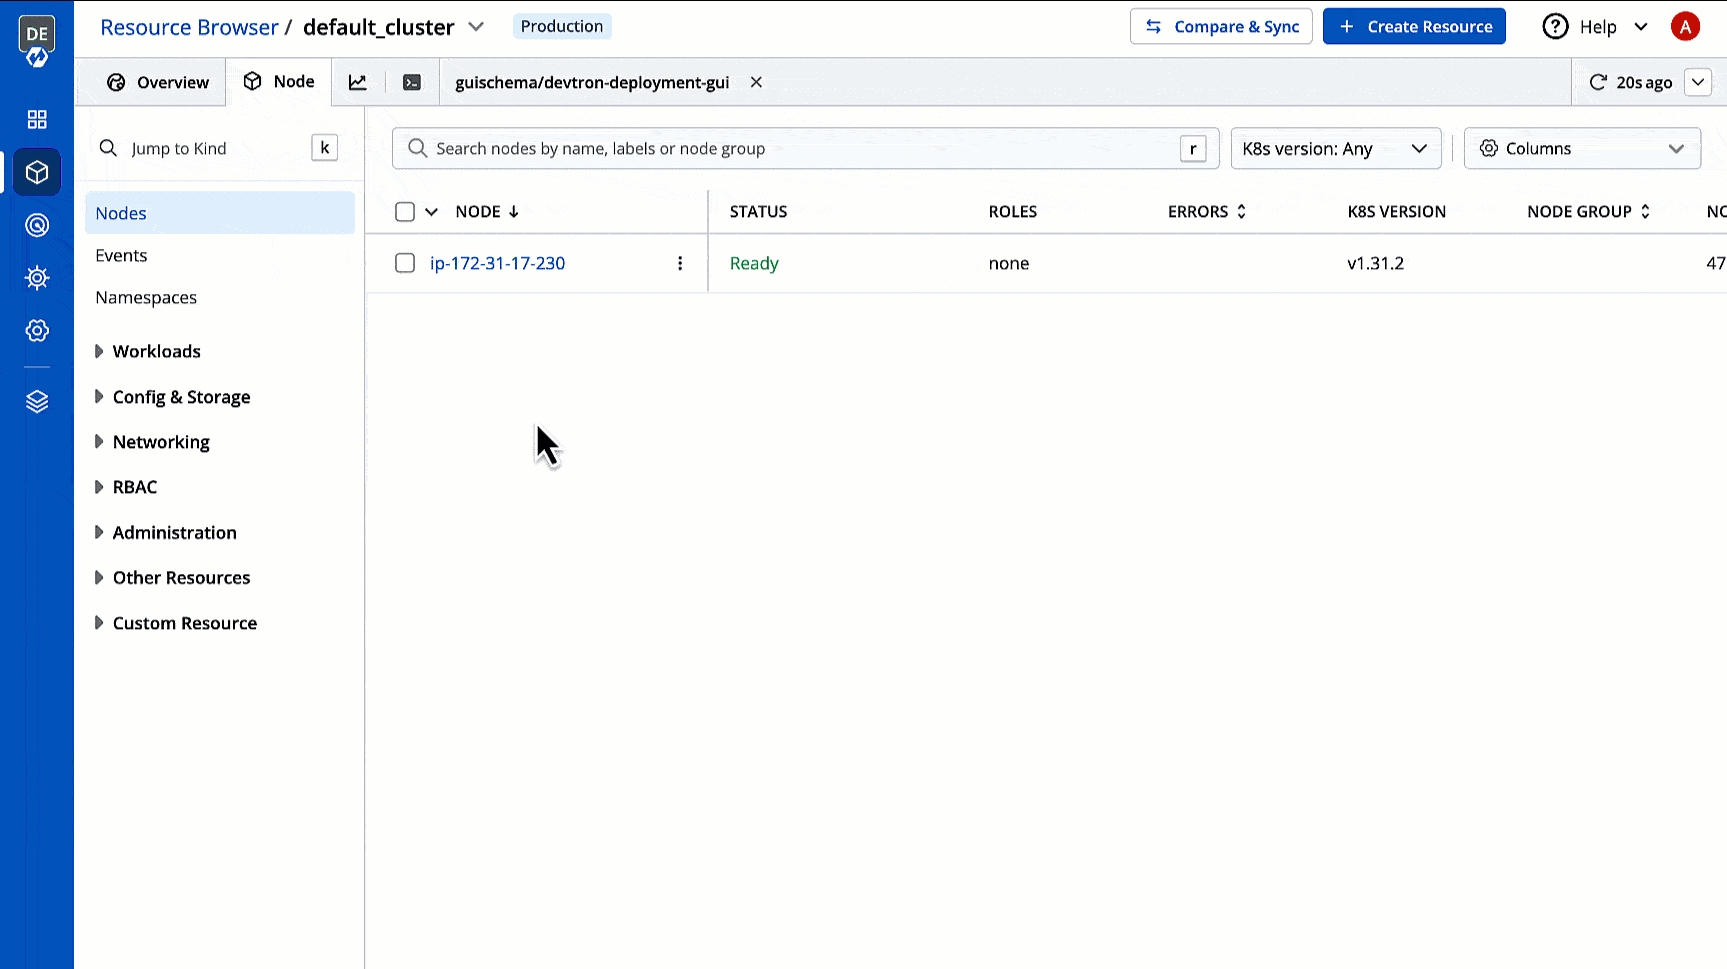
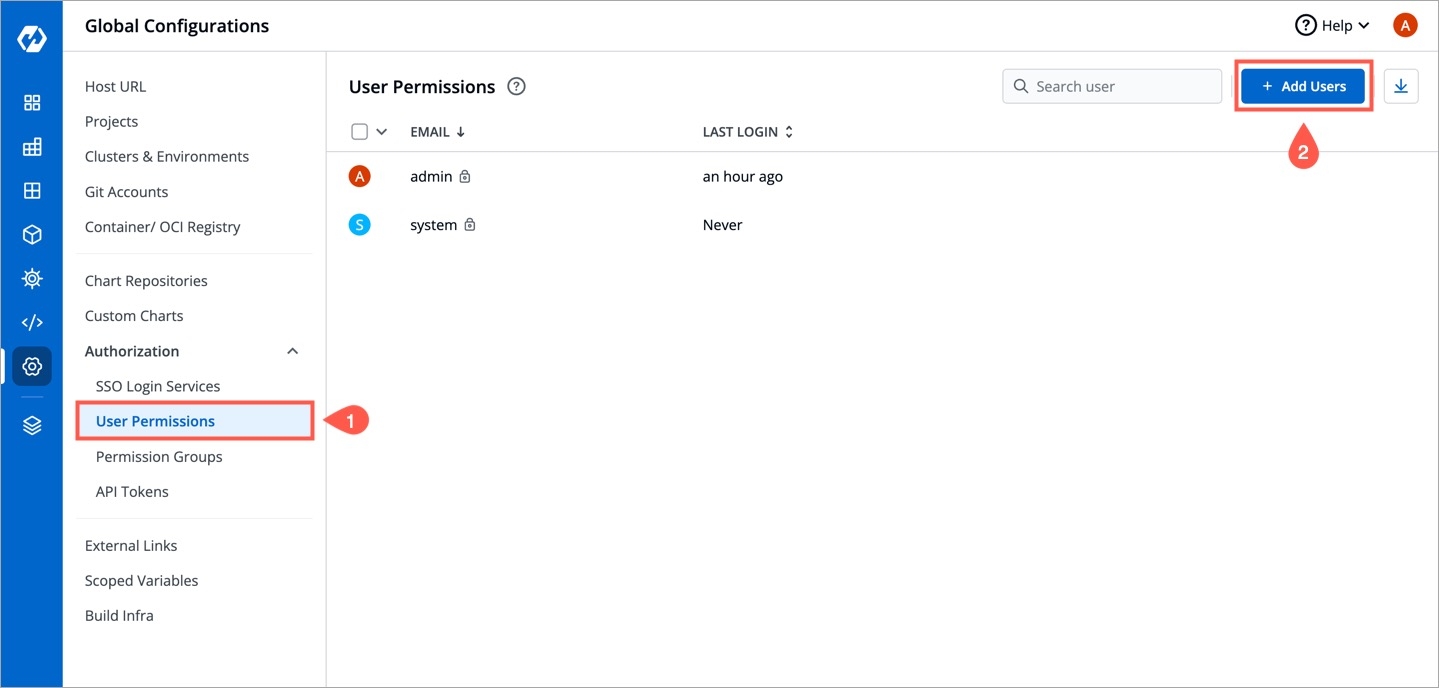
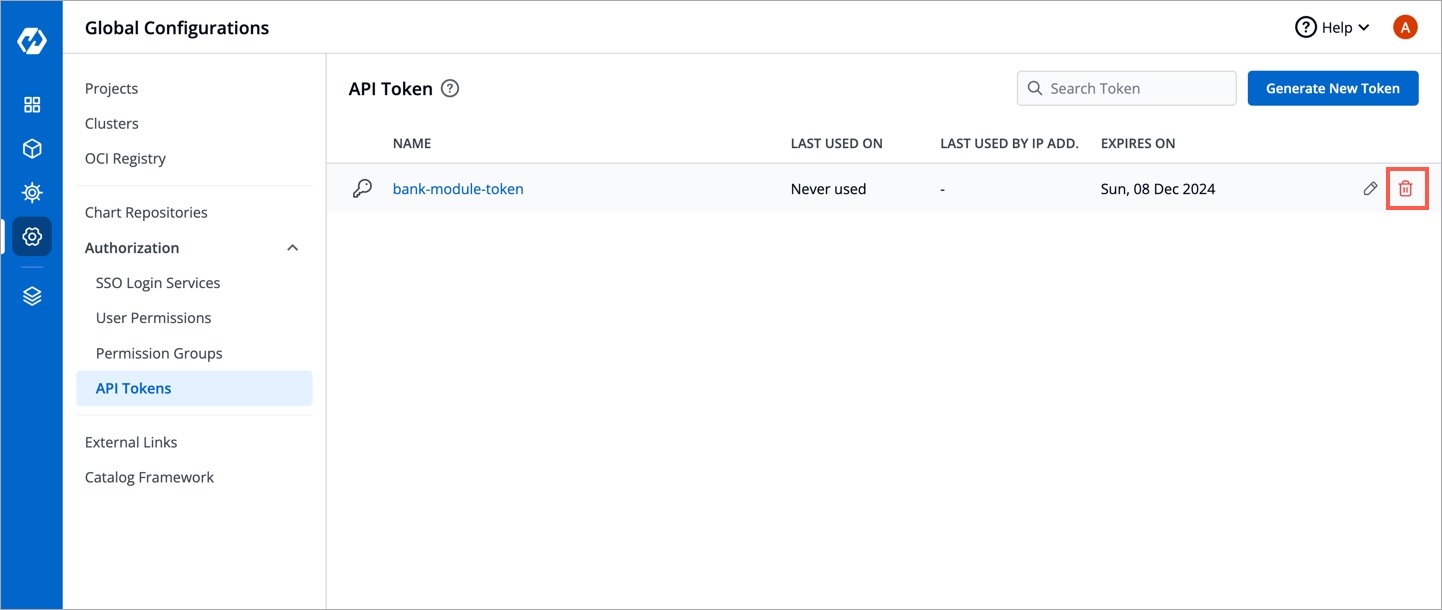
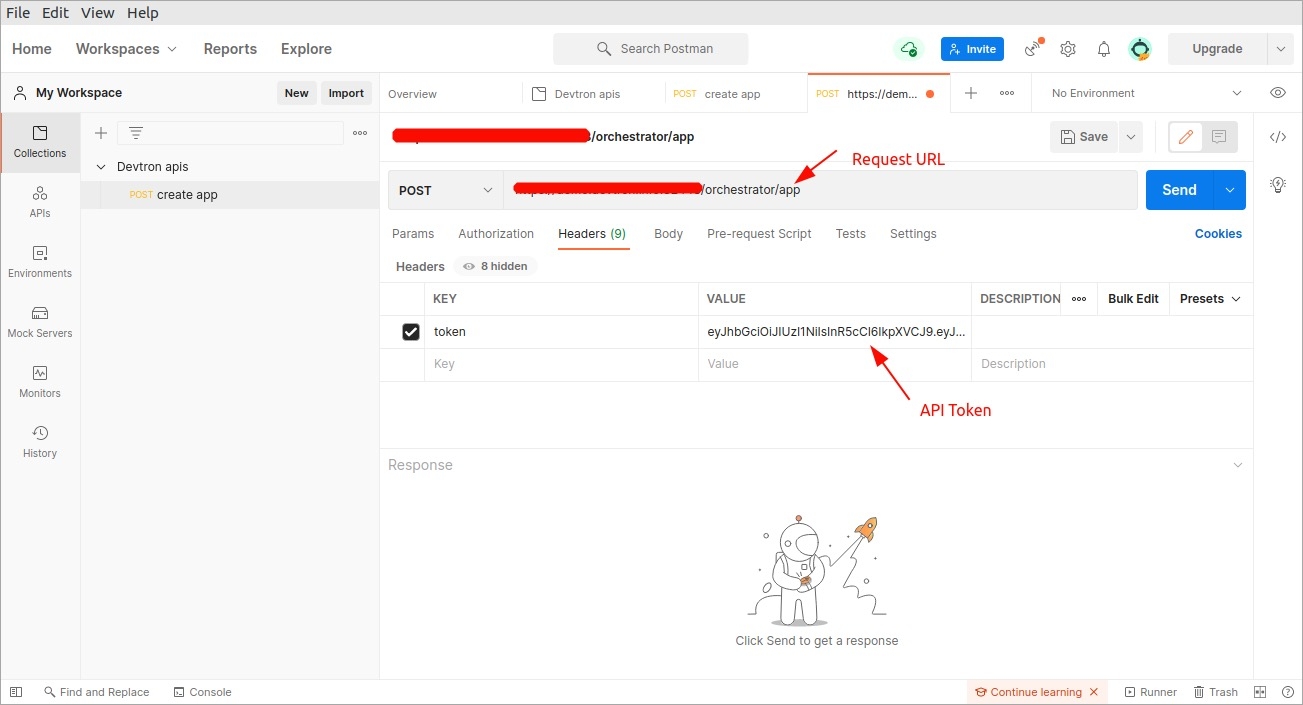
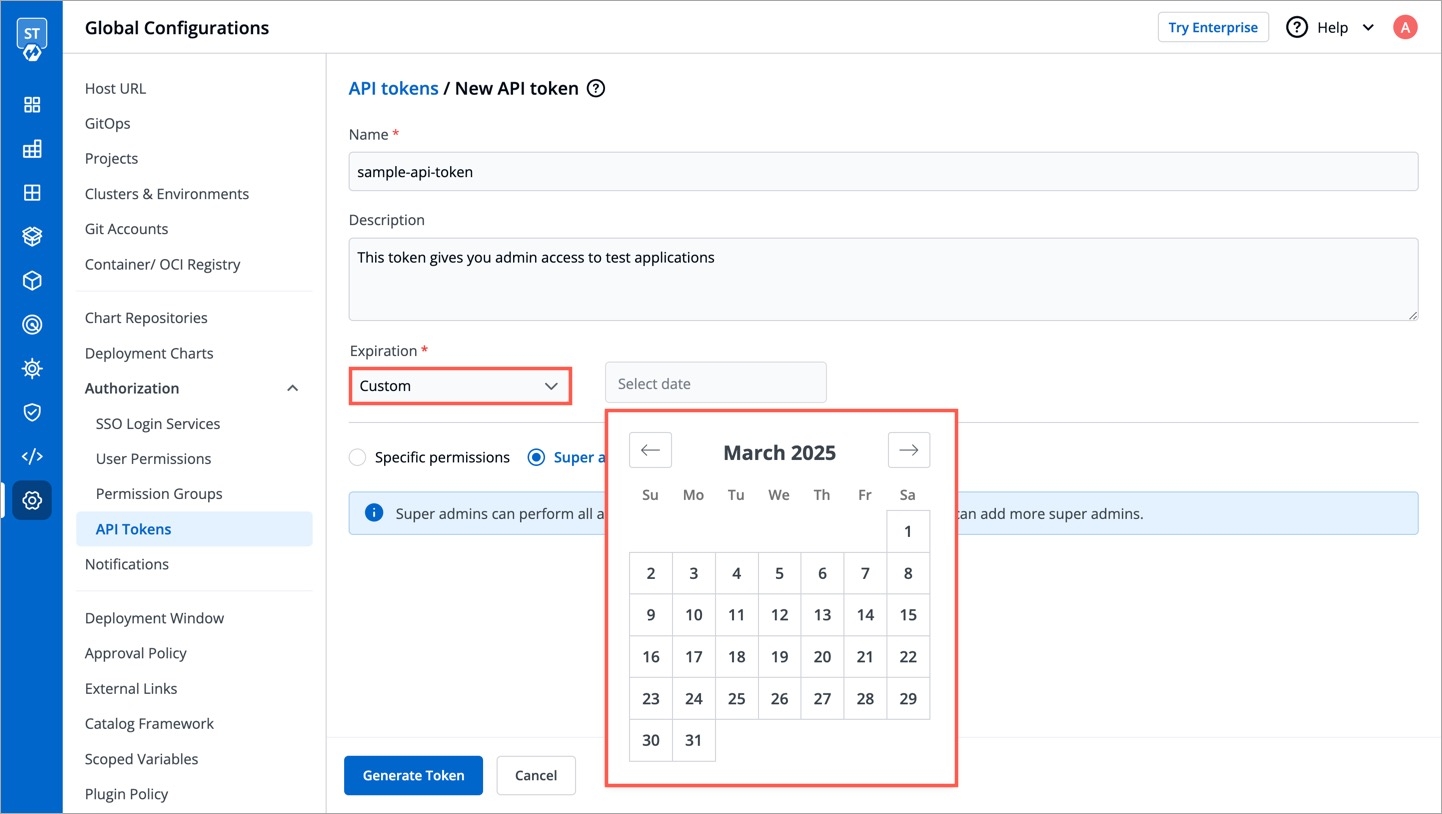

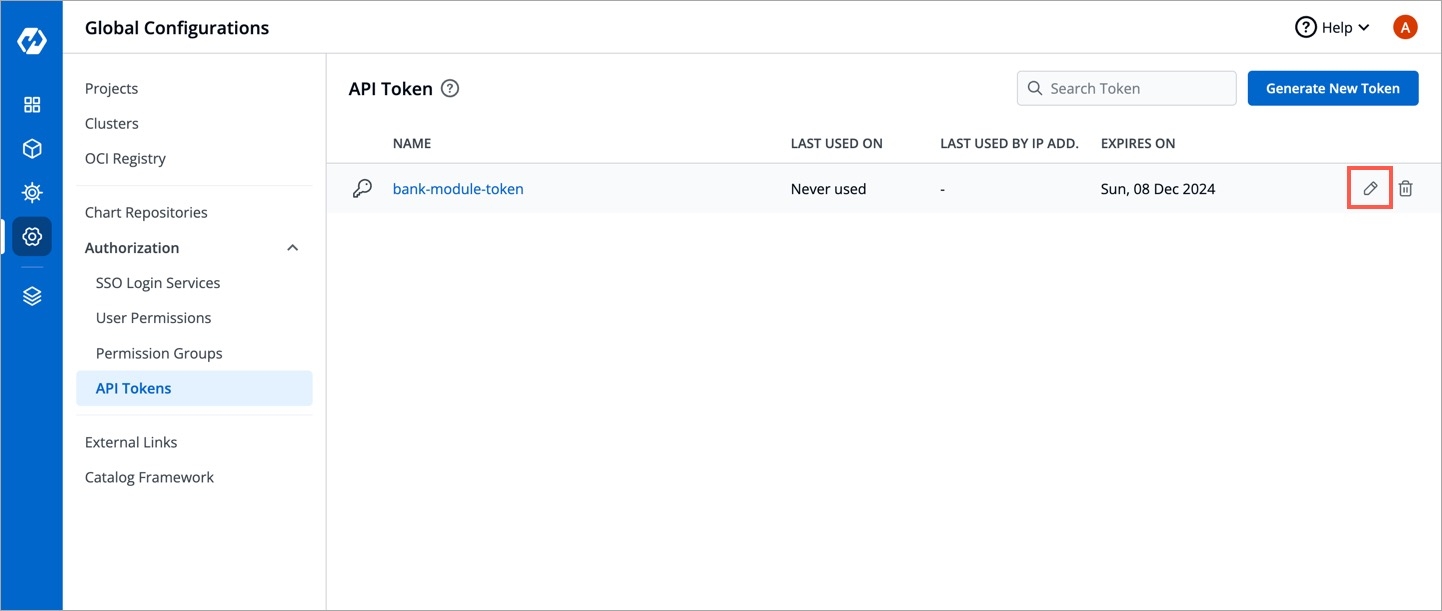
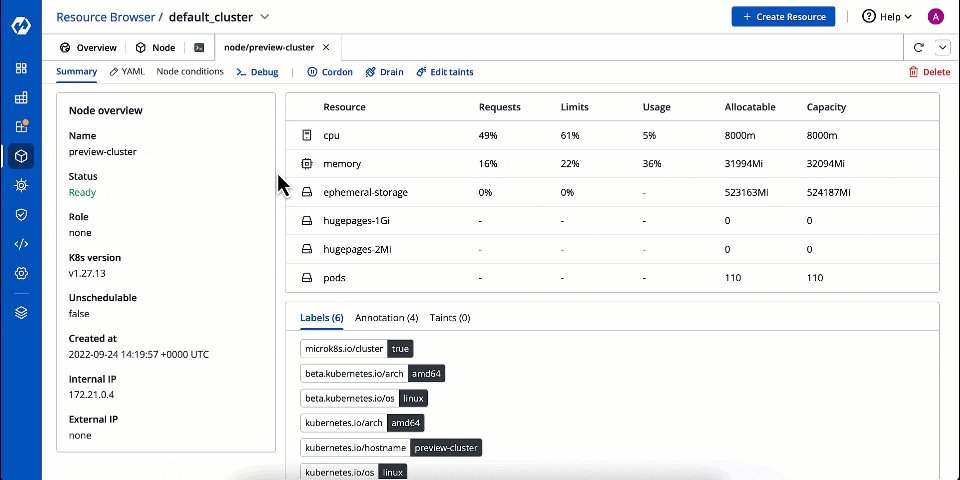
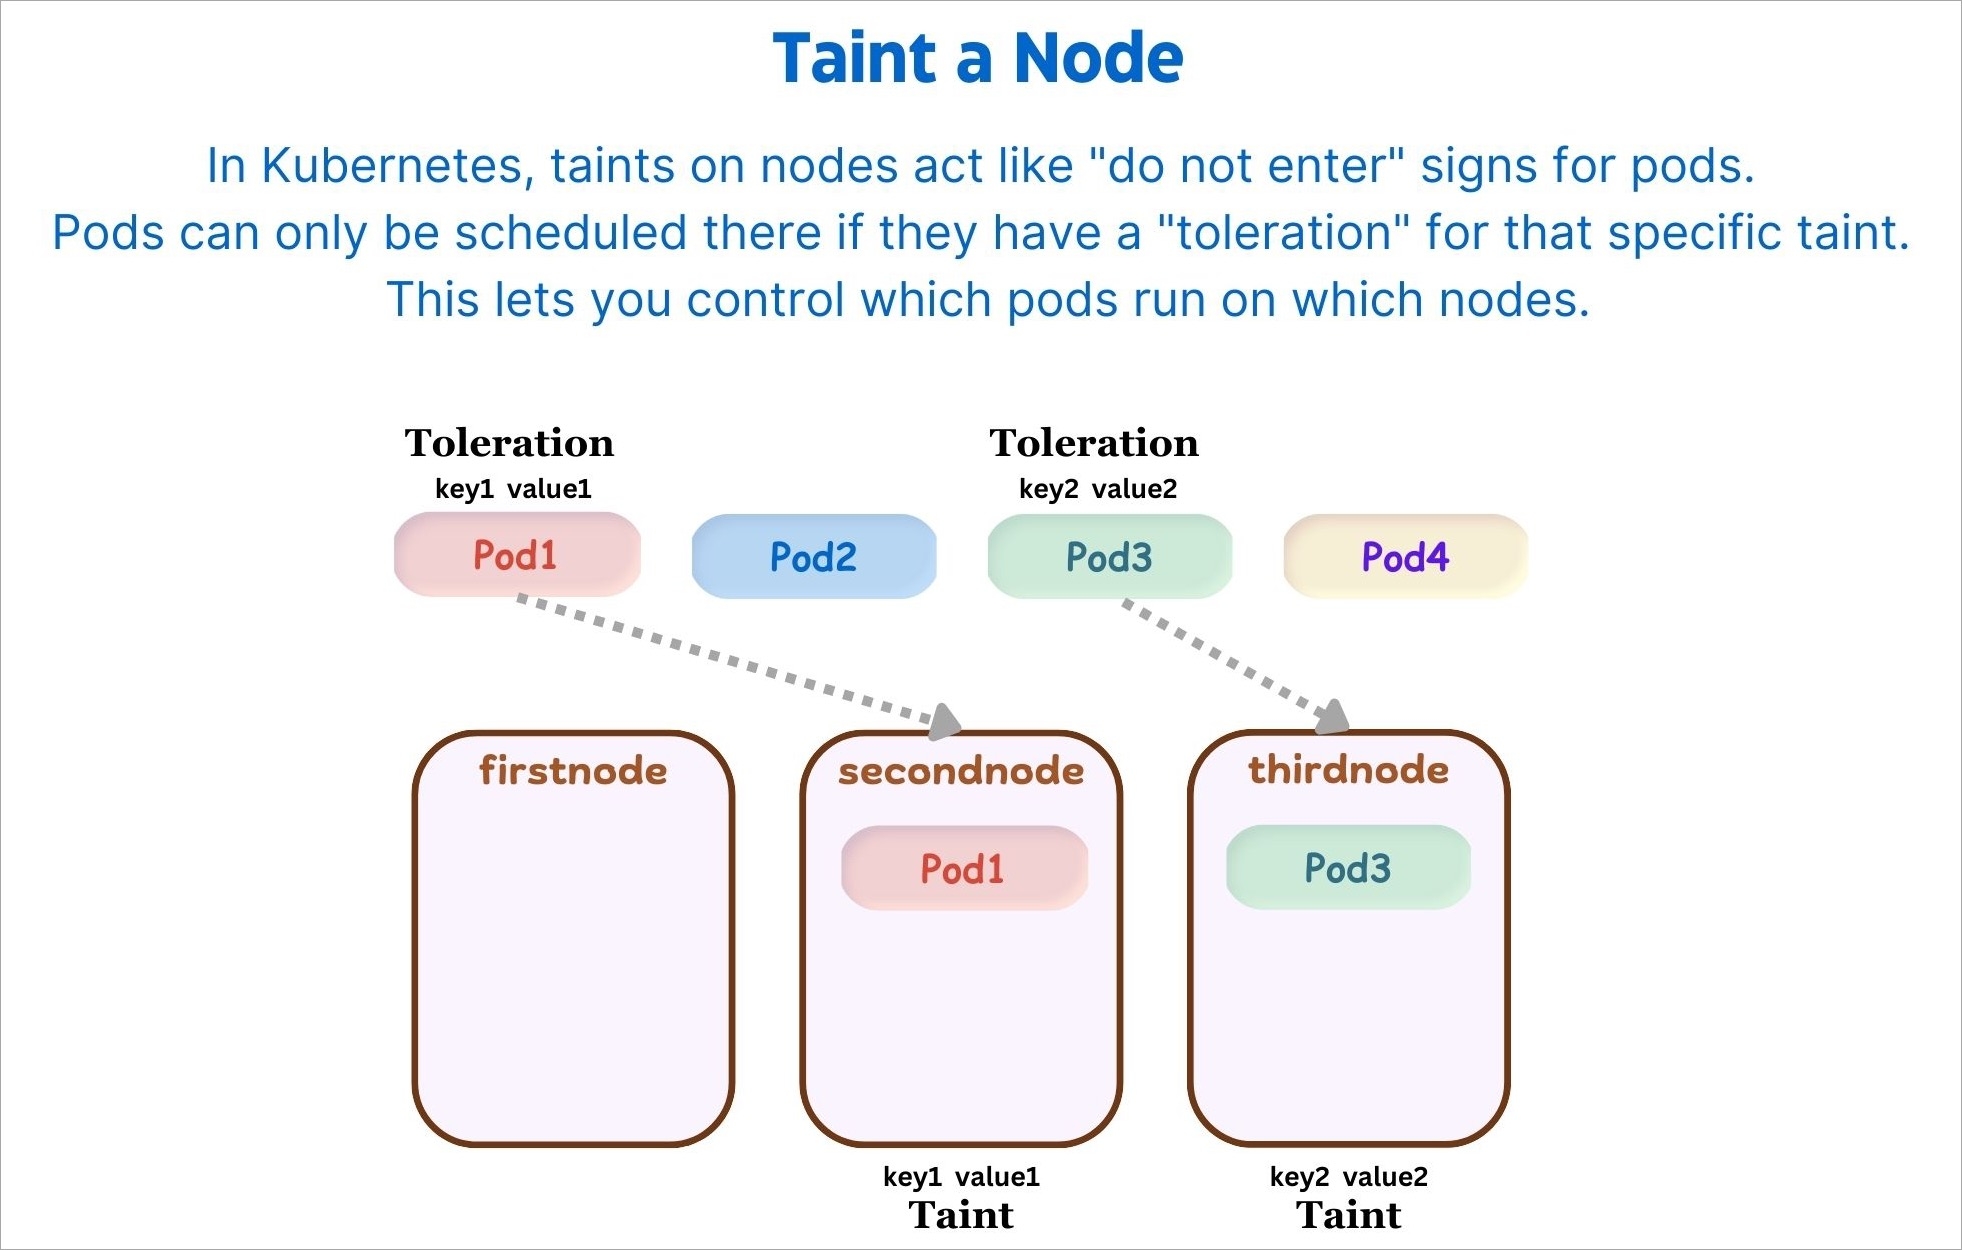
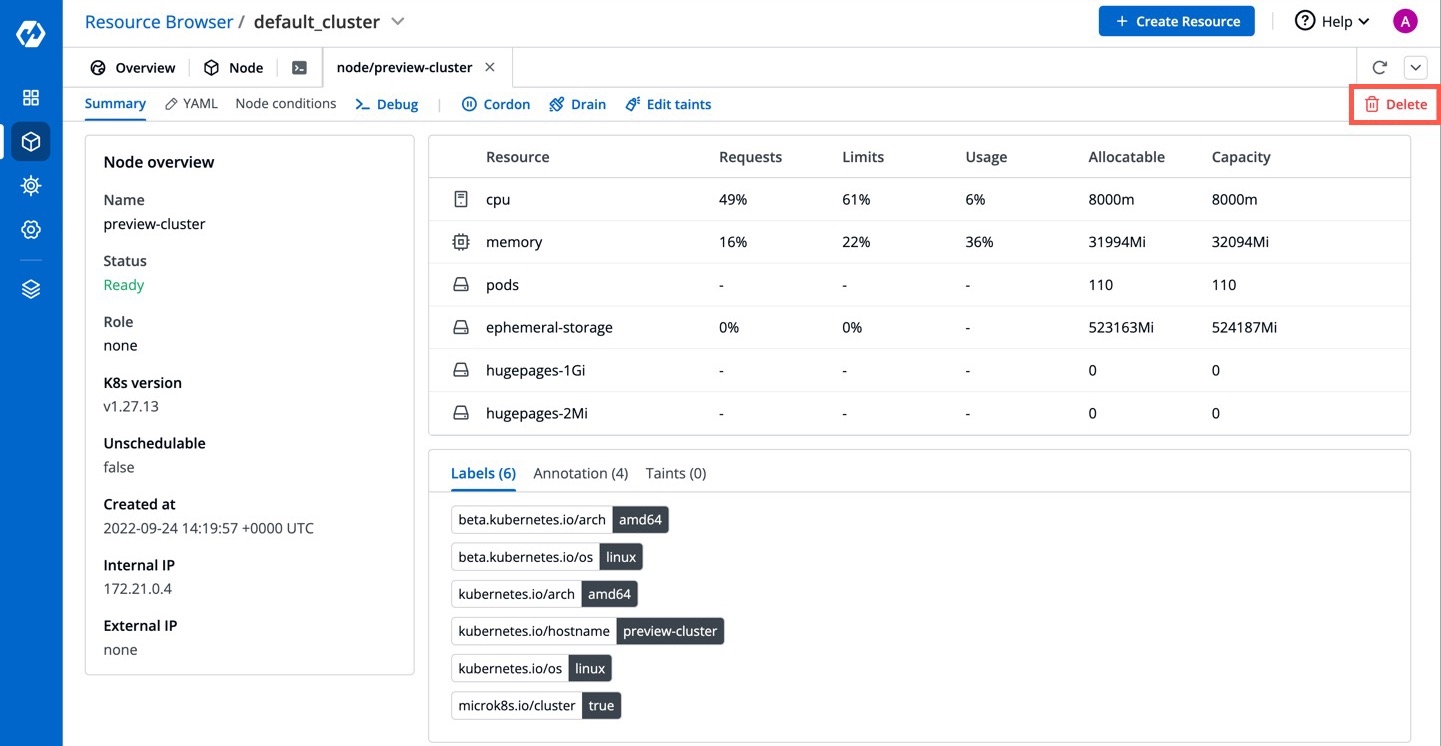
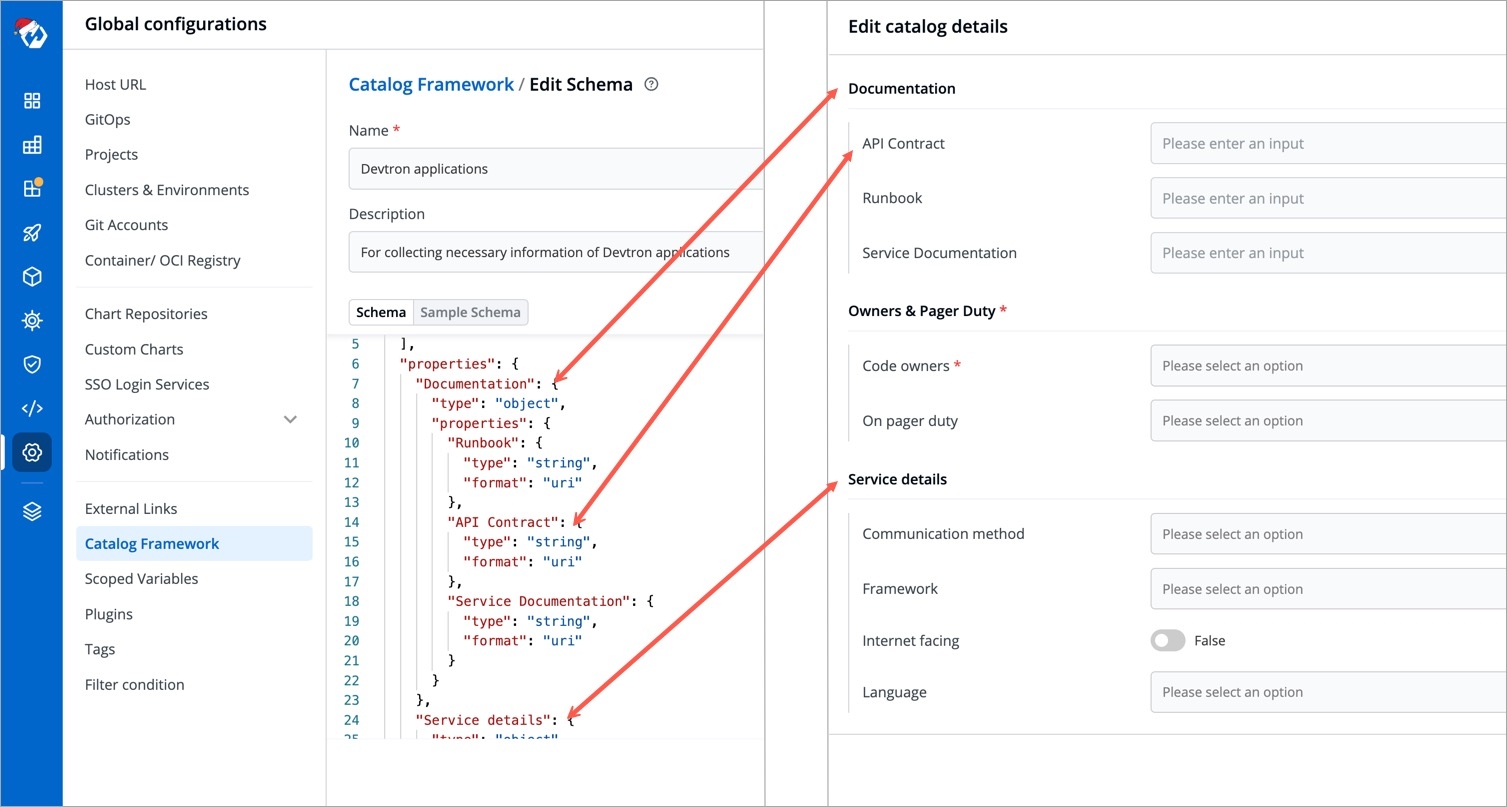
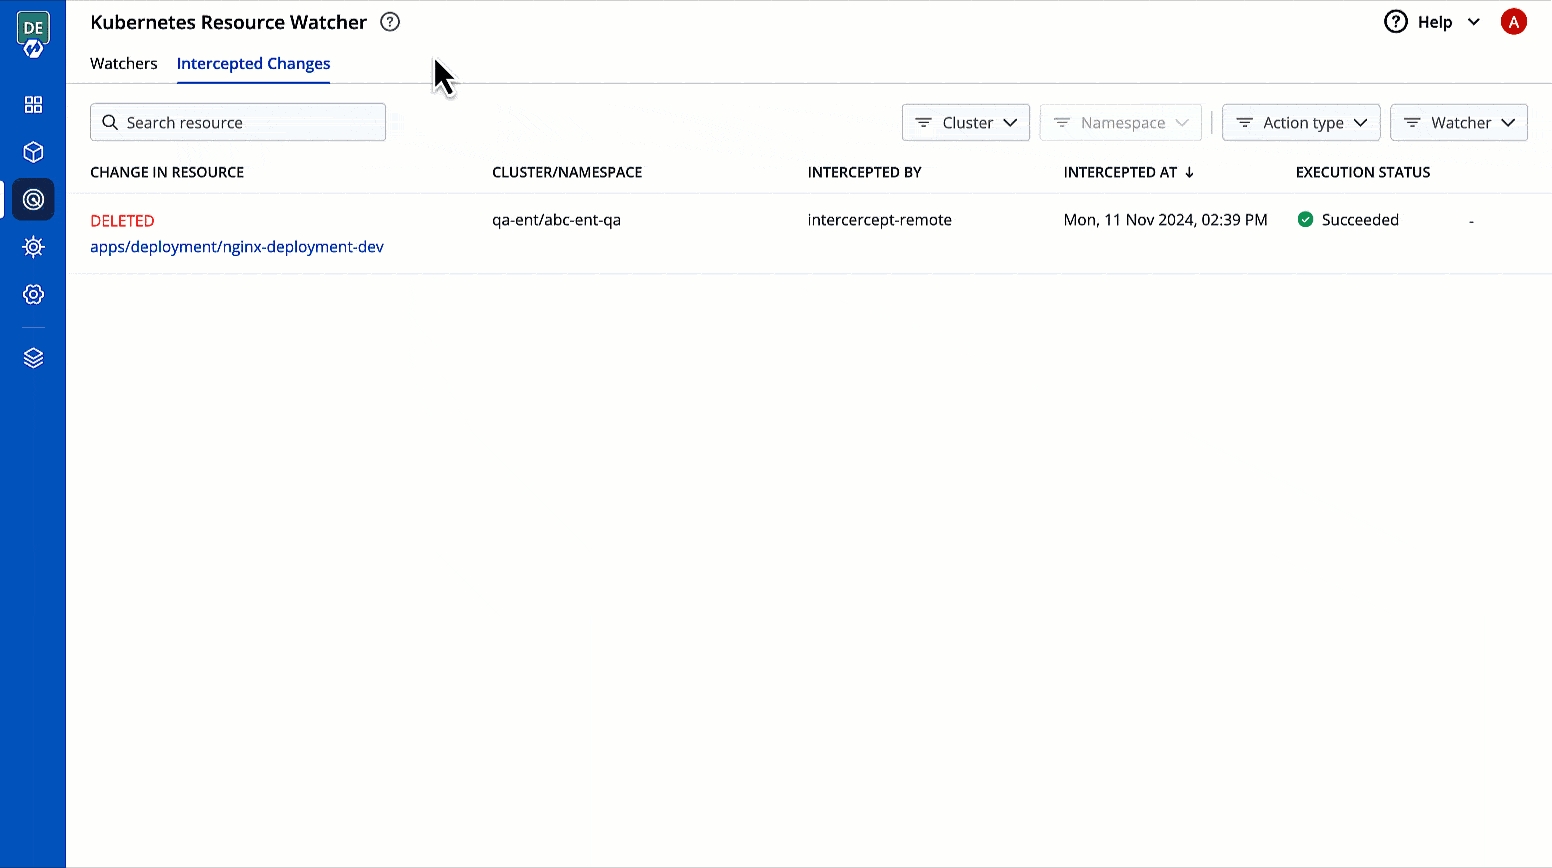
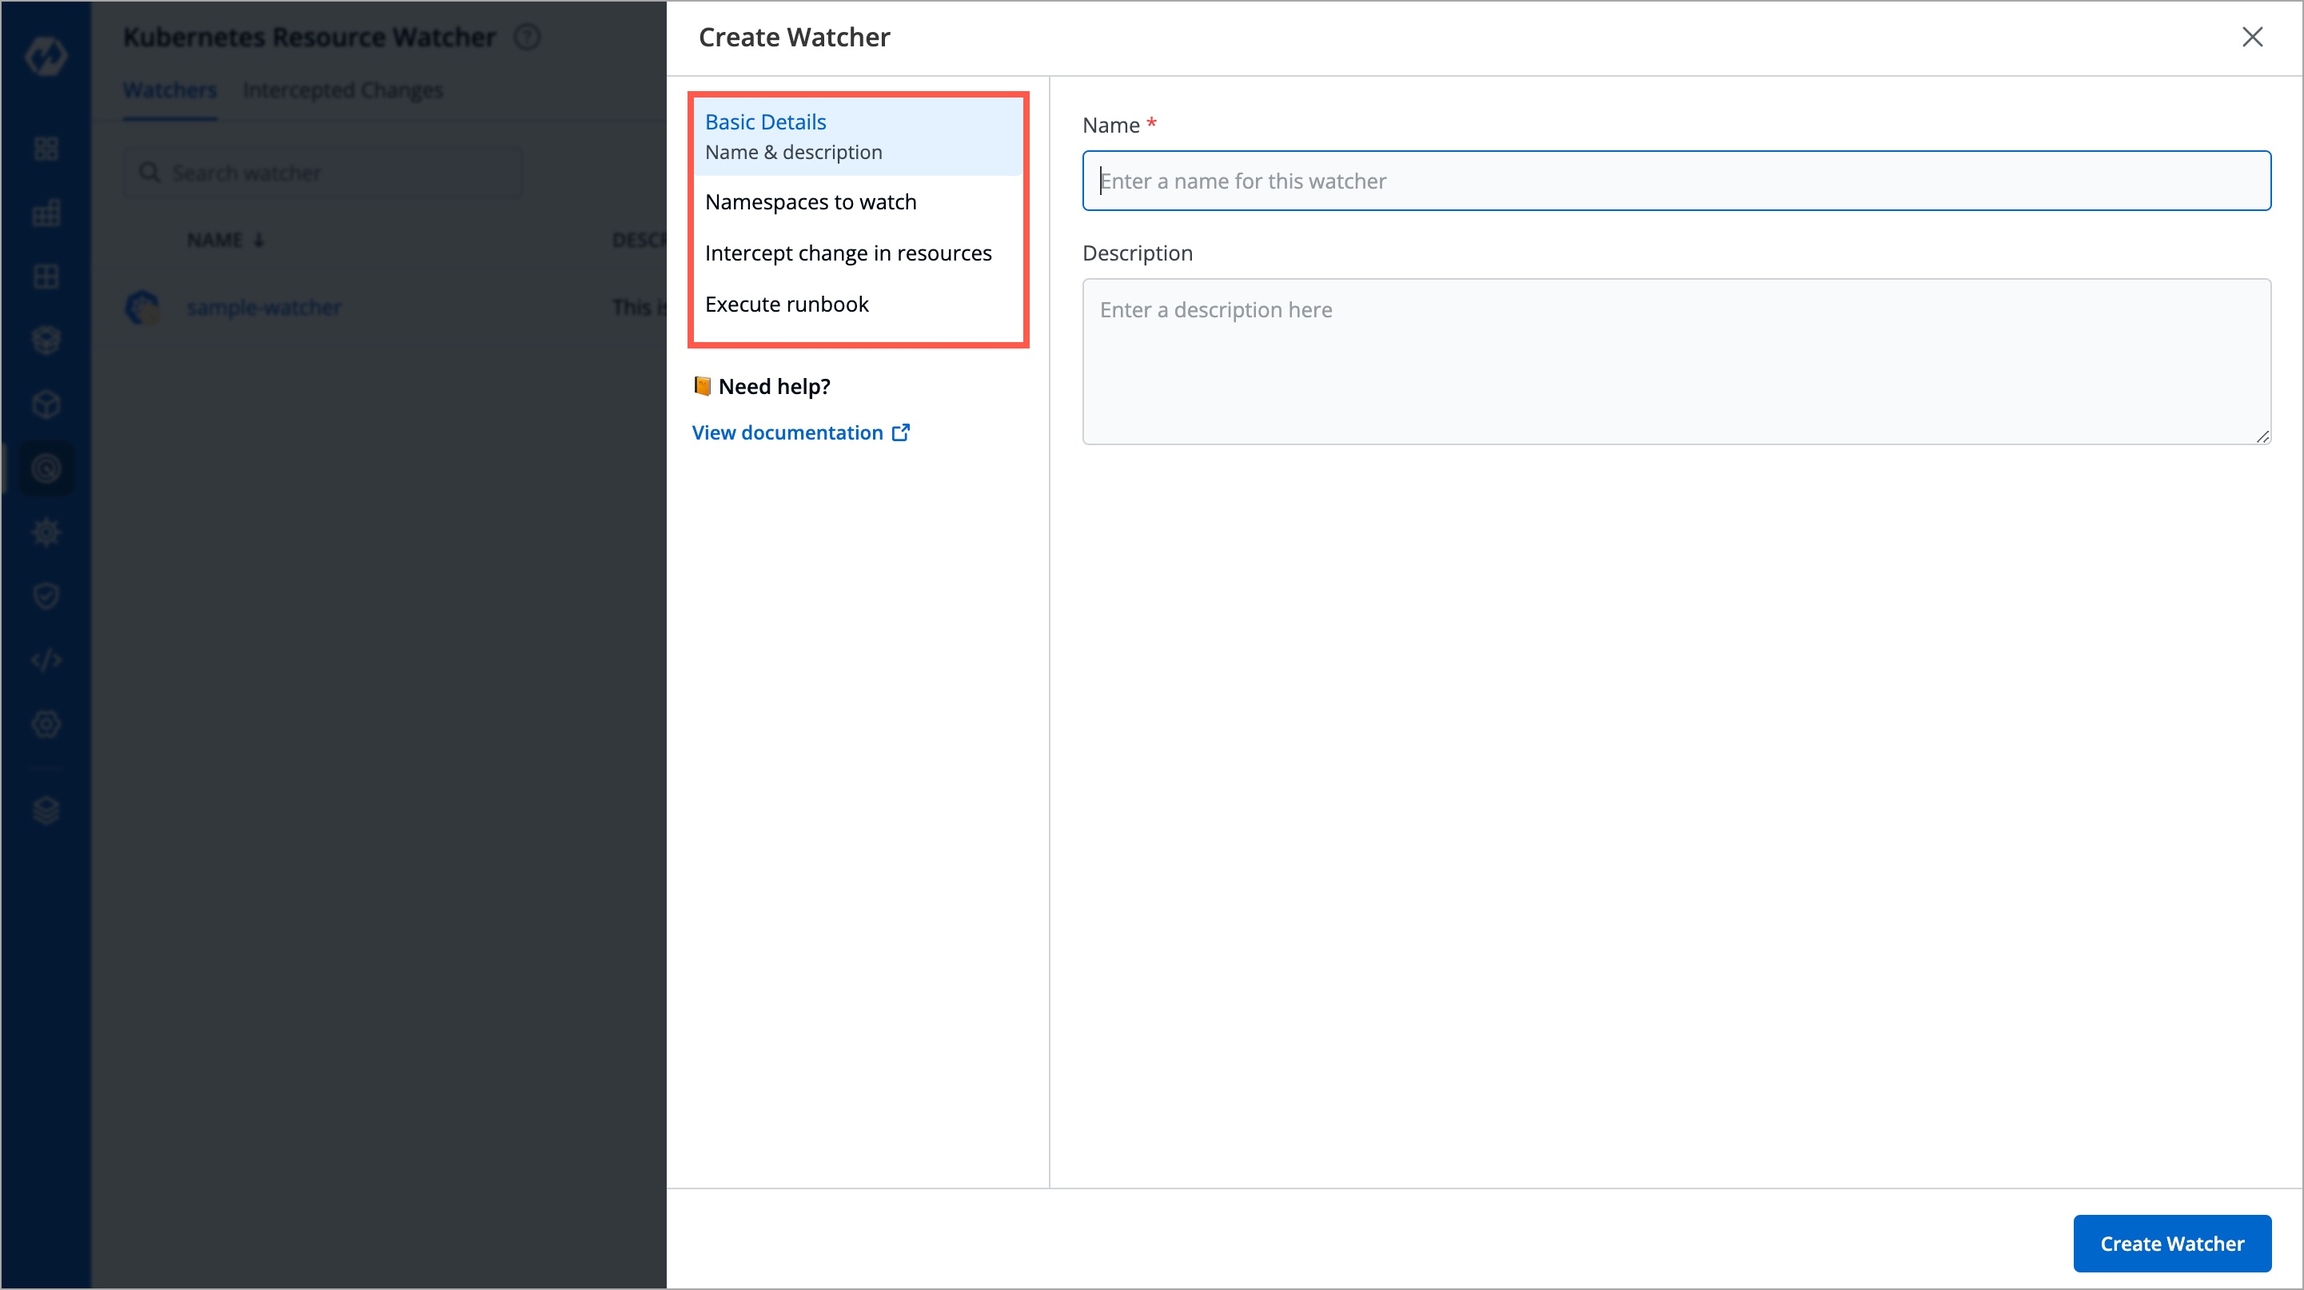
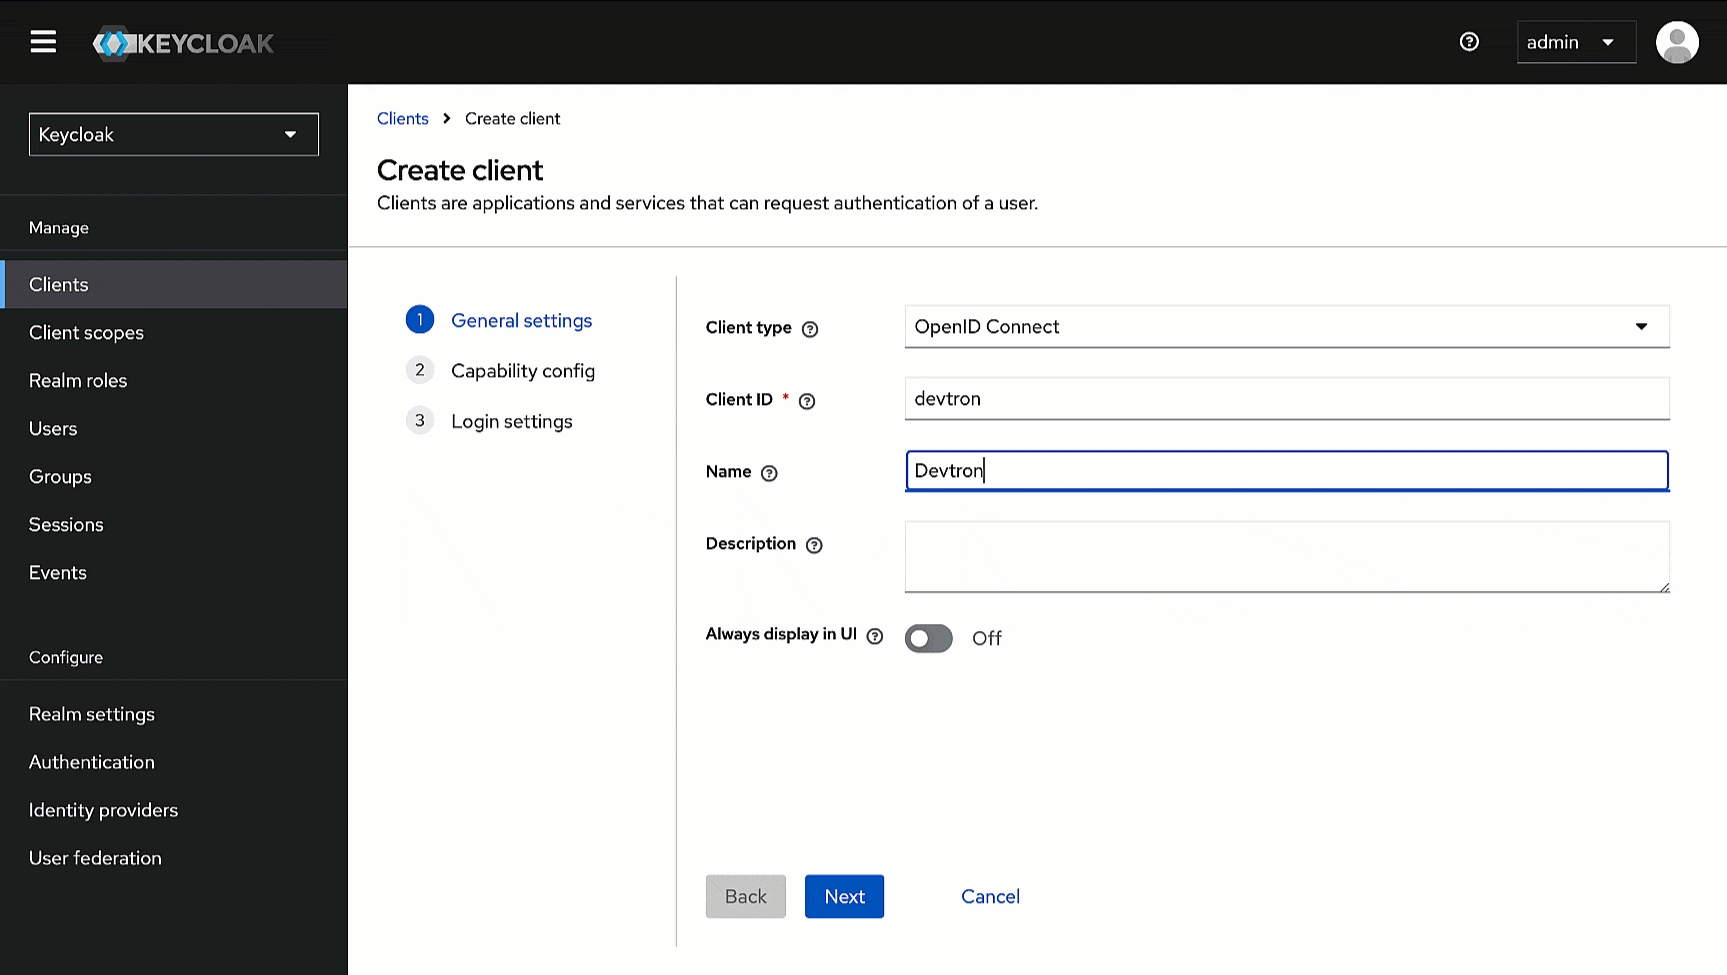
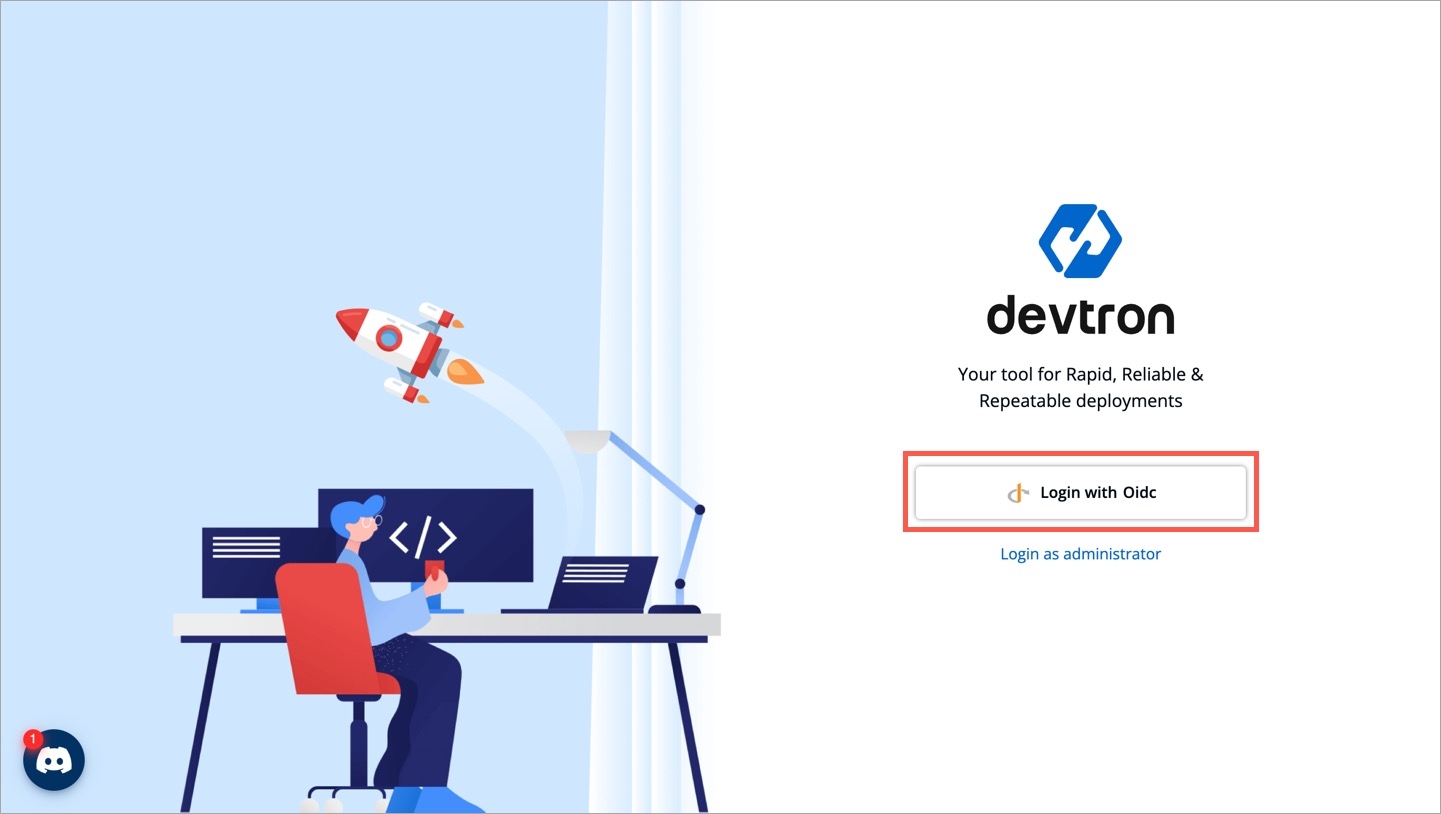
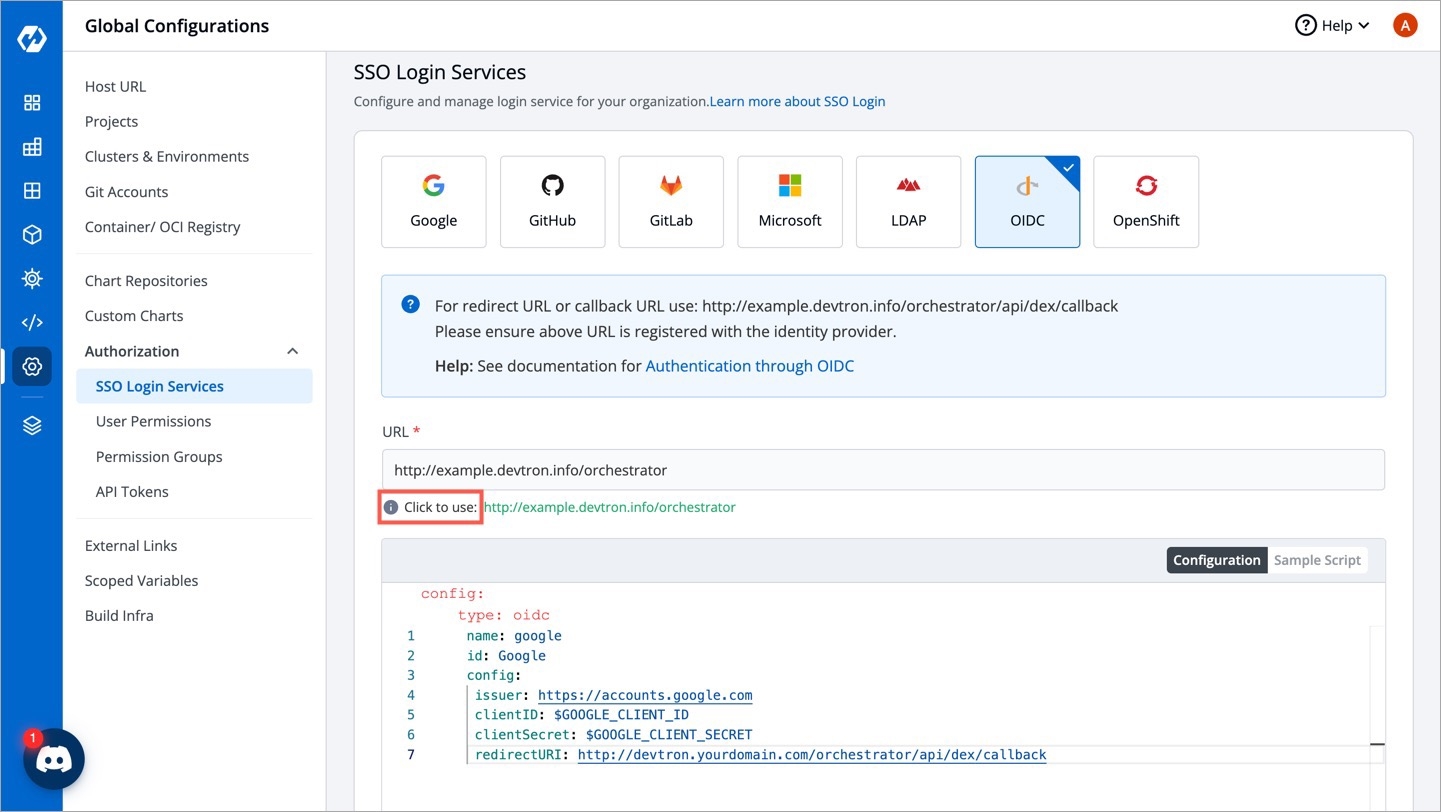
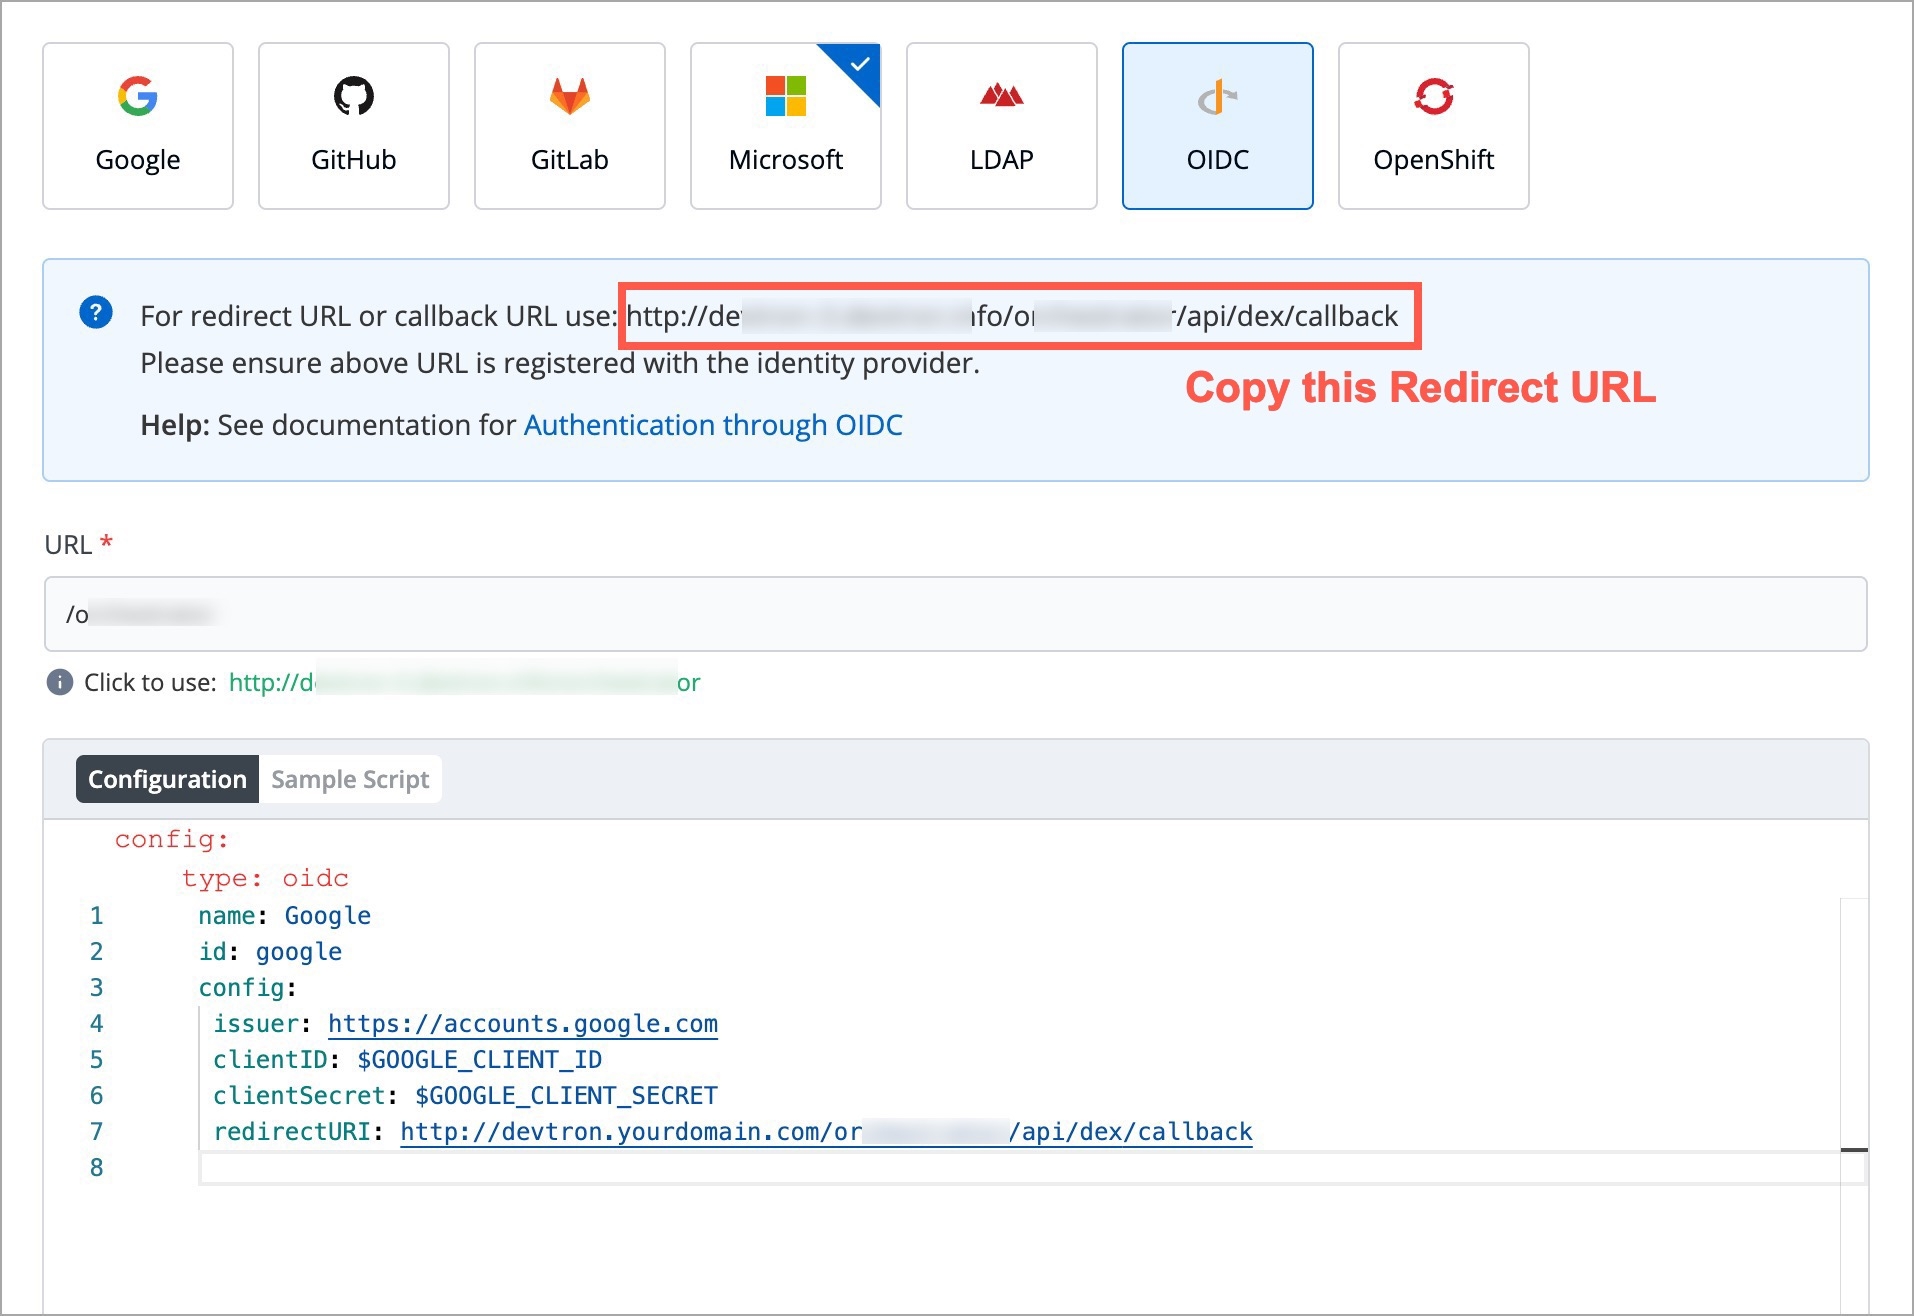
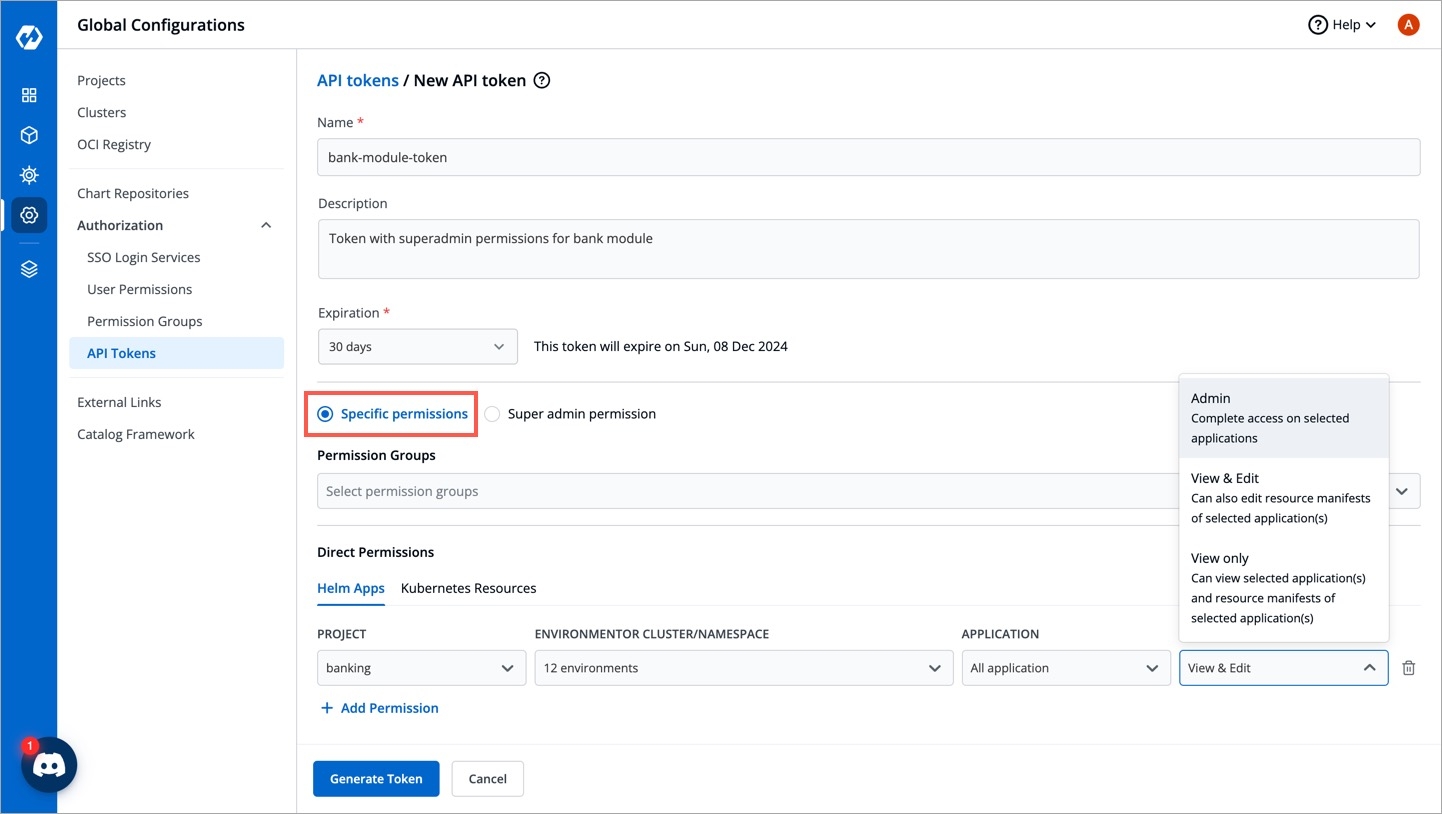
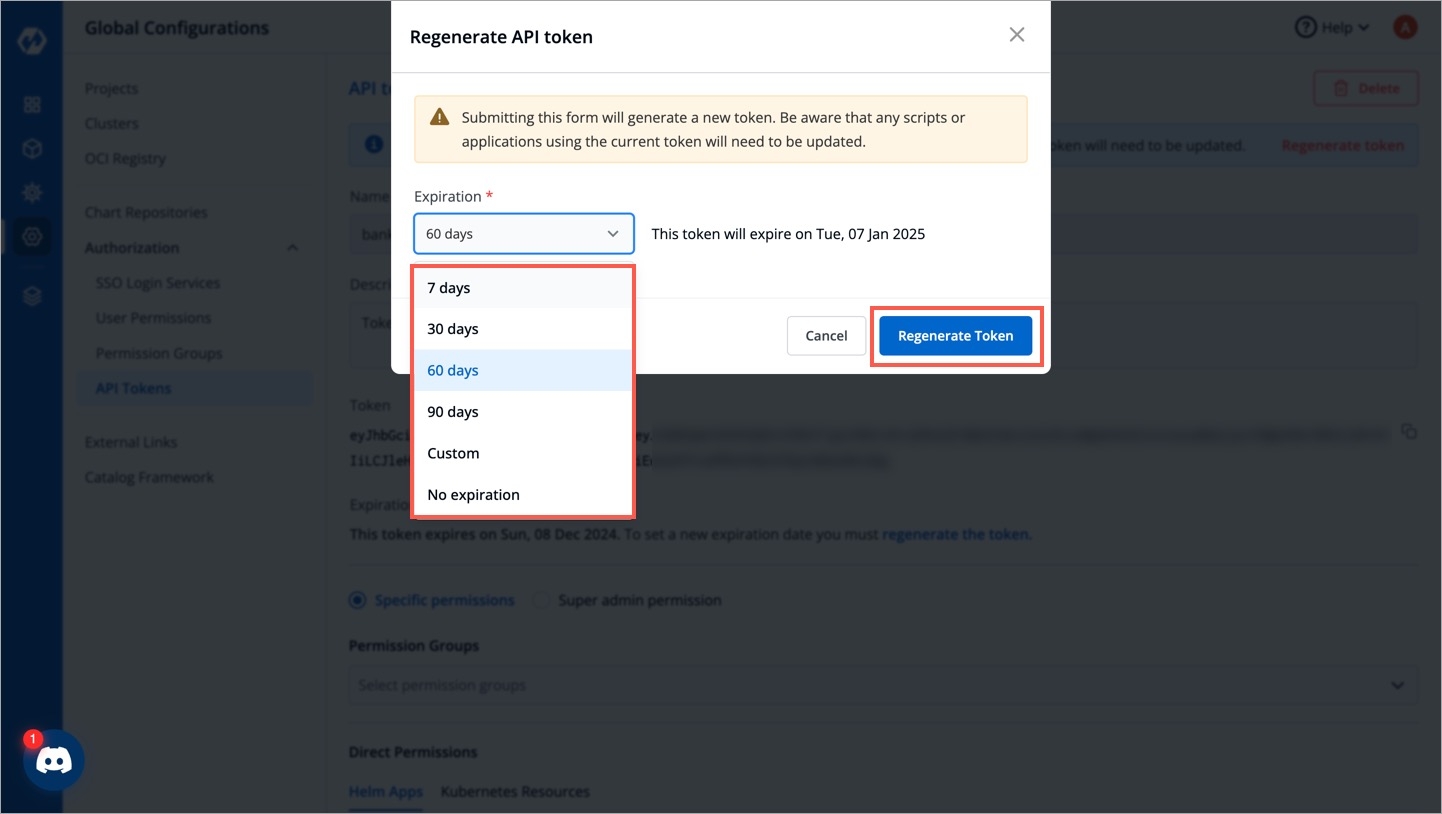
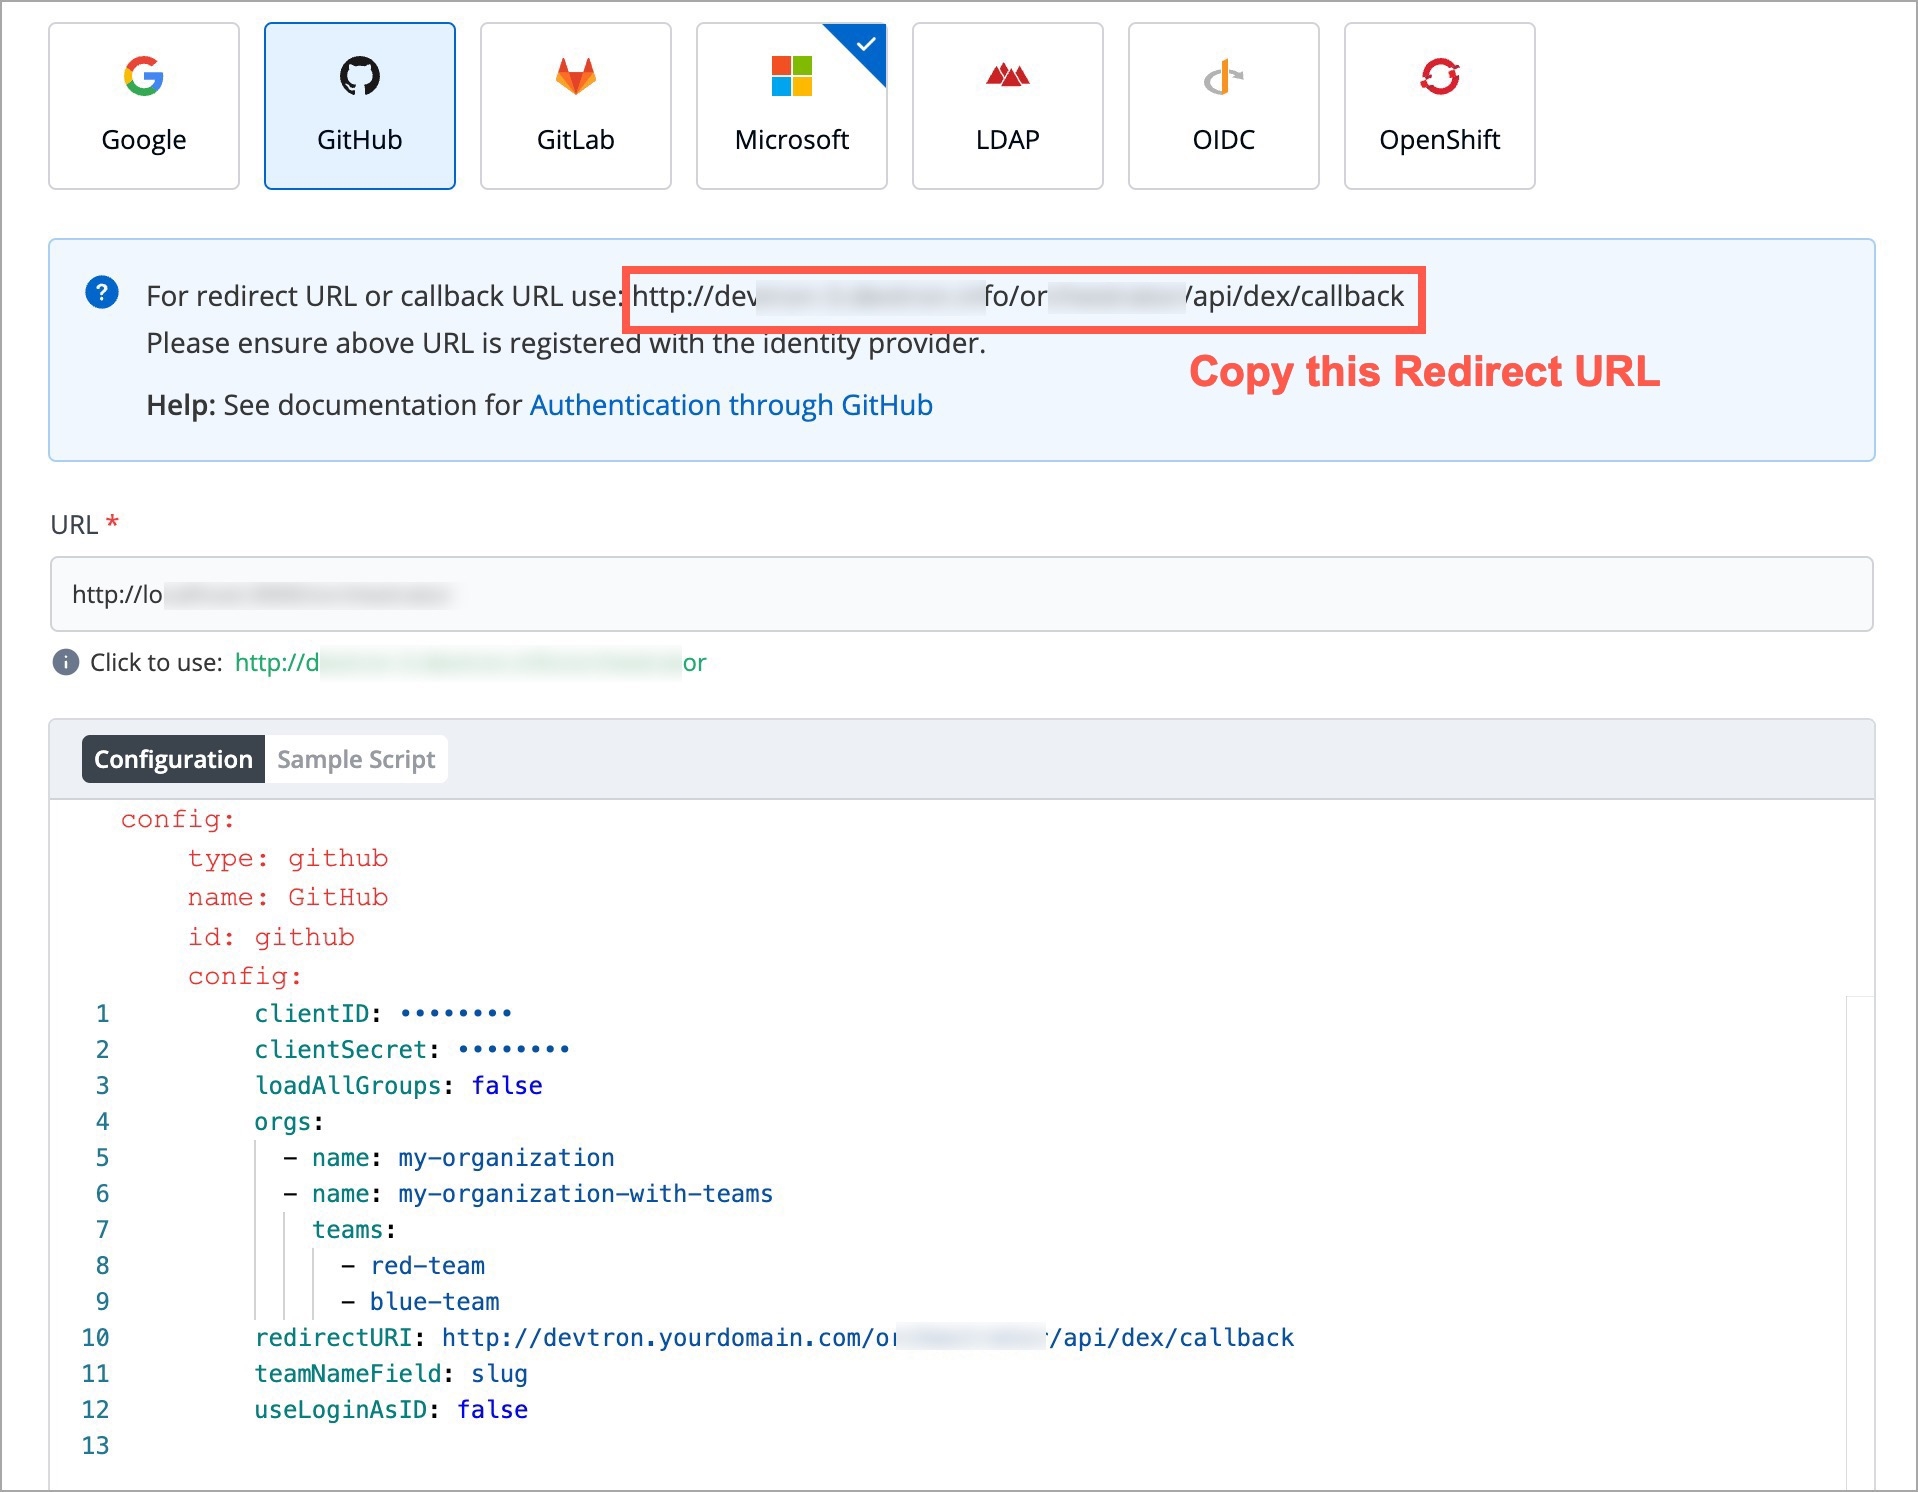
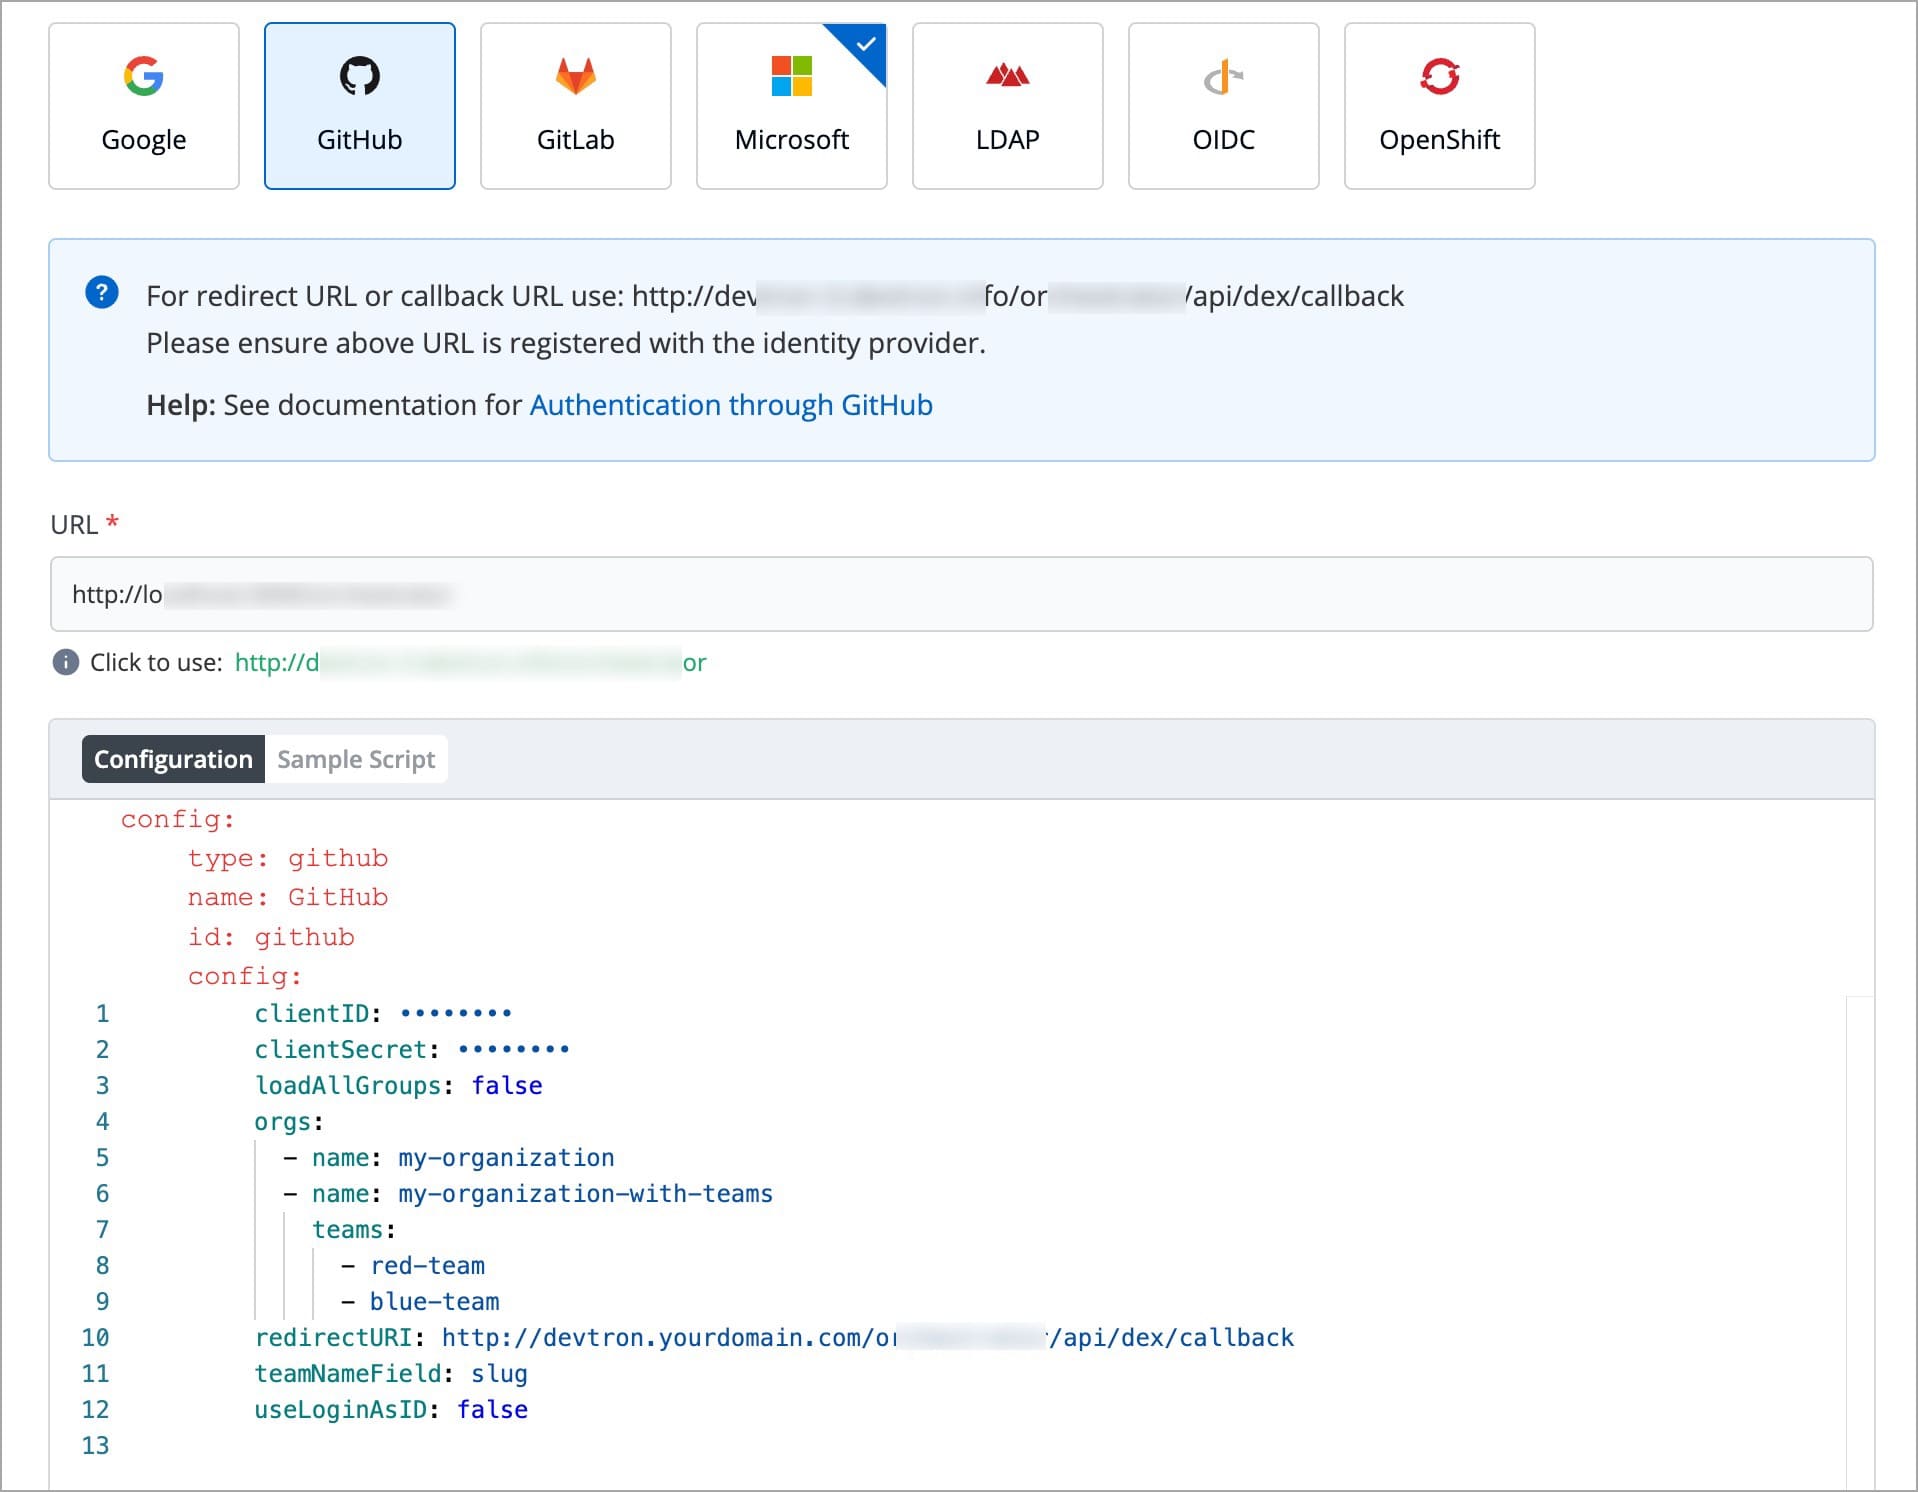
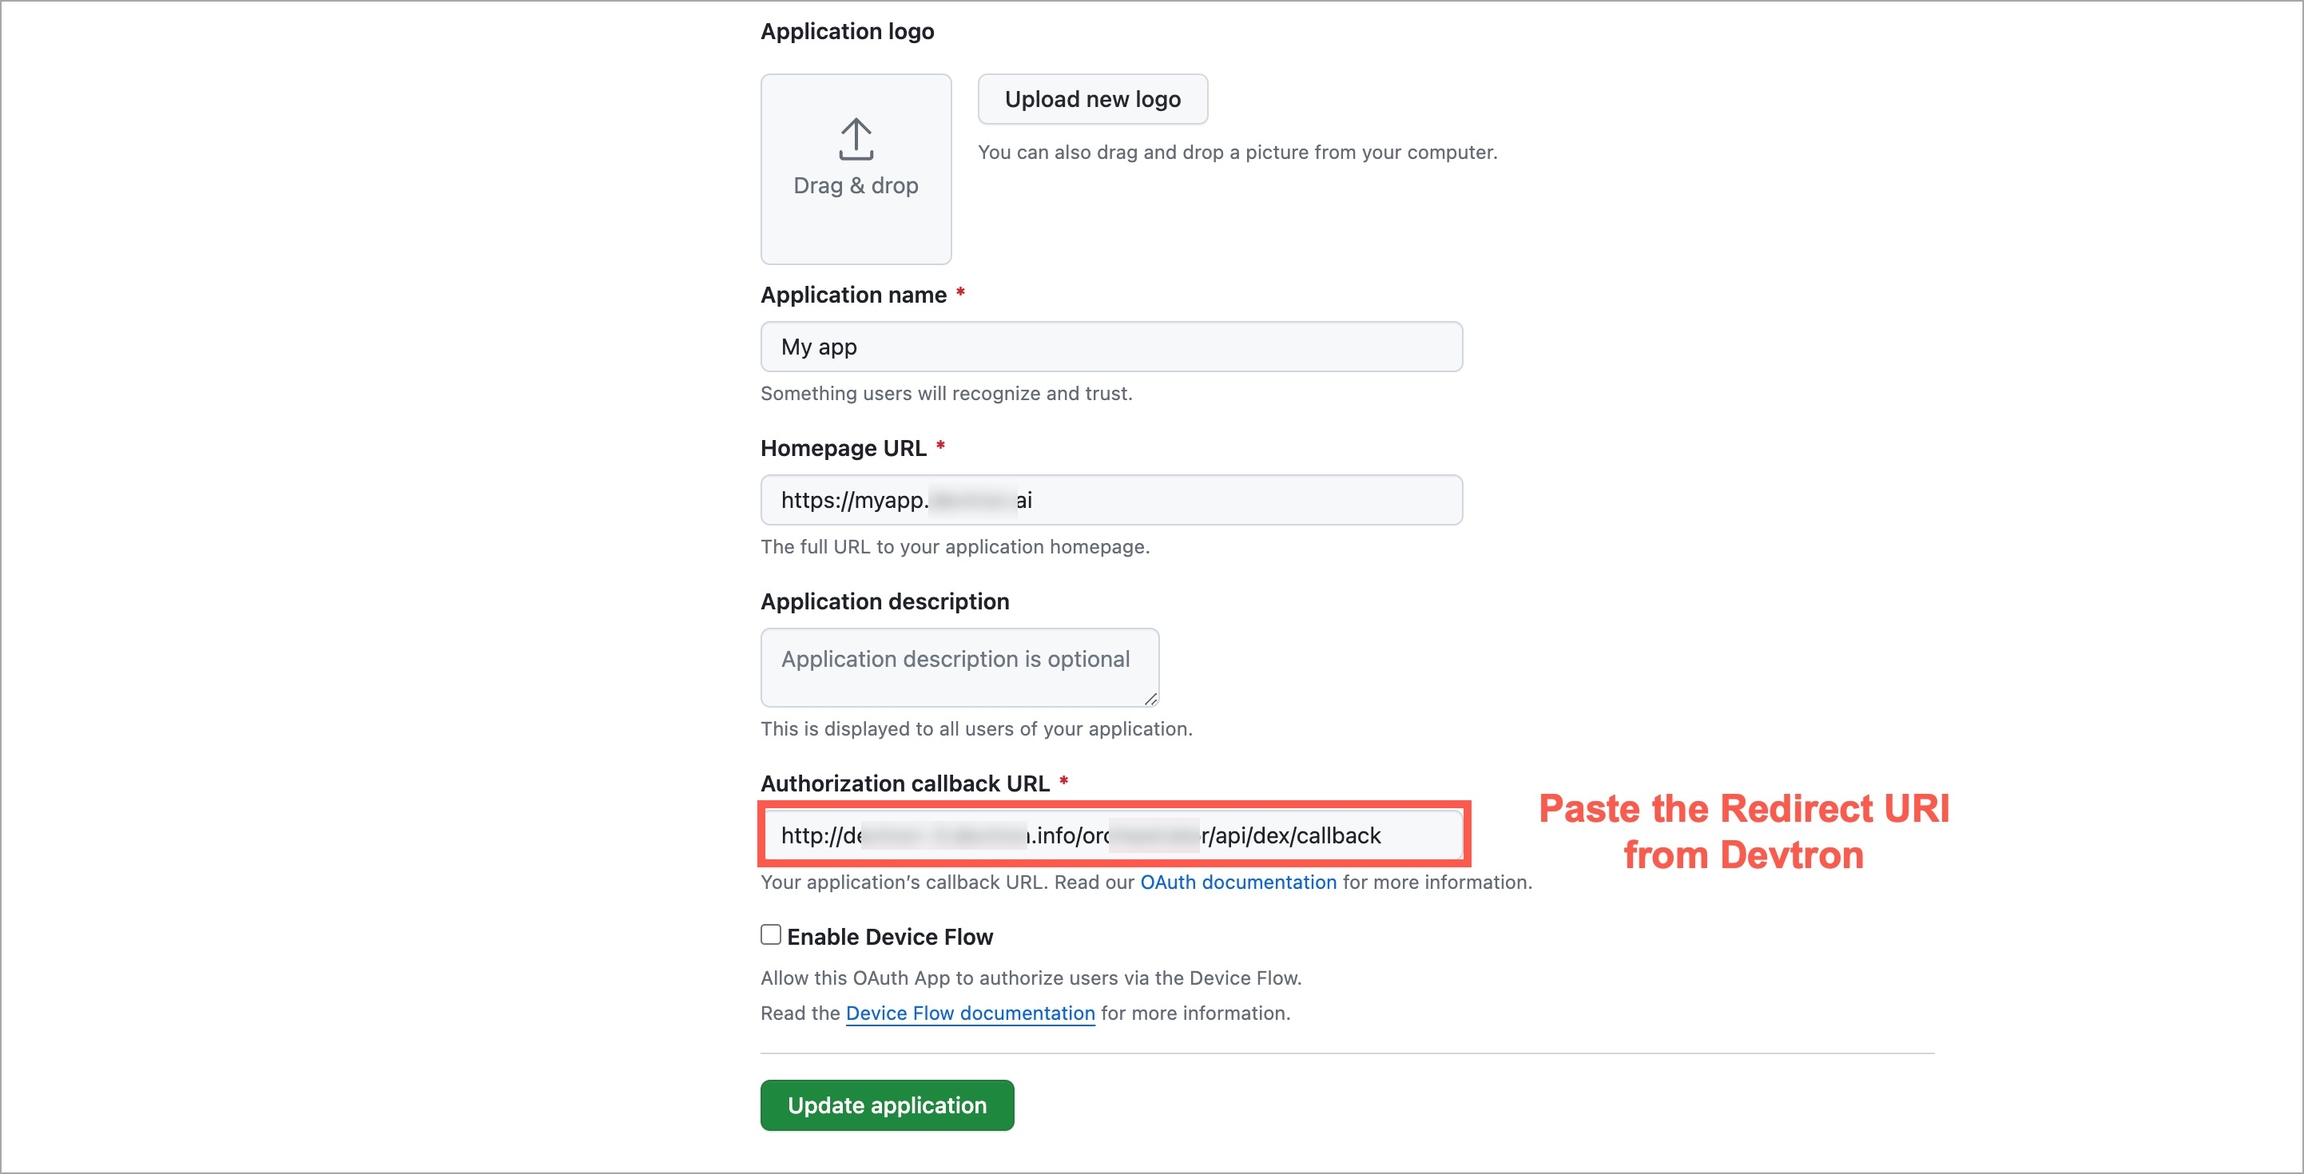
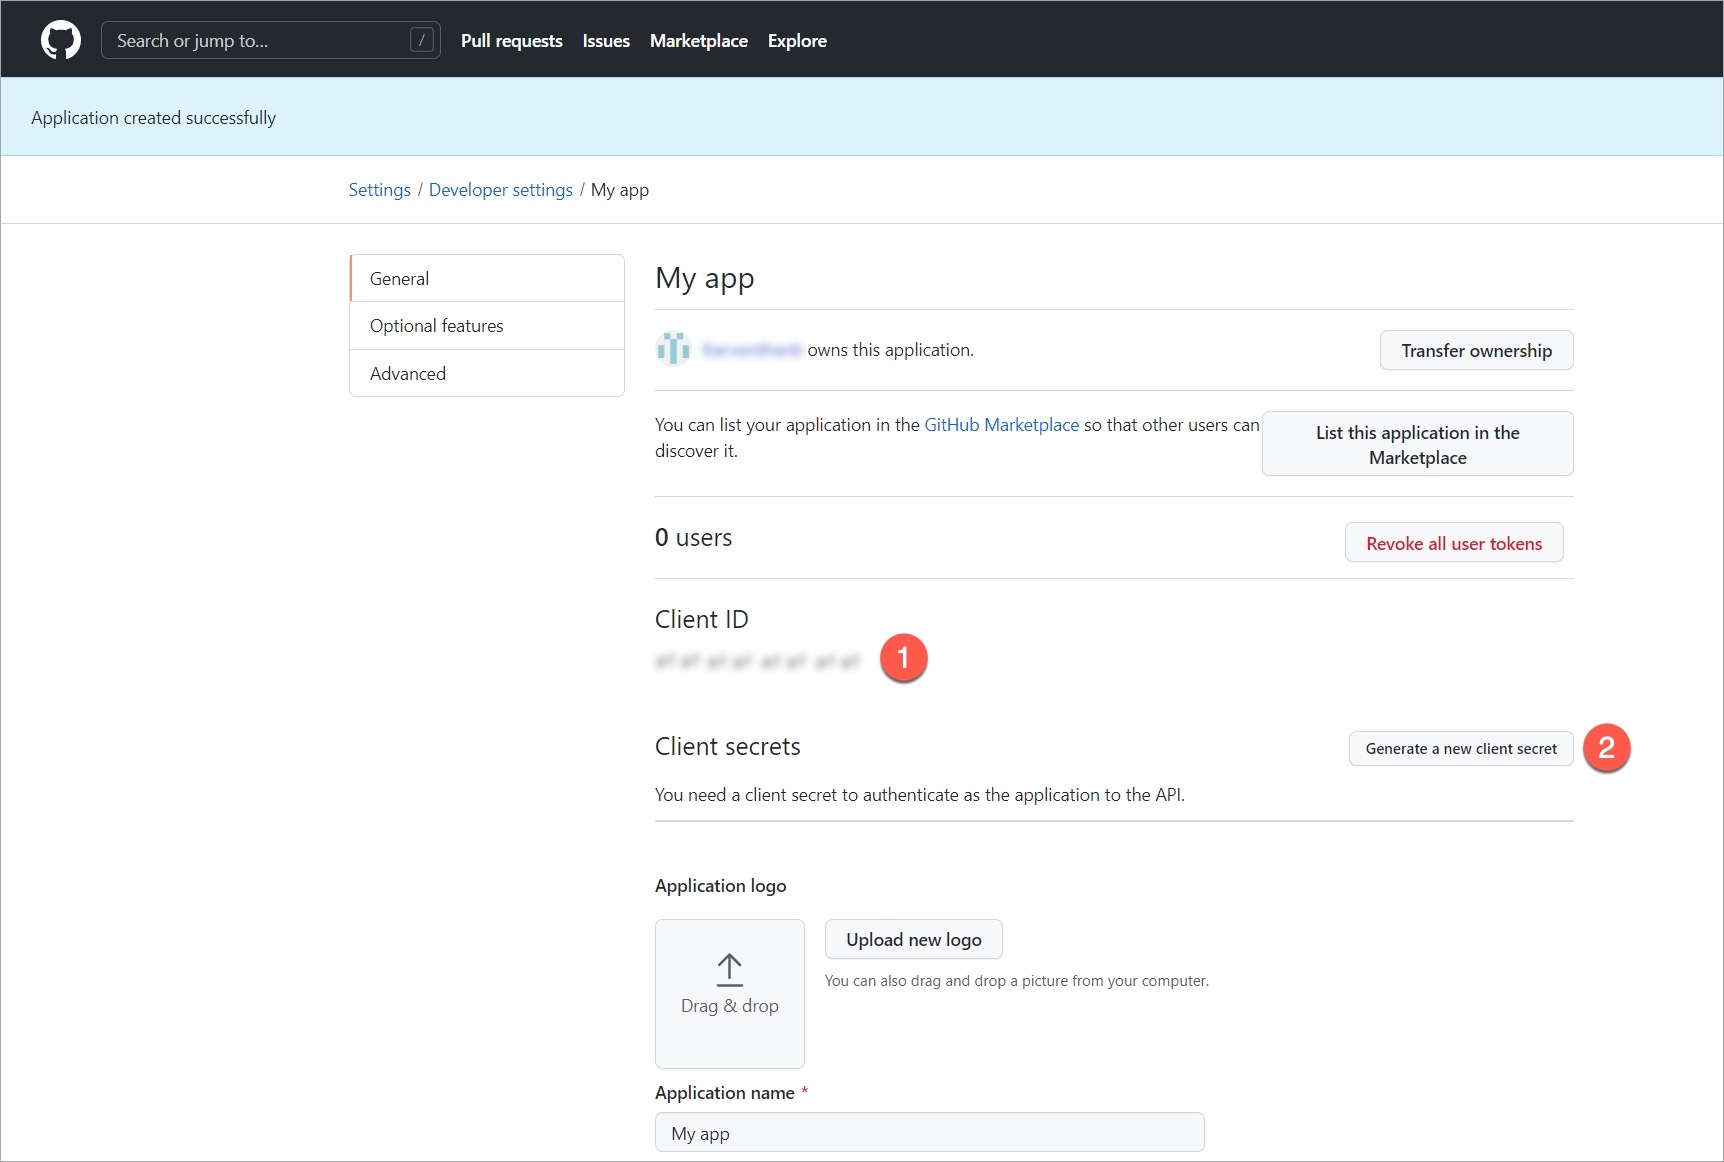

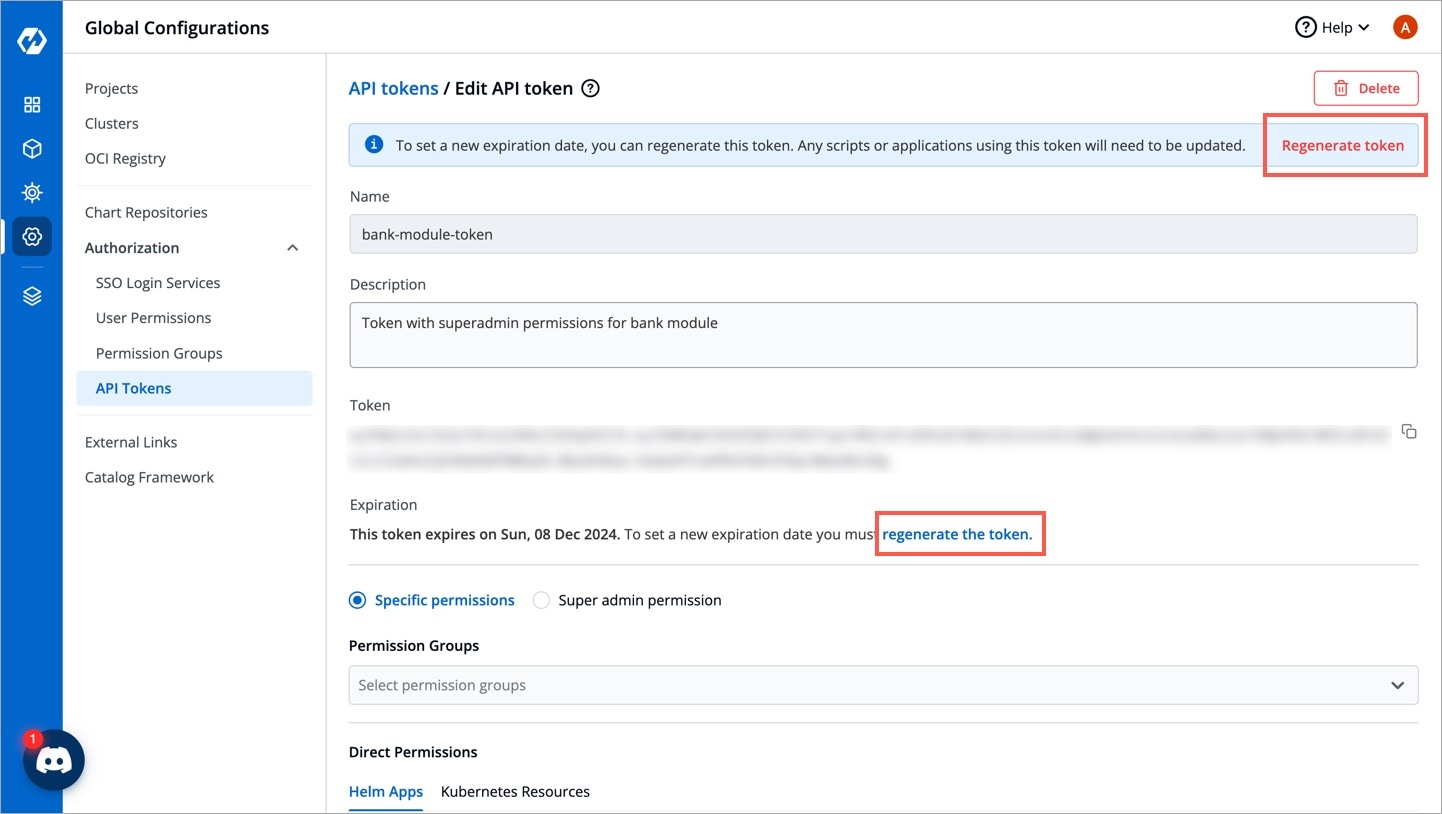
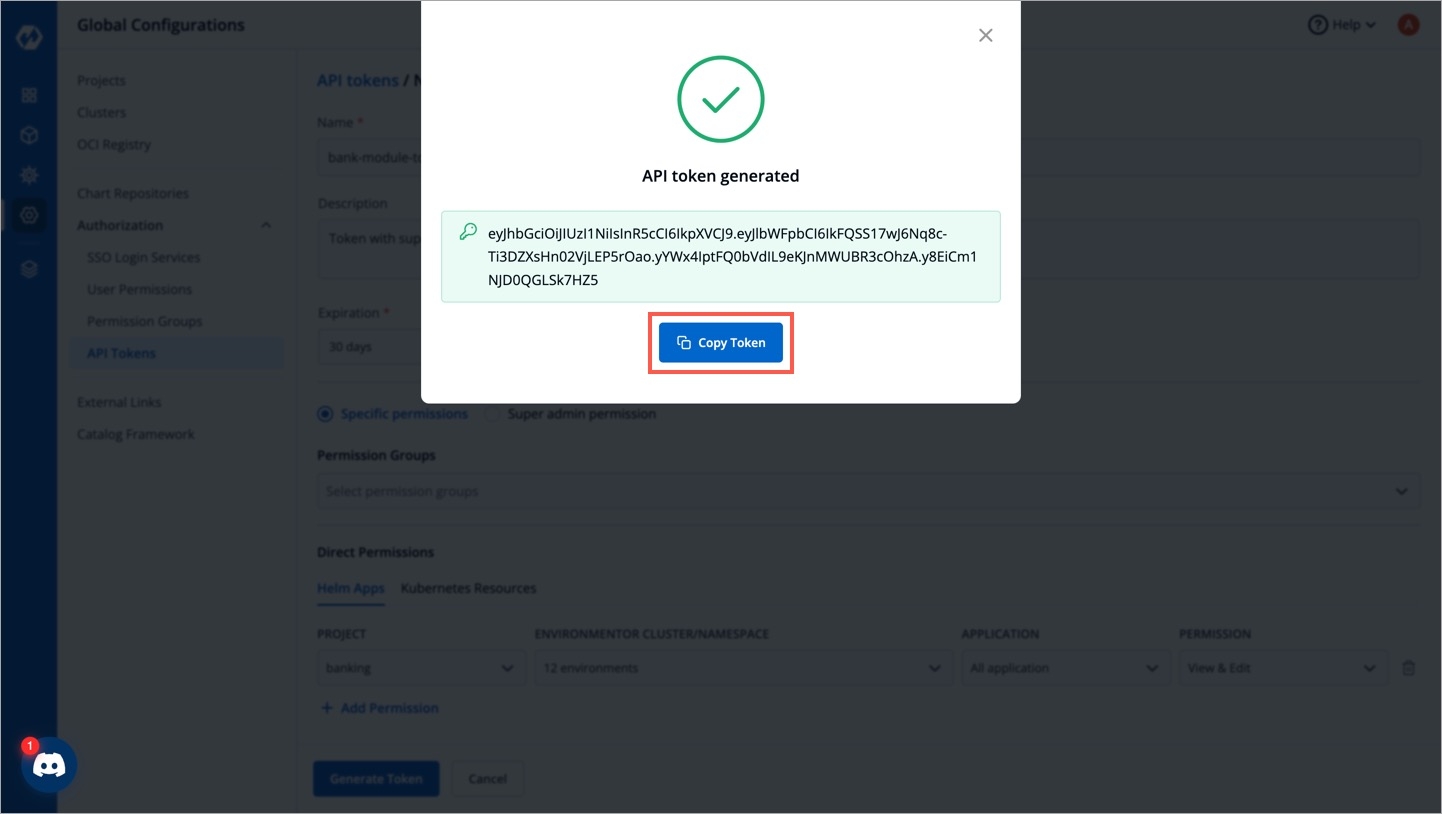
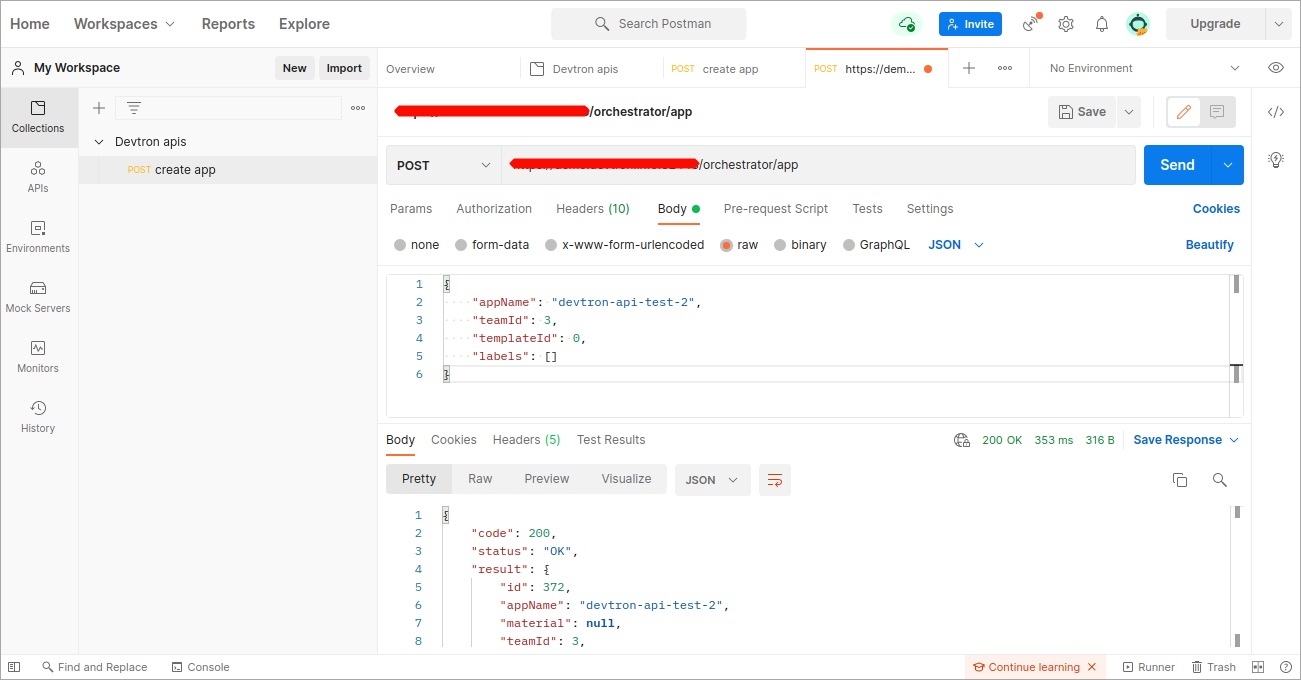
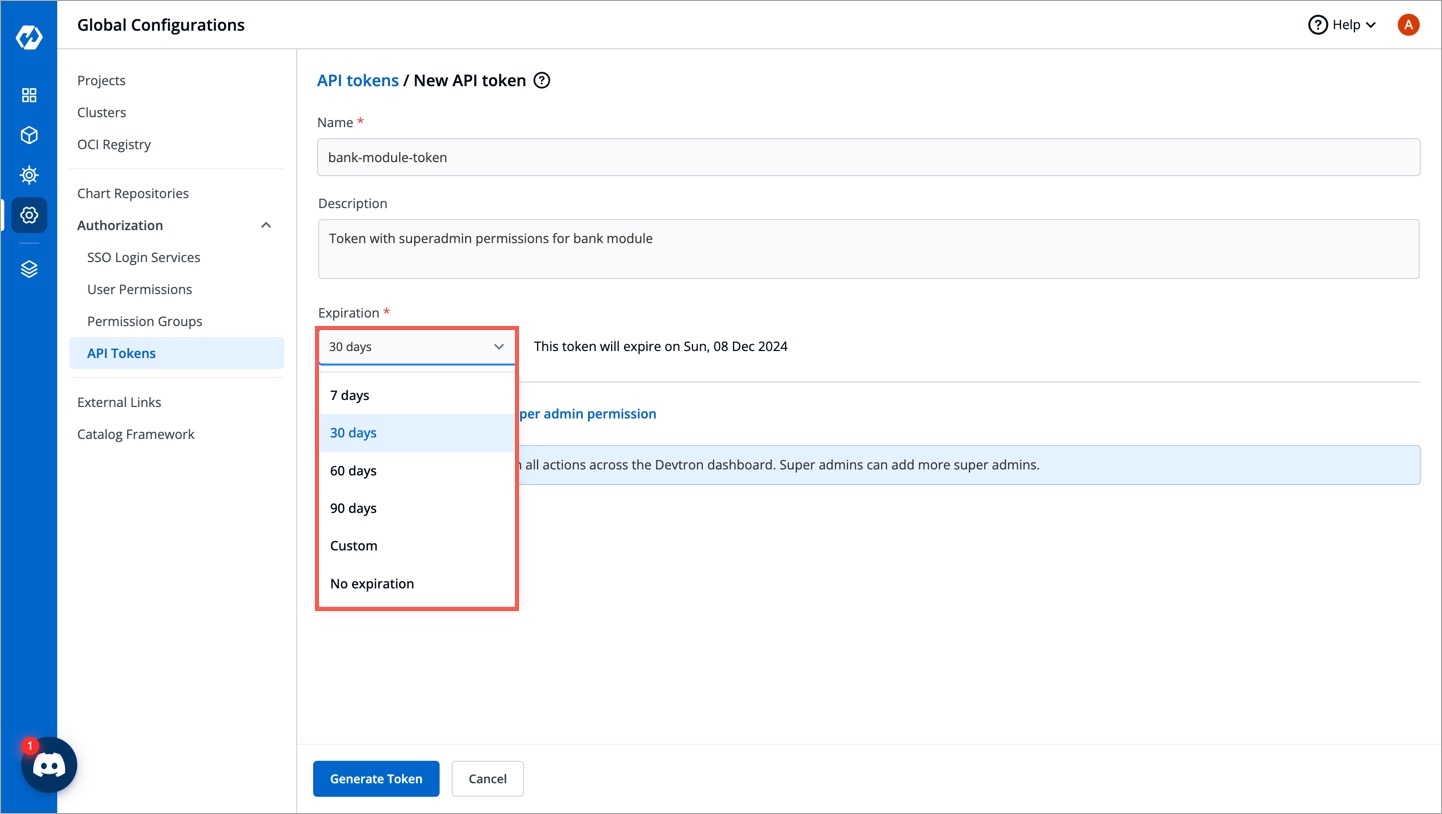

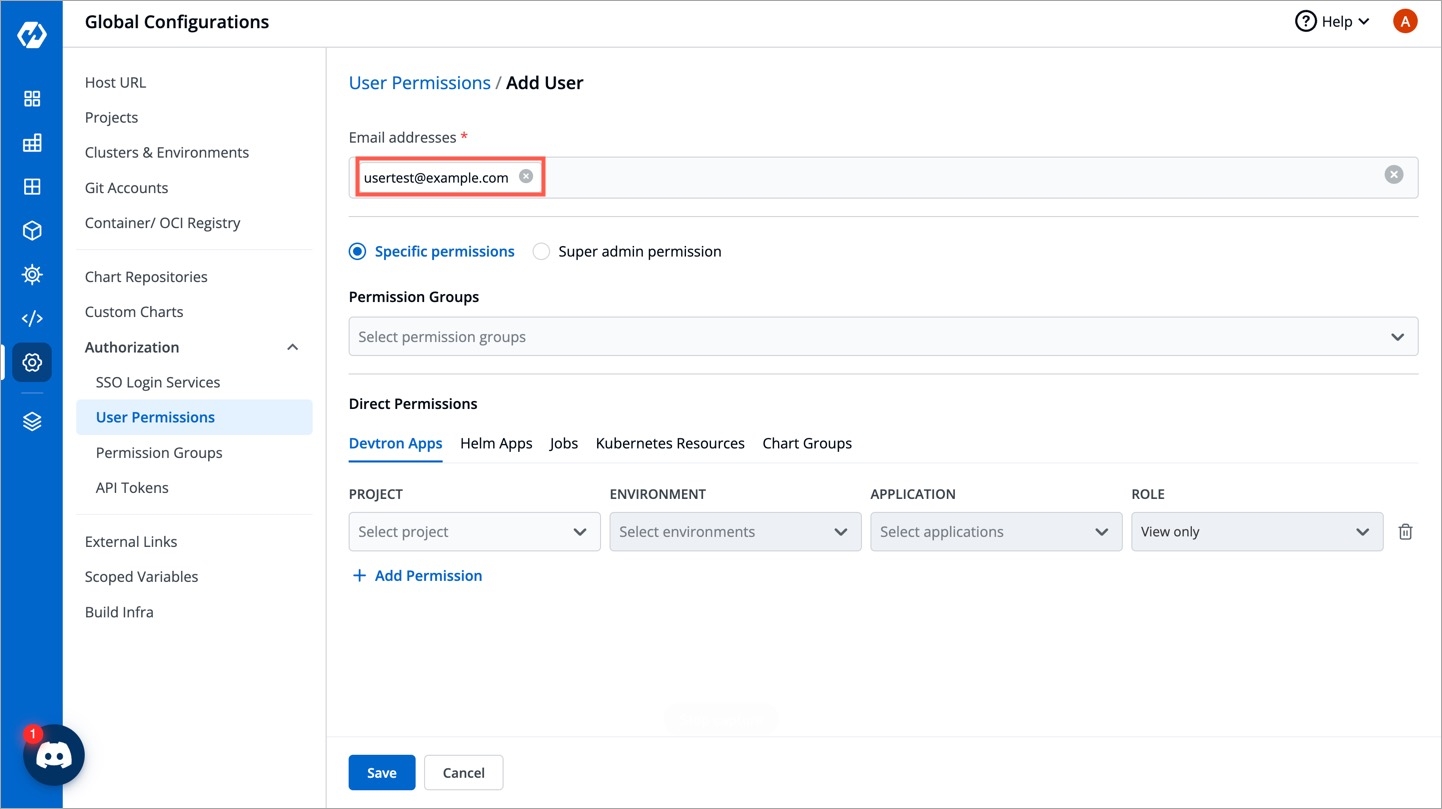
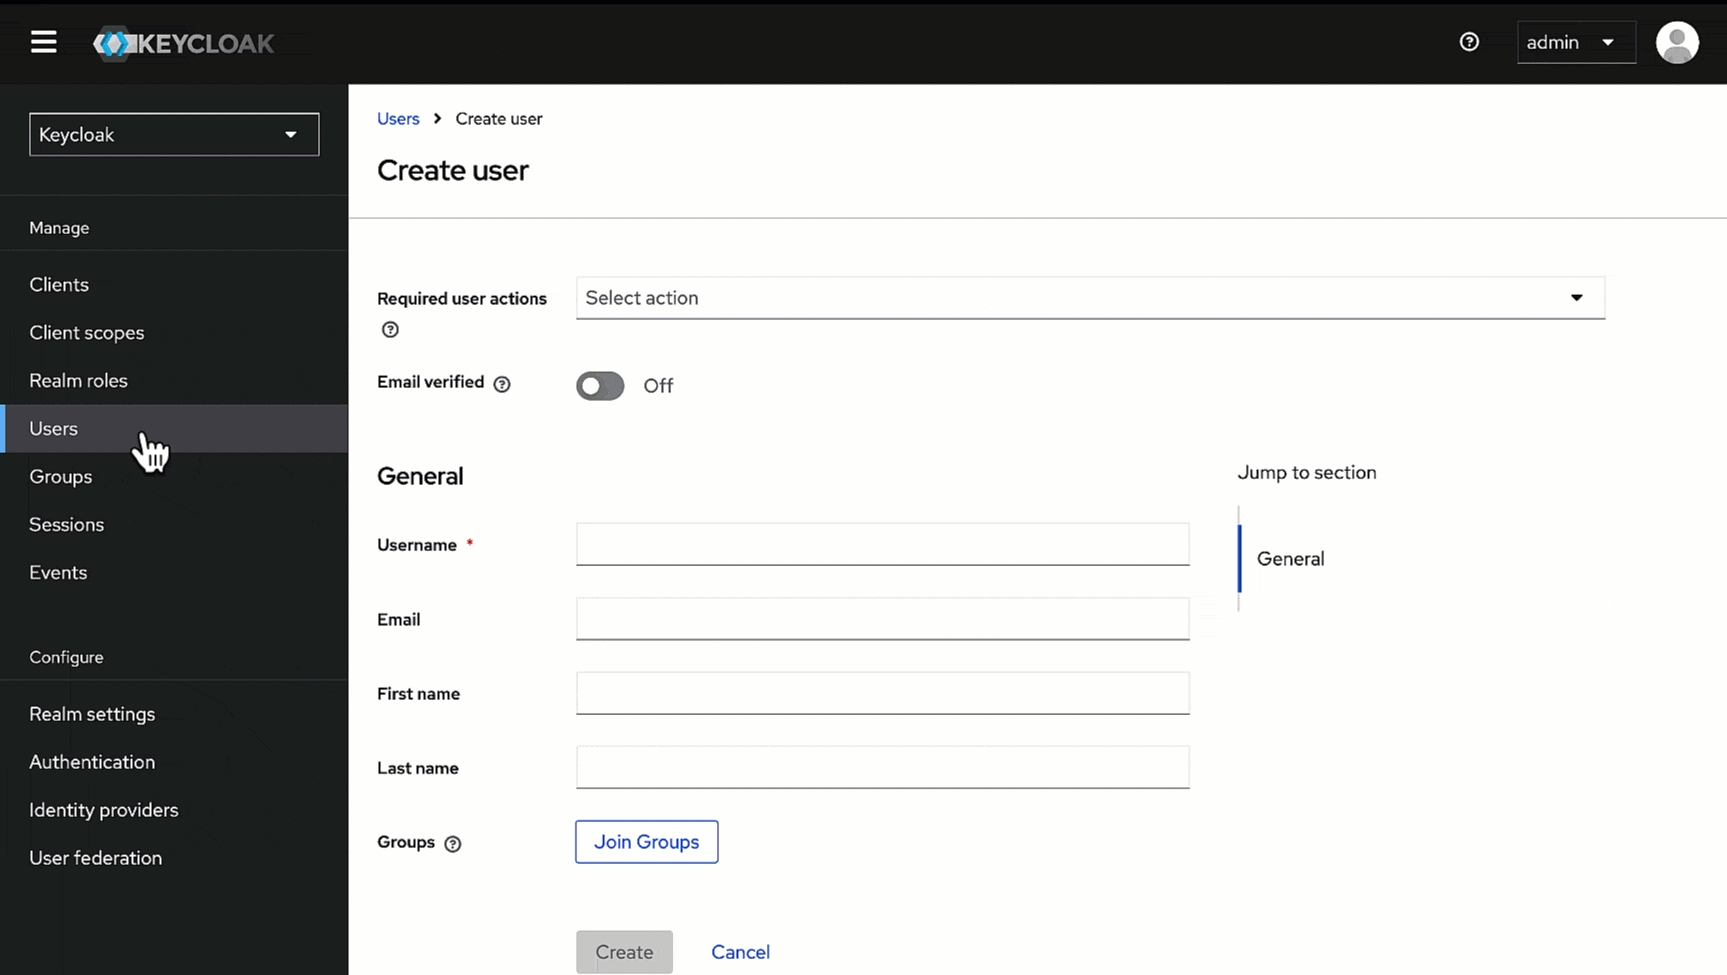
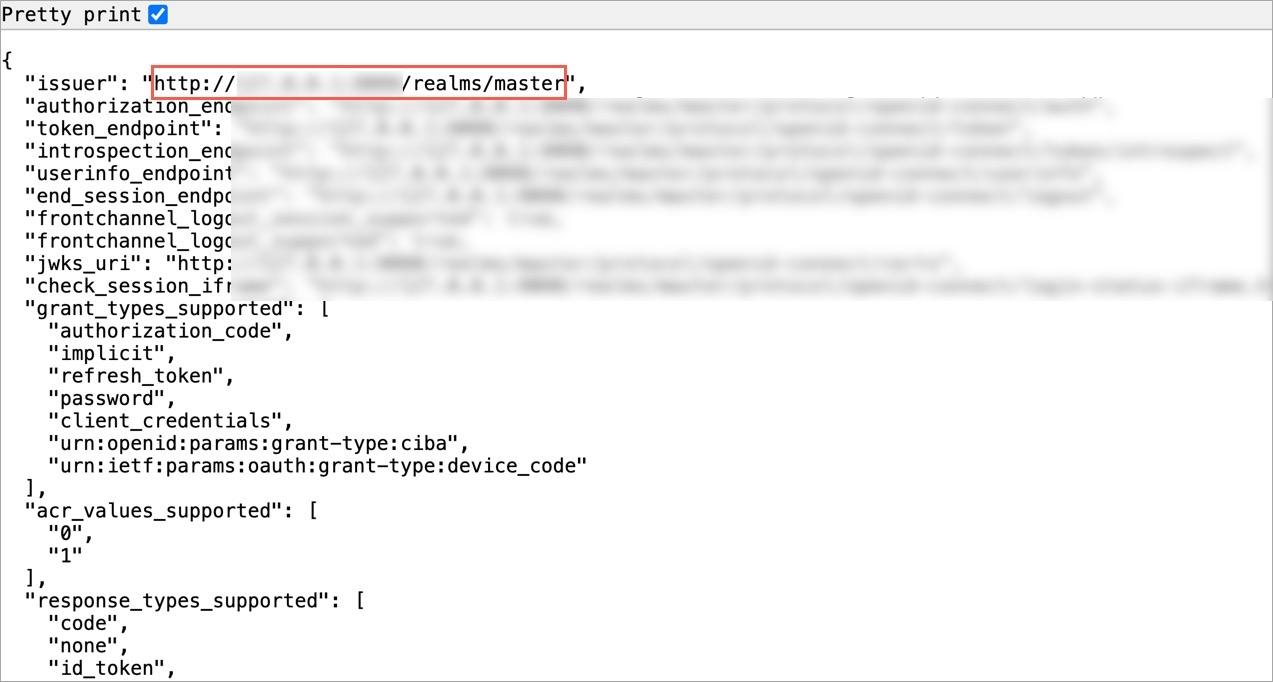
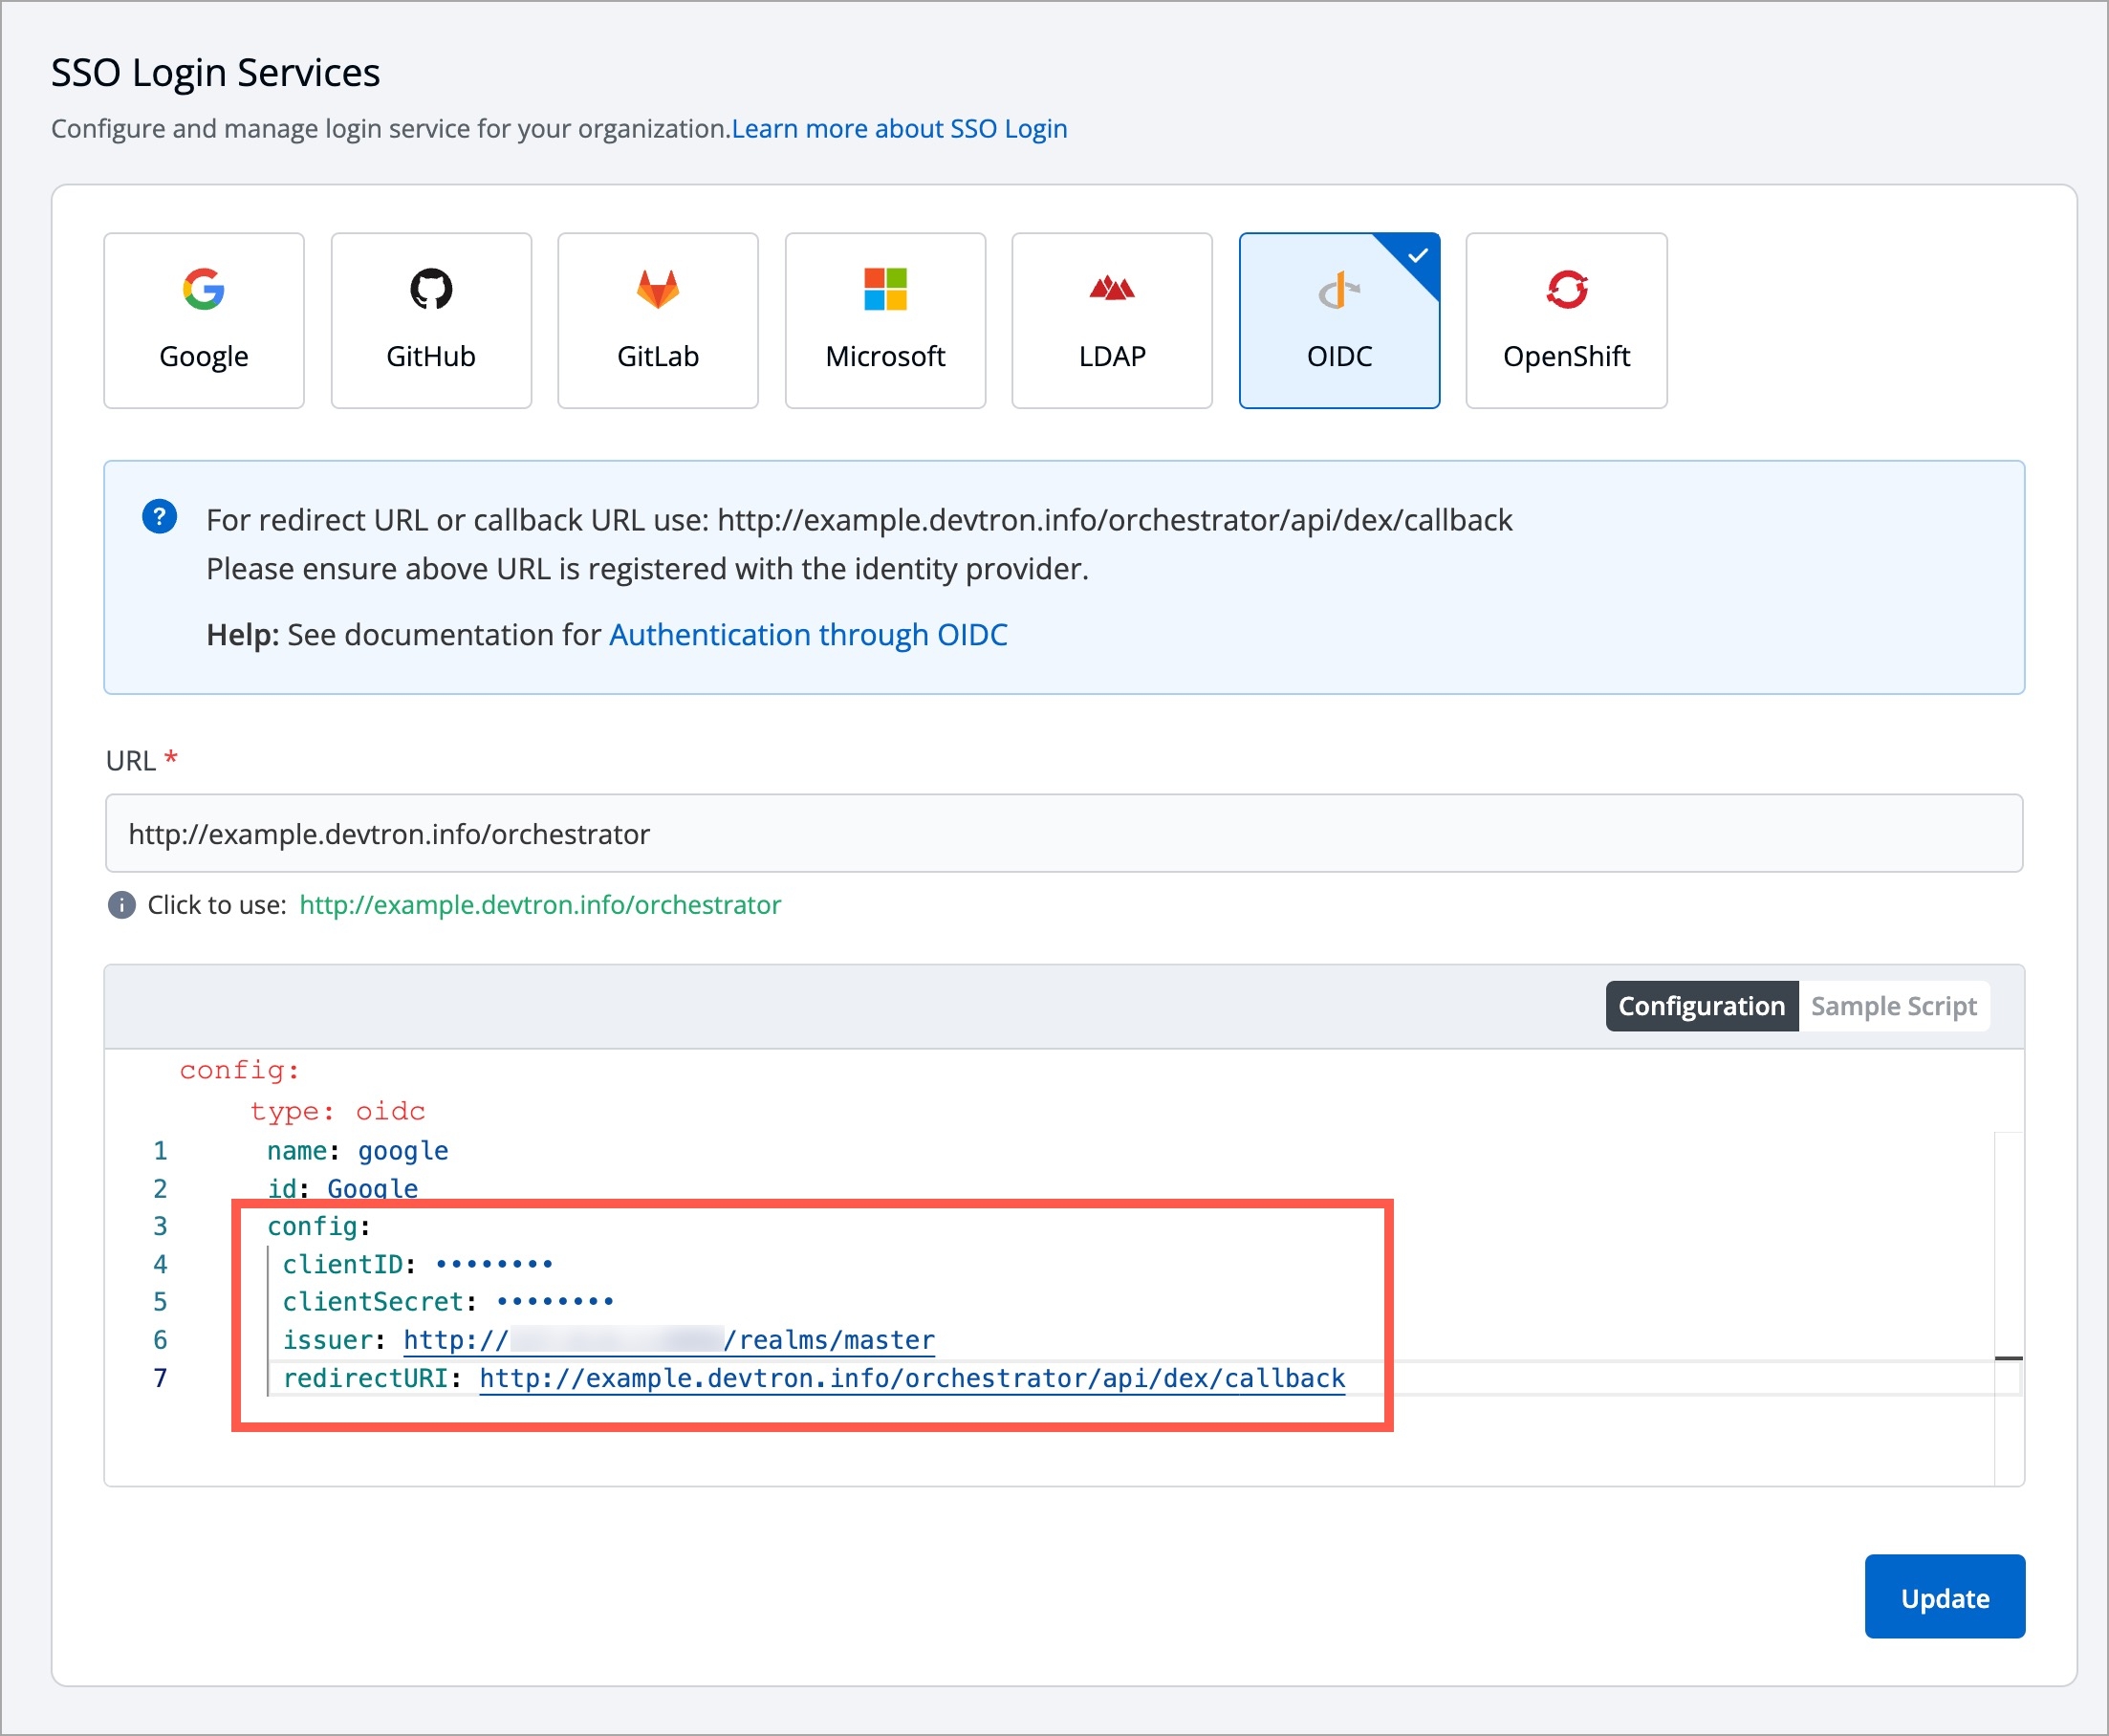


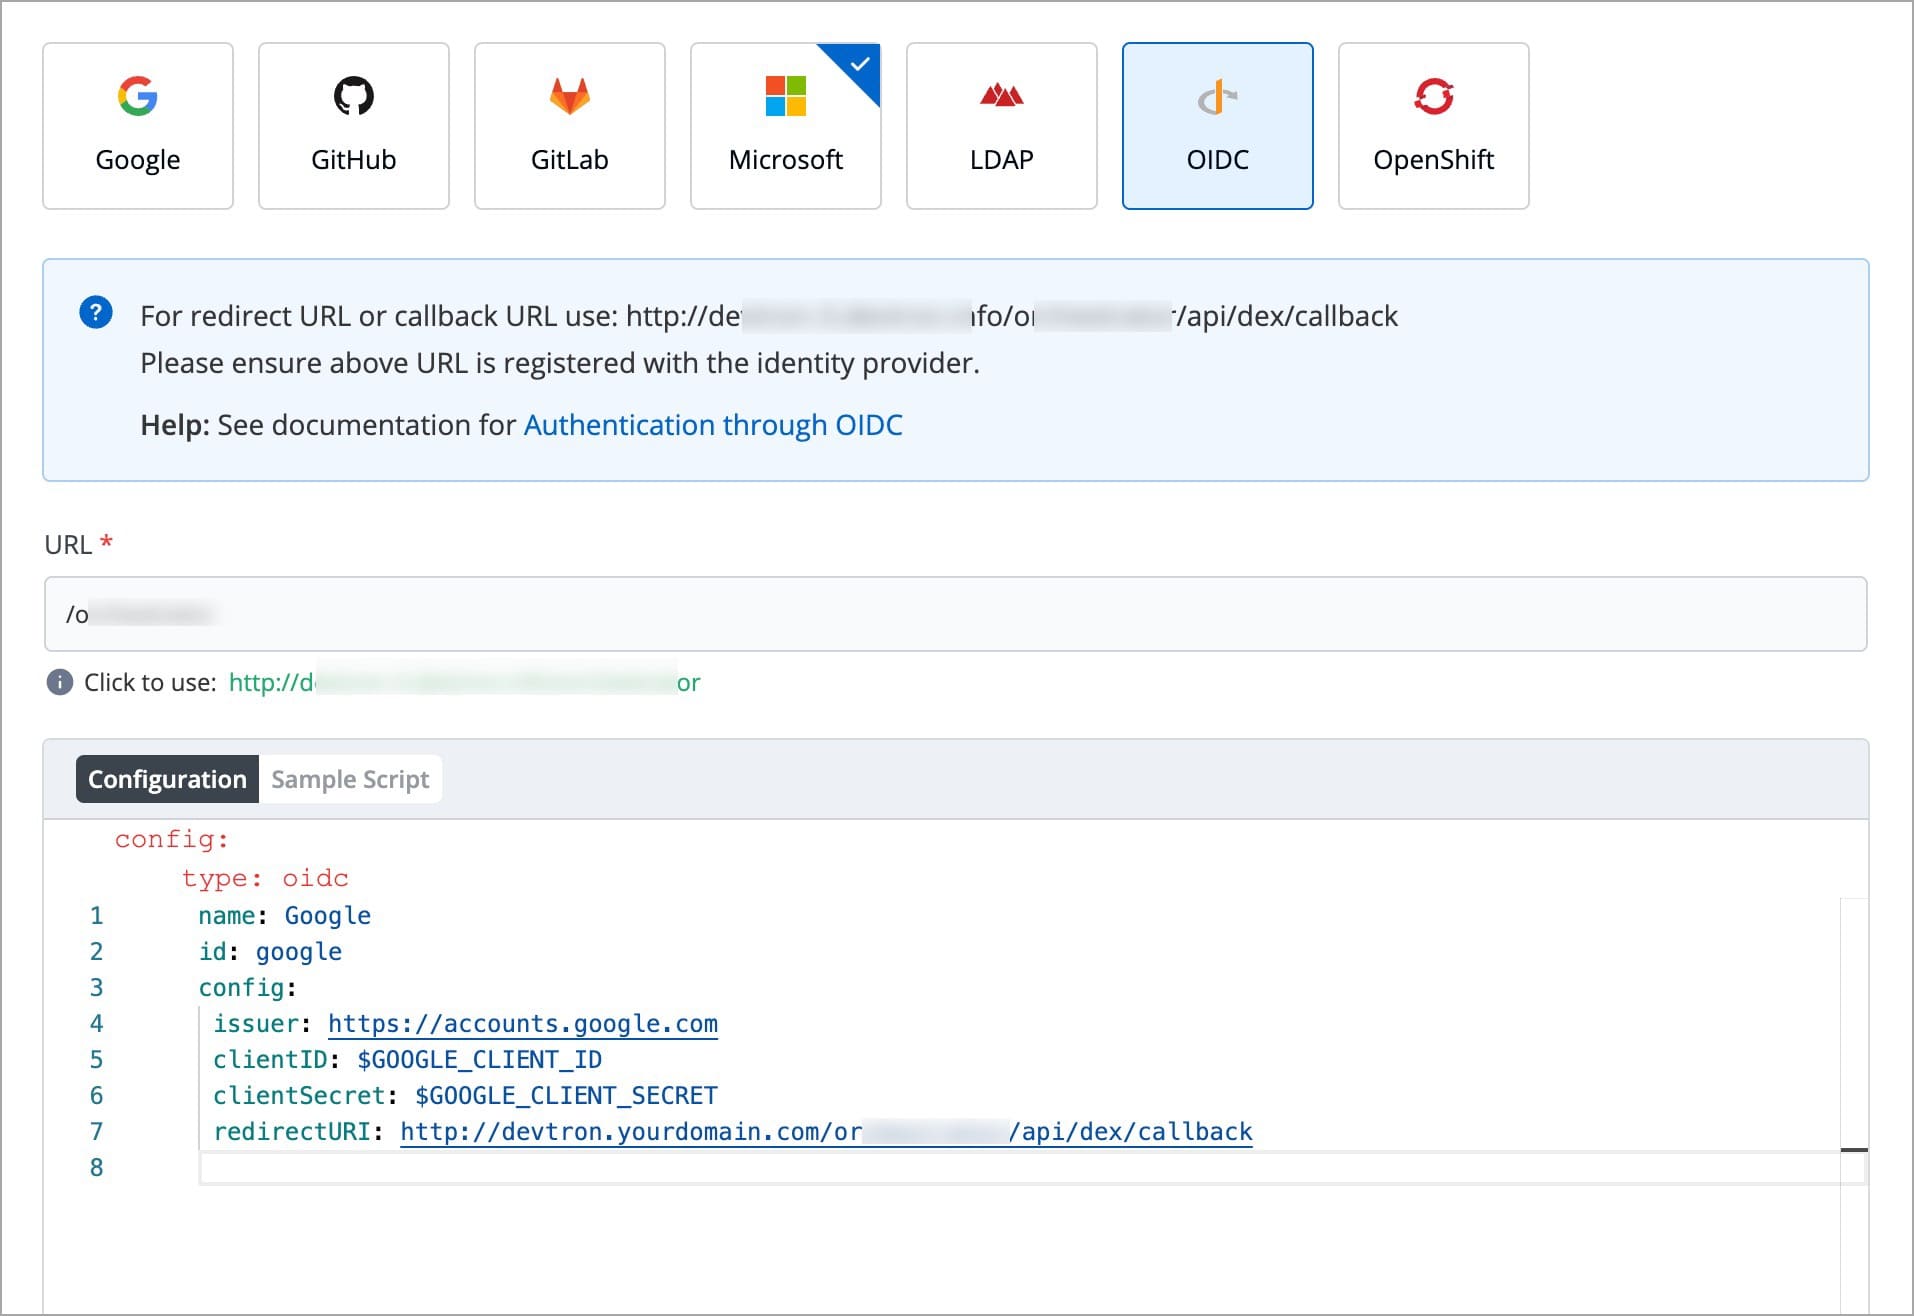
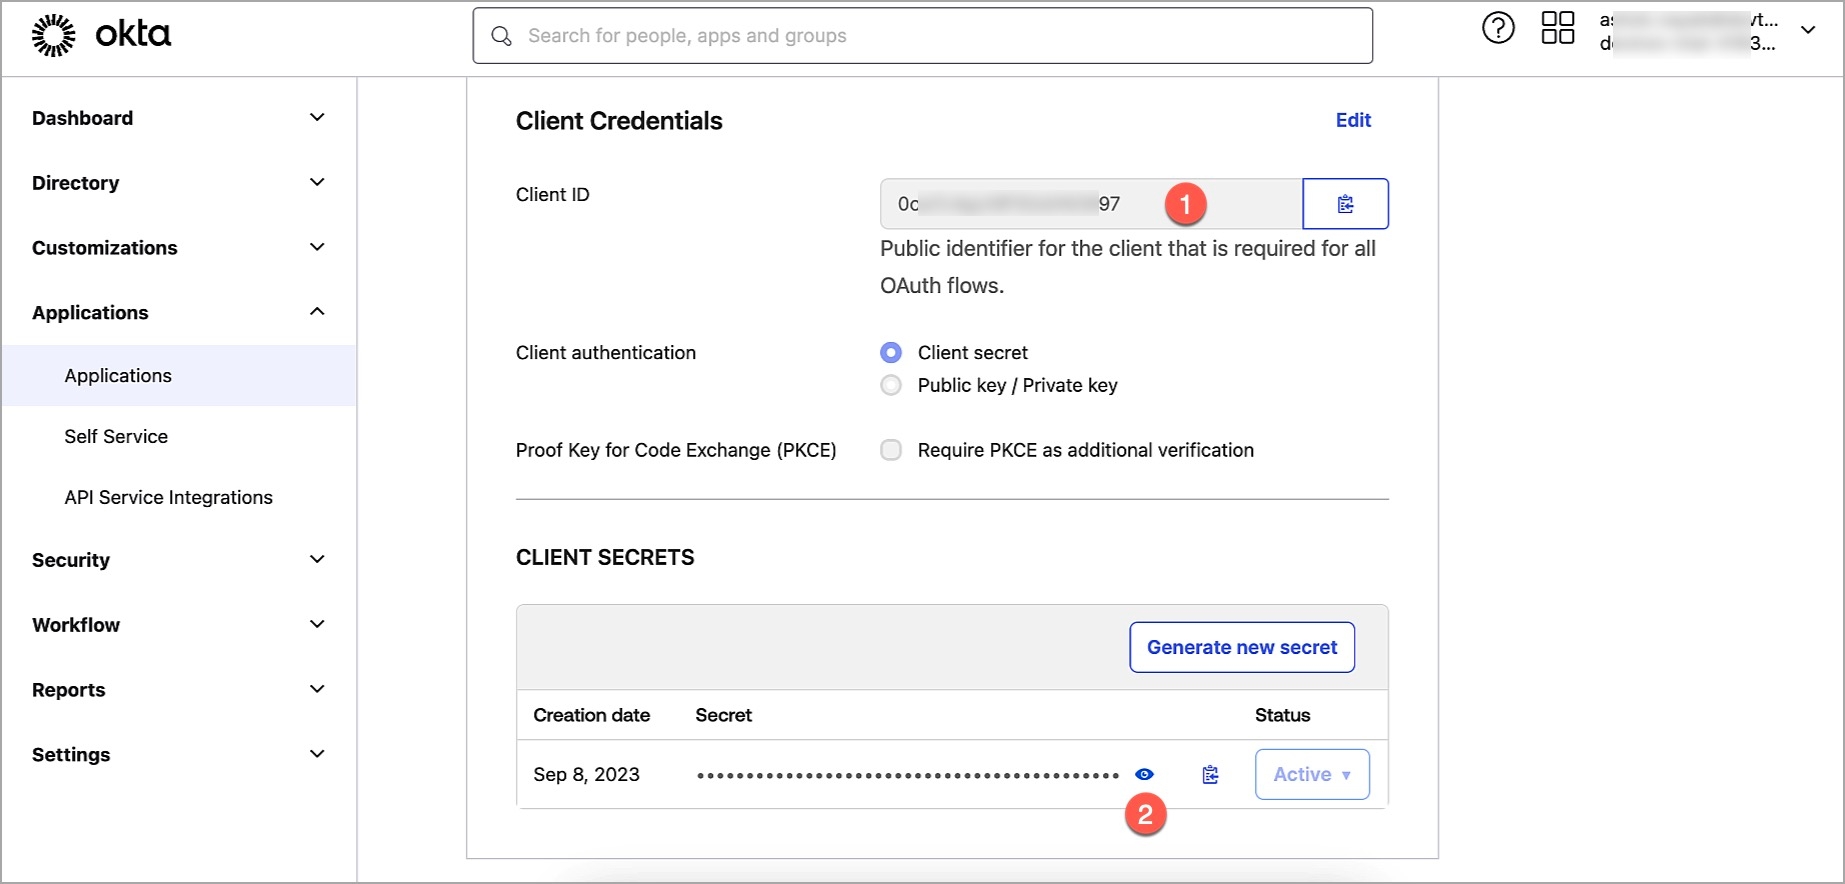
An immutable blob of data generated as an output after the execution of a job, build, or deployment process, e.g., container image, helm chart. In Devtron, you can view the artifacts in the Build History and Deployment History of your application. Whereas, job artifacts are visible in the Run history of your job.
Once a build is complete, you can view the build artifacts by going to Applications (choose your app) → Build History (tab) → (choose a pipeline and date of triggering the build) → Artifacts (tab).
Once a deployment is complete, you can view the deployment artifacts by going to Applications (choose your app) → Deployment History (tab) → (choose an environment and date of deployment) → Artifacts (tab).
Once a job is complete, you can view the job artifacts by going to Jobs → Run history (tab) → (choose a pipeline and date of triggering the build) → Artifacts (tab).
ArgoCD Apps are the micro-services deployed using a deployment tool named .
If ArgoCD applications are present in your cluster, they will appear in the .
A deployment template is a manifest of the application defining its runtime behavior. You can select one of the default deployment charts or custom deployment charts created by super-admin.
It’s a single entry point for you to enter the values, so that when the application is deployed your filled values go to the respective template files (YAML), and accordingly the resources would be created.
In Devtron, you get the option to select a base deployment template in the App Configuration tab at the time of creating an application.
For building a docker image we require a and a build context. The Dockerfile contains the instructions to build. Context is the path where the build process may refer for getting the files required for build.
To build files from the root, use (.) as the build context. Or to refer a subdirectory, enter the path in the format /myfolder or /myfolder/mysubfolder. If the path is not set, the default path will be the root directory of selected git repository.
Go to Applications (choose your app) → App Configuration (tab) → Build Configuration → (choose 'I have a Dockerfile') → Set Build Context.
A series of automated steps that transform source code into a deployable container image. In Devtron, you can create a build pipeline by going to Applications (choose your app) → App Configuration (tab) → Workflow Editor → New Workflow.
A place where all Helm charts are centrally listed for users to deploy applications on Kubernetes. In Devtron, the chart store is available in the left sidebar. You can view, configure, and deploy the existing charts or add new chart repositories too.
A cluster in Kubernetes refers to a set of connected computers (nodes) that collectively manage containerized applications using Kubernetes. It provides resources and services to run, manage, and scale applications.
In Devtron, you can view the list of clusters in 'Global Configurations' as well as 'Resource Browser'.
A unique identifier representing a specific version of source code in a Git . In Devtron, you can view the commit hash of the top 15 commits you pushed to your branch while selecting the git material under the Build & Deploy tab of your application.
Kubernetes objects used to store configuration data as key-value pairs. They allow separation of configuration from application code, making it easier to manage and update settings.
You can use different ConfigMaps for respective environments too.
It is a collection of repositories that store container images. It allows developers to store, share, and manage images used to deploy containers. In Devtron, you can add a container registry by going to Global Configurations → Container / OCI Registry. Your CI images are pushed to the container registry you configure. .
An OCI-compliant registry can also store artifacts (such as helm charts). Here, OCI stands for Open Container Initiative. It is an open industry standard for container formats and registries.
Temporarily marking a node as unschedulable, preventing new pods from being assigned to it. In Devtron, you can cordon a node by going to Resource Browser → (choose a cluster) → Nodes → (click on a node) → Cordon (available in blue).
CronJob is used to create Jobs on a repeating schedule. It is commonly used for running periodic tasks with no manual intervention. In Devtron, you can view a list of cronjobs by going to Resource Browser → (choose a cluster) → Workloads → CronJob.
A Custom Resource Definition (CRD) allows you to add custom resource types to Kubernetes, extending its capabilities to support configurations specific to your application. In Devtron, CRDs enable you to manage these custom resources alongside standard Kubernetes resources, making it easier to handle specialized application requirements within the platform.
Devtron offers a variety of ready-made Helm charts for common tasks and functions. If you have a specific need that isn't met by these preconfigured charts, super-admins have the permission to upload their own charts. Once uploaded, these charts become accessible for use by all users on the Devtron platform.
A Kubernetes object that ensures a specific pod runs on all or certain nodes within a cluster, often used for tasks such as logging or monitoring.
In Devtron, you can view a list of DaemonSets by going to Resource Browser → (choose a cluster) → Workloads → DaemonSet.
A defined approach for deploying updates or changes to applications. Devtron supports rolling updates, blue-green deployments, canary releases, and recreate strategy.
In Devtron, you can choose a deployment strategy by going to Applications (choose your app) → App Configuration (tab) → Workflow Editor → (edit deployment pipeline) → Deployment Strategy.
Your Kubernetes cluster gets mapped with Devtron when you save the cluster configurations. Now, the Devtron agent (rollout controller) must be installed from the chart store on the added cluster so that you can deploy your applications on that cluster.
Devtron Apps are the micro-services deployed using Kubernetes-native CI/CD with Devtron. To create one, go to Applications → Create (button) → Custom App.
A script that defines how to build a Docker . It includes instructions to assemble the image's base, dependencies, and application code. It's recommended that you include a Dockerfile with your source code.
However, in case you don't have a Dockerfile, Devtron helps you create one. Go to Applications (choose your app) → App Configuration (tab) → Build Configuration.
Evacuating pods from a node before cordoning it, ensuring that running pods are gracefully rescheduled on other nodes.
In Devtron, you can drain a node by going to Resource Browser → (choose a cluster) → Nodes → (click on a node) → Drain (available in blue).
You can deploy your application to one or more environments (e.g., development, testing, production). In Devtron, Environment = + . For a given application, you cannot have multiple CD pipelines for an environment. For e.g., if an application named 'test-app' is deployed on an environment named 'test-environment', you cannot create another deployment (CD) pipeline for the same app and environment.
Your application can have different deployment configurations for respective environments. For e.g., the number of could be 2 for staging environment, whereas it could be 5 for production.
Similarly, the CPU and memory resources can be different for each environment. This is possible through Environment Overrides.
You can add external links related to the application. For e.g., you can add Prometheus, Grafana, and many more to your application by going to Global Configurations → External Links.
FluxCD Apps are the micro-services deployed using a deployment tool named .
If FluxCD applications are present in your cluster, they will appear in the .
A methodology for managing and automating Kubernetes deployments using Git repositories as the source of truth. Changes to the desired state of the cluster are driven by Git commits.
Apps deployed using Helm Chart from the Chart Store section of Devtron. In Devtron, you can view such apps under a tab named Helm Apps in the Applications section. To create one, go to Applications → Create (button) → From Chart store.
Packages that contain pre-configured Kubernetes resources and configurations. Helm charts are used to define, install, and upgrade applications on Kubernetes clusters. Refer to know more.
A packaged and standalone software that contains the code and dependencies needed to run a containerized application. Using Devtron, you can build a container image of your application, push it to a container registry, and deploy it on your Kubernetes cluster.
Since images are platform-agnostic, you don't have to worry about compiling your application to work on different systems. With Devtron, you can enable automatic image builds and vulnerability scanning whenever you make edits to your source code.
You can also view the list of image builds while preparing your deployment in the Build & Deploy tab of your application (provided the CI stage is successful).
In Devtron, there is a job that is very similar to Kubernetes job. A Kubernetes job is an object used to create one or more pods to complete a specific task or job and then terminate.
If you are a super-admin in Devtron, you can view Jobs in the sidebar.
Distributes incoming network traffic across multiple instances or nodes to ensure efficient resource utilization and improved performance. In Kubernetes, Load Balancer is a service type. Behind the scenes, the managed Kubernetes service connects to the load balancer service of the respective cloud service provider and creates a load balancer, mapping it to the Kubernetes service.
GKE and AKS provide the public IP of the Load Balancer as the service endpoint, while in the case of EKS, it provides a non-customizable DNS name.
A manifest is a YAML file that describes each component or resource of your Kubernetes object and the state you want your cluster to be in once applied. A manifest specifies the desired state of an object that Kubernetes will maintain when you apply the manifest.
In Devtron, you can view the manifest of K8s resources under App Details and also under Resource Browser.
In Git Repo, the source code of your application in a given commit is referred as material. The option to choose a Git material will be available in the CI stage under the Build & Deploy tab of your application.
A namespace is a way to organize and isolate resources within a Kubernetes cluster. It provides a logical separation between different applications or environments within a cluster.
In Devtron, you can view a list of namespaces by going to Resource Browser → (choose a cluster) → Namespaces.
A setting applied to a node that influences the scheduling of pods. Taints can restrict which pods are allowed to run on the node.
In Devtron, you can edit the taints of a node by going to Resource Browser → (choose a cluster) → Nodes → (click on a node) → Edit taints (available in blue).
A Kubernetes service type that exposes a port on each node in the cluster, making a service accessible externally.
The physical or virtual machines that make up a Kubernetes cluster, where containers are scheduled to run.
In Devtron, you can view nodes by going to Resource Browser → (choose a cluster) → Nodes.
Kubernetes objects are the building blocks that define and manage your applications running on the platform. They are also known as 'Resources' or 'Kinds'. This includes nodes, pods, deployment, cronjob, configmap, and many more.
Devtron's helps you manage all such objects present in your clusters.
The smallest deployable unit in Kubernetes, consisting of one or more containers that share storage and network resources within the same context.
In Devtron, you can view a list of Pods by going to Resource Browser → (choose a cluster) → Workloads → Pod. In Devtron, you can create a pod by going to Resource Browser → Create Resource (button).
Actions or processes performed before the actual image-building process in a containerized application's deployment pipeline, e.g., Jira Issue Validator.
In Devtron, you can configure pre-build actions by going to Applications (choose your app) → App Configuration (tab) → Workflow Editor → (edit build pipeline) → Pre-build stage (tab) → Add task (button).
Actions or processes performed after the building process in a containerized application's deployment pipeline, e.g., email notification about build status.
In Devtron, you can configure post-build actions by going to Applications (choose your app) → App Configuration (tab) → Workflow Editor → (edit build pipeline) → Post-build stage (tab) → Add task (button).
Steps, scripts, or configurations executed before deploying a new version of an application to a Kubernetes cluster.
In Devtron, you can configure pre-deployment actions by going to Applications (choose your app) → App Configuration (tab) → Workflow Editor → (edit deployment pipeline) → Pre-deployment stage (tab) → Add task (button).
Actions, checks, or processes carried out after a new version of an application is successfully deployed to a Kubernetes cluster, e.g., Jira Issue Updater.
In Devtron, you can configure post-deployment actions by going to Applications (choose your app) → App Configuration (tab) → Workflow Editor → (edit deployment pipeline) → Post-deployment stage (tab) → Add task (button).
A Kubernetes object responsible for maintaining a specified number of replica pods, ensuring high availability and desired scaling.
In Devtron, you can view the deployed ReplicaSet by going to Applications (choose your app) → App Details (tab) → K8s Resources (under Application Metrics section).
Abbreviation for "repository". It could either signify a Git repo, container repo, or helm repo.
Git repo - A version control system (like Git) that stores and manages source code and other project assets. Once you create a git repo, you can add it in Applications (choose your app) → App Configuration (tab) → Git Repository → Add Git Repository.
Container repo - A collection of , e.g., Docker repository.
Helm repo - Also known as chart repo. You can add it in Global Configurations.
The process of reverting a deployment to a previously known working version in case of errors or issues with the current version.
In Devtron, you can rollback a deployment by going to Applications (choose your app) → Build & Deploy (tab) → (click the rollback icon in the deployment pipeline).
Kubernetes objects used to store sensitive information, such as passwords and API keys. Secrets are encoded and can be mounted as files or environment variables in pods.
In Devtron, you get the option to add secrets in the App Configuration tab of your application. You can use different secrets for respective environments too.
A Kubernetes resource configuration that defines security settings and permissions for pods and containers. A security context defines privilege and access control settings for a pod or container.
A Kubernetes object designed for managing stateful applications, maintaining stable network identities and storage across pod rescheduling.
In Devtron, view the list of StatefulSets by going to Resource Browser → (choose a cluster) → Workloads → StatefulSet.
The operating system and architecture for which the will be built, e.g., ubuntu/arm64, linux/amd64. The image will only be compatible to run only on the target platform chosen in the build configuration.
In Devtron, you can choose the target platform by going to Applications (choose your app) → App Configuration (tab) → Build Configuration → (create build pipeline) → (click Allow Override button) → Target platform for the build (section).
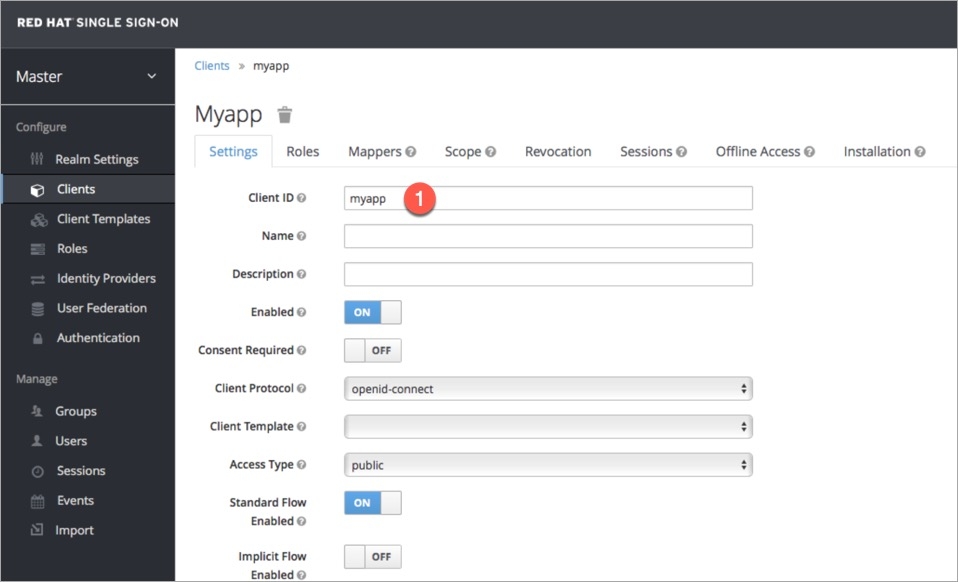
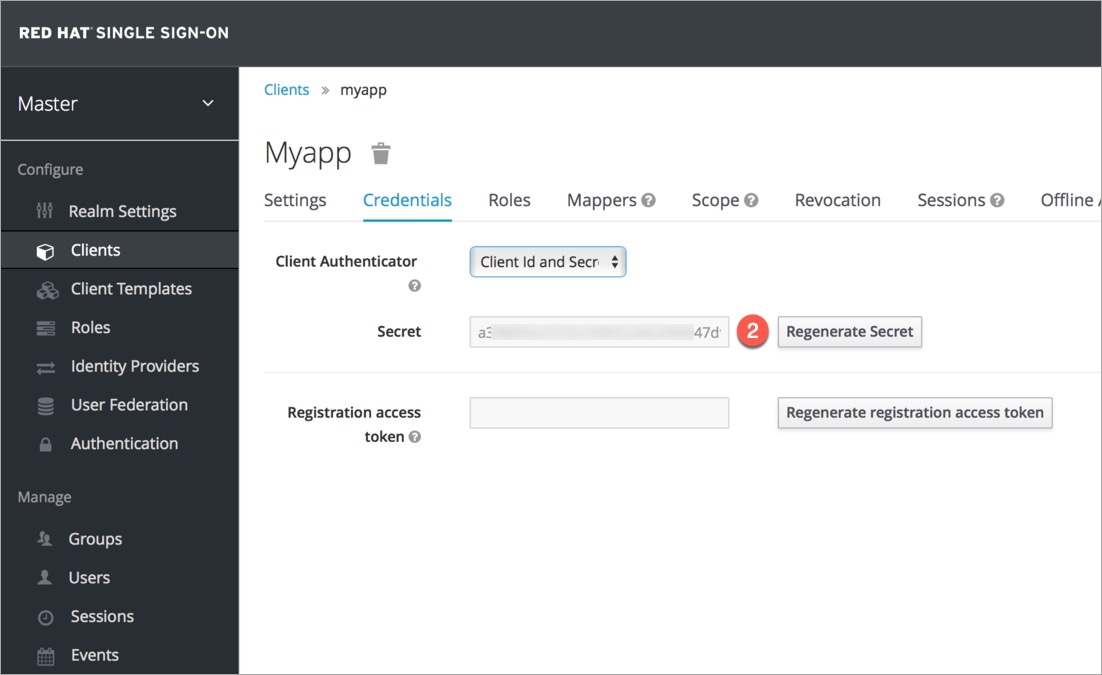

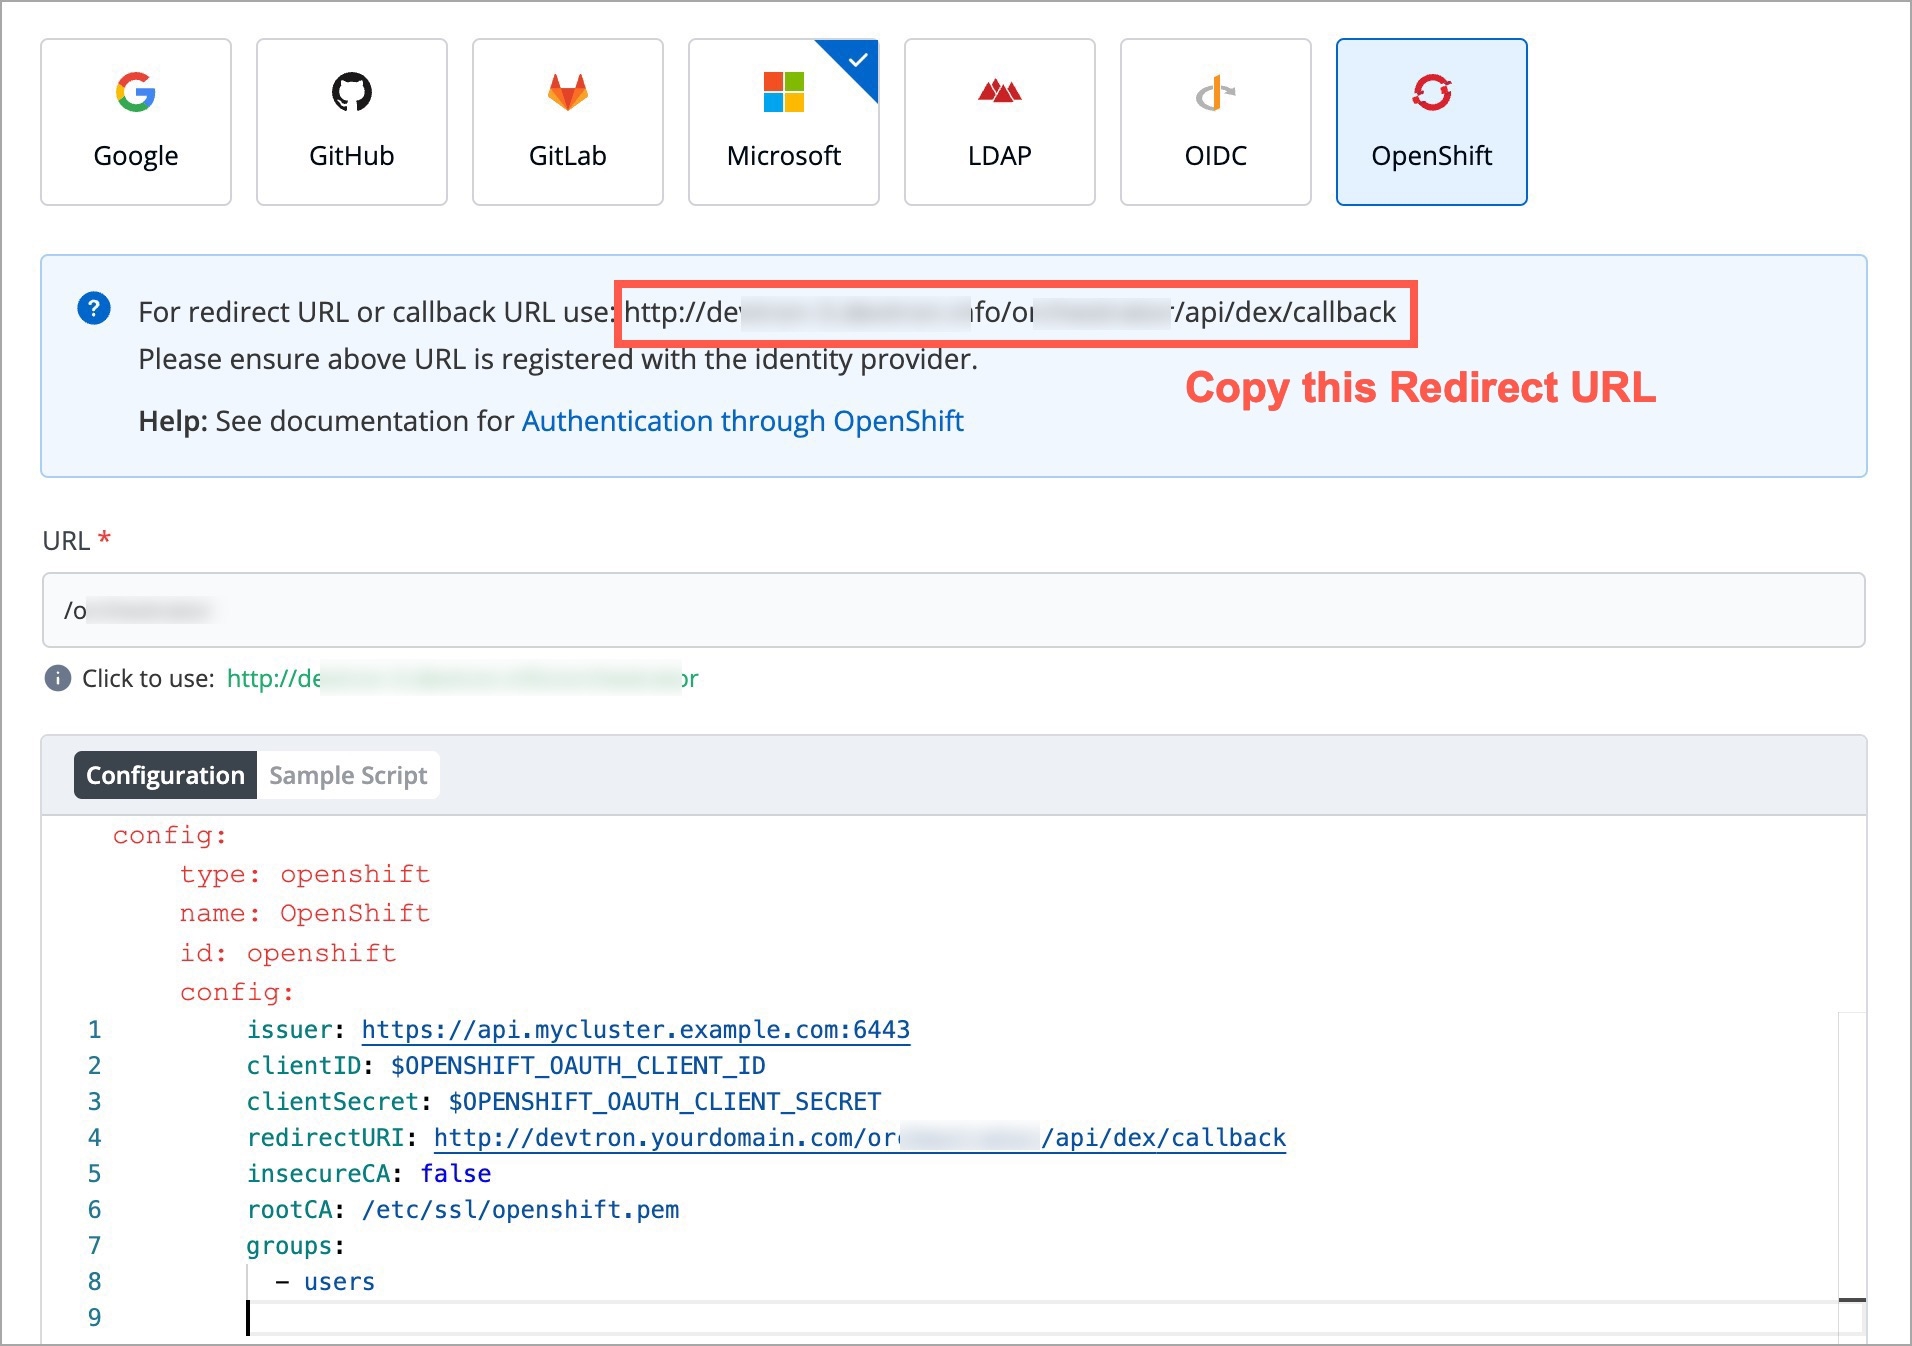

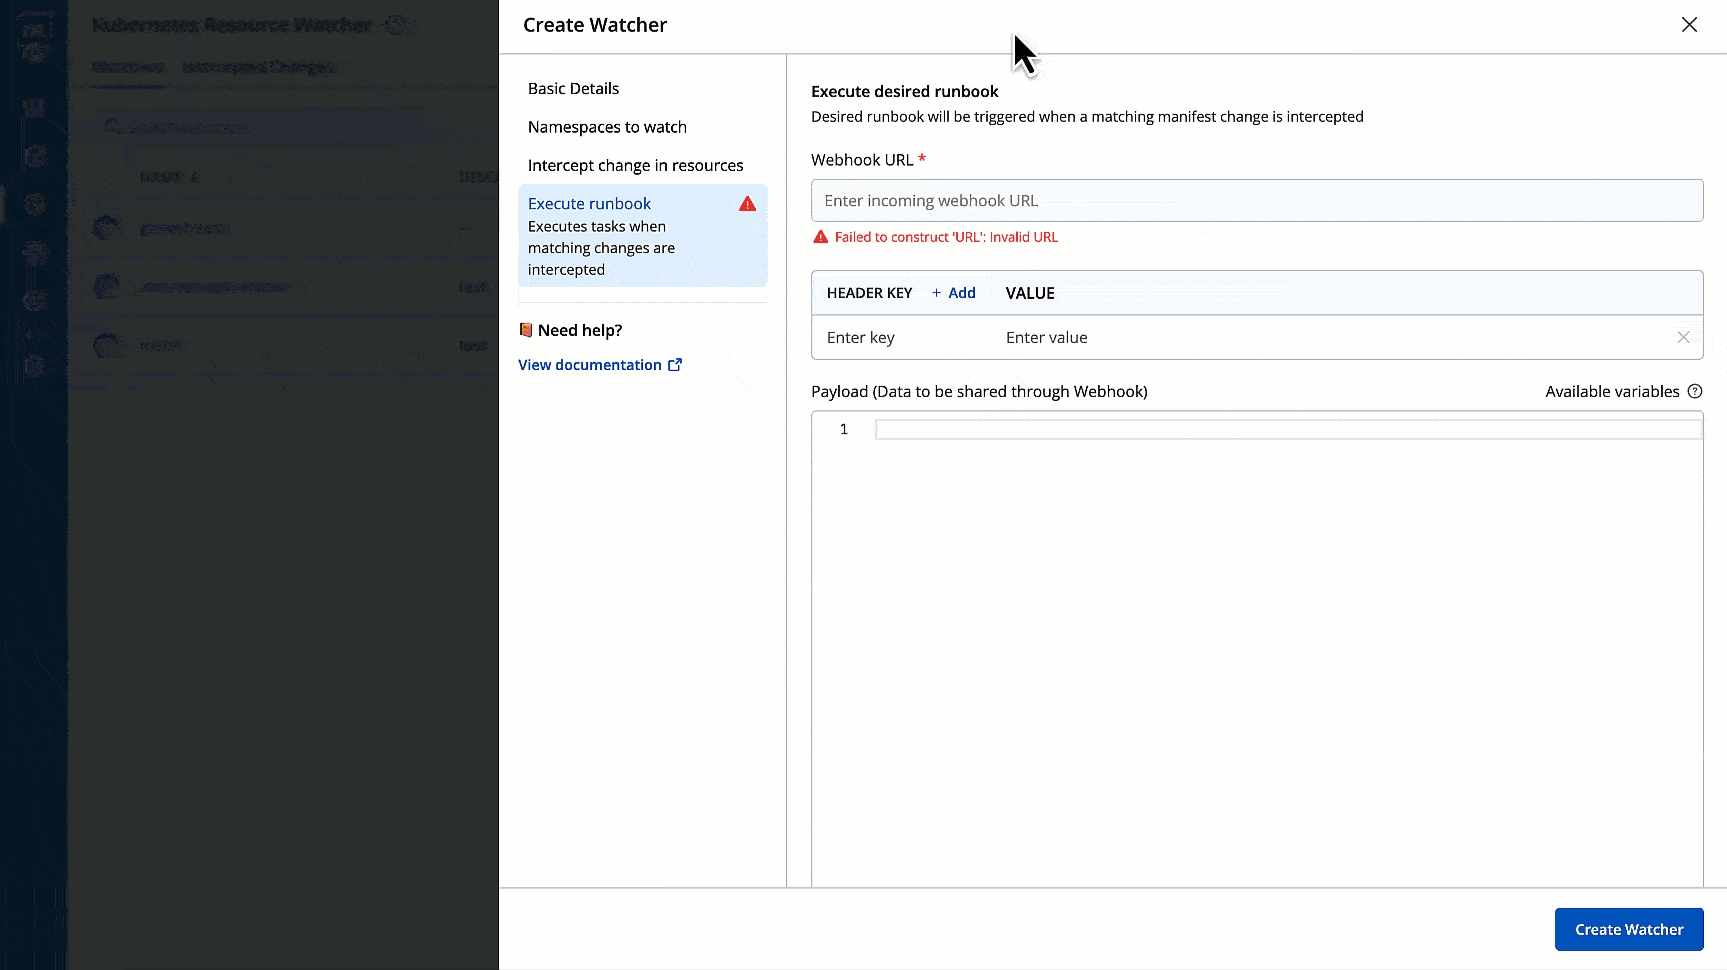
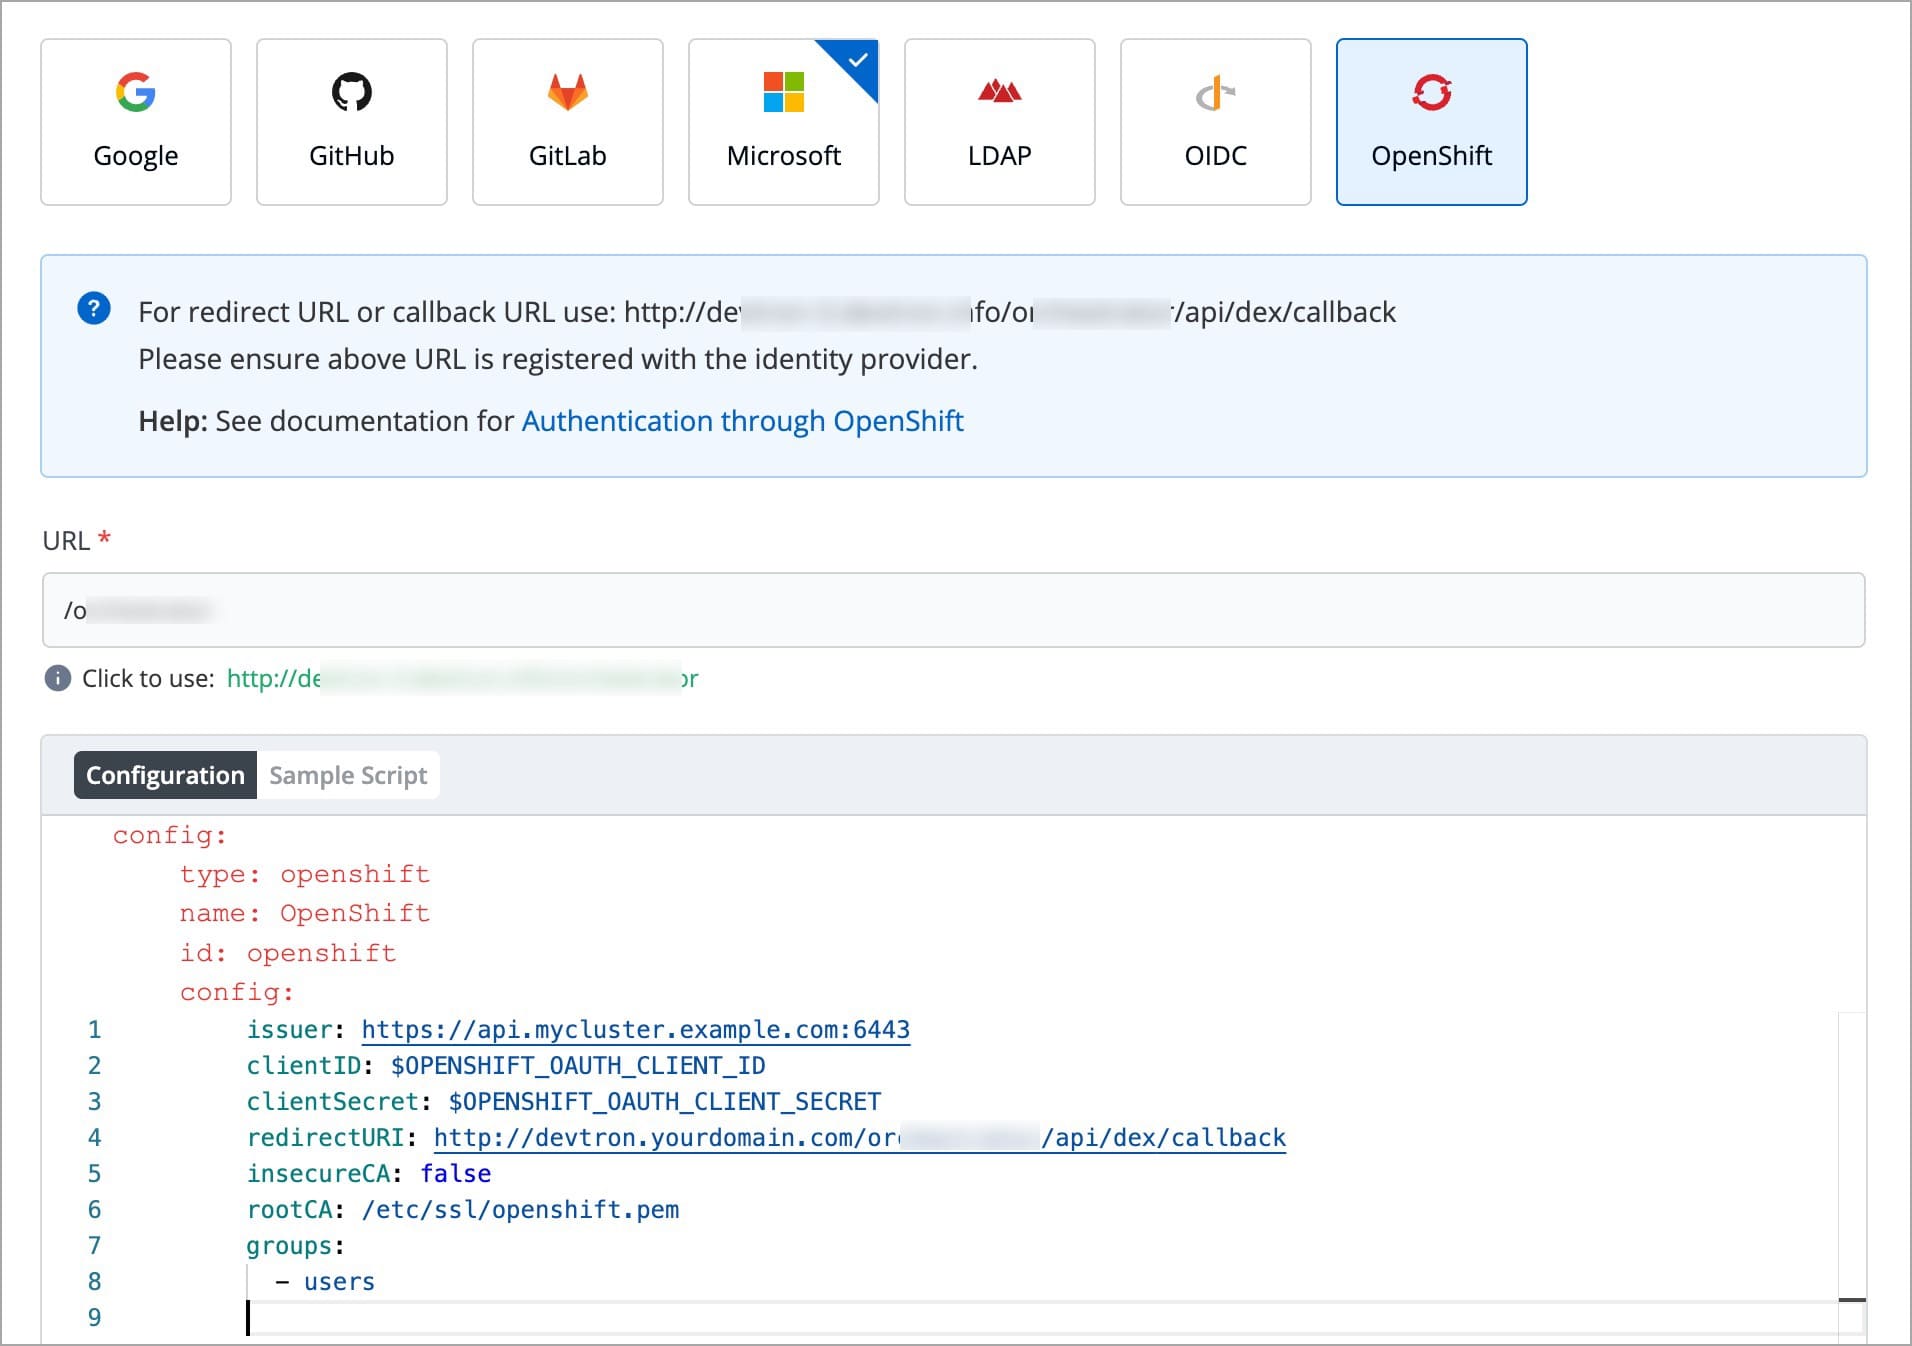
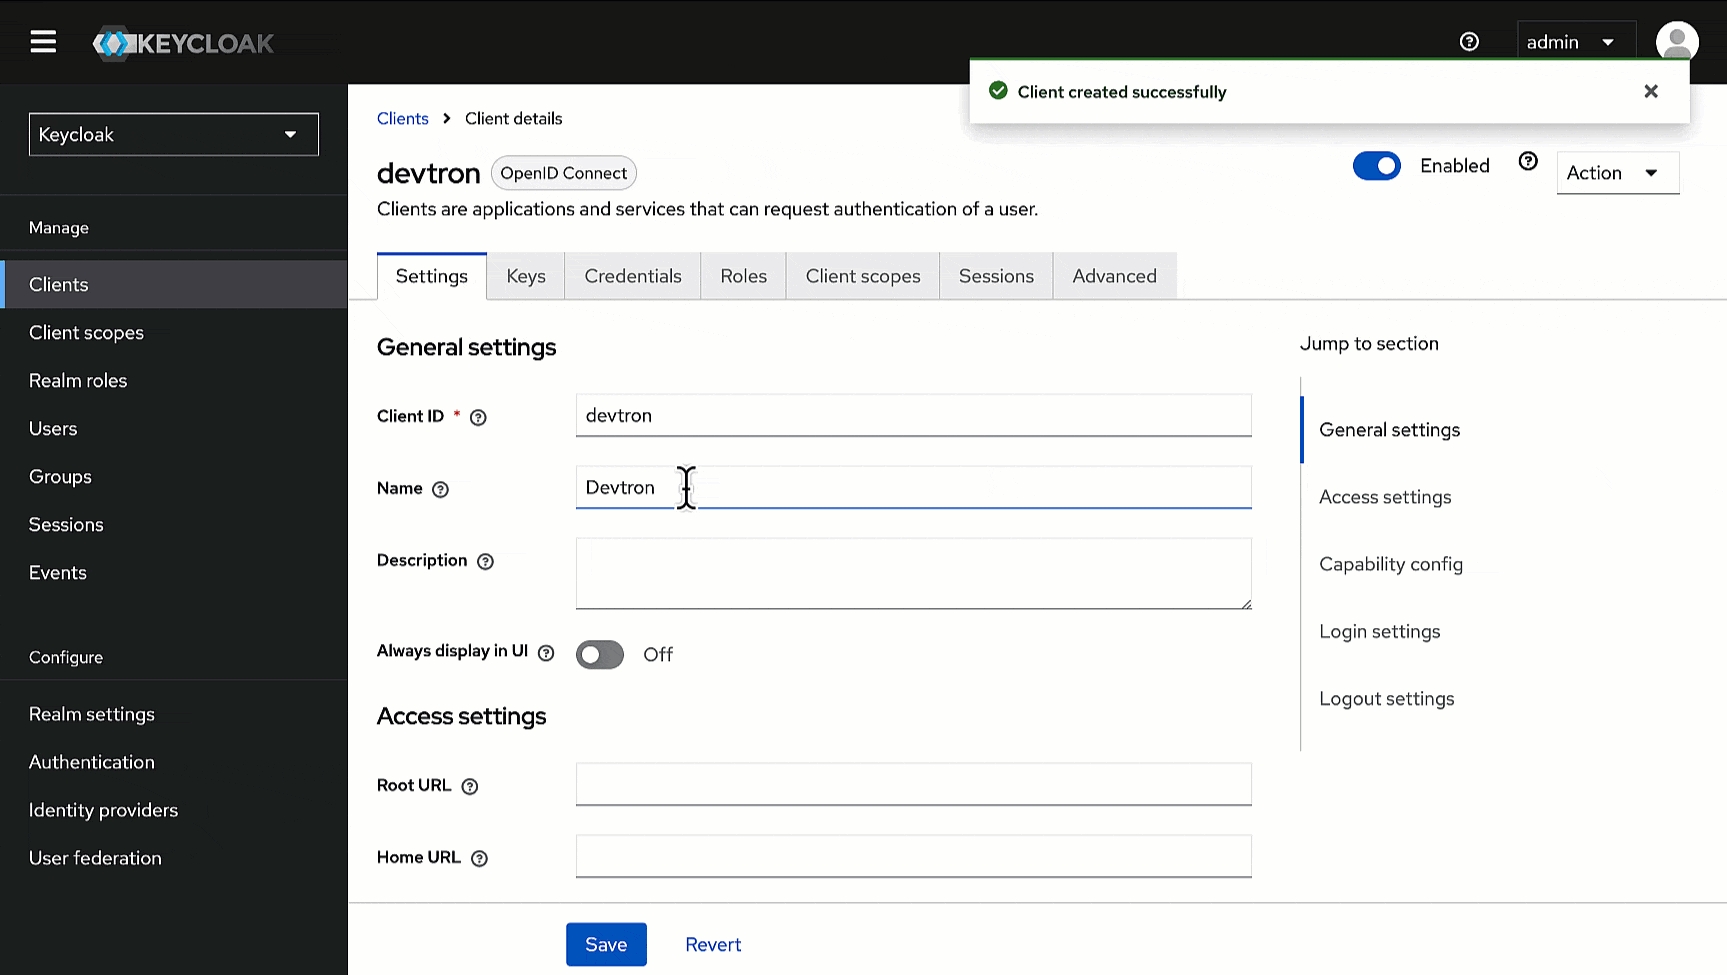
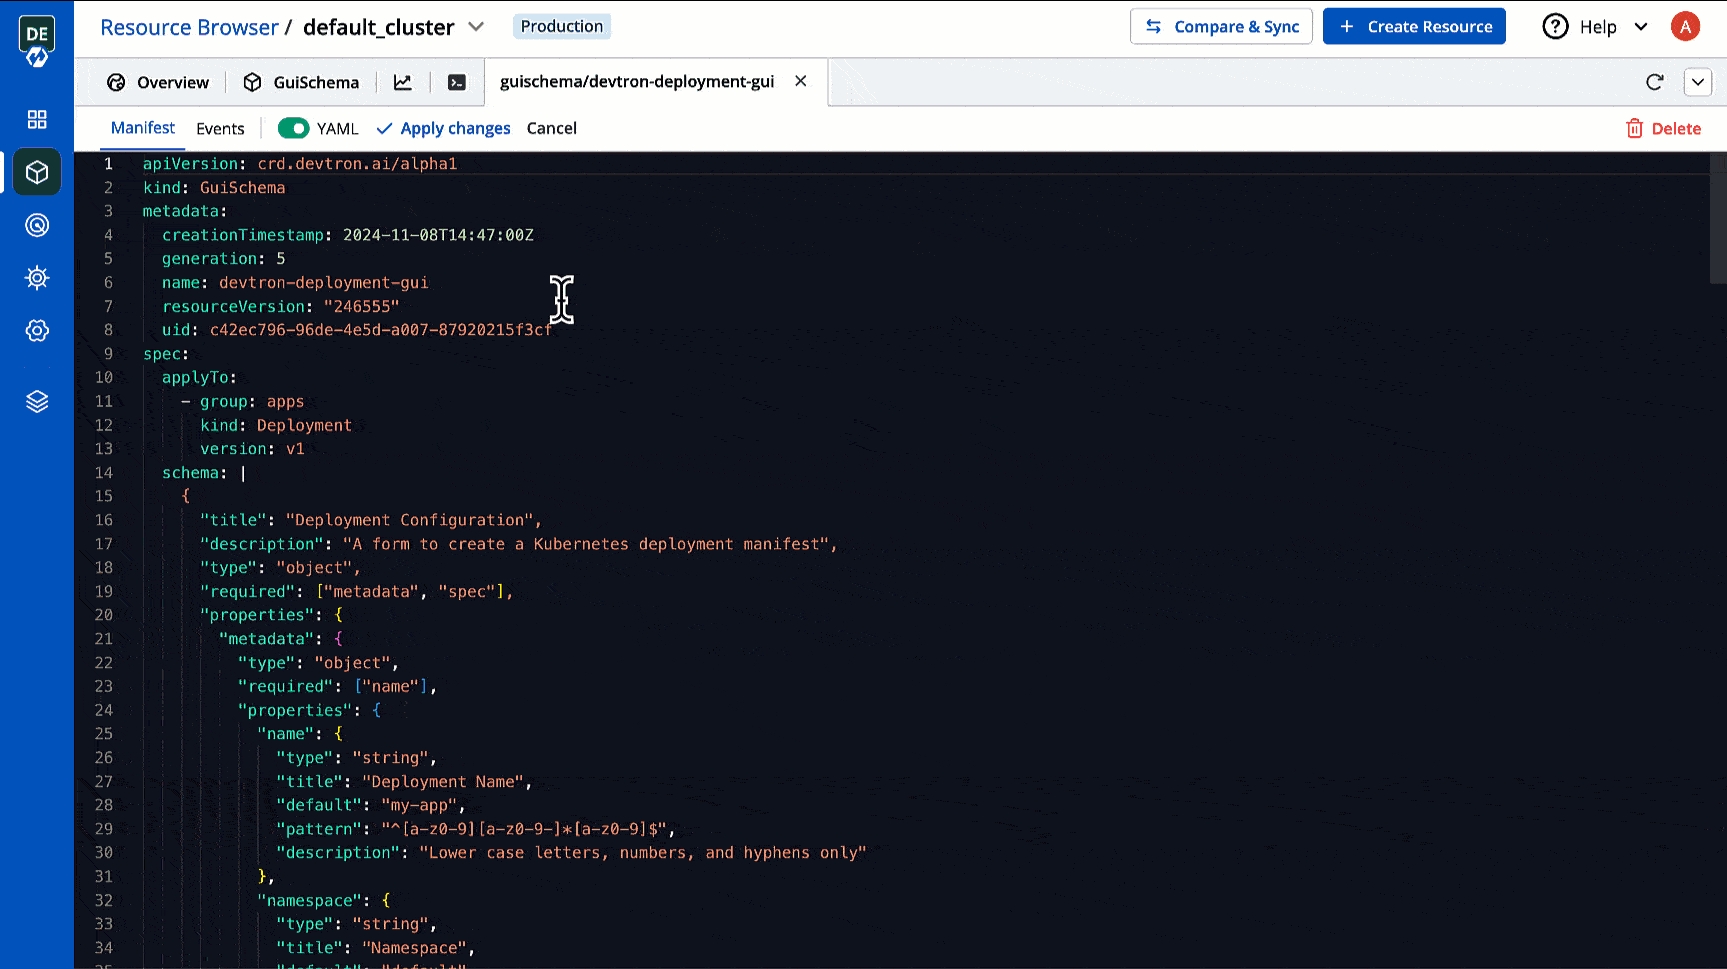
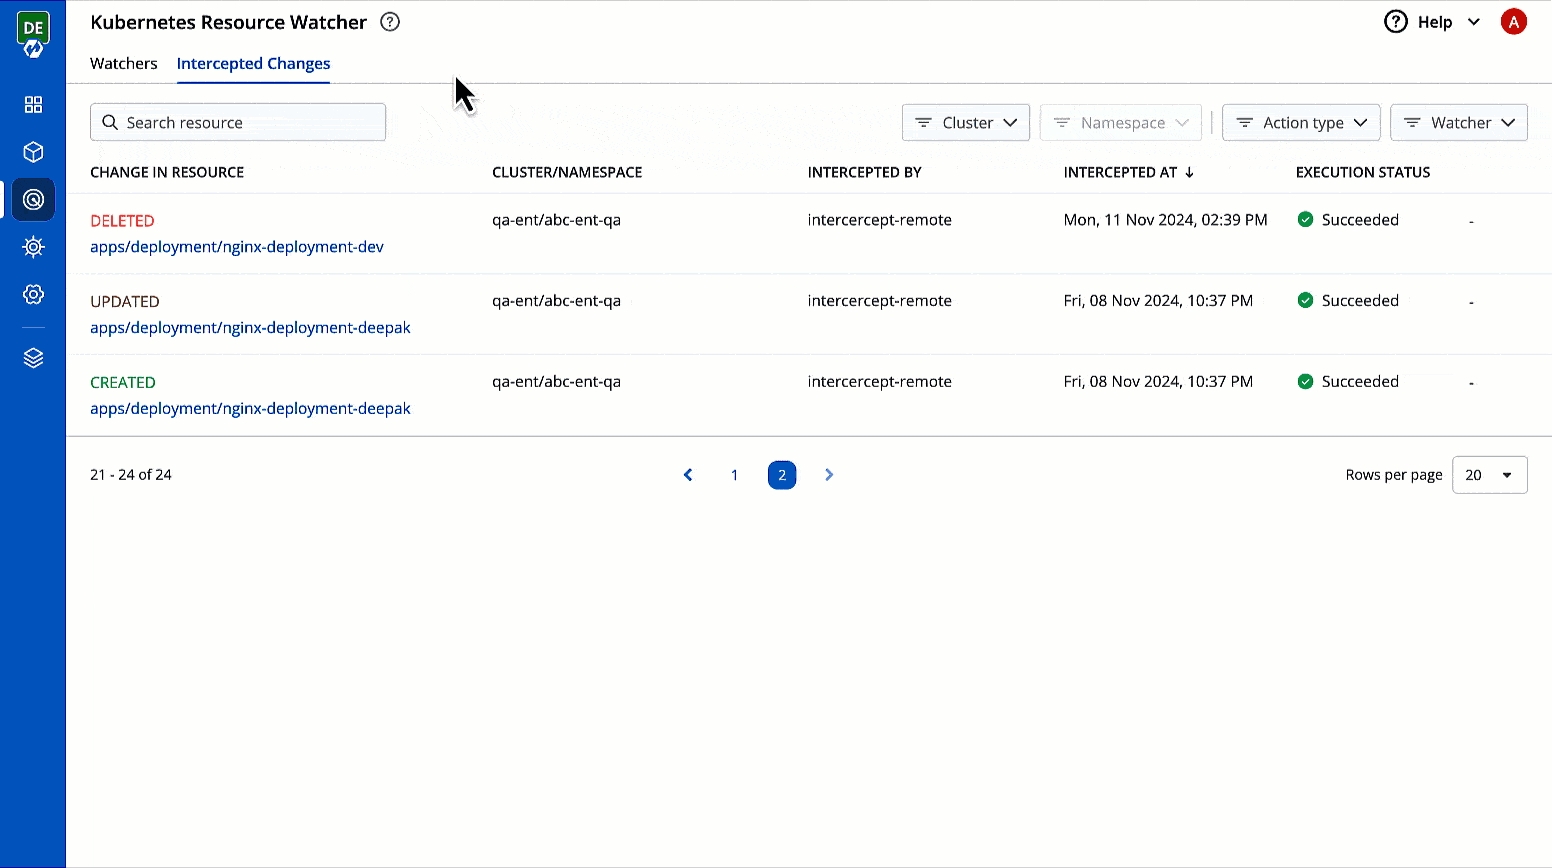
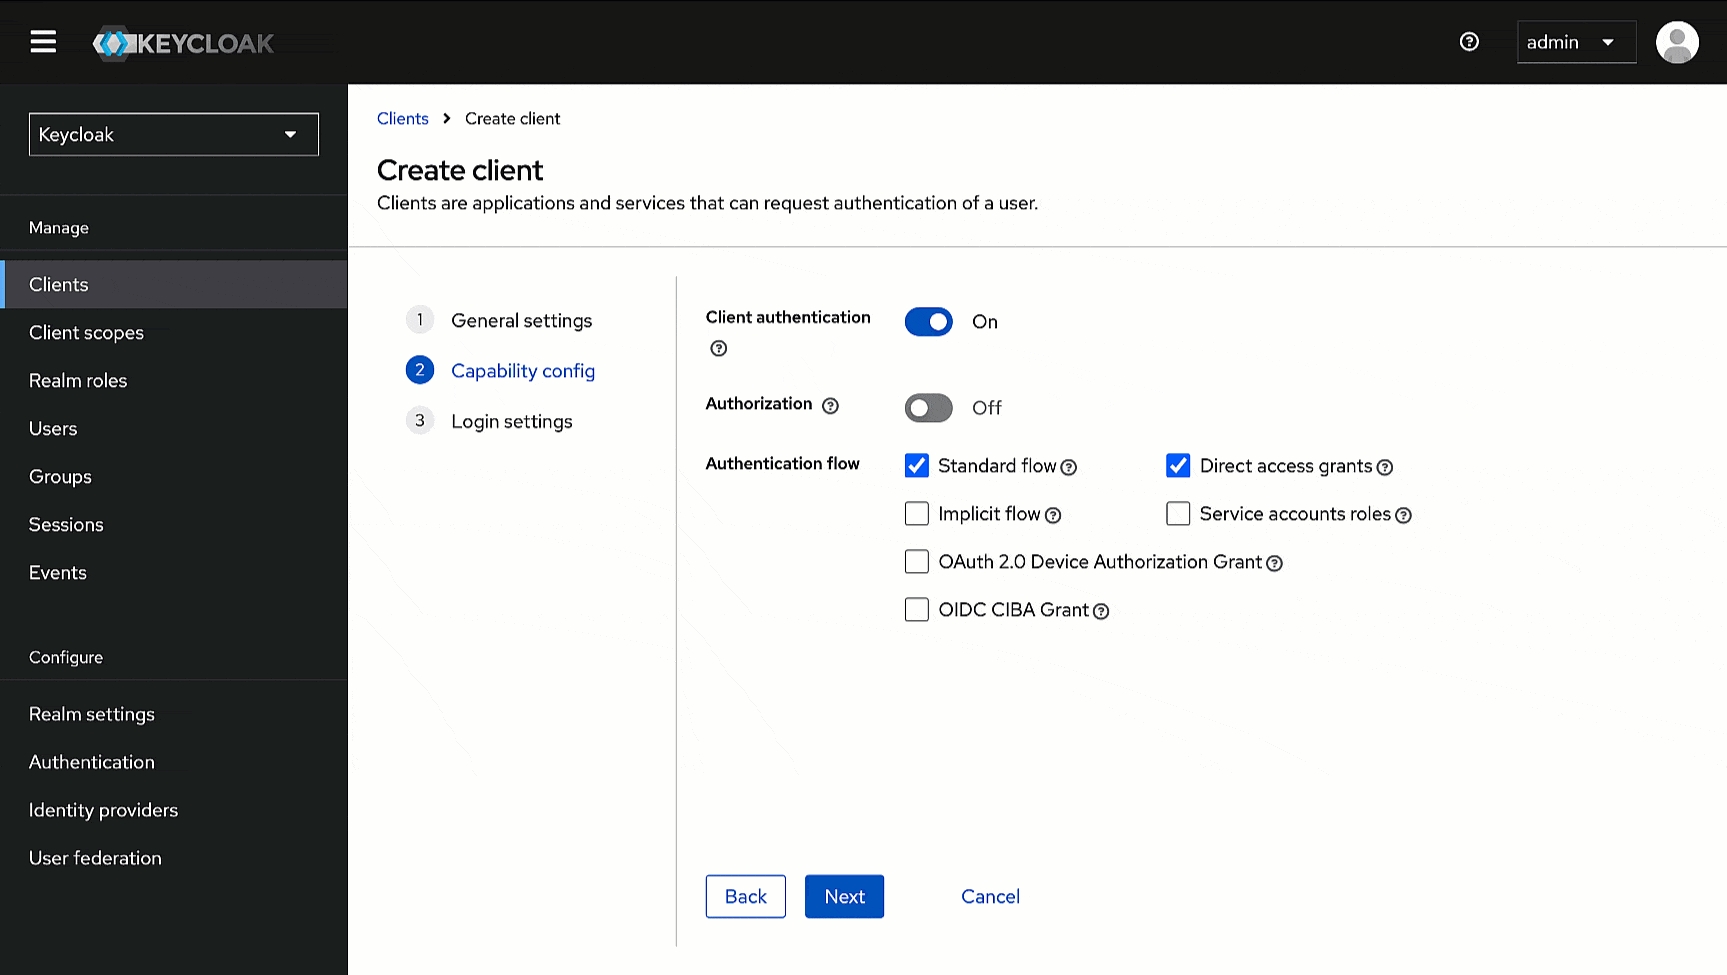